129 | Steady State vs Ramp Run - Understanding Dyno Modes
Summary
If we want to get the best results from our dyno tuning session, we need to make sure we’re using the dyno to accurately simulate how the car will be driven on the road or race track. In this webinar, we’ll discuss the techniques of steady-state tuning and ramp run tuning, when we should use each, and why.
While this lesson isn't specific to just a chassis, engine, or hub dyno, it is specific to a load-bearing (aka eddy current, hydraulic, or electric) dyno. These techniques are not possible on an inertia-style dyno, which is solely useful for tuning under wide-open throttle acceleration.
| 00:00 | 1 It's Andre from the High Performance Academy, thanks for joining us for this webinar. |
| 00:03 | We were going to be discussing the differences between steady state tuning on a chassis dyno and ramp runs, and for that matter, chassis dynos, engine dynos, we can perform these functions on both of those sorts of dynos. |
| 00:19 | These techniques that we are going to be talking about, I will mention now though, are specific to a load-bearing dyno, it's not possible to do a good job of steady state tuning on an inertia dyno, really inertia dynos are solely useful for tuning under wide open throttle acceleration because there is no power absorber to allow that dyno, that type of dyno, to operate under steady state conditions. |
| 00:51 | So, just to clarify what I'm talking about with those two terms, I throw them around, I'm going to be using them a lot through this webinar, so we'll start right away by clarifying what I mean, so when I'm talking about a ramp run, what we're doing there is using the dyno to allow the engine to accelerate. |
| 01:10 | So we're generally using this type of mode of dyno operation to replicate the way the engine in the car will accelerate when we're out on the road or the racetrack, and we're using full throttle or close to full throttle, and we're running through the engine's rev range, changing through the gears. |
| 01:28 | So that's what I'm talking about with a ramp run. |
| 01:30 | Generally, on our dyno, we'll be able to define a start RPM, a finish RPM, and then a rate of acceleration, we're going to talk about that kind of setup a little bit later on. |
| 01:42 | The other mode that we're going to be using the dyno in is steady state, and in steady state, as its name implies, we're using the dyno to hold the engine RPMs steady, or consistent. |
| 01:55 | Now, the reason we might want to use steady state tuning is to allow us to move really accurately through our fuel and our ignition tables in three dimensions, so essentially what we're doing is using the dyno to control the engine RPM and hold that consistent, then by using the throttle and veering our throttle position, this is going to allow us to move up and down in the engine load, and what we'll do is we'll just get our 350Z running here, and we'll have a really quick demonstration for those who are not familiar with this, we'll have a really quick look at what steady state tuning looks like. |
| 02:35 | So we'll just go online with our Link G4+ ECU, I am using a G4+ ECU for this demonstration, but obviously the techniques are applicable to absolutely any ECU you may be tuning. |
| 02:49 | So right now we can see that we've got the engine's sitting at idle, it's sitting right about 800 RPM at -70 kPa, we're in neutral, the wheels aren't turning. |
| 02:59 | What I'm going to do is just get the engine running, and what I'm going to do is move into fourth gear, and I'll let the clutch out of fourth gear now, and what I'll do just for the sake of this demonstration is I'll just use the controls on the mainline dyno to bring our engine speed up to 2,000. |
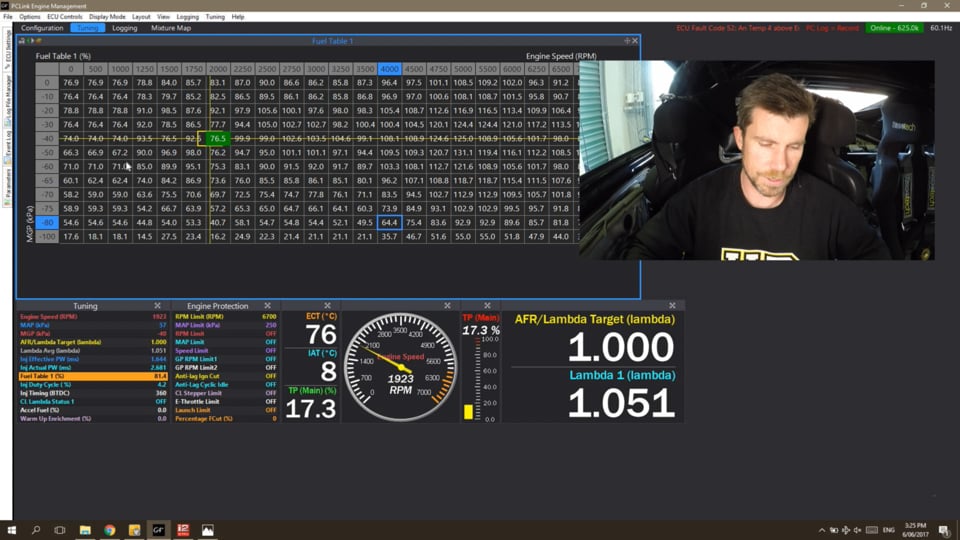
| 03:20 | Since what we've got now, we're sitting at 2,000 RPM, you can see there we're sitting at -40 kPa, and you can see that in order to achieve that, we look down at the bottom here, you can see that I'm sitting at 17.3% throttle. |
| 03:36 | Now what's happening here is that while I'm talking to you, the dyno is constantly monitoring the roller speed, the rear wheel speed, or roller speed is linked directly to our engine speed by virtue of the rolling diameter of our wheel and tire combination, the final drive ratio, and the gear ratio in the gearbox. |
| 03:57 | Now because particularly we're using a manual gearbox, there's really no slip in the drivetrain there, so there's a direct correlation between engine speed and road speed, what this means is that if I increase my throttle opening, I'll just open the throttle a little bit further now. |
| 04:13 | We can see that we can come up in the load to, in this case, 30 kPa, and you can see that I've increased my throttle opening up to about 19.5% in order to achieve that. |
| 04:26 | You can see that the dyno has made the necessary adjustment to the load being applied through the power absorber, module attached to the dyno, in order to maintain that roller speed and hence our rear wheel speed-- sorry, hence our engine speed. |
| 04:42 | Likewise, I'm just going to drop my throttle down a little bit now, and we'll come down, try to get into the center of the -60 kPa zone, so you can see we've done there now, we're sitting at -60 kPa at 2,000 RPM, and you can see that now I'm sitting at 13% throttle. |
| 05:01 | So this is steady state tuning, this is what we can use in order to really accurately move vertically up the RPM column, and we can then access each of those individual cells inside that RPM column, and we can tune them, and this is relevant for both our fuel table, as well as our ignition table. |
| 05:25 | So quick demonstration there just for those who really aren't familiar or don't necessarily understand exactly what I mean when I use the term steady state tuning. |
| 05:36 | So as I've said, it does require a load bearing dyno, where the dyno is equipped with some kind of power absorber module, in this case the mainline dyno we're using uses an eddy current power absorber, and this allows the dyno to apply a variable amount of load, basically what it's doing is applying an amount of load to combat the amount of torque being applied by the rear wheels to the roller, and if the power absorber can match the amount of torque that the engine is producing, or the rear wheels are producing, fading into the dyno bid, this is going to result in the RPM remaining consistent. |
| 06:16 | I'll just head back to my notes now. |
| 06:19 | So essentially understanding those two terms, steady state and ramp run tuning, what we need to do is use the dyno to our advantage to replicate the current conditions, the type of conditions that the engine is actually going to operate in, this is really the key point of today's webinar lesson. |
| 06:40 | We're wanting to use the dyno to, as accurately as we possibly can, replicate the conditions the engine is going to be operating under. |
| 06:48 | So, what do I mean when I talk about the conditions the engine is going to be operating under? What I mean by that is if we are out on the open road, the freeway, the motorway, and we're cruising in fifth or sixth gear at a constant speed. |
| 07:03 | Understandably in those conditions, if we are at a constant speed, hence the engine RPM also will remain constant. |
| 07:10 | So particularly under cruise conditions, we are operating in steady state conditions, the engine RPM is remaining fixed. |
| 07:20 | So, to be as accurate as we possibly can with our tuning, it would make sense that we tune these areas of our map in steady state, to match the way the engine's going to operate. |
| 07:33 | Now looking at the flip-side of that, if we now go to wide-open throttle, let's say we're at 2,000 RPM, and we're in fourth gear, we're out on a flat piece of road, if we now go to wide-open throttle, of course, under these conditions, the engine is now producing more power, it's producing more torque, the natural reaction of this is the engine is going to accelerate, the car is going to accelerate, and our RPM will increase. |
| 07:58 | So we don't tend to operate our cars at 2,000, 3,000 RPM wide-open throttle in steady state. |
| 08:06 | Under those conditions in this, we're towing a massive trailer with a huge load, or we're climbing just about a vertical cliff, the engine is naturally going to accelerate until we get to a point in the rev range in the gears where we're essentially running out of power to combat the aerodynamic drag, et cetera, that we're going to see at very high RPM, we reach peak or terminal velocity for our car. |
| 08:32 | So if we are under wide-open throttle conditions or close to it, understandably it would make sense for all the map accuracy, if we do our tuning there for both our fuel and our ignition under ramp run conditions. |
| 08:47 | So that's what I'm talking about there, it's just a case of understanding how the engine is going to operate under a certain condition, and then using the dyno to replicate those conditions so we're going to get the most accurate results from our tuning efforts. |
| 09:03 | The common thing here is that in terms of steady state tuning, we want to focus our energies and our attention on doing the best possible job in the areas that we're actually going to be running the engine predominantly, so this would be obviously idle, we spend a lot of time at idle, don't strictly need a dyno to do that. |
| 09:22 | Beyond that we're going to also be transitioning out of idle as we start rolling, and the car starts actually moving along the road or the racetrack, and then of course we're going to be spending a huge amount of our time in the cruise areas of our fuel map and the sort of, might be the ridge in perhaps, 1,500, 3 to maybe 3,500, 4,000 RPM depending specifically on the type of engine we're talking about, so we want to do a really good job of the accuracy of both our fuel and ignition tuning in these areas under steady state conditions. |
| 09:53 | Flip-side of that is, we don't tend to drive our cars very often at, let's say, 6,500 or 7,000 RPM and part throttle, hence, we don't need to be quite so precise with our tuning up in these areas, we obviously can't completely ignore them, we do still need to have some numbers that are at least in the ballpark in those areas, but we're not going to sit at 6,500, 7,000 RPM at 20% throttle for an extended period of time. |
| 10:23 | Chances are, more likely, we're going to only be transitioning through those sorts of areas as we back off the throttle for a gear shift, and under those conditions it's just not quite so critical. |
| 10:34 | Okay, so we've talked about why what we need to do with the way we use the dyno, we want to replicate the way the engine is actually behaving out on the road or the racetrack, and replicate those conditions. |
| 10:49 | But, why is this important? This is one of the key aspects that we need to understand, surely for example, if we tune our engine under steady state conditions in wide-open throttle, then if we've done it at 3,000, 3,500, 4,000 RPM and our fueling is accurate, then we could safely expect that under acceleration conditions, being that the fueling will still be correct as well, surely. |
| 11:15 | Well, not always, and this is an aspect that a lot of tuners will have noticed and maybe scratch their head and wondered about a little bit, so the usual sort of implication, the usual situation where we may see this is where we have done exactly what I've just talked about, we've steady state tuned our engine under wide-open throttle conditions, for simplicity let's just say for example, here we're talking about a naturally aspirated engine, and we've tuned it under steady state conditions, wide-open throttle from, let's say 2,000, 3-5,000 RPM. |
| 11:48 | Then what we do is we flip to doing ramp runs on our dyno, and we're doing acceleration runs through that same RPM range, 2,000 through to 5,000, and we find that if we pick an arbitrary ramp rate, let's say 500 RPM per second, which would probably be somewhat realistic for our relatively high gear, what we will quite often find is under those conditions, now we actually find that our air-fuel ratio tends to be just a touch lean, and this can be a little bit confusing. |
| 12:22 | The reason that this happens is due to the fuel film that forms inside the ports on our engine, and for a more thorough explanation of fuel film, you can check out our transient enrichment webinars in the archive, they explain this in a little bit more detail than I'm going to do here. |
| 12:45 | But essentially, let's just jump across to my laptop screen, this is an image from our EFI Tuning Fundamentals course, where we talk about transient enrichment, just to give you an idea of what's actually happening inside the engine, now most people would expect that the fuel injector injects fuel, and that fuel goes into the cylinder. |
| 13:04 | Well it does do that, obviously, but it does it in a slightly more roundabout way than most people would initially think, and what happens is, we tend to get some amount of the fuel that's being injected, forms a film that sits on the port wall. |
| 13:22 | Now, the size of this film is constantly changing based on our air speed, which is affected by our engine RPM, also our air temperature and our air pressure. |
| 13:33 | So it's a constantly changing volume of fuel that goes to make up this fuel film. |
| 13:39 | Now, under steady state conditions, the fuel film is not really that relevant, because what happens is that the fuel basically evaporates off the port wall, which we can see here, labeled as Fuel Vapor, it evaporates off the port wall, and also tends to somewhat dribble into the cylinder in a liquid form, at exactly the same rate that the fuel film is being topped up, so under steady state conditions, what we find is that the fuel that the injector is delivering, essentially all of the fuel volume that the injector is delivering makes its way into the cylinder, but as I said, indirectly. |
| 14:19 | Some of it is going to top up that fuel film, but it's topping it up at the same rate that the fuel film is evaporating or dribbling down into the cylinder, so the neat effect is the volume the injector delivers is what's going into the cylinder, and that's why we can do a good job of tuning our air-fuel ratio under those conditions. |
| 14:38 | If we consider what happens though under a high rate of change of engine RPM, we've got our air speed changing, this fuel film is constantly changing, and what we tend to get is an effect which is similar to what happens under acceleration enrichment, where as the engine accelerates, we tend to have some of that fuel being delivered by the injector, is going into increasing the volume of the fuel film, so what we find is that under acceleration, the fuel film is actually growing in volume, growing in size, and hence the amount of fuel being delivered into the engine tends to be slightly less than what's directly being delivered by the injector, and this is why under acceleration conditions, when we've got a positive rate of change of engine RPM, we tend to see a slight lean condition quite often, of course, unless we have an ECU that is properly modeling the fuel film and dealing with the fuel film. |
| 15:38 | Likewise, although it is much less relevant to our conditions, if we had a negative rate of change of engine RPM, we're going to end up finding that as the engine decelerates under wide-open throttle, high load, we're going to actually see our air-fuel ratio move rich, obviously that is less important because that's not a condition that we're going to experience. |
| 16:03 | It's important just to show you this image so you get some understanding of what's going on, and hopefully, for any of you who have been wondering why you see this effect, why you see this effect in the fueling, when you go from steady state to ramp run or acceleration tuning, this is going to help explain why that scenario is occurring. |
| 16:25 | I'll just head back over to my notes now. |
| 16:30 | So, what does all of this mean to you? If you are tuning every cell in steady state and you never did any ramp runs on the dyno at all, what you are quite likely to find is that you will see the land or air-fuel ratio under acceleration out on the road or the racetrack, will tend to be a little bit leaner than your target. |
| 16:58 | There's a million and one aspects that will define how much leaner the air-fuel ratio goes, but that is generally the trend that you are going to see. |
| 17:10 | So that's why it's so important to tune the engine to suit the way it's being used, and that's what I'm saying, if we're at wide-open throttle, we want to perform our acceleration ramp runs on the dyno rather than steady state tuning. |
| 17:28 | Likewise, in terms of steady state tuning, we do need to be a little bit practical about this, obviously the steady state tuning process does take a little bit of time to move into an untuned cell, look at our air-fuel ratio, or if we're tuning our ignition timing to look at our torque, make the necessary changes to optimize the fueling and the ignition, and then move forward. |
| 17:52 | Now, under a low-powered, naturally aspirated engine, like our Nissan 350Z, this potentially doesn't present us with any real issues, and while I'm not an advocate for it, we certainly could choose to steady state tune our engine all the way out to the rev-limiter at 6,500 RPM. |
| 18:12 | But of course, when we're talking about more powerful engines, particularly those that are turbocharged, this starts creating a huge amount of heat, very very quickly, which is obviously potentially dangerous for our engine, and also when we're generating an unrealistic combustion chamber temperature, this tends to affect the tuning as well so we really are ending up with a situation that just isn't realistic of what the engine is actually going to see when it's on the dyno. |
| 18:46 | So what I'm going to do is the 350Z here, sadly, is not the best example for this situation, but I'm going to try my hardest to give you a really quick demonstration here of exactly what I'm talking about. |
| 19:04 | So I just got our 350Z running, and let's just jump across to our laptop screen. |
| 19:09 | And what I'm going to do here is we'll just go through and perform some steady state tune under wide-open throttle, we'll just really quickly go through and confirm that our fueling is correct, I'm going to do this between 2,000 RPM and 4,000 RPM, we're going to be targeting in this case, 0.90 lambda, what we'll do is just go across to our AFR/Lambda Target table, and we can see that that is the target that I've got set up in our table. |
| 19:41 | It's important to note here, I'll just go through and show you, our closed loop lambda here is set to off, so there is going to be no interaction while I'm performing this demonstration, the ECU isn't going to be doing anything to correct any errors. |
| 20:00 | What I'll do is, we'll just quickly get ourselves up and running in fourth gear, and we'll go through to wide-open throttle. |
| 20:14 | And what I'm going to do now is just make a couple of quick adjustments, so what you can watch here is our lambda target, versus our measured lambda, and I'm just going to make sure that I'm within at least a percent of my target at each of these points in the table, let's come up to 2,250. |
| 20:40 | And I'm just going to quickly go through and do each of these points here. |
| 20:47 | You can see we've got slight errors, but we're already pretty close, hopefully this demonstration is going to help eventually reinforce this situation, of what I've been talking about rather than making it harder to understand, but we'll just give it a go here, come up to 3,000 RPM now. |
| 21:11 | And I'm just gonna come up to, we'll continue this all the way up to 3,500 RPM. |
| 21:28 | So, I think I said that I would go to 4,000, so I will do that. |
| 21:36 | Okay, so we've got wide-open throttle area of our fuel table there mapped really accurately between 2 and 4,000 RPM, hopefully during that demonstration you can see that our lambda was sitting at least within our 1% there of 0.9 lambda, so we know that under steady state conditions, our fueling was correct, let's just jump across to our dyno screen now, we'll go through to our ramp run screen. |
| 22:07 | And it's just setting up our dyno at the moment, we've got our air-fuel ratio, our lambda that's at the top here, I've got a reference line here through at 0.90, this is where we should be running. |
| 22:19 | Let's jump across to our setup now, and for the demonstration, what we're going to be doing is we're going to be starting with a really high ramp rate, so this is what we might see in our lower gears. |
| 22:32 | We're looking at a ramp rate of 800 or 795 RPM per second, in other words the engine speed will be allowed to increase at 800 RPM per second, and we're going to be going here from 2,000 RPM to 5,400 RPM. |
| 22:48 | Just remember for this demonstration, the quick area that I just had a look at there was from 2,000 to 4,000 RPM. |
| 22:57 | So let's go into fourth gear again, and we'll get our dyno, our engine running. |
| 23:06 | Just allow everything to settle here, we'll go to full throttle, and you can watch on the dyno here, the lambda during this run. |
| 23:23 | So, straight away, the thing that you want to pay attention to here is particularly around about 3,500 to 4,000 RPM, we can see that our lambda had moved lean, remember our target was 0.90 at this point, we can say that we're actually sitting at 0.95, so we're actually about 5% leaner than our target, so obviously not what we're wanting, what I'll do is I'll just save this run-- Oops, that's interesting. |
| 23:53 | We'll save that run, and we'll go back through, and we'll do another run, and I'm going to choose a slower ramp rate for our second run. |
| 24:05 | If I can? Right, it's going to allow me to set this up now. |
| 24:10 | So what we'll do now is choose, probably, a slightly slower than realistic ramp rate just to really show that the two extremes there, so what I'll do is I'll come down to 400 RPM per second. |
| 24:22 | As a rough rule of thumb for those of you who have gone through our practical dyno tuning course already know, I generally recommend that we use a ramp rate that represents the real acceleration rate of our engine, if we're out on the road or the racetrack, in a relatively high gear. |
| 24:40 | Now obviously, the rate of change of RPM or our acceleration rate's going to be totally dependent on which gear we're in, but what we're interested in here is making sure that in the higher gears where the engine is under high load, this is where we want to be very sure that our air-fuel ratio is accurate, that our timing is safe, we're not suffering from any detonation. |
| 25:02 | So, generally, yeah, 500 RPM is a good rule of thumb that I tend to use, but obviously if you've got data from that car out on the road or the racetrack, you can be a little bit more accurate, the key thing here is a lot of people will say that they've dyno tuned the car, and they've gone out on the road or the racetrack, and they find that the air-fuel ratio doesn't match what they saw on the dyno. |
| 25:25 | If you match the conditions on the dyno that the car sees in the real world, so the intake temperature, the engine coolant temperature, and in particular, the rate of change of RPM, then there's absolutely no reason why we won't get exactly the same results on the dyno as what we see in the real world, so that's an important consideration. |
| 25:45 | So, here we've gone for the 400 RPM, we'll leave our start and finish RPM the same, and let's do another run, we'll just get back up and running here again. |
| 25:57 | Just get rid of our last run data. |
| 26:03 | Alright, we're at full throttle, we'll just allow the engine to settle for a second, and we'll start our run. |
| 26:25 | So as you see under these conditions, we've got a leaner condition than what we saw in our first run. |
| 26:32 | Now normally, we're actually at about the same point, 95.96. |
| 26:37 | Normally what we tend to find is that at the higher acceleration rates, will tend to drift leaner from our target, as the rate of change of RPM drops down, we tend to come back closer to our target. |
| 26:53 | So that's why it's really important to make sure that in particularly, at least, we've got an ECU that is correctly handling the fuel film model, we need to make sure that we perform our wide-open throttle tuning using ramp runs and make sure that we're matching our rate of change of RPM to what we're likely to see out in the real world. |
| 27:17 | We'll move into some questions pretty shortly, so if you do have any questions, please put those into the chat box, and Colin will transfer those through to me. |
| 27:26 | Just gonna finish off here with a quick discussion of how we can approach using the dyno, how we can know where to make the change or transition from performing our ramp runs--sorry, our steady state tuning, through to our ramp runs. |
| 27:41 | And we'll start by discussing with a naturally aspirated engine, the reality is that for turbocharged engines, it's not a lot different, but naturally aspirated engines, obviously, make this nice and simple, because we only have one load row that we're going to be operating through at wide-open throttle. |
| 27:59 | So my preferred line in the sand here, this is discussed in much more detail in our practical dyno tuning course, so anyone who has gone through our practical dyno tuning course will have already heard me teach this; my line in the sand here is that I recommend steady state tuning the engine, both fuel and ignition initially, up to approximately two-thirds of the engine's rev limit, or where we want to be changing gear. |
| 28:27 | Now, that's not set in stone, we can obviously choose to adjust this to suit our own requirements, the reason I recommend two-thirds is, this is going to make sure that for the most part, except for very few occasions, we're going to be covering the area region that fuel and ignition tables that we're going to spend the majority of our time in, truly under steady state conditions when we're driving on the road or the racetrack. |
| 28:55 | Again, we're unlikely to be siting at 6,500 or 7,000 RPM under true steady state conditions, it just doesn't happen, and this we're doing something pretty strange. |
| 29:05 | So to put some numbers around that, if we've got an engine that has a 7,000 RPM rev-limit, what this means is that I would advocate tuning in steady state out to approximately 4,500, so again, not set in stone, maybe you want to make that 4,000, maybe you want to make it 5,000, that's fine, that's up to you. |
| 29:25 | Now, what this means is that we are going to have really good precision in those areas that we are running the engine, and we're going to know that in those areas, regardless of our combination of throttle position and engine RPM, we're going to know that our air-fuel ratio is correct; remember, under steady state conditions, the fuel film effect is negated because it reaches equilibrium, the fuel is evaporating off the port wall and dribbling into the cylinder, at exactly the same rate that the fuel film is being topped up by the injector, so we will be getting the air-fuel ratio that we have asked for. |
| 30:01 | Now, the other aspect that's easy to overlook here is under the higher load areas, as we transition up to wide-open throttle, if we have steady state tuned these areas of our map accurately, this is also going to mean that it helps or improves our transient, or acceleration enrichment tuning. |
| 30:22 | Now the little bit here is to pin in on the way our ECU performs in the case of the Link G4+ here, the acceleration enrichment is modeled purely on rate of change of engine RPM, with a few modifiers for load, temperature, et cetera. |
| 30:37 | Some of the ECUs that are coming out these days do actually model fuel film more thoroughly, but essentially the important point to understand here as an acceleration enrichment model tends to work over and above the base fuel table, so it's really important before we ever worry about fuel film, or acceleration enrichment tuning, it's really important to make sure that we start with a thoroughly and correctly tuned base fuel table, and this is what we're going to achieve if we are correctly tuning our engine up to that point, two-thirds of our engine rev limit under steady state conditions, again, there's very few opportunities where we're going to be meshing the throttle wide open, much higher than this, so this is going to give us really good results for it when it comes time to get our acceleration tuning dialed in as well. |
| 31:31 | Now, I am advocating here that we will tune up to the wide-open throttle areas in steady state, up to our 4,500 RPM point. |
| 31:41 | Now, as we've already discussed, this may mean that when we switch over to performing wide-open throttle, acceleration ramp runs on the dyno, this may mean as due to the fuel film effect, that our air-fuel ratio lambda, doesn't quite match the target that we hit, so we've already gone over why that's the case. |
| 32:01 | The reality is though, what we are going to end up with is fueling numbers that should be very close, certainly should be within a few percent maybe, within 5%, and we're also going to have a general shape to our fuel table. |
| 32:16 | We're going to get a general feel for the shape of the fuel or the VE table. |
| 32:22 | Now, generally what I do recommend is once we have completed our steady state tuning exercise, assuming we are dealing with an ECU that doesn't model the fuel film effect correctly, before we jump to ramp run tuning, we'll actually highlight the entire wide-open throttle running area of our load table, our fuel table in terms of the load zones, and we'll add a few percent fuel to those areas, at this moment, we're only really guesstimating the effect of the fuel film change, this is going to mean when we start performing our ramp runs, that we're already going to be really close, we can then fine tune that based on the conditions we're going to see, remembering now that we are taking into account the fact that when we get to full throttle, maybe 2,000 RPM, the engine is going to naturally be accelerating. |
| 33:15 | Before we go into doing those ramp runs, I also recommend that we actually remove a couple of degrees of ignition timing from those same load zones in the ignition table. |
| 33:25 | Again, this is really just a safety aspect, we may quite likely find that we're going to be adding those back in a little bit later on, but we always want to start, ideally, rich and a little bit retarded in our timing, and that's going to give us a nice safe starting point, we can then erode some of that safety margin once we start finding out where exactly we are. |
| 33:47 | The other aspect here is before we jump into our ramp run tuning, all we can do is extrapolate the results we got up to 4,500 RPM, we can extrapolate those out across to the rest of our fuel table. |
| 34:02 | Now, obviously at this point, we are only going to be taking a broad guess at what the fuel or ignition table may look like in these higher RPM areas, but what we find is as we build some experience, we tend to have a pretty good idea of what that shape's going to continue to do, and it's also important to know what we should expect to see here, in our predicament we're looking at a VE table, we can know that the shape of the fuel table should approximate the shape of the torque curve of the engine. |
| 34:34 | So, what this means is we should be seeing our peak numbers in our fuel table somewhere approximately around about the RPM range that we are seeing our peak torque values, so that's a good guideline there. |
| 34:47 | Once we're moving out into those higher RPM areas, we can go out into those 500 RPM increments, so for example, with steady state tuned to 4,500 RPM, we should be able to relatively, safely perform a ramp run between, let's say, 1,500 and 4,500 RPM, we're really only transitioning through the areas that we've already tuned in steady state. |
| 35:11 | So what we can do then is start transitioning out into those untuned areas in 500 RPM increments, and this will mean that we're not really exposing too much of the untuned map, no exposing the engine to too much of the untuned map, and we can quickly start building up those areas, and if we find with rich or lean, we can make appropriate changes. |
| 35:31 | What I do in the areas above 4,500 RPM though, is I tend to make overall changes, so what I mean by this is I would tend to highlight the entire column and make changes so let's just jump back into my laptop screen for a second. |
| 35:47 | Let's say we got out to 5,000 RPM, and we are operating at wide-open throttle in the 0 kPa and -10 kPa zones, so these are the areas, these are the two cells that we would actually need to tune specifically to adjust our fueling, just under wide-open throttle conditions. |
| 36:09 | However, because we've followed the same trends, the same shape to our VE table that we saw down at 4,500 RPM, where we correctly steady state tuned the entire table. |
| 36:21 | We know that generally, let's say where a 5% rich at 5,000 RPM in wide-open throttle, the chances are we're going to also be a similar amount rich down in these lower load areas, so what I tend to do here is I would make an across the board change, so I put 5% rich, I might start by taking 5% out of the entire column. |
| 36:42 | Now for those of you who are sitting there, looking at the numbers in the table, going, "What is going on here? "Why have we got a value of 103% at wide-open throttle?" Yeah, we've got a value of 115% or 124% down at -50, -60 kPa, don't worry about that, this is a base map that I used for webinar purposes, and it is not completely tuned, so these numbers are not realistic. |
| 37:08 | Please don't consider them to be realistic, this is not what we'd expect, that's just important for me to note that now. |
| 37:16 | So this is the process we'd use, we're going to build up our RPM, move out into these untuned sites, making across the board changes to it our entire column. |
| 37:25 | And then once we've got our entire mapping complete, we've steady state tuned to 4,500, with wide-open throttle ramp run tuned, our full throttle operating area. |
| 37:35 | What we can then do because we've got this area, down in the sort of lower load areas between 4,755 RPM and 6,500 RPM, -30 kPa and below. |
| 37:48 | What we can do is briefly go into those areas in steady state, just look and make sure that our air-fuel ratio is at least inside the ballpark, and again, we don't need to be so precise here, so rather than looking at individual sites, we can just pick a few key zones, make sure that we're within a few percent of our target, and we're going to be happy with that. |
| 38:08 | How precise we decide to be here is really up to the individual tuner, how long are you prepared to put into the tune, how long are you prepared to put into the dyno sessions? Again, these areas just aren't as important because we don't spend time there. |
| 38:21 | If anything, we just like them to be slightly richer than our target run, and slightly lean obviously, that is the safe condition. |
| 38:30 | We're going to move into questions really shortly, I'll just briefly cover off how that varies for turbocharged engines, really the process is identical here, but what we want to do is make sure that we start by using wastegate boost pressure, the minimum amount of boost that we can, and then once we've got our complete map built up there in steady state, and then wide-open throttle ramp runs at our minimum boost, what we'll do then is start increasing our boost levels until we reach our boost target, and then we can then interpolate any areas in between the boost pressure we're seeing, our wastegate pressure, and the maximum boost pressure that we want to run, there's no need to steady state tune a turbocharged engine at very high boost levels. |
| 39:17 | If you want a better explanation of exactly how that process goes on turbocharged engines, please search for our turbo tuning webinar in the archive, and that's explained in detail. |
| 39:30 | Alright, I'll move into some questions now, again if you do have any more questions, please ask those, and I will do my best to address them. |
| 39:39 | Our first question comes from Cory, who's asked us recently, "Had to tune a turbo Miata on my Dynojet, I had to manually "pulse the dyno brakes to keep it "in the cell I was trying to tune, "Is there a way to program that into my dyno so I don't "have to manually pulse the brakes?" Sorry, Cory, my experience with Dynojet, unfortunately, is very limited, and the only Dynojet dynos I have used have been pure inertia dynos with no brake system at all. |
| 40:09 | I would probably recommend at that point that you got a hold of Dynojet, from my understanding, their customer service's reasonably good, and they should be able to help you with an answer to that question. |
| 40:22 | Now again, this obviously isn't an area of my own personal experience, but just be aware that even with a brake system on the dyno like that, because it doesn't have an actual load cell that's measuring the torque being produced, you're not going to be able to use an inertia-style dyno even if it has a brake, like a physical brake assembly on it to correctly tune the ignition tables to NBT, because you're not getting a torque feedback as such, so there's just something to note there. |
| 40:58 | Teddychance asked, "Is it not possible/impossible "to duplicate the rate of RPM change for every gear, "though because each gear should have a different rate "of change of RPM?" Yeah, it is, it depends how your ECU can deal with this, the real reality because for 15 years of my own tuning career, this is an area that's always been in the back of my mind, but really, it has proven that it just simply isn't that relevant, is you don't need to correct those lower gears, where the rate of change of RPM is higher. |
| 41:34 | Yes, the air-fuel ratio will tend to be a little bit leaner in those gears, and possibly what you may find is that if you were to optimize the ignition timing in those gears, you may find that you end up with a slightly a different ignition table as well, chances are that those lower gears may accept a little bit more ignition advance, so they may not be quite optimal, particularly in terms of engine safety, obviously having the ignition timing a little bit more retarded than optimal is not going to be dangerous. |
| 42:05 | The slightly leaner air-fuel ratio, again, doesn't prove to be dangerous simply because the engine isn't being loaded as heavily due to the rate of change of RPM, that's why my recommendation is to focus on your tuning in the higher gears, where the engine is more loaded, this is where we really want to be very sure that our ignition timing is safe, that we have no sign of knock detonation occurring, and that our air-fuel ratio is on our target. |
| 42:33 | That's not to say it's impossible, there are ways we can go about adjusting this, you could, for example, run a four-dimensional compensation table, you could base those tables on a gear or something of that nature, so yes, it is possible to make changes, some ECUs do allow correction based on rate of change of RPM, so there are ways around that, but my own personal experience is simply not as critical as, perhaps, we may think, as long as we've got the air-fuel ratio correct under those high load conditions, where we've got that slightly slower rate of change of RPM. |
| 43:14 | Okay, that brings us to the end of our webinar, we've got no more questions there, so as usual, if you do have any questions that crop up, please make sure that you ask those in the forum and I'll be happy to answer them there. |
| 43:26 | Hopefully you all enjoyed that webinar, and I look forward to seeing you all next week. |
| 43:31 | Thanks for joining us. |


