146 | Cylinder Head Sealing Techniques
Summary
When it comes to ultra-high boost engine performance, the amount of boost we can run is often limited- by how well we can seal the cylinder head to the engine block. In this webinar, we’ll cover the common techniques used in high boost drag applications and discuss their pros and cons.
Note: We had a microphone failure during this webinar. All the audio is there but at times there is some static. Sorry for any inconvenience this may cause.
In this webinar:
Introduction:
0:00 | Why cylinder head sealing the biggest issue with high boost engines
Gasket Options:
6:00 | OE style composite gasket
7:50 | MLS gasket
15:36 | Copper gaskets
Fasteners:
24:24 | Studs
O-rings:
30:30 | O-rings and MLS gaskets
16:27 and 32:10 | O-rings for copper gaskets
32:48 | Gas filled o-rings
36:42 | W-ring
37:32 | Aluminium Bronze sealing rings
Monitoring head gasket seal:
41:11 | How do you know if your head gasket is leaking
| 00:00 | - It's Andre from the High Performance Academy, welcome along to this webinar, where we're going to be investigating some of the aspects to do with cylinder head gasket sealing. |
| 00:10 | This is obviously not a big issue on standard engines. |
| 00:14 | We are quite capable of getting away with completely stock componentry. |
| 00:18 | But as we start increasing the specific power levels from our engine, this becomes really a limiting factor into how much boost pressure and then of course how much power we can produce. |
| 00:29 | So of course at the upper echelons where we're producing very high specific power levels, very high boost pressures, the likes of import drag racing, this really does become a major problem. |
| 00:42 | And certainly with our shop cars as well as our customer cars that we ran many years ago in import drag racing here in New Zealand, this really was our limiting factor as to how much boost pressure we could get away with running and then how much power the engines would produce. |
| 00:58 | So if we get to a point where the head gasket begins to leak, this is going to result in the combustion pressure escaping from the combustion chamber, generally it's going to make its way into the cooling system and the result of this is it can blow coolant out of the cooling system. |
| 01:17 | So the problem here, what's causing this I should say, is that under very high cylinder pressures that we see at high boost and high horse power, the actual pressure inside the combustion chamber is enough to create a flex between the cylinder head and the engine block. |
| 01:35 | Essentially the two surfaces will flex apart. |
| 01:38 | And it doesn't take more than a few thousandths of an inch of flex to enable the combustion pressure to escape and it's obviously we need the gasket or whatever sealing medium we're using to be able to expand and take up any flex that we've got between the cylinder head and the block surfaces. |
| 02:01 | And if that gasket can't expand to take up that flex, then this is where we're going to have problems with our head gasket leaking. |
| 02:10 | Now when the head gasket does leak as I've said, the pressure first of all's going to make it's way into the cooling system, into the coolant jacket around the outside of the cylinder bores. |
| 02:22 | And what this does is it pressurises the cooling system and therefore it increases the pressure in the cooling system beyond what the cooling system's designed for. |
| 02:32 | This allows the water, the coolant to be pushed out into the overflow. |
| 02:38 | So essentially it opens the bypass in the radiator cap and allows the coolant to be pushed out the cooling system. |
| 02:45 | So if we're faced with this for an extended period of time, it can end up blowing out enough coolant from our cooling system that we can end up with our engine overheating. |
| 02:56 | It also, in extreme situations can result in quite significant damage to our engine block and head. |
| 03:03 | If we can jump across to my laptop again for a moment. |
| 03:06 | Here we can see the sort of damage that we can get from a head gasket failure. |
| 03:13 | Now this is quite common to see this sort of damage, particularly on our high boost, methanol turbo engines. |
| 03:20 | And it doesn't take a very big leak for very long to end up with quite catastrophic damage to the cylinder head where essentially it looks like someone's taken to the head with a gas axe and it's cut a path straight out to the outside of the block. |
| 03:34 | Now that sort of failure of course is also going to make itself known very very quickly when that does happen. |
| 03:42 | Right I'll just head back to my notes now for a second. |
| 03:45 | So this is a sort of a common failure point, particularly on high boost turbo charged engines. |
| 03:53 | Maybe not so much the torching of the cylinder head that we've just looked at but certainly head gasket failure is a problem that we are likely to come across quite frequently when we're really pushing the boundaries. |
| 04:06 | And for this reason some engine builders will actually take into account that a head gasket failure may occur. |
| 04:14 | And of course as I've said we don't want the pressure making its way into the cooling system because that will push the coolant out and ultimately end up having the engine fail from overheating. |
| 04:25 | So particularly in the early F1 turbo era as well as in a number of the group A turbo cars that were running in the touring car championship around the late '80s, early '90s, it was quite common to actually factor in that a head gasket failure could occur, and in order to deal with this, grooves were purposefully machined into the deck surface of the engine block to allow combustion pressure to have a path to escape that didn't lead into the cooling system. |
| 04:58 | So these grooves came out from the combustion chambers or out from behind the head gasket sealing area, and this meant that if the head gasket did leak, the combustion pressure could escape straight to the outside of the block without making its way into the cooling system. |
| 05:14 | So in this webinar we're going to have a look at our common gasket options that are on the market now. |
| 05:20 | We'll talk about the pros and cons of these options, and what is suitable for what particular application. |
| 05:27 | We're also going to discuss the fasteners that we use to hold the cylinder head onto the engine block. |
| 05:34 | We're going to then also talk about o-rings as well, this is a common option at the higher end of the motorsport spectrum where we are really starting to make a lot of power. |
| 05:44 | Now of course as usual we will be having a question and answer session so if there's anything that I talk about during the webinar that you'd like me to elaborate on or anything to do with this topic that you'd like to ask, please type that into the comments or the chat, and Ben and Jono will pass those through to me, we'll deal with those at the end. |
| 06:04 | OK so we'll start by just discussing the main gasket options that we have available to us. |
| 06:11 | We'll start very briefly by talking about the OE or factory style composite gasket. |
| 06:16 | Now these composite gaskets consist of a composite material sheet which normally has a fire ring that locates around the combustion chamber to help improve the sealing of the combustion gases. |
| 06:32 | These are relatively cheap. |
| 06:34 | They also have the advantage of sealing the fluid, so the coolant passages between the cylinder head and the block as well as the oil galleries and oil return paths between the cylinder head and the block reasonable easily The composite material compresses and it seals quite well. |
| 06:52 | Particularly against an irregular surface, so these will work reasonably well if the surface condition of the head or the block is not ideal. |
| 07:02 | However they provide very limited strength in a high boost, high specific power application. |
| 07:09 | So really these are only suitable in a very low power application and even in factory applications now we've really seen most of the OE manufacturers as factory engine performance has increased year on year, most factory engine manufacturers have now moved to a multi layer steel or MLS style gasket in their performance engines. |
| 07:34 | So generally if we're in the performance market, we're going to want to stay away from a factory style composite gasket, throw those in the bin very quickly and look for a superior aftermarket alternative. |
| 07:47 | So we'll move now onto the MLS gasket. |
| 07:50 | So just as a brief look at what an MLS gasket looks like, I've got one here for our Subaru FA20. |
| 07:57 | This is actually a factory gasket straight from Subaru or Toyota. |
| 08:03 | So you can see, or hopefully you can see, it has multiple layers of a stainless steel material, and this one is also coated with a specific coating that helps improve the ability of the gasket to seal fluids. |
| 08:18 | Now in general when we're talking about an MLS gasket, we're going to be talking about a gasket that comprises of at least two or more embossed stainless sheets which are relatively thin, and these will be riveted to a center metal core. |
| 08:35 | Some gaskets will have five to seven layers in the gasket, some will only have two or three. |
| 08:43 | Now the idea behind the MLS gasket is it's essentially creating a spring like effect. |
| 08:49 | And remember the key to sealing the cylinder head to the engine block is the gasket being allowed to flex, to take up the space that's made when the cylinder head flexes away from the block under high boost applications. |
| 09:05 | So that's the idea with the MLS gasket is it allows a little bit of elasticity essentially. |
| 09:11 | You can think of it almost a little bit like a spring. |
| 09:14 | And that allows that gasket to expand and take up the room when the cylinder head does flex. |
| 09:23 | So the fluid sealing is generally achieved, as I've sort of shown you here, there's a black coating that's sprayed onto the metal gasket here. |
| 09:33 | This is generally achieved with a nitrile rubber or an elastomer coating that is applied onto the stainless steel. |
| 09:41 | Now when you're using an MLS gasket, one aspect that's really important is it does require reasonably precise surface preparation. |
| 09:48 | There's not a lot of give in the MLS gasket, so there's no ability for it to take up large imperfections in the block or cylinder head surface. |
| 09:59 | A lot of engine builders would think therefore that for the ultimate in sealing with an MLS gasket, we need a mirror like finish to the block and the deck surface of the cylinder head. |
| 10:11 | And that's actually not the case, we do still require a certain amount of surface roughness and this is measured with an RA number. |
| 10:21 | Good luck finding a machinist that is actually going to be able to give you an RA number as a result of their machining on the deck surface of the block. |
| 10:32 | However you will find that all of the aftermarket gasket manufacturers will give you a recommendation of the surface finish or RA number that you should be shooting for or your machinist should be shooting for in order to achieve a perfect seal. |
| 10:48 | What you're going to find is that the large majority of engine machinists will not have the necessary equipment to actually measure the surface roughness. |
| 10:57 | However with their experience in the industry, and the knowledge of the surface preparation they need to go through, they're still probably going to be able to provide you with the sort of result that you need from these. |
| 11:10 | Now when we're talking about these gaskets, a term that is often used is the term stopper type and bead type. |
| 11:18 | Now I've sort of borrowed this from HKS, the Japanese performance parts manufacturer. |
| 11:23 | However it is a common term that is used to describe a couple of different ways of manufacturing these types of gasket. |
| 11:32 | What I wanna do is just show you the difference between these two. |
| 11:35 | So if we can just jump across to my laptop screen here, this is from some HKS documentation. |
| 11:41 | So this is their stopper type. |
| 11:43 | Just to give you some indication, this section here is on the inside diameter of the cylinder bore so what we're actually looking at here is our inside of our combustion chamber is out here to the left of our drawing. |
| 11:57 | So the idea here is first of all we've got these two embossed areas which helps seal. |
| 12:02 | And we've also got this little wrap around of the inner layer of the gaskets. |
| 12:08 | So essentially this is crushed and helps with the sealing effect when the cylinder head is torqued in place. |
| 12:16 | If we jump across and look at the bead type, we see that the construction is slightly different and we're only really relying on these embossed sections here, these beads if you like, to provide the sealing onto the engine block and the cylinder head. |
| 12:33 | So in terms of manufacturing a complexity, the bead type is slightly easier, hence the cost is normally cheaper. |
| 12:40 | The stopper type however is the superior gasket if you are looking at getting the best performance possible from a high boost engine application. |
| 12:52 | OK we can also use these gaskets in conjunction with an o-ring. |
| 12:59 | So again if we can just jump to my laptop screen for a moment, this is just an idea of what this might look like. |
| 13:07 | I'm gonna talk more about these o-rings a little bit later in the webinar but what we can see here is there is a groove that's been machined around the outside diameter of the cylinder. |
| 13:18 | So this runs all the way around the outside of the cylinder and a wire ring is then made up and pressed down into that groove. |
| 13:27 | And what this does is it has the effect, as we can see here, of distorting the o-ring and pushing it up towards the cylinder head. |
| 13:34 | And if this is done correctly it can improve the seal from the head gasket. |
| 13:40 | Does need to be done very carefully though because if we get this wrong, if our protrusion of our o-ring is too great, we can end up with our head gasket seal being compromised. |
| 13:51 | So need to be very careful with that. |
| 13:53 | Now in terms of MLS gaskets, this is a common question that we get a lot, is can we reuse an MLS gasket? Generally the manufacturers would suggest that no they are a one time use item. |
| 14:07 | In particular the reasoning for this is that the embossed area that it relies on for sealing will be compressed during its first installation. |
| 14:18 | In my own experience though, I have found that when pushed and we really needed to, I have reused MLS gaskets providing they are in good condition when they are removed. |
| 14:29 | And I've had excellent results. |
| 14:31 | One problem if you are going to reuse an MLS gasket though is that the surface finish, the elastomer coating that helps seal the fluids can end up getting damaged when the gasket is removed. |
| 14:45 | There are a number of head gasket sealant sprays that I've used, most of these have some copper component in them, and a light spray of a copper head gasket sealant, will be enough to get you through and have that gasket reseal. |
| 15:03 | OK so we've talked there about MLS gaskets, now these are probably going to be the gasket of choice for most of the low end through to even moderately high powered engines that we're likely to deal with. |
| 15:17 | These gaskets really are that good now and when combined with a decent stud kit and also proper block and head preparation, they really can seal quite high boost and power levels. |
| 15:31 | So in most instances these are going to be ample and they're a pretty cost effective solution. |
| 15:36 | However if you're looking to go further than what an MLS gasket can support, the next option that we will look at is a copper gasket. |
| 15:47 | So these sort of gaskets are used in the very highest power levels that we see in internal combustion engines, so I'm talking here about the likes of top fuel and also top alcohols. |
| 16:00 | So I've got engines here in top fuel that are reportedly now making in excess of 10000 horsepower. |
| 16:06 | So over a 1000 horsepower per cylinder. |
| 16:09 | So it really doesn't get to be a more brutal test of a gasket's ability to seal than that sort of application. |
| 16:17 | With a copper gasket though it's not just as simple as taking a machined piece of copper, laying it on top of the block and torquing your head down. |
| 16:27 | The gasket, the copper material on its own, while it is immensely strong, doesn't really provide any elasticity which is what we need remember to take up that gap that's going to occur when the cylinder head flexes off the block. |
| 16:45 | So we still need something more to go along with the copper gasket and the way this is dealt with is with an o-ring that's placed either in the block or the cylinder head and generally a receiver groove. |
| 17:01 | So let me just find that. |
| 17:04 | If we can jump across to my laptop screen again for a moment. |
| 17:07 | This particular image has been taken from SCE which is a copper gasket manufacturer. |
| 17:13 | So should be pretty self explanatory here but we've got a stainless wire o-ring that in this situation is being installed in the block. |
| 17:22 | Now the copper gasket itself is annealed, which softens it prior to being installed. |
| 17:28 | And when the cylinder head is placed on top of the block and torqued down, the o-ring tends to press the copper and deform it out into the receiver groove, which is this section we can see here in the cylinder head. |
| 17:43 | So what this kind of achieves is if you could look at it like a bit of a lock, it essentially pushes that copper material up into the cylinder head and it locks it there into that receiver groove. |
| 17:56 | So we've got a seal at the bottom with the o-ring that's pressed hard into the copper gasket material and then that copper gasket material's sort of being pushed out, forced out, extruded if you like, out into that receiver groove. |
| 18:07 | So this gives quite a complex lock that the combustion gases would need to make their way past, that's why it works incredibly well in those top fuel applications. |
| 18:20 | When we're talking about these sort of receiver grooves as well there's some information here from SCE, which is quite important, one of the common questions that we get is what sort of protrusion should you be using with an o-ring? In this instance with a copper gasket, you're going to want to use a protrusion of around about 25% so a quarter of the diameter of the wire that you're using. |
| 18:49 | While you can use any wire diameter you want, one of the common ones that is used is 41 thou stainless wire. |
| 18:56 | So essentially what this means is we're going to have a protrusion above the block surface of around about 10 thou. |
| 19:02 | The receiver groove on the other hand, we only want to machine that receiver groove 75% of the protrusion. |
| 19:11 | So in other words if we've got 10 thou of protrusion of the stainless wire we're going to machine that receiver groove to 7.5 thou depth. |
| 19:21 | But at the same time what we're going to do is make it 150% of the width of the wire. |
| 19:26 | So this allows the copper gasket to be pushed outwards and lock into that receiver groove. |
| 19:33 | Now it does create a complexity there as well, because first of all there's a lot of cost and complexity involved in the machine work. |
| 19:41 | We need to cut some very accurate o-ring grooves into the block surface of the engine, and then just as importantly we need to make sure that we have very accurately cut receiver grooves in the cylinder head. |
| 19:55 | And of course these receiver grooves need to be machined completely concentric with the o-ring grooves in the block, otherwise it's not going to work. |
| 20:05 | So there's trick to doing that, there's a lot of work that needs to go into getting that prepared correctly. |
| 20:10 | The other thing of course, any time we want to either deck the surface of the block or the cylinder head, the o-ring grooves will also need to be readdressed. |
| 20:20 | So it does require a little bit of consideration, particularly during an engine freshen up. |
| 20:29 | The problem with using a copper gasket material, is that it does a terrible job of sealing the fluids in the block. |
| 20:42 | So it does a really bad job of sealing the coolant passages between the engine block and the cylinder head as well as those oil passages, both the main oil feed into the cylinder head, as well as the oil return. |
| 20:55 | So in order to use a copper gasket and not result in leaks, this again requires a little bit of thought. |
| 21:02 | Normally a special sealant is going to be required on the gasket material. |
| 21:07 | So these really are suited mostly to sort of top ends of drag racing where the blocks have no coolant in them and fluid leaks are less likely. |
| 21:17 | However there are options for using these gaskets with a normal engine that has water in it. |
| 21:27 | If we can jump across to my laptop screen again for a moment. |
| 21:31 | This is a gasket that SCE make, they call it a tightened gasket. |
| 21:36 | And I don't think I've actually seen too many other manufacturers do this. |
| 21:40 | What you can see is on the copper gasket surface, there are embossed sections of sealant. |
| 21:46 | So basically a rubberised sealant is applied directly to the gasket surface and that's applied around all of the oil and water jackets in the engine block or in the gasket I should say. |
| 21:58 | And this allows the gasket to do a pretty good job of sealing. |
| 22:03 | Now I'll just go over my own experience, so with our drag engine program, with our Mitsubishi 4G63s, the cylinder head gasket integrity was really one of our limiting factors as I've already mentioned. |
| 22:14 | And looking at what was happening as a really proven technology in top fuel, top alcohol, we decided that we would try using a copper gasket with a stainless o-ring and a receiver groove in the cylinder head. |
| 22:29 | And it was unfortunately a complete disaster. |
| 22:33 | We ended up with the head gasket leaking at no more than about 35 psi of boost. |
| 22:39 | Whereas with our previous MLS gasket, in conjunction with a stainless wire o-ring, we were able to support 50-55 psi of boost. |
| 22:49 | So this shows there's a little bit more going on than just the head gasket and I think this is an area that a lot of people overlook. |
| 22:57 | In order to really provide stable sealing of the head gasket we also need to consider the construction of the engine block and the cylinder head. |
| 23:06 | So when we're looking at those engines that are being used in top alcohol and top fuel, we're talking about solid billet aluminium engine blocks and cylinder heads. |
| 23:15 | There are no water jackets in these blocks or heads. |
| 23:18 | These are just solid chunks of aluminium and these are much much more rigid than our light factory castings that we're using for the likes of our 4G63. |
| 23:29 | So what this means is that when we're talking about these very high specific power levels, the actual construction of the block and the cylinder head becomes a limiting factor too, and we're seeing those surfaces start to distort and move around and of course this makes everything that much more difficult. |
| 23:46 | For the copper gasket to work correctly, it's essential that everything is being held stable. |
| 23:53 | So that's just one thing we learned from our own experience in the drag industry. |
| 23:59 | We're seeing now the likes of the billet 4G63 engine block and one of the focuses they've gone through there with that billet engine block design is to massively increase the thickness of the deck surface for this very reason to help aid sealing. |
| 24:19 | OK before we move into o-rings I just wanted to also mention the way we are fastening the cylinder head down onto the engine block. |
| 24:29 | So in a factory application this is almost always going to be achieved using bolts. |
| 24:34 | When we move into the aftermarket we're starting to develop a higher power performance engine, we're much more likely to replace the factory bolts with an aftermarket stud kit. |
| 24:46 | So this is another aspect here, we're trying to improve the clamping force that's holding that head down onto the engine block. |
| 24:54 | Now one thing a lot of people overlook is that not all studs are created equal. |
| 25:00 | And I'll use ARP as an example here. |
| 25:03 | Their standard off the shelf stud that they make for just about every performance engine is made out of a material they refer to as ARP 2000. |
| 25:13 | Massive improvement in performance over a factory bolt. |
| 25:17 | It provides a lot more clamping force so it clamps that cylinder head down tighter. |
| 25:23 | However if we're going to be producing extreme power levels they do provide better materials so custom age 625 is another step up the ARP material ladder. |
| 25:35 | So all things being equal, a stud made out of the ARP custom age 625 material will provide additional clamping. |
| 25:43 | So it's gonna do a better job of holding the cylinder head down. |
| 25:47 | Another option if we get beyond what we're capable of doing with a factory stud size is we can simply increase the size of the studs. |
| 25:56 | So we can machine and drill out and tap the holes in the engine block and physically fit larger studs into the engine block. |
| 26:06 | Now this will provide us with a larger diameter stud that again provides a higher strength and can do a better job of clamping the cylinder head down. |
| 26:16 | Now if you are gonna go to this effort though it does need to be done very carefully, if we don't get this right we can actually create more headaches than we solve. |
| 26:26 | It really needs to be done on a mill, and this is probably something that's best left to the engine machinist. |
| 26:32 | It can certainly be achieved in the home workshop if you're very very careful, but it does need to be approached with care. |
| 26:40 | Also once we've drilled and tapped the holes in the engine block, we also need to drill and enlarge the holes that those studs go through in the cylinder head, that's an area that's quite often overlooked. |
| 26:54 | And if we're going really large on the studs we may also find that we need to make up and fit larger diameter dowels to locate the cylinder head to the block. |
| 27:05 | So there's a few considerations there. |
| 27:09 | Now in my own experience again just drawing back to our drag racing program. |
| 27:14 | Larger studs are definitely, or better quality studs, are definitely an essential element of improving your ability to seal the head gasket, or seal the cylinder head to the block. |
| 27:25 | However they aren't a fix all solution and if you're not a little bit careful with them, you can again create some new issues. |
| 27:34 | So in particular when we're dealing with a relatively weak factory casting, if we go to a very large diameter stud, and it's a very very high quality material that's going to allow a lot of torque to be applied, this can actually end up distorting the engine block and the cylinder head around those studs. |
| 27:52 | And essentially what we can get into is a situation where the head and block sort of bow away from each other between the studs. |
| 28:00 | So we're sort of setting ourselves up for a failure there right from the start. |
| 28:06 | Now another area that's really important and I just wanted to show you this, on our overhead camera, so this is our Subaru FA20 engine block. |
| 28:15 | Not really an engine block that lends itself particularly well to high power anyway. |
| 28:21 | But this is quite common with a lot of alloy blocks, this is what's referred to as an open deck block, and we can see that the actual cylinders themselves are completely detached from the outside of the engine block. |
| 28:33 | So this is done for manufacturing purposes, it makes it much easier to cast the engine block like this. |
| 28:40 | So this is referred to as open deck. |
| 28:42 | Now the problem with an open deck block is that because those cylinders sleeves really aren't supported by the outside of the block. |
| 28:50 | Under high boost application what we can find is that the cylinder sleeves walk around or can be distorted by the combustion pressure and of course it's essential that these sleeves stay put and don't move around if we want to achieve a good cylinder head gasket seal. |
| 29:07 | So an option there if we've got an open deck block, if we can just jump across to my laptop screen here. |
| 29:15 | This is a solution made by Deshele Performance Engines over in Australia and this is for the FA20 block. |
| 29:21 | It's already assembled, what we can see here at the bottom of the picture, there is a CNC machined plate that's designed to basically be machined and pressed into the top of the cylinder bores, cylinder block. |
| 29:35 | And above that we can see the plate is installed. |
| 29:41 | Now essentially it's almost invisible with it installed there in the block but this creates a closed depth block, it gives support of the cylinders by the outside of the engine block and helps support those cylinders and stop them moving around. |
| 29:55 | A word of warning here though, this is quite a complex task to fit these sorts of supports into the block. |
| 30:03 | And they'll inevitably create some amount of distortion in the bores so this is a task that needs to be achieved before we go through the boring and honing process, otherwise it's going to affect our cylinder, whether our cylinders are perfectly round and it's also likely to affect our piston to wall clearance. |
| 30:30 | We'll move on now and the next aspect we wanted to talk about is o-rings. |
| 30:36 | So there's various options here when it comes to using o-rings in conjunction with our head gasket and I want to go through a few of the most common ones. |
| 30:46 | So we'll start with the addition of an o-ring to an existing MLS gasket. |
| 30:51 | So as I've already mentioned this was the solution we were using in our mitsubishi 4G63 drag engines. |
| 30:57 | We were using an HKS stopper type head gasket. |
| 31:01 | And we were combining this with a stainless o-ring. |
| 31:04 | I have used both copper and stainless o-rings. |
| 31:07 | Copper o-rings obviously a little bit softer than stainless. |
| 31:11 | But we need to select the o-ring as well as the protrusion based on the material that we are using. |
| 31:19 | In the end with our own application we were using a stainless o-ring with a relatively small protrusion. |
| 31:26 | We were around about six thousandths of an inch protrusion. |
| 31:29 | When you are dealing with an MLS gasket that doesn't have a lot of give in it, we want to make sure that that protrusion isn't too great otherwise we can actually cause more problems than we're solving and can create both fluid leaks as well as combustion pressure leaks. |
| 31:45 | The other aspect with using an o-ring in conjunction with an MLS gasket is the location of the o-ring is quite critical. |
| 31:55 | This needs to be designed to work in conjunction with the gasket that you're using. |
| 31:59 | And you want to make sure that the location of the o-ring will work with the existing sealing ring design. |
| 32:06 | Basically we wanna make sure that the o-ring is applying pressure to the correct part of the gasket. |
| 32:12 | OK so we've already looking in a little bit of detail there at o-rings for copper gaskets so again the copper gasket material on its own doesn't actually do a great job of sealing. |
| 32:23 | So really if we're using a copper gasket, it is essential that we're going to be using an o-ring with that gasket. |
| 32:30 | We can choose to use the copper gasket with either a single o-ring groove or alternatively, as we've already looked at, we can use it with an o-ring groove and a receiver groove as well. |
| 32:45 | OK the next option that I'm going to cover is the use of a gas filled o-ring. |
| 32:51 | So if we can just jump across to my laptop screen here, I've just got a picture of what this sort of can look like. |
| 32:59 | This is actually a particular type of head gasket solution that comes from Cometic, they call it their fusion head gasket, which combines, what we've got here is an MLS Cometic gasket which is used to seal the oil and water jackets with this gas filled o-ring which is used for the combustion sealing. |
| 33:19 | So the gas filled o-ring basically is a complete ring that sits around the outside of the combustion chamber on the top of the cylinder sleeve and that is what's going to be doing all of the sealing of our combustion pressure so it seals between the top of the cylinder sleeve and the head gasket itself. |
| 33:42 | Alright we'll just head back to my notes for a second here. |
| 33:45 | So these gas filled o-rings were quite common and prominent in use in both the early days of the F1 turbo days as well as they also got a lot of use during the turbo touring car era, late '80s, early '90s, they were quite common. |
| 34:03 | So the gas filled o-rings are filled with a gas that's at quite a high pressure somewhere in the region of 700 to 1000 psi. |
| 34:12 | Obviously depending on the specific manufacturer of the o-ring. |
| 34:17 | And the idea behind them is that in operation they first of all are crushed as the cylinder head is torqued into place. |
| 34:26 | And they provide a certain amount of elasticity naturally by their very design and the fact that they've got that high pressure gas in them. |
| 34:33 | But more importantly in operation as the engine temperature increases or the combustion temperature increases, the gas in the centre of the o-ring also expands, further improving that seal. |
| 34:47 | The other option with these sorts of o-rings is that they can have small holes, essentially manufactured into them, that lead to the inside of the combustion chamber. |
| 34:59 | So these are no longer a sealed gas ring. |
| 35:02 | And these rely on the combustion pressure actually entering the hollow gas ring during the combustion process and the combustion pressure itself helps press the o-ring expander out and take up any flex that's occurring between the cylinder and the block and the cylinder wall. |
| 35:21 | Now generally other than that photo that I showed you from Cometic, generally the use of these type of o-rings requires that a groove is machined around the top of the cylinder bore that locates that o-ring in it. |
| 35:36 | And they don't do anything in terms of sealing the fluid passages either. |
| 35:42 | So these are commonly used either in conjunction with a copper gasket with some kind of sealant applied to it to seal the fluid, or alternatively they can be used with a modified MLS gasket. |
| 35:55 | So in the past where we've used these we've taken a factory MLS gasket like this and essentially had the inside diameter of the sealing ring machined out so it will clear the o-ring. |
| 36:09 | These are quite an expensive option as well and generally these need to be manufactured specifically for your engine. |
| 36:17 | So the sets that we've had made came from a manufacturer in Europe. |
| 36:22 | I can't honestly off the top of my head give a cost but they are quite pricey. |
| 36:27 | There's also a reasonable turn around time for them to be manufactured so generally you're going to want to purchase a couple of sets or at least a couple of spares as well. |
| 36:36 | With the gas filled o-rings, they are reusable provided they aren't damaged though. |
| 36:43 | Next we'll talk about something that really I don't see these days, it's referred to by various names, I'm going to call it a w-ring. |
| 36:51 | So this was used back again probably in the late '80s, early '90s in the turbo touring car era. |
| 36:59 | So it's not really an o-ring at all. |
| 37:02 | Essentially what it is is a machined stainless ring that has two spikes on the top of it. |
| 37:09 | So it's located into a machined recess in the top of the bores and the spikes actually press up into the cylinder head when the cylinder head is torqued in place. |
| 37:20 | So it cuts into the head in order to provide essentially a mechanical seal for combustion pressure. |
| 37:25 | They are effective to a point but the problem with these is that it does to damage to the head surface. |
| 37:32 | Lastly we're going to talk about a newer technology that we have been using which is an aluminium bronze sealing ring. |
| 37:43 | Now I think these probably have been around for a while. |
| 37:46 | We started using them probably about six or seven years ago, maybe five or six years ago. |
| 37:52 | So they are probably a more recent solution compared to the likes of these w-rings or the gas filled o-rings. |
| 37:58 | They are pretty well proven now in import drag racing. |
| 38:02 | For example Colin Wiltshire from Jett Racing in Australia uses these in his billet 4G63. |
| 38:09 | It currently holds claim to the fastest four cylinder engine in the world. |
| 38:14 | It's around 220 mile per hour on the drag strip, and that particular engine also produces 1900 horsepower at an excess of 95 psi. |
| 38:24 | So I've got some photos which I'll go through, so essentially the aluminium bronze o-ring is exactly as its name implies, it's a sealing ring made out of an aluminium bronze alloy. |
| 38:37 | It's a solid sealing ring and it locates in a groove that is cut in the top of the cylinder bore. |
| 38:44 | And then seals directly against the cylinder head, and then from that it also is used in conjunction with a copper gasket which is in charge of sealing fluids. |
| 38:56 | So let's have a quick look at that system. |
| 38:59 | So if we jump across to my laptop screen, this is the aluminium bronze sealing ring system installed on a Mitsubishi 4G63 drag engine here. |
| 39:08 | So we can see the aluminium bronze rings located around the top of each of the cylinders, along with obviously the copper gasket on the outside. |
| 39:17 | So this is the copper gasket that's used. |
| 39:21 | You can see that the inside of the gasket is cut away to provide clearance with those o-rings. |
| 39:28 | Little bit of an up close look at the installation there. |
| 39:31 | There is a very small amount of protrusion with these aluminium bronze sealing rings, but it is very very minor. |
| 39:40 | Essentially everything's almost completely flat there. |
| 39:43 | So it starts with the requirement for these o-ring grooves which we can see here. |
| 39:48 | So the underside of the sealing ring actually has a little step on it that locates down into this o-ring groove that's machined around the top of the sleeves. |
| 40:00 | We've got a picture here of the o-ring sitting in that groove so that's located there and the advantage with the way this locates is two fold. |
| 40:10 | First of all it means that it's positively located, the sealing ring can't move. |
| 40:14 | The other aspect here is that it provides sort of a mechanical lock for the combustion pressure, it can't really escape underneath that o-ring particularly easily and then we've got the o-ring on its own. |
| 40:26 | So these are a pretty good option for the high boost applications now and are also relatively cost effective. |
| 40:35 | They've been proven as I've said in our import drag motors which tend obviously to have their castings move around a little bit more than perhaps that likes of the top fuel, top alcohol, proper solid billet blocks. |
| 40:50 | Alright so we're going to have some questions and answers shortly. |
| 40:55 | If you do have anything that you'd like me to go into more detail on that I've discussed, or anything that is related to head gasket sealing in general, please ask those in the comments of the chat and I'll get to those shortly. |
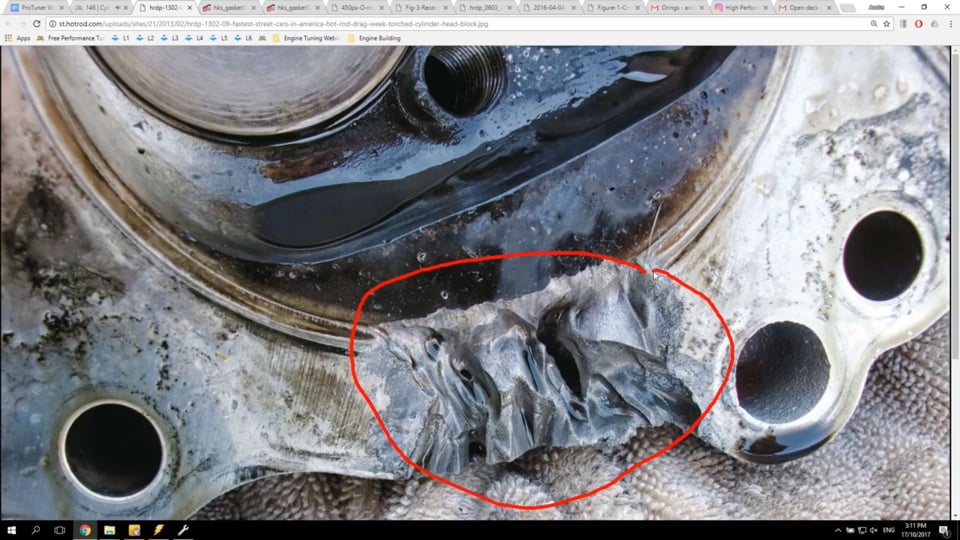
| 41:12 | OK so we've talked about the head gasket sealing options but I also think it's worth talking about the ways we can actually monitor our head gasket seal, how do we know if we are getting a problem with our head gasket leaking? So obviously if we've got an extreme leak, we're going to end up with a pretty obvious problem like the torched cylinder head that we saw right back at the start of the webinar. |
| 41:37 | Let's just jump back to my laptop screen. |
| 41:40 | So if you get something like this going on, you're going to know about it instantly. |
| 41:44 | So that goes without saying, it's pretty clear that you're going to have a problem and you're going to have to fix it. |
| 41:49 | But of course not all head gasket leaks are going to be this catastrophic and not all of them start out as being major. |
| 41:57 | So there are a few things that we need to keep in mind and look at so that we can catch some of these problems pretty early on before they start becoming more major. |
| 42:08 | OK so a lot of the drag engines that we set up that still used a cooling system, we would actually fit a pressure sensor to the cooling system. |
| 42:18 | So this allows us to data log the cooling system pressure and this makes it pretty clear if we are getting any combustion pressure leaking into the cooling system. |
| 42:28 | Generally, depending on the radiator cap that you're using, it's likely that we'll see somewhere around about 18 to maybe 20, 22 psi of pressure in the cooling system. |
| 42:39 | So when that cylinder combustion pressure starts making its way into the cooling system, we're gonna see very very quick and sharp rises in pressure in the cooling system. |
| 42:49 | This can also be used in conjunction with a driver warning to tell the driver to get out of the throttle. |
| 42:55 | This can help prevent catastrophic engine damage. |
| 42:58 | The other area which is important to look at with a drag car though is if we do end up with a cooling system leak, this can result in water getting underneath the tires which again can be incredibly dangerous so it's a good idea to have a driver warning there just to let the driver know something's not right. |
| 43:17 | This obviously isn't an option if we are running a dry engine with no cooling system, and of course as our power levels get very high, if we do have a head gasket failure, it's gonna make itself known very very quickly because it will torch a channel through the cylinder head or the block like we've already seen. |
| 43:37 | So the other aspect is monitoring our head gasket integrity while we've got the engine in for tuning, while it's actually running on a dyno, and there's a few things here that are worth keeping in mind. |
| 43:50 | A really common sign that we have a head gasket failure or a head gasket that's leaking is that the engine will overheat during and directly after a full power ramp run on the dyno. |
| 44:02 | These are quite unusual situations that are only specific to boosted engines. |
| 44:07 | So if we consider a normal road going passenger car, naturally aspirated when, typically when one of these has a head gasket leak, the engine's gonna overheat all of the time, just driving along the road basically, will be impossible 'cause the engine temperature will increase. |
| 44:24 | With a turbo or supercharged car it's quite different. |
| 44:27 | The head gasket will only leak, at least initially, when we're under high boost and there's that high combustion pressure to push past the gasket. |
| 44:36 | So it's quite often, in the early stages of a head gasket failure that if we're not driving the car on boost, it'll actually operate absolutely fine with no cylinder leakage at all. |
| 44:47 | It's only when we come up onto boost. |
| 44:49 | So that's why we see this during a ramp run and after a ramp run we'll see the temperature start to sky rocket out of control. |
| 44:56 | And it may take some minutes to return to a normal level after we have performed the ramp run. |
| 45:02 | So that's one sign to look out for. |
| 45:04 | Of course this could be related as well to a situation where your cooling system simply isn't big enough. |
| 45:11 | So you can't say that that's the specific problem there. |
| 45:17 | The other aspect that I used to use while dyno tuning some of these drag engine was that I would temporarily fit a clear container to the overflow from the radiator header tank. |
| 45:30 | So this could be as simple as a drink bottle or something like that, just a clear plastic drink bottle, that we've run the overflow tube from the head tank in the radiator into, and we can monitor after a ramp run on the dyno, we can see if any water is being pushed out. |
| 45:46 | It's not uncommon to see a small amount of water being pushed out when the cooling system pressurises and gets hot however when we've got a problem with a head gasket leaking, we're going to be seeing a situation where maybe 50 to 100 mils of fluid or even more is gonna be pushed out so that's an indication that we've got a problem and we should be stopping there. |
| 46:08 | OK so the next thing we'll talk about is how to diagnose these problems once we've actually got the engine apart. |
| 46:14 | So we know we've got a head gasket problem or we've got some coolant being pushed out under high boost. |
| 46:22 | What are we actually looking for when we pull the engine apart? So if we can just jump across to our Go Pro here. |
| 46:28 | I've got a head gasket here which in this situation is actually in perfect condition. |
| 46:33 | But what we're going to be looking for primarily is the most likely areas for a head gasket to fail into the cooling system is between the head studs. |
| 46:41 | So here we've got a stud here, we've got a stud here. |
| 46:46 | So we're most likely to get the cylinder head flexing away from the block right between them. |
| 46:51 | So what we'd be looking for is a dark area, or a burned area on either side of our head gasket material where in particular the black coating has been burned away. |
| 47:01 | And that would indicate to us that we've got a head gasket failure. |
| 47:06 | We're just as likely to have that situation occur down here at the end as well. |
| 47:11 | So these are one of the first things we're going to be looking at when we pull the head gasket, pull the cylinder head off. |
| 47:17 | We're gonna be inspecting very carefully the surface of the head gasket on both sides to see if it is showing any sign that it has been leaking combustion pressure. |
| 47:28 | Now at the same time we also will often see this resulting in a dark stained appearance on the engine block and the cylinder head. |
| 47:37 | Now if you've got a long term situation where the cylinder head, the head gasket has been leaking, this can also cause damage to the cylinder block surface or the cylinder head surface in particular, we can end up with the cylinder head going soft in that area which can essentially result in that cylinder head casting being junk. |
| 48:02 | So there's a lot there to keep in mind, and particularly if we can catch one of these problems fairly early on in the piece, this is going to help us determine the problem and fix it before it becomes a major. |
| 48:16 | Alright we're going to move into some questions and answers now. |
| 48:20 | And if you've got any more, please ask those in the comments in the chat and I'll deal with those shortly. |
| 48:29 | Right our first question comes from Andy who's asked what sort of cylinder pressures are we talking about here at wide open throttle on strong motors? Unfortunately I have never been in the situation myself to have in cylinder pressure sensors, so I can't give you specific numbers from my own experience. |
| 48:45 | From my own research for a reasonably strong street motor we might be talking in the order of maybe 1000 to 1500 psi. |
| 48:55 | When we're talking about these very high boost applications we can be in the order of 2500 to 3000 plus psi. |
| 49:03 | Next question comes from Janoo who's asked does more layers to the MLS gasket seal even better? I honestly couldn't give you an answer on that specifically. |
| 49:13 | I think there's a little bit more to it than just the number of layers and also this does come down to the thickness of that gasket. |
| 49:22 | Obviously if we've got a gasket that needs to be relatively thin, so an example here of our FA20 gasket, which off the top of my head I think is around about 0.6 or 0.5 of a mil thick. |
| 49:34 | Obviously this limits how many layers we can use. |
| 49:37 | It does make sense though if we think about an MLS gasket as a spring that more layers can improve the elasticity of that gasket and help potentially improve the seal. |
| 49:50 | Chris Rick has asked, when using a copper gasket does it matter what material the block and or the head is made out of? No it is compatible with both cast iron and aluminium. |
| 50:02 | However that is probably a consideration there in our own testing there that I have mentioned we're using a cast iron 4G63 block which goes alongside a aluminium head. |
| 50:16 | There are some considerations there around the relative expansion rates of cast iron versus aluminium which expands more there that we do probably want to keep in mind. |
| 50:27 | Janoo's asked does the o-ring life last as long as the head gasket? Really depends there I guess on what o-ring you're talking about, I have mentioned a few there. |
| 50:37 | For the stainless wire o-rings that I was mentioning, essentially these will last as long as the engine block provided they aren't damaged in some way, and in fact they're also very very difficult to remove. |
| 50:51 | When you are making up a stainless wire o-ring you are generally going to be using a 41 thou wire. |
| 51:00 | And to provide some positivity in the way that o-ring is installed in the block, the groove in the engine block is generally machined about 39 to 40 thou. |
| 51:11 | So we've got 'round about one to two thou of interference. |
| 51:14 | So understandably this makes sure that that o-ring isn't gonna fall out during assembly but of course it makes it very difficult to remove. |
| 51:21 | As for the gas filled o-rings that I've talked about, these are reusable, again just making sure that there isn't any sign of physical damage to them. |
| 51:33 | 2JZGTE's asked does it matter which gets o-ringed, the block or the head? Either will work. |
| 51:40 | I've generally o-ringed the block and machined receiver grooves into the head, although I know in top alcohol often this is done the other way around. |
| 51:50 | The reason we've done the o-ring on the block is generally I've found that this is easier for our machinist to accomplish for us, no other reason than that. |
| 52:00 | Paul has asked, in alcohol application do you guys ever cement the blocks? Yeah absolutely all of our methanol 4G63 engines were concrete filled or solid filled. |
| 52:11 | It wasn't actually concrete, it's generally referred to as concrete, we used a special Moroso block filling compound. |
| 52:18 | It's made specifically for the task of filling the block. |
| 52:21 | And it is formulated to have the same thermal expansion coefficient as cast iron. |
| 52:26 | Which is an important consideration if we don't want to end up with distortion in our bores as the engine heats up. |
| 52:34 | Janoo's asked, does going over the ARP recommended torque spec increase clamp force? For example if they said 90 foot pound of torque, can we do 105 to 110 instead? Yes you can, needs to be done with a little bit of care though. |
| 52:49 | What you'd find is that the torque specifications that ARP give are to 75% of the yield strength. |
| 52:56 | So by increasing the torque specifications slightly above ARP's recommendation, I only do this in very high specific power applications but by increasing that torque slightly you can actually increase the clamp from the stud. |
| 53:17 | Janoo's asked, which gives the best results to prevent head lift, closed deck or increasing the stud size, or o-ringing the block? OK if you're dealing with an open deck block then you're really fighting an uphill battle until that block has been closed deck. |
| 53:33 | The reason for this is it doesn't really matter what type of gasket solution you're using. |
| 53:39 | With an open deck block as I mentioned earlier, the sleeves can physically distort and move around under high boost use and this can result in problems with your head gasket integrity. |
| 53:51 | So really at the upper echelons of performance with an open deck block that's probably almost an essential. |
| 53:58 | Beyond that really again depending how far you wanna go, essentially everything you've listed becomes essential, you'd want to also increase the size of the stud. |
| 54:07 | In the EJ and FA20 worlds it's quite common to step up to a 14 mil stud to provide a lot more clamping force from the studs and then of course o-ringing of the block depending on your head gasket solution. |
| 54:23 | Janoo's also asked, do you reuse ARP625 when you rebuild your Evo block every season? Yeah the ARP studs are designed, we've just sort of talked about this, the design torque rating has them below their yield point. |
| 54:39 | So this means that they are reusable. |
| 54:41 | It's when you take a stud or a fastener beyond its yield point, so these are often referred to as torque to yield fasteners, you'll see this commonly with OE fasteners, where they have a torque rating plus an angle, this is a torque to yield fastener and these are a one use item. |
| 54:57 | Ryan's asked what about running an oversized, otherwise a big bore gasket on a smaller bore, will this cause any problems? OK so generally I like to try and keep my head gasket bore size reasonably closely matched to the bore size of the engine. |
| 55:16 | But it doesn't have to be perfect. |
| 55:18 | If we're running an 86 mil bore, we don't have to have an 86 mil head gasket. |
| 55:23 | It's quite possible to have a couple of mil of difference between our bore diameter and our head gasket diameter. |
| 55:30 | But for that particular example I would try and stay reasonably close, I don't like to have the head gasket bore diameter much more than about two millimetres larger than the actual bore that I am running. |
| 55:43 | Car Bibbles has asked what location were you cutting the o-ring groove in relation to the HKS stopper gasket on the 4G63 race engine? OK so it's a little hard to show you 'cause I don't have one of those gaskets here in front of me, but if you look really carefully at the construction of the stopper type gasket, there is a little folded section which we saw earlier in the diagram and I was locating the o-rings just at the rear of this so that it was pressing essentially onto the stopper itself. |
| 56:15 | Janoo's asked, are there any tuning techniques to avoid head lift? Yeah make less power. |
| 56:22 | That's probably the key one. |
| 56:24 | There are some considerations to keep in mind though if you are dealing with an engine that you know has head gasket integrity issues and one of those is to reduce the torque through the peak torque area of the engine operation. |
| 56:38 | So essentially the torque is a pretty good indicator of our cylinder pressure. |
| 56:43 | Obviously the engine is likely to have head gasket sealing problems when it has more cylinder pressure. |
| 56:50 | So what we want to do is purposefully detune the engine around that peak torque area. |
| 56:55 | There's a couple of ways we can approach this, one is to ramp the boost in higher once we've gone past peak torque and the torque is starting to fall away on the dyno. |
| 57:06 | The other way we can do this to a degree is to retard the ignition timing around that peak torque area just to control and manipulate the peak engine torque that's produced. |
| 57:18 | James has asked, where does the ARP L19 stud compared to the OEM or ARP 625 series fit? And in my opinion is ARP the best manufacturer of head studs? OK so the L19 fits somewhere between the ARP 2000 and the Custom Age 625. |
| 57:37 | So the L19's actually an exceptionally good option. |
| 57:39 | The Custom Age 625 is probably overkill for most applications. |
| 57:44 | My go to stud was always the ARP 2000. |
| 57:48 | And for our race applications I would be predominantly using the L19 and in a few very limited situations maybe Custom Age 625. |
| 57:58 | Certainly I wouldn't say that ARP is the best manufacturer of head studs, they certainly produce a good quality item. |
| 58:04 | Probably one of the reasons that I've kind of navigated to using those is that they are available easily here in New Zealand. |
| 58:13 | They're relatively well priced. |
| 58:15 | And they have proven to me that they are effective in the applications we are using them for. |
| 58:22 | Janoo's asked are sleeve blocks more likely to lift the head? No no not at all. |
| 58:28 | Sleeve blocks have their own set of issues though and the sleeving process while a lot of people view it as a cure all for engine reliability, if it isn't done correctly, what we can end up with is problems in operation where the sleeves actually drop. |
| 58:45 | Now it's the sleeve dropping that produces this issue with the cylinder head leaking in a sleeve block. |
| 58:53 | So it's not really the head gasket's problem, it's actually an installation error, or an installation issue with the sleeves themselves. |
| 59:00 | So what we find is that generally when the sleeves are installed, it needs to be done very very accurately, very very carefully so that the sleeve is completely and properly supported at the base so that is can't drop. |
| 59:13 | It's also quite often we'll find that the sleeves are installed with a very slight protrusion above the deck surface of the block. |
| 59:22 | Just a story there as well about an engine machinist that I deal with quite closely here in New Zealand, and they were producing a lot of sleeve blocks for use in speedway here. |
| 59:33 | And they had so many problems with the sleeving process and sleeves dropping in operation, that they actually changed their technique. |
| 59:41 | They have an in house dyno, and what they would do is sleeve the blocks, they would run them on the dyno, get them hot, and then they would actually strip them down and redeck the blocks because essentially what happens is the sleeves can move around during the first few heat cycles of the engine when it's freshly run. |
| 59:58 | Once the sleeve has stabilised and moved around, done whatever it's going to do, generally after that you won't have any more continuing problems with the sleeves dropping. |
| 01:00:07 | So that was their solution to that. |
| 01:00:10 | Anthony has asked with the w cut head gasket is it reusable, head surface needs to be resurfaced? Yeah it is reusable. |
| 01:00:19 | So essentially it's going to do damage to the head surface, that's really the big problem with it. |
| 01:00:25 | However if you do reinstall the cylinder head onto the same w-ring it's obviously going to locate in predominantly exactly the same location. |
| 01:00:34 | But over repeated strip downs and reassemblies you are going to end up doing some pretty ugly damage to the deck surface of the cylinder head. |
| 01:00:43 | Rodney has asked, so are the rings easily replaceable in the case of decking the block? OK no, I think I've really touched on that earlier. |
| 01:00:51 | So if we're talking about o-rings that are pressed into an o-ring groove in the block, they're actually a real pain in the ass to get out. |
| 01:00:58 | So you don't want to have to deck the block unless it's absolutely essential. |
| 01:01:04 | Generally though unless there's some damage occuring, that's probably not something we're going to need to do too often which is lucky. |
| 01:01:13 | Michael has asked would a softer gasket help prevent the torching of the head so the gasket blows out, or can that be a result of the gasket itself blowing out? No it is actually the gasket blowing out that causes the torching of the head. |
| 01:01:26 | So there really is no easy solution there if the gasket blows out. |
| 01:01:30 | If we end up with leakage that is a likely result. |
| 01:01:35 | Having said that, as I've mentioned earlier in the webinar, this is a problem we really only see on high boost methanol drag applications as well. |
| 01:01:44 | AJ Gale has asked how do you differentiate the head gasket use for high powered NA motors versus high boost motors? OK well the cylinder pressure that we're likely to see in a naturally aspirated motor, even a really highly strung naturally aspirated motor is just nowhere near comparable to what we're going to see in a high boost engine so generally head gasket integrity is much less of an issue on a naturally aspirated engine and generally we'll be able to get away with a good quality MLS gasket installed with a good quality set of studs and as long as our cylinder head and block surface preparation is on point. |
| 01:02:23 | Matthew's asked is there a recommendation on the boost or cylinder pressure range that different sealing solutions become required, like MLS to go to 40 psi, over 60 psi, over 100 psi? No I don't think there's a simple line in the sand that we can draw like that, while that would be nice. |
| 01:02:42 | Probably the issue there really comes down to the specific engine that we're working on. |
| 01:02:47 | A lot of this will also be related to the components, the material that the engine block and the cylinder head are manufactured from. |
| 01:02:56 | So what I mean by this is we can probably go a little bit further with a cast iron block than we can with an aluminium block, a factory aluminium block. |
| 01:03:05 | So no it's probably not that easy. |
| 01:03:07 | The other thing as well is boost pressure alone is not really a good indicator or, sort of indicator of cylinder pressure. |
| 01:03:16 | So if we talked for example of running maybe 40 psi from a relatively small turbo, maybe a Garrett GT3582 and then we compare that to 40 psi of boost from maybe a Garrett GT55, we're moving a huge amount more air with the GT55 so a common misconception really. |
| 01:03:36 | Boost pressure is, probably an easy way of looking at it, it's more just a measure of the flow resistance to the engine. |
| 01:03:44 | So yeah using boost pressure alone is not a really complete solution. |
| 01:03:50 | Johnny's asked, years ago we would use the aerosol spray copper coat trick for a better sealing. |
| 01:03:56 | Does this still apply now with MLS gaskets? Look I've used the copper spray on an MLS gasket with our own drag engines and I've used them without. |
| 01:04:05 | I've never really come to a definitive conclusion as to whether or not it is better. |
| 01:04:11 | As I mentioned earlier, I definitely will use the copper spray if I am reusing an MLS gasket. |
| 01:04:18 | But as to whether it gives a real advantage, a real measurable advantage from a bare MLS gasket, I'm really not sold on it, I couldn't give you a solid answer there. |
| 01:04:29 | Tony Fan has asked, looking at an SR20 DET head gasket for a stock bore, the only option is 87 millimetres, should I try to find an 86 millimetre gasket? No that's absolutely fine, you'll have no problems with that at all. |
| 01:04:42 | Ryan has asked what about rewelding the head after damage, is it possible welding from slight damage and pushing in new valve seats? Yeah it is possible but it creates a huge number of headaches because when we weld the head, the head can be soft which then also affects the head's ability to seal properly on the head gasket. |
| 01:05:03 | So it's something that we have done ourselves on some of our drag heads, we have recovered them by welding them, but it does need to be addressed on a case by case basis based on exactly how bad the damage is. |
| 01:05:16 | Because in some instances, the trouble we need to go through to recover the head simply isn't worthwhile. |
| 01:05:23 | Obviously this is something you'd consider on a very expensive head that's had a lot of money poured into it with porting work et cetera. |
| 01:05:32 | Aymes has asked, you just explained how you can get a leak between the head stud holes. |
| 01:05:36 | What is the remedy to this? Is it caused by the head studs being torqued too high, while pulling and distorting the surfaces? There's two issues here. |
| 01:05:48 | I mean this is really the main problem we're going to see is that the head is going to flex away from the block in the area where there's the least clamping force applied. |
| 01:05:57 | So naturally that tends to be between the head studs. |
| 01:06:00 | So regardless of all else that is the most likely area we're going to have a problem. |
| 01:06:06 | So this is why we need a gasket that, or a head sealing solution that has some elasticity into it to allow it to expand and take up that flex. |
| 01:06:15 | However as I kind of mentioned when I was talking about the larger or stronger studs, if we are using a very very strong stud that has a huge clamping load and a very high torque rating, then yes this can in turn also distort the factory castings if they're quite weak. |
| 01:06:33 | So there's a couple of issues there and it's not always clear exactly what is causing that problem. |
| 01:06:42 | Turbo Buckeye has asked, for a block that still has water, what are your thoughts on dry decking the head and block when using copper gaskets? Yeah it's a really common solution there. |
| 01:06:51 | It's not one that I've personally used. |
| 01:06:54 | I've used copper gaskets and I've used them with a spray on sealant and I've had probably a 95% solution to fluid sealing. |
| 01:07:03 | I wouldn't say it was absolutely bullet proof but it does work quite well. |
| 01:07:07 | Dry decking the head and block is quite an involved exercise so if you're going to do that, there's a lot involved. |
| 01:07:16 | And it generally, this is done where we've already solid filled the block with a block filling compound. |
| 01:07:21 | So it's a case of essentially welding up the water, water jacket in the cylinder head where that comes down to the deck surface. |
| 01:07:29 | More often this is done to help also prevent the chance of getting water under the tires in a drag application as well. |
| 01:07:38 | Matthew McMillan has asked what type of gasket do you recommend for NA to forced induction on a 2JZGE? If not a specific answer, what should I be looking for? Look that's a pretty broad question 'cause it's really, as we've kind of been talking about here, down to the power level you're talking about. |
| 01:07:56 | If you're taking a naturally aspirated engine and adding forced induction to it, I'm gonna guess that without building the entire engine, your power aims are pretty mild. |
| 01:08:06 | And with a 2JZ it's pretty well proven to support even quite high power levels without too much trouble, so probably up to 800 to 1000 wheel horsepower you'll get away quite happily with a quality MLS gasket. |
| 01:08:20 | The likes of HKS for example there. |
| 01:08:23 | And a good quality set of studs. |
| 01:08:27 | James has asked who in your opinion make the best head gaskets? I've had really good results with HKS through my tuning career. |
| 01:08:37 | Obviously they're really only available in the import or Japanese domestic market engine market. |
| 01:08:42 | I think it's one of those things that I couldn't say that they're the best manufacturer, they're one that I've found works really well. |
| 01:08:48 | And when you find something that works you tend to stick with it. |
| 01:08:52 | There's really no point reinventing the wheel unless you've got a specific reason to do so. |
| 01:08:56 | One that I have tested myself on our drag engines and I had absolutely zero success with, was the Cometic gasket. |
| 01:09:05 | We had those fail at probably no more than about 38 to 40 psi of boost. |
| 01:09:11 | I'm not entirely sure if that was an issue with the Cometic gasket itself or maybe the application for the 4G63. |
| 01:09:19 | I did run this at the time past Cometic's technical support line and they made it pretty clear that they weren't particularly interested in working with us to find a solution there with our application being relatively unique. |
| 01:09:35 | Jake Nicholson's asked how much boost can a 6.5:1 static compression ratio handle? It's a cast iron LS block. |
| 01:09:41 | Simply not enough information in there for me to come close to giving you an answer. |
| 01:09:46 | The static compression ratio of the engine is just one very small part in defining how much boost an engine will be able to support. |
| 01:09:57 | Kenroy has asked, can too much timing cause the head to lift? Yes absolutely it can. |
| 01:10:03 | So one of the problems with too much ignition timing, is first of all if everything is still tuned correctly, more ignition timing as we move towards MBT or maximum brake torque timing, this is going to result in an increase in cylinder pressure. |
| 01:10:17 | It's the cylinder pressure that's going to result in the head gasket leaking, the cylinder head flexing off the block, and the head gasket leaking. |
| 01:10:26 | So even in a well tuned engine, more timing on a weak system can result in the head gasket leaking. |
| 01:10:33 | However the more real issue as well that we need to consider is if we've got too much timing in the engine creating knock or detonation, this creates really large spikes in pressure inside the combustion chamber, and these spikes in pressure can be orders of magnitude higher than the normal peak cylinder pressure and this of course can result in the head gasket leaking. |
| 01:10:58 | Chris Rick has asked, speaking of your drag engines, how often do you guys check or replace the head gaskets on those motors? Basically if the head isn't leaking, we leave the damn thing alone. |
| 01:11:09 | Yeah they can be very very finicky. |
| 01:11:12 | So if we've got a head that's sealed nicely, it's holding 50 plus psi of boost pressure, we really don't wanna disturb that unless it's absolutely necessary. |
| 01:11:23 | With the engines at that sort of level of operation though, we are also quite often pulling them down for general inspection so we would be pulling them apart quite regularly just to look at the bearings, look at the condition of the pistons et cetera. |
| 01:11:40 | So there probably, even if everything is going OK, the engine was probably getting pulled down for an inspection maybe every four or five meetings. |
| 01:11:50 | Alright that's brought us to the end of our questions, so thank you everyone for watching today, I hope you've learned a little bit more about what goes into keeping the cylinder head firmly sealed to the engine block, and hopefully some of the information in the webinar will help you in your own engine building. |
| 01:12:06 | If you've got any more questions, as normal please feel free to ask those in the forum, and I'll be happy to answer them there. |


