162 | How to Correctly Install a Head Gasket
Summary
Correctly fitting the head gasket and cylinder head can have a large impact on the ability for the head gasket to correctly seal combustion pressure, coolant, and oil. In this webinar we’ll discuss what you need to consider and demonstrate the correct technique.
| 00:00 | - It's Andre from the High Performance Academy, welcome along to today's webinar, where we're going to be talking about some of the aspects you'll need to keep in mind when you are fitting a head gasket to an engine. |
| 00:11 | Now on face value this seems like a relatively straightforward process and certainly to anyone who is experienced in engine building, this is a relatively simple step by step process that you need to go through, however those of you who are watching, who are maybe a little bit fresher to engine building, there's gonna be a lot of information in here that you're going to be able to take on board, that's gonna help you make sure that when you are fitting a head gasket you're going to get a reliable seal between the cylinder head and the engine block. |
| 00:42 | Getting this right is essential if we want to maintain that seal. |
| 00:46 | And this involves three aspects. |
| 00:49 | It involves making sure that our combustion pressure is staying where it should be, it's gonna be staying inside our combustion chamber, inside our cylinder, and that's going to allow all of that combustion pressure to actually do the job we want it to be doing, which is acting on the top of the piston, transferring all of that pressure into torque at the crankshaft. |
| 01:07 | By the same token we also want to make sure that the water jacket or water passages that transfer water from the cylinder head and into the engine block, that those are also correctly sealed so we're not going to get any water leaks. |
| 01:20 | And lastly we also have oil galleries that both provide pressurised oil up into the cylinder head, as well as returning the oil down into the crank case. |
| 01:31 | So all of those need to be sealed correctly. |
| 01:35 | If we don't have all of those sealed correctly, then this is going to end up causing us reliability problems. |
| 01:41 | Now in a naturally aspirated engine, our job is made a little bit simpler here because we generally aren't going to have the very high cylinder pressures where we're likely to start seeing problems with turbo charged and super charged engines. |
| 01:56 | So our job is a little bit easier but everything we're going to talk about here in this webinar is still going to be absolutely relevant to naturally aspirated, super charged, turbo charged, and even engines running nitrous. |
| 02:11 | Ok so the first step here is to select the type of head gasket that you're going to use. |
| 02:17 | This is our very first step, we need to make sure that we are using a suitable head gasket. |
| 02:23 | Now what we'll find is that a lot of the earlier OE head gaskets, so the factory style head gaskets that would've come equipped on our engine out of the factory are an organic style, composite style gasket. |
| 02:38 | So this is a composite material, it's sort of a fibrous material. |
| 02:42 | And these are cheap to manufacture and they're probably absolutely fine for a factory engine, however particularly with our modified engines, once we start increasing the power levels and we start increasing the combustion pressure, these composite gaskets aren't strong enough to support that and what we'll find is that the gasket can very quickly fail. |
| 03:04 | So there's very very few instances that I would recommend using a factory composite style gasket. |
| 03:13 | And fortunately with just about any common or popular performance engine, we're going to have the option of a range of MLS or multi layer steel gaskets from a range of different suppliers. |
| 03:26 | So this is certainly what I'd be recommending going to. |
| 03:30 | In saying that though, we're finding that a lot of the modern crop of performance engines are now coming out with factory fitted multi layer steel gaskets. |
| 03:39 | Often these are also incredibly cost effective. |
| 03:41 | And it's definitely worth doing a little bit of research before you dive in and spend what often can be quite a large sum of money on an aftermarket multi layer steel head gasket. |
| 03:51 | You may very well find that the factory gasket has been well and truely proven to support the sort of power levels that you're looking for. |
| 04:00 | If you're dealing with a naturally aspirated engine, this is almost certainly going to be the case. |
| 04:04 | It's only when we're starting to look at very high boost pressure levels where sometimes the factory MLS gaskets may not be up to task. |
| 04:13 | One of the examples I'll give you there is the late model Mitsubishi Evo 4G63 gaskets. |
| 04:19 | These are an MLS style gasket, and these have been well proven to 1000 horsepower or thereabouts so in that case your options are a little bit wider. |
| 04:31 | In some very specific race engine applications, we may go a little bit further than using an MLS gasket. |
| 04:39 | And we may also include either o rings in the block or the cylinder head or both to help improve the sealing under very high combustion pressure levels. |
| 04:49 | This is a bit beyond the scope of our webinar today, but if you are interested in learning more about that, we ran a complete webinar talking about head sealing techniques, for our HPA gold members, that webinar is available in our archive, and if you just search in our archive for head sealing, that'll bring up that webinar for you. |
| 05:11 | OK so the thickness of the gasket is another aspect that's really important to make sure we've got that right. |
| 05:17 | And this is one area where we may want to veer away from using an OE gasket. |
| 05:23 | With a lot of factory engines, when it comes to the supply of factory gaskets, we're not going to have the option of different thicknesses. |
| 05:31 | So what this means is if the factory thickness of our gasket isn't going to give us the sort of clearance we need, then we're going to have no option but to look to the aftermarket. |
| 05:42 | And again for popular engine combinations, particularly if we look at maybe something like the GM LS V8, if we look at one of the common manufacturers of aftermarket gaskets like Cometic, we're going to have a range of different thicknesses so this gives us a lot of flexibility in choosing a gasket thickness that's going to give us the exact clearances we want. |
| 06:05 | So in that aspect, we need to consider why we would need to adjust that gasket thickness. |
| 06:11 | So this comes down to setting the clearance between the crown of the piston at TDC and the underside of the cylinder head. |
| 06:19 | So we obviously want to make sure that we have sufficient clearance there that we don't risk having the piston actually contact the cylinder head in operation, particularly at high RPM. |
| 06:29 | So by adjusting our head gasket thickness, this is going to affect that piston to head clearance. |
| 06:35 | By definition, that at the same time is also going to affect our piston to valve clearance. |
| 06:40 | It's also going to affect our compression ratio. |
| 06:43 | So if you are trying to get a very specific compression ratio, then you're going to want to take into account the thickness of the head gasket. |
| 06:53 | And you're going to need to basically take into account all of those calculations including your combustion chamber volume and also the volume of any dome or dish on your piston crown. |
| 07:04 | If you want more information about how to go through calculating and measuring all of those aspects, we do detail this in our engine building fundamentals course. |
| 07:13 | OK so once you've got the right thickness of head gasket, the next thing we need to consider is making sure that we have the right surface finish. |
| 07:21 | So all of this needs to be done before we ever get anywhere near actually installing the head gasket and the cylinder head. |
| 07:30 | So what we need here is a perfectly flat finish on both the deck surface of the block, as well as the deck surface of the cylinder head. |
| 07:39 | And this is where moving from a factory composite style gasket to an MLS gasket does require a few considerations here. |
| 07:51 | So what we want to do is be very careful that the surface finish on the deck of the block and the cylinder head is suitable for that MLS gasket. |
| 07:59 | Generally with a composite style gasket, there is a little bit more ability for that composite gasket to deform and fill in voids so it's a little bit more forgiving, whereas the MLS gasket, it has a thin Viton coating on the surfaces of the gasket that will contact our cylinder head. |
| 08:18 | I've got one actually here I should show you while I'm talking about that. |
| 08:21 | So this is the black finish we've got here, this is a Cometic gasket to suit our Honda B18C. |
| 08:26 | We'll have a look in a few minutes at how we can go about installing that. |
| 08:30 | So that black Viton coating there is basically a sealing product that's applied to the MLS gasket. |
| 08:36 | So we don't have a lot of give there in that Viton to seal any imperfections we've got in the deck surface of the block or the head, so they have to be absolutely correct. |
| 08:49 | So we'd also normally end up having our machinist deck the cylinder head as well as the engine block during the machining process. |
| 09:00 | So I like to do that just as a matter of course. |
| 09:02 | There'd be very few instances where I'm not going to have that process done. |
| 09:07 | We do need to consider that this will take some small amount of material off those surfaces. |
| 09:14 | So if we are rebuilding and freshening an engine time and time again, we do need to take that into account and consider whether or not we're going to deck the block, but if I'm dealing with an engine that I'm seeing for the first time, unless there's a very special circumstance that would prevent me from doing that, I'm going to end up having the machinist go through that process. |
| 09:33 | We're likely there to be taking material in the order of about one to perhaps a maximum of three thou off those surfaces. |
| 09:41 | So it is an incredibly small amount of material that we are removing. |
| 09:46 | And what we're trying to do is just ensure that two things are correct for us, first of all we wanna make sure that if there is any imperfections or a lack of flatness in our block surface, or our head surface, we're going to be getting rid of that. |
| 10:02 | So we're gonna be starting with a perfect flat surface. |
| 10:05 | So that's gonna give us our best chance of the head gasket sealing. |
| 10:09 | At the same time we also want to be very certain that that surface finish is correct. |
| 10:15 | So when it comes to our surface finish, we do want to know what the head gasket manufacturer has recommended. |
| 10:23 | So you can check with your gasket manufacturer. |
| 10:26 | I am using Cometic here, I've talked about them a couple of times. |
| 10:30 | We've got no affiliation with Cometic, it just so happens that we do have a Cometic gasket here for our B18C. |
| 10:35 | So let's just jump across to my laptop screen just here for a moment. |
| 10:40 | And this information is all available on Cometic's website. |
| 10:44 | You should also get this information with the gasket. |
| 10:46 | But what we're looking for here, is under their FAQ section, we're looking at this bit here. |
| 10:52 | What surface finish is required to use an MLS gasket? So you can see there, well hopefully you can see, that Cometic recommend a surface finish of 50 RA, RA stands for roughness average, or finer. |
| 11:07 | OK so anything rougher than 50 RA is unlikely to give us the best possible seal from that head gasket. |
| 11:14 | Now of course to us that probably is going to mean absolutely nothing. |
| 11:20 | This is the information that we need to provide to our engine machine shop. |
| 11:24 | Chances are they're already going to know, they're already going to be really well versed at machining cylinder heads and engine blocks to suit MLS gaskets. |
| 11:32 | They've been doing it for a very long time. |
| 11:35 | But of course it doesn't hurt to provide your engine machinist with all of the accurate information about exactly what you want them to achieve. |
| 11:42 | And that way if there is any problems, if anything deviates from that, then that's going to potentially come back on them, rather than you. |
| 11:51 | So that's the next step. |
| 11:52 | So we've got our cylinder head and we've got our cylinder block machined so that our surfaces are perfectly flat, and that we've got our roughness average or our RA value correct as per the manufacturer's recommendations. |
| 12:08 | Once we've done this, we're essentially at a point where we should be ready to actually start assembling our components. |
| 12:14 | Now I'll just also talk about if we are going to be reusing an engine block in a cylinder head and you're not going to go through that process, then we can also measure and make sure that our surfaces are flat. |
| 12:29 | This is going to require a specialist straight edge though. |
| 12:33 | And I'm not talking here about a basic ruler. |
| 12:37 | This is a job that I would probably still recommend, unless you do have a proper straight edge for this purpose, I'd recommend getting your machinist to do this. |
| 12:46 | The straight edges I'm talking about here, generally are made out of quite a thick piece of steel plate with a sharpened edge machined onto them. |
| 12:53 | That steel plate's important because it means that the straight edge is going to not be flexible. |
| 12:59 | So by holding that across both our cylinder head deck surface as well as our engine block, and using feeler blades. |
| 13:06 | Or actually you can even see with light coming through, if there is any deviation from a perfectly flat surface. |
| 13:13 | We're going to be able to decide whether or not those components can be reused. |
| 13:19 | Now quite often if the engine has been pulled apart, and there's no current failure, so we haven't actually had a head gasket failure, we can expect those components to be in good condition. |
| 13:31 | There's no reason why they should've warped. |
| 13:33 | The situation we can get into where these components are going to need machining, is if the engine has suffered a head gasket failure, and has been run for some time. |
| 13:44 | Or alternatively if the engine has been overheated dramatically, particularly with an alloy cylinder head, and an alloy block. |
| 13:53 | This can actually cause those components to warp. |
| 13:56 | So even if there is no sign of a head gasket failure, it's still a really good idea to actually check those surfaces and make sure that they are still flat. |
| 14:05 | Lastly when it comes to the cylinder head, another thing, you'll want to get your engine machinist to do during this process, they'll normally do it anyway, but I would request that you have them check the hardness of the cylinder head. |
| 14:19 | So again this is more of a problem if we're had an engine that has had a head gasket failure and it's been run for some time. |
| 14:26 | And what we end up with is steam and water and combustion gases escaping past the cylinder head surface and that can essentially overheat the head surface in a localised area. |
| 14:37 | And it results in the head losing its heat treatment in that area and becoming soft. |
| 14:42 | And if you've got a head that has become soft in any particular area, then essentially no amount of machining is going to rescue that. |
| 14:50 | We'd actually need to either replace the head or in some very very limited circumstances, we may look at having the head re heat treated. |
| 14:58 | That's an incredibly time consuming and relatively expensive process that we'd only be applying if we've got a very special head that we can't locate a replacement for. |
| 15:08 | If maybe it's had a huge amount of money poured into porting and other modifications on it. |
| 15:14 | I just wanna talk as well about reusing an MLS gasket because there is a little bit of misinformation out there about this as well. |
| 15:23 | So with our MLS gaskets, because they are simply a multi layer steel gasket, there's nothing that's actually going to wear when it's being used. |
| 15:36 | So it is possible to reuse an MLS gasket. |
| 15:40 | I personally don't recommend it. |
| 15:42 | Particularly not if you're dealing with anything that is high power. |
| 15:46 | But if you're in an absolute pinch, then yes it can be done. |
| 15:49 | There are a few considerations though, if you are going to reuse an MLS gasket. |
| 15:55 | First of all when we remove the gasket, once it's been heat cylced, we're going to find that this black Viton coating is going to stick in some places to the block surface, and in other places it's likely to stick to the cylinder head surface. |
| 16:11 | So that's going to leave us with a patchy finish to our head gasket and because that Viton coating is generally somewhere in the region of about a thousandth of an inch, we're going to end up with a gasket that's essentially not a consistent thickness. |
| 16:26 | So in order to correct this, my own personal approach to doing so, is to use something like a green scotch brite here that I've got and we can simply use this to remove the remaining Viton coating from our gasket. |
| 16:40 | So we wanna clean all of that back on both surfaces until we've got a clean metal head gasket. |
| 16:48 | Now in that situation though our head gasket is now not going to seal as well as it did when we had that Viton coating on it. |
| 16:56 | So what we want to do is actually use a product which is a copper head gasket sealant. |
| 17:03 | Now I don't have a can of it with me, but if we can just jump across so my laptop screen for a moment, this is a product that I've used locally, it's a VHT product called copper gasket cement. |
| 17:17 | And it's a really simple product to use. |
| 17:18 | All we do is we take the gasket and we spray a couple of light coats on both sides of the gasket and allow it to dry. |
| 17:26 | And again if we just, oh no, that's the same thing. |
| 17:31 | I've lost the photo that I was going to show you. |
| 17:33 | However once we've got our head gasket coated, it's going to just have a bright copper appearance. |
| 17:40 | So it's important if you are using a product like that, to make sure that you apply a light coat. |
| 17:46 | If you apply the copper spray too vigorously, you're going to end up with runs on it, just like any spray paint. |
| 17:54 | And we want to make sure that we build up a consistent thickness. |
| 17:57 | What is going to happen though is that once that head has been torqued down, we're going to end up when the engine heat cycles, with that copper basically melting and helping to seal the gasket. |
| 18:09 | So I have used that technique and it's worked well for me in a pinch. |
| 18:13 | As I'd say, really with the cost of MLS gaskets these days continuing to drop, for the best possible results, if in doubt, I would always recommend that you start with a replacement gasket. |
| 18:27 | Just because we've talked about that copper cement there, that copper head gasket cement, another question we quite often get asked is should we be applying that copper head gasket cement to a brand new gasket? So before we install our gasket with our Viton coating, should we also be using the copper head gasket cement? My opinion on that is no, it is absolutely not necessary. |
| 18:49 | And in this case if we've got a good quality gasket with a Viton coating, you're actually likely to end up with a detrimental result. |
| 18:58 | It's actually likely to take away from the gasket's ability to seal. |
| 19:02 | So I've tried personally through our drag racing program with the 4G63 engine, both using MLS gaskets with and without the copper cement, and I always ended up getting better results without using that copper gasket cement. |
| 19:16 | The other added bonus is when it comes to stripping and disassembling the engine, if you've run an engine with that copper cement, it does tend to be quite messy to remove. |
| 19:26 | So not using that speeds up the process of cleaning everything down ready for reassembly. |
| 19:32 | OK we are going to move into questions and answers really shortly so if you've got any questions there anything I've talked about or anything relating to today's topic, please ask those in the comments and in the chat and I will address those shortly. |
| 19:45 | So what I want to do is just go through a step by step process here, we're going to jump ahead with a few bits, but we're going to look at the process of installing these components on our Honda B18C, and I'm going to provide you with a step by step process that you can follow. |
| 20:01 | So as we've talked about, the very first step really comes into the machining aspect, what we want to do is make sure that that surface finish is correct. |
| 20:09 | We wanna make sure it's flat, and if it isn't we want to make sure it's being machined. |
| 20:13 | It's always a good idea as well, even when we get our components back from our engine machine shop, to spend a little bit of time and carefully inspect the surface finish for any defects. |
| 20:26 | So we wanna inspect both the cylinder head as well as the engine block. |
| 20:30 | Just make sure that nothing's been dropped on it, there's no indents, there's no dents that could end up catching us out later if we don't spy them. |
| 20:39 | And it's always going to be a lot easier to get these corrected when the engine block's still bare. |
| 20:45 | There's nothing worse than finding a mark on the deck surface of the engine block, right at the end of the assembly process where you're just about to fit the cylinder head for the final time, you've got your crankshaft, your full rotating assembly in there. |
| 20:58 | The other problem with that is, then when did it happen? Was this something that the machinist has done, has it happened in transport, or is it something that you've accidentally done? Maybe you've dropped a tool on that deck surface of the block while you've been working on it and you just haven't noticed. |
| 21:12 | So if we catch that right at the very start, when we're unwrapping those components, we can get straight on the phone to our engine machine shop and get it rectified. |
| 21:20 | So that's always the first place we want to start. |
| 21:23 | Of course as I've mentioned you'll also want to make sure that we have the correct RA finish for our gasket that we're using. |
| 21:31 | Now another aspect here that I'm quite keen on doing as well with both the cylinder block as well as the deck surface of the head, I wanna try and show you this on our cylinder head, so can we jump across to our iPhone camera here. |
| 21:48 | So what you're going to find, see if we can get that stable there, what you're going to find is that when some material is removed from this deck surface of the block, we're going to end up with little burrs that occur around all of these holes, in this case we're looking at holes for our water jacket. |
| 22:04 | You're gonna get exactly the same thing happening, sometimes around the holes for our head bolts, and any holes for our oil galleries as well or our oil feed holes. |
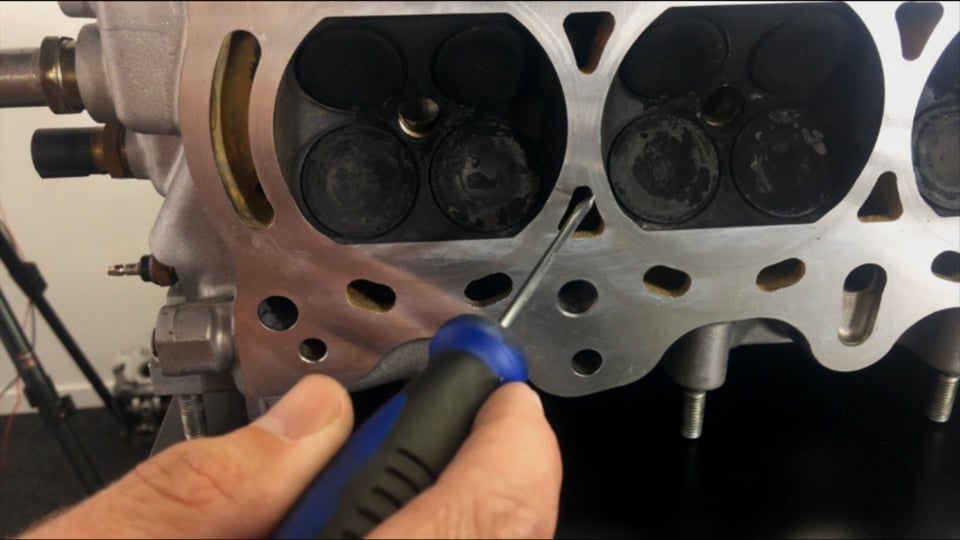
| 22:15 | So what I like to do is just use a deburring tool, you can use a small die grinder, even a small needle file, and I just like to take any sharp edges off those areas. |
| 22:28 | So this just ensures that in operation if there's any little sharp pieces of aluminium, they're not going to break off and risk going through our engine so it only takes a few minutes to go through and deburr all of those. |
| 22:40 | Obviously we're also going to want to blow out all of those components with compressed air, and make sure that they are absolutely clean. |
| 22:47 | But we do want to do that before we go assembling anything. |
| 22:50 | So the same goes for our engine block, if that has been decked you're going to get exactly that same scenario in all of the water jacket oil gallery holes, oil drain holes et cetera. |
| 23:01 | So I use a combination of a small die grinder, I've got a small Dremel die grinder that I use with a carbide burr. |
| 23:10 | The other thing that I quite often use is just a metal working deburring tool to run around any of the round holes on that surface. |
| 23:18 | So once we've gone through that, again we need to go through a thorough cleaning process. |
| 23:22 | So once we've got our components ready there, we want to also next check our head gasket is correct. |
| 23:31 | So we've already talked about this, we want to make sure that we have the correct gasket for our application. |
| 23:37 | That should go without saying but there are a lot of subtle differences between gaskets. |
| 23:43 | Particularly if you're dealing with a v configuration engine you wanna make sure that you have the right gasket for each bank of cylinders. |
| 23:50 | And we also want to make sure that the thickness of that gasket is correct. |
| 23:54 | So once we've got all of that done, we're ready to assemble our parts. |
| 23:57 | What we're going to do then is go through and thoroughly clean all of the components. |
| 24:02 | So this is just making sure, this is a final assembly clean before our cylinder head is dropped into place. |
| 24:09 | And what I'm going to do for this, I'm just using a can of brake clean here and a clean rag. |
| 24:15 | And what we can do is just spray down the deck surface of the cylinder head here and just wipe that down with our clean rag. |
| 24:24 | So this will make sure that we're removing any oil, any grease, any dirt, or any imperfections that are likely to end up causing us drama once our head is bolted in place. |
| 24:35 | We're also going to go through exactly that same process, obviously with our engine block. |
| 24:42 | So we wanna make sure that there is not a speck of dirt, dust, anything on those components that could affect our head gasket seal. |
| 24:50 | Once we've done that as well on our engine block, we're going to install our head studs. |
| 24:55 | So in this case, and this will be the case for most performance builds, we have replaced the stock head bolts from our B18C with a set of ARP head studs. |
| 25:06 | One of the common mistakes I see people make with head studs is that they believe that they need to be torqued into place in the engine block and a lot of engine builders will actually install them with Loctite. |
| 25:19 | That's simply not necessary. |
| 25:21 | if you follow ARP's instructions to the letter, you're gonna find that all you need to do with those components is make sure that they are installed just a little bit past finger tight. |
| 25:30 | So I just use an allen key in the end of the stud just to make sure that they're tightened into place. |
| 25:37 | Alright what we'll do is we'll swap across to our remote camera here and there's another couple of aspects, hopefully you'll be able to see here. |
| 25:44 | With our engine block we are also going to have locating dowels that serve the task of locating a head gasket, and also they locate the cylinder head positively down onto the engine block. |
| 26:02 | So we need to make sure that these are installed, are in location. |
| 26:05 | Once we've done that, what we can do is finally take our head gasket and we can install it in place. |
| 26:12 | Now this again should be really really straightforward but the number of times I've seen people install head gaskets the wrong orientation is quite surprising. |
| 26:23 | So we wanna be really really careful and make sure that the head gasket is installed around the correct way and also up the right way. |
| 26:31 | Now again if we can just swap to our remote camera here. |
| 26:35 | It's a little hard to see. |
| 26:38 | We've got a marking on this MLS gasket that says up. |
| 26:42 | So we know what way is up, that's half the battle won right there. |
| 26:47 | And in this case once we've got our head gasket up the right way, we actually can't install it in the wrong orientation because we have larger cutouts, larger holes, where the head gasket will slip down over the dowels. |
| 27:00 | So with that in mind, I'm just gonna take our head gasket, and we're going to drop that down, and I'm just going to make sure that it locates nicely over those dowels. |
| 27:10 | So those dowels set the purpose there of ensuring that our head gasket is going to stay in place, it's not going to move around. |
| 27:16 | So we've got all of our components clean and ready to go, now what we can do is take our cylinder head and drop that into location. |
| 27:23 | Now it's always a good idea here if you use a helper, particularly with a cylinder head that's a little bit heavy. |
| 27:30 | In this case I'm gonna struggle by and do it on my own for the purposes of this webinar. |
| 27:36 | And what we want to do is be really careful when we are locating this. |
| 27:40 | One of the common mistakes is to end up getting our cylinder head hung up on one of these head studs. |
| 27:46 | So what I tend to do here, again it's easier if we're using two people. |
| 27:49 | But I'll actually be looking down through the head stud holes in the cylinder head and aligning one end initially with a head stud. |
| 27:58 | Once I've got that started, once I've got it dropped down just into location, then we can move to the other end of the head and do exactly the same. |
| 28:05 | So I'm just going to follow that procedure now. |
| 28:08 | I'll just take our B18C cylinder head. |
| 28:12 | And I'm just getting this far end here into location. |
| 28:19 | And once we've done that, we can just gently drop that head down. |
| 28:22 | Now it's also important to make sure that our head does drop down nicely onto our dowels. |
| 28:28 | So that's exactly what's happened there, we've just dropped that down into location. |
| 28:32 | So comfortable with how everything's sitting. |
| 28:34 | The procedure from here really is to install all of our ARP fastener washesr and also our nuts. |
| 28:46 | So in this case to get the best results, what you want to do is follow ARP's instructions. |
| 28:51 | In particular what we're going to be doing, is using the ARP assembly lubricant which comes with these fasteners. |
| 28:58 | We want to make sure we are using the correct lubricant. |
| 29:01 | Quite a lot of engine builders that are more used to building factory engines, they will be familiar with using normal, just normal grade engine oil during the assembly of their engines. |
| 29:13 | And if you use normal motor oil when you're assembling these ARP fasteners, you're not going to get the correct torque out of them, you're not gonna get the correct clamp load. |
| 29:22 | So what we wanna do is make sure that all of our washers are coated very lightly on both sides with that ARP lube. |
| 29:30 | I'm not going to do this for the purpose of this demonstration, just know that that does need to be done. |
| 29:35 | And I'm just going to use a small flat blade screwdriver here to just drop these down into location over the studs. |
| 29:43 | It can get a little bit tricky when you're dealing with some engines where the studs are really recessed down into the cylinder head. |
| 29:53 | It can be a little bit tricky to get to them, and in some instances we may actually find that we need to install the washers before we drop the cylinder head into place. |
| 30:03 | What we'll find with some instances particularly if we're dealing with an engine where we've fitted larger head studs to the engine, we can find there's actually not enough room to get the washers into place. |
| 30:17 | So this comes down to a little bit of experience with your particular engine. |
| 30:21 | In this case everything's relatively straightforward. |
| 30:24 | So we'll just drop down our last two washers. |
| 30:28 | And we'll be able to get the nuts into location as well. |
| 30:32 | So again with the nuts, just like the washers, it's important to apply a small amount of the ARP moly lubricant to the underside of the nut as well as to the threads of the nut. |
| 30:44 | Following that, all I'm doing here is using a half inch socket, these have to be a multi point socket, and then we can just drop these down into location and just screw them down. |
| 30:55 | At the moment all I'm doing is tightening these down by hand. |
| 30:59 | So we'll go through that process and basically install all of those. |
| 31:02 | I'm not gonna go through and do all of those now, it's just a repeat of the process that we've just looked at. |
| 31:08 | But the important point here is that in our ARP stud kit we're going to have a little information sheet that'll tell us exactly what torque setting we're going to use to tighten these down. |
| 31:22 | And in this case at the bottom here we have three equal steps to 80 foot pound. |
| 31:28 | So that's the torque that we're going to apply to our fasteners. |
| 31:33 | Now the part that's often overlooked though is it's not just the torque that's important, we also need to torque these down in the correct order. |
| 31:41 | So if we can just jump across to my laptop screen for a minute. |
| 31:48 | So this comes from the factory workshop manual, and it gives us the order that we're going to go through and torque the cylinder head down. |
| 31:54 | So we can see that we start with one and then jump across to two. |
| 31:58 | So we're actually starting from the middle and then we're working our way outwards diagonally from the middle and this just helps pull the cylinder head down nice and evenly without distorting the head. |
| 32:10 | So it's ensuring again we're just getting the best possible chance of our cylinder head sealing. |
| 32:17 | So once we've gone through the three stages there, we've got our cylinder head torqued down, job's complete and we're good to go. |
| 32:25 | Now with an MLS gasket, another common question we get asked is do we need to retorque the gasket? With an MLS gasket unless the manufacturer specifically requests you to do so, it isn't required. |
| 32:39 | Unlike a lot of the composite style OE gaskets where you will actually have the retorque the cylinder head after the gasket has been heat cycled a couple of times. |
| 32:48 | What we find is that the gasket does tend to compress in use a little bit and we need to retorque the head in order to achieve the correct amount of clamping on that gasket. |
| 32:59 | Alright so let's just jump across and we'll have a look at some questions now. |
| 33:04 | Again if you do have any more, please ask them and I'll do my best to answer them. |
| 33:11 | Martin asks, MLS tell me to put the MLS gasket dry with a Viton coating, do you think the copper Loctite spray? I'm hoping there that you guys have asked that question, there's a few of them there actually, Motor Ray's asked, or Hylomar head gasket, and HS Engineering's asked about, what about gasket shellac? So hopefully I've already answered that question for you. |
| 33:32 | No with the MLS gasket, definitely we want to be installing that dry, allow that Viton coating to do its job. |
| 33:39 | However as I've already discussed, if you are going to go through the process of reusing an MLS gasket, I've explained what you need to do there. |
| 33:48 | The only product I have used for that is that copper spray that I've talked about. |
| 33:54 | And I tend to be probably a lot like most performance engine builders, a little bit sceptical, once I've tried a product, I know that its worked for my application, unless there's very good reason for me to try something else, I tend to stick to what I know works. |
| 34:10 | So Hylomar I know that is a product that other people have used, it's not one that I've personally tried. |
| 34:20 | Taz has asked, can you reuse a head gasket, I got distracted by my snack when I mentioned it. |
| 34:27 | OK so again no, well yes you can reuse an MLS gasket, you cannot reuse a composite gasket. |
| 34:34 | When you remove the composite gasket, parts of that composite gasket are gonna end up staying stuck to the engine block or the cylinder head so definitely can't reuse that. |
| 34:42 | MLS gaskets, it is possible, certainly in a performance application, I wouldn't recommend it. |
| 34:49 | Saijin has asked, if you're using a new single layer MLS gasket, which layer from a normal three layer would you use? And even though it's new in this circumstance would you still not use a copper spray? Not quite sure what you're getting at there Saijin. |
| 35:04 | Pretty much in its name it implies what it is, it's a multi layer steel gasket, so yeah you're not using one single layer of the gasket. |
| 35:14 | I'm not quite sure where you were actually going with that question, sorry if I can't answer that. |
| 35:19 | Craig has asked, the Viton copper cement is to take up the imperfections in the block head. |
| 35:24 | Does it perform any other task? So it does help to seal the oil and water as well. |
| 35:31 | So that's I guess the other task of that. |
| 35:34 | While, again this isn't really a subject of today's webinar, I've mentioned the other webinar we ran on head sealing techniques. |
| 35:42 | One of the common ones on very high performance drag engines, this is common on top alcohol, top fuel, for example is the use of a copper head gasket. |
| 35:51 | So this is just a solid piece of copper. |
| 35:54 | And the problem with those type of gaskets is that they can do a really good job of sealing combustion pressure, but they do an absolutely terrible job of sealing oil and water. |
| 36:04 | So a product such as the copper spray can help actually improve the ability of those gaskets to seal oil and water. |
| 36:13 | Although when you are using copper gaskets there are other products. |
| 36:16 | There's a Loctite product that is recommended for that particular application. |
| 36:20 | Evo Auto's asked how thick should the head gasket be when o ringing the head only? There isn't a specific thickness that it must be. |
| 36:28 | In my own experience with the 4G63, the gasket that I used and sort of tended to stick to was the HKS stopper type gasket, those were 1.2 millimetres thick. |
| 36:40 | Obviously though if you are using an o ring with a certain amount of protrusion, if you're using a very very thin gasket, then that gasket's not going to be able to I guess deform with that protrusion and you're likely to end up causing problems. |
| 36:55 | So yeah that's, the 1.2 millimetre gasket I found worked really well with a stainless o ring and around about seven thou protrusion in the 4G63 block. |
| 37:07 | D Mutton's asked, do you use three taps before installing the head studs to get the maximum depth of the threads for the new stud bolts. |
| 37:14 | Sometimes it gives an additional couple of threads per bolt. |
| 37:20 | So in the process of cleaning out the threads, really it is an essential part of the cylinder block preparation, once we get the block back from being machined. |
| 37:35 | And yes definitely chasing out the threads is an important aspect. |
| 37:39 | So to do that there are actually special thread cleaning taps that you can purchase. |
| 37:45 | I've never personally bothered. |
| 37:46 | What I prefer to use is a bottoming tap. |
| 37:49 | I think this might be where you were going with the three taps. |
| 37:53 | You can get a starter tap, and intermediate tap, and a bottoming tap. |
| 37:56 | In this case because we have good threads already in the block we don't need a starter tap, and the bottoming tap will allow us to thread all the way down to the very bottom of the holes in the block. |
| 38:09 | And you'll be surprised even with a brand new engine block, exactly how much crud and crap comes out of there. |
| 38:16 | So definitely worthwhile. |
| 38:21 | Saijin has asked, a lot of people use a single layer gasket to get a thinner gasket, taking apart a three layer gasket to accomplish this. |
| 38:27 | Spoon head gaskets are basically OEM Honda gaskets with only the top and bottom layers. |
| 38:32 | So they're two layer instead of milling the head. |
| 38:34 | Yeah OK sorry so this is just to carry on from Saijin's earlier question. |
| 38:39 | Yeah so that would be a viable aspect there. |
| 38:41 | One layer I just, it's not going to allow the gasket to do its job there. |
| 38:48 | And probably my preference there, so it's going to depend on your particular application. |
| 38:53 | So if you're really fighting to try and get a specific compression ratio then obviously reducing the thickness of the head gasket is one way. |
| 39:02 | I would prefer to be purchasing a gasket that is manufactured to my required thickness rather than disassembling an MLS gasket and only using some of the layers. |
| 39:16 | Problem with this is that a factory or aftermarket MLS gasket is generally built and designed to work with all of the layers that the manufacturer supplied. |
| 39:26 | Some of them such as the HKS stopper type, also you'll find that the internal layers of that MLS gasket actually are crimped together to form firing ring around the combustion chamber. |
| 39:36 | So yeah I can't say that in most instances, removing layers from an MLS gasket is going to be a very good idea. |
| 39:44 | Then also if you really need to make adjustments to your compression ratio, there are other ways of doing this, such as milling the head, such as milling the block, et cetera to get exactly the piston to cylinder head clearance that you're requiring. |
| 39:56 | Project D has asked, any thoughts on cutting copper head gaskets for forced induction? Cut ring copper head gaskets for forced induction. |
| 40:05 | Seems like a cut ring setup would cost less than an MLS for a similar result due to the extra MLS prep cost and hassle. |
| 40:13 | OK so copper head gaskets, this is something that I have used myself in the past, and the problem with them is that yes, while they're a really cheap gasket, they, as I've mentioned just earlier, they do a really really poor job of sealing oil and water. |
| 40:29 | So they're great on a dry deck drag racing engine where there is no water passing through the head gasket. |
| 40:36 | But particularly for a street application, they can be problematic. |
| 40:40 | There are a couple of manufacturers out there that have tried to deal with this by embossing the copper gasket with a Viton material, rubber material that seals around the oil and water jackets. |
| 40:53 | I haven't personally seen too much success with those gaskets in my own endeavors. |
| 40:59 | So again it's sort of, I've stuck to what I've found works. |
| 41:05 | Paul Andrew has asked, is an o ring better? When we're talking about o rings this really goes a little bit beyond the topic today. |
| 41:13 | So again this is something we dealt with in detail in our cylinder head sealing techniques webinar. |
| 41:19 | It's not a case of is it better, it's a case of is it going to be necessary. |
| 41:24 | So o ringing an engine does require quite a bit of work both in costs in machining, as well as the process of actually making up our o rings and assembling everything. |
| 41:35 | So if it's not necessary then certainly it's not something that we'd want to do. |
| 41:40 | Also what you're going to end up doing is permanently damaging the engine block, or the cylinder head, whatever component has that o ring installed. |
| 41:48 | So that's something to consider, it's not something we're going to be able to remove at a later point and revert to stock. |
| 41:54 | So it's a permanent modification that we are making. |
| 41:56 | And then lastly as well, we do need to consider that if that o ring is incorrectly made, incorrectly specified, or incorrectly installed, we can end up with a much worse situation. |
| 42:07 | That being said, if we are looking at very high boost pressure levels and we know that an MLS gasket on its own has been proven in the past on our application to not be effective, then we may have no option but to go down the path of o rings. |


