167 | How To Read a Micrometer
Summary
If you want to be able to thoroughly check all of the clearances inside your engine, you’re going to need to understand how to properly use and read a micrometer. In this webinar we’ll discuss the types of micrometer available, and we’ll show you how to correctly use and read a vernier micrometer.
| 00:00 | - Guys it's Andre from High Performance Academy, welcome along to today's webinar. |
| 00:03 | Now in today's webinar we're going to be looking at one of the most important tools that you're going to need to use if you're going to be rebuilding engines. |
| 00:12 | And that is a micrometer. |
| 00:15 | A tool that is essential for getting really accurate measurements on all the components that are going into and engine. |
| 00:22 | Now when it comes to micrometers though, they do cause a little bit of fear for novice engine builders. |
| 00:27 | And a lot of novice engine builders shy away from using a micrometer simply because they're not 100% confident or familiar with the process of using the micrometer. |
| 00:37 | And in this webinar we're gonna hope to break down some of those barriers, get rid of some of that fear and show that the micrometer's a relatively simple device. |
| 00:46 | And it is a device that can be used relatively easily as long as you know the correct techniques for reading the micrometer. |
| 00:55 | Now I want to just mention as well with micrometers, we see a lot of novice engine builders tend to prefer to use digital micrometers. |
| 01:04 | And that makes it really easy because obviously you've got a digital readout showing you the exact measurement that the micrometer has made. |
| 01:12 | Now that's great, however when it comes to using micrometers for the purposes of engine building, we are going to be measuring a wide range of products or components and we're not going to be able to get away with a single micrometer. |
| 01:26 | So for example I've got a set of micrometers sitting on the bench here and these range between zero through to six inches. |
| 01:35 | So each of the micrometers in this set will only measure a range of one inch. |
| 01:40 | So of course in order to be able to measure all of the components that we're going to be using in our engines, we're going to need more than one micrometer, that's why I've got this set here. |
| 01:51 | Now if you are going to be using a digital micrometer, there's nothing wrong with that, they really are a great device for those who struggle with a normal vernier micrometer, you're going to need multiple digital micrometers as well and since the digital micrometer is typically much more expensive than a normal vernier micrometer, you're going to end up paying a lot more money for a full set of these. |
| 02:16 | So for example, we'll just talk as well about the pricings, I have raised this. |
| 02:20 | The set of micrometers that I am using here is a relatively cheap set that's sourced out of China. |
| 02:26 | And there's obviously some pros and cons with the cheaper equipment coming out of China. |
| 02:31 | We do see a lot of terrible quality product coming out of China and these days we are however finding that some of these micrometer sets actually do a really good job, even at a relatively low price point. |
| 02:46 | So for example this set which was sourced from JEGS in the USA, is around about USD$300. |
| 02:53 | If we were looking at a high quality name brand micrometer set from the likes of Mitutoyo, instead of USD$300, we're probably more likely to be in the range of maybe USD$800-1000 So there is a significant cost saving here. |
| 03:08 | Although I do need to sort of warn you obviously, there is quite a lot of variability in the products coming out of China. |
| 03:18 | This particular set that we sourced from JEGS, I've found to be really excellent. |
| 03:22 | It matches the higher quality micrometers quite easily. |
| 03:28 | So it is a set that I'm quite comfortable with using. |
| 03:33 | Now when it comes to selecting micrometers as well, you do need to make a relatively important decision early on, and that is whether you're going to be using an imperial or metric micrometer set. |
| 03:45 | So when we're purchasing the micrometer we need to decide this. |
| 03:49 | We don't find micrometer sets that will work in both metric and imperial, unless of course we are using a digital micrometer, relatively easy to swap units on that sort of micrometer. |
| 03:58 | But if you're using a normal vernier micrometer, then we will need to decide. |
| 04:05 | Now in this instance it is a little bit tough, even coming from New Zealand here, where we do favour the metric system, when we are building performance engines, often we're going to be dealing with components that are sourced out of the USA. |
| 04:19 | And since the USA favours the imperial system, at some point, regardless whether we live in a country where the metric system rules, you are going to need to be able to measure and use the imperial, measure in and use the imperial system. |
| 04:33 | Relatively easy if you just keep in mind that there are 25.4 millimetres in one inch. |
| 04:40 | But it is something we're going to need to decide when we're purchasing micrometers, and in this case we have got an imperial micrometer set here. |
| 04:49 | So everything that I'm going to talk about from here on in, we're going to talk in imperial units. |
| 04:55 | OK so with that out of the way we'll now talk about the various parts of our micrometer. |
| 05:01 | So let's just switch to our iPhone camera here. |
| 05:07 | And I'll just point out the various components that we have here. |
| 05:11 | So this particular micrometer we can see is a two to three inch micrometer. |
| 05:15 | You can also see that it will measure down to four decimal places, 0.0001 of an inch, or 1/10000th of an inch. |
| 05:25 | We'll just flip it back around again. |
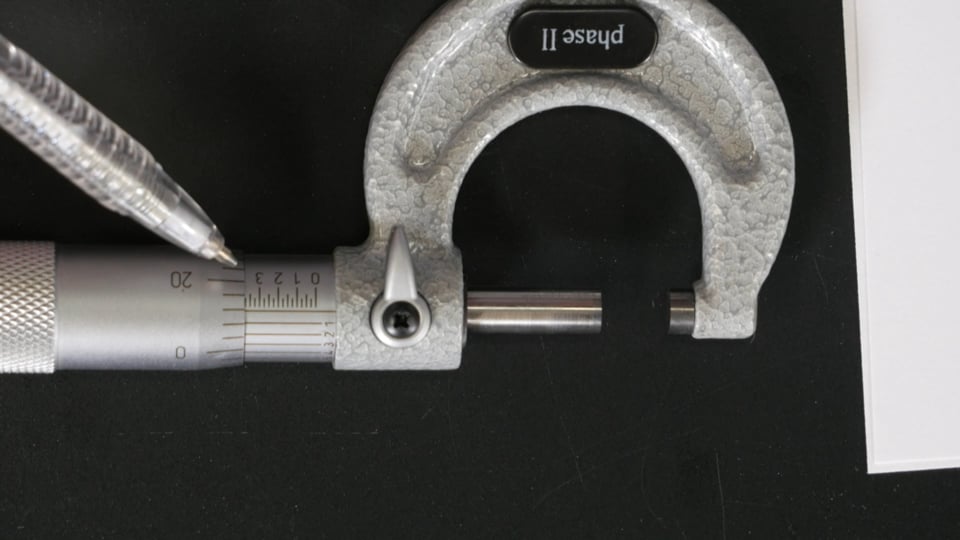
| 05:27 | OK so the important components of our micrometer, we have the frame which physically holds the micrometer. |
| 05:32 | We've also got this little plastic button here which ultimately or ideally is the location we should be holding the micrometer from. |
| 05:40 | And that will reduce or limit the heat transfer from our hands into the frame of the micrometer. |
| 05:47 | Which, if you're wanting to get down to the absolute accuracy you can, then that can affect the measurement you're going to be reading. |
| 05:55 | Now we have at one end here we've got our anvil of our micrometer. |
| 06:00 | And at the other end we have out spindle. |
| 06:02 | So those are the two components which we're going to be placing the product we want to measure between. |
| 06:08 | And that's what we're going to close up in order to measure the product or component that we are measuring. |
| 06:18 | If we move down we also have, I'll just open this up a little bit here. |
| 06:22 | We have our sleeve here which has our measurement markings on it. |
| 06:28 | The component that I was just turning there is referred to as the thimble, and at the very end we have what's referred to as a ratchet stop. |
| 06:37 | And the ratchet stop allows us to achieve consistency when we're tightening the micrometer down on whatever component we are trying to measure. |
| 06:47 | And in particular it helps avoid inconsistency between different operators using the micrometer. |
| 06:54 | If we aren't using the ratchet stop on a micrometer then depending on exactly how hard we tighten the micrometer down on the component we're measuring, that will affect our ultimate reading from the mic. |
| 07:07 | I should've mentioned at the start of this webinar as well, as with all of our webinars we will be having a section for questions and answers at the end. |
| 07:14 | So if there's anything that I discuss here during the webinar that you would like me to talk about in more detail, please ask that in the comments and in the chat and the guys will transfer those through to me. |
| 07:26 | So those are the basic components of our micrometer, oh actually one more that I should've mentioned here, if we just jump back to our other camera. |
| 07:32 | We also have a little locking stop here. |
| 07:35 | So once we've made our measurement we can actually lock the micrometer off which will prevent it turning, and this allows us to actually take our reading on the micrometer without any chance of the micrometer moving and affecting the accuracy of the actual reading. |
| 07:51 | OK so that's the components, that's relatively simple and straightforward. |
| 07:55 | Now we need to understand what each of the markings mean, and this is really the key to understanding how to read our micrometer. |
| 08:04 | Let me just set up on our overhead camera here and I'll try and explain these readings on our overhead camera. |
| 08:14 | OK so there are a range of readings on our micrometer. |
| 08:17 | First of all the markings on our thimble go from zero, which hopefully we can just see in the screen there, through to, if we turn this right around, there are 25 marks on our thimble. |
| 08:32 | So when we turn the thimble through one full rotation, that is the equivalent of 25 thousandths of an inch. |
| 08:39 | So each of these individual marks on the thimble here represents 1/1000th of an inch or 0.001 of an inch. |
| 08:50 | We've also got some marks along the sleeve which we can see here. |
| 08:54 | Now each of these individual increments, represents 25 thousands of an inch. |
| 08:59 | So in other words every time we turn our thimble one full revolution we're going to reveal one more of these little increments on the sleeve of our micrometer. |
| 09:11 | Now every time we go past four of these increments, we can see we have a number shown here, so if we increment by 4/25000ths of an inch, that's the same as 1/10th of an inch. |
| 09:24 | So this is the key to understanding how the micrometer works. |
| 09:27 | And we're gonna go through a practical demonstration of using it which hopefully is going to really cement exactly how this works. |
| 09:34 | So what we're looking at is how many of these increments have been exposed at the point that we are taking our measurement. |
| 09:41 | Lastly, and we'll just swap to our phone camera here for a moment, we have the vernier scale, which is what we can see along the top of the micrometer here. |
| 09:53 | And this is used to give us our fourth decimal place or our 1/10000th of an inch measurement. |
| 10:00 | So again if we understand how the micrometer works, what all those markings on the micrometer mean, then it's possible to do a very very good job of measuring really really accurately the components that we're interested in. |
| 10:14 | OK so we're gonna through and see how we can actually use the micrometer. |
| 10:19 | There are a couple of things that we need to keep in mind before we even start using our micrometer to take a measurement. |
| 10:26 | One of the first things is that we want to make sure that the anvil and the spindle are clean. |
| 10:33 | So any debris, any oil, any contaminants on those components will have the potential to affect the accuracy of our reading. |
| 10:42 | So my preference here, I'm just going to use a brake clean product and a clean lint free rag and just make sure that there's no debris on the measurement surfaces. |
| 10:57 | Now the next thing we can do as well is we can check the zero point on our micrometer, or we can check the calibration. |
| 11:04 | So in this particular instance I'm using a two to three inch micrometer, and we'll find that our micrometer sets come with little bars which we can use to check the zero point on our micrometer. |
| 11:15 | So in this case I've got a two inch bar here. |
| 11:17 | What I'm going to do is just locate this between the anvil and the spindle and we'll just tighten the micrometer down. |
| 11:26 | So initially I'm just using the thimble here to tighten it down. |
| 11:30 | Once I get close though, I'm swapping across to the ratchet stop here. |
| 11:34 | And this again just allows me to apply a relatively consistent amount of force when I'm tightening the micrometer down. |
| 11:45 | So that allows me to get consistency. |
| 11:47 | It's also important when we're measuring any component to just gently rock the component we're measuring backwards and forwards between the anvil and the spindle just to make sure that we do have it sitting nice and square. |
| 11:59 | Once we've got that measured we can lock the micrometer. |
| 12:02 | I'm just going to remove the little measuring bar there. |
| 12:05 | And now what we can do is we can check the zero point. |
| 12:08 | So again we'll just zoom in here on our phone camera. |
| 12:14 | And what we're looking for, when this is sitting on zero we should see our zero line align directly here. |
| 12:22 | So at the moment we can see that this micrometer is not correctly zeroed. |
| 12:27 | So we can actually adjust the zero point here, we can adjust this to get it correct. |
| 12:33 | And what we'll find is our micrometer does have a little hole in the back of the sleeve here that we can locate this little tool that comes with the set and what we can do, I'll try and do this on screen. |
| 12:49 | We can just gently adjust this until our zero point is correct. |
| 12:56 | So it's something we want to do before we actually start taking any measurements. |
| 13:00 | We wanna actually make sure that the micrometer is correctly zeroed. |
| 13:05 | Without the micrometer correctly zeroed we're basically wasting our time, we're going to end up getting a garbage measurement. |
| 13:12 | One of the most common problems I see with people using micrometers is not checking this and relying on the data. |
| 13:20 | That's just as bad as not understanding how to use the micrometer in the first place, and incorrectly reading the measurement marks. |
| 13:28 | OK so what we're going to do now is go through and take two measurements just to show you how the micrometer does work. |
| 13:37 | The first component we're going to measure is the skirt diameter of a JE forged piston. |
| 13:44 | Probably one of the common uses we would have our micrometer set for in the first place. |
| 13:50 | Now when it comes to measuring the piston skirt diameter it's really important to make sure that we are measuring the piston skirt at the correct point. |
| 13:58 | And what I mean by this is the piston skirt is actually not parallel, even though it may look like it is. |
| 14:05 | There's a slight barrel shape to the piston skirt. |
| 14:08 | So if we measure the piston skirt right at the very base of the skirt or right at the top near to the oil control ring, we're going to end up with different measurements. |
| 14:19 | OK so in this instance we need to understand what the piston manufacturer has asked for. |
| 14:24 | So let's just jump across to our phone camera again. |
| 14:29 | And this is the specification sheet that comes with the JE forged pistons. |
| 14:33 | What we can see here is that our measurement point is seven millimetres or 0.275 of an inch from the base of the skirt. |
| 14:43 | So once we know that, we know where we're actually going to be taking our measurement. |
| 14:48 | OK so in this instance it is quite helpful if we go to the trouble of actually putting a couple of little vivid marks or whiteboard marker marks on our piston skirt just so we can really accurately align our micrometer. |
| 15:05 | And what we can do now is just line our micrometer onto our piston skirt and I'm just gently tightening that micrometer down and again once we've got it tightened down we also want to just really gently rock that micrometer backwards and forwards, just confirming that we do in fact have the micrometer located at the largest point on that piston skirt. |
| 15:29 | Once we've done that we can remove the micrometer from the piston skirt. |
| 15:35 | And let's just have a look at the measurements that we've got here. |
| 15:39 | Actually what I'll do, we'll just swap this around for the moment. |
| 15:50 | OK so I'm gonna do two things here, I'm gonna talk about, actually I'm gonna have to swap that around, hopefully this isn't gonna be upside down for you guys at home, but that's alright we'll talk about the results we're looking at anyway. |
| 16:02 | OK so if we go to our overhead camera. |
| 16:05 | Now the first thing we want to do is we want to look at the number of increments that have been exposed here. |
| 16:14 | So what we're looking at here is we can see that we have our zero, our one, our two, our three, and our four. |
| 16:21 | So remember each of those represents a 10th of an inch. |
| 16:25 | Now we've actually gone slightly past our zero point here. |
| 16:29 | This is our reference here, we've gone slightly past our zero point here. |
| 16:32 | So we're actually slightly beyond 0.4 So the easiest way I find to do this and not make any mistakes is to write down exactly what each of the increments that we're looking at means. |
| 16:47 | So let's try this and I'll try and explain what I'm doing here. |
| 16:50 | So first of all we have a three to four inch micrometer. |
| 16:53 | So we know that we're already above three inch, so I'm just going to write 3.0000 because we're measuring to four decimal places. |
| 17:01 | So that's our very first measurement. |
| 17:03 | Then if we jump back to our overhead camera, we know that we are just beyond our 0.4 mark. |
| 17:10 | So we're 0.4 of an inch on that scale there, so let's just jump back and we'll add that in. |
| 17:16 | So our next one is 0.4000 Now what we want to do is jump back to our overhead camera and we're going to look at our marks here on our thimble. |
| 17:29 | And we can see that we've gone past, remembering each of these individual marks represents 1000th of an inch. |
| 17:37 | So in this case we've just barely gone past our first mark, so we know that that represents 1000th of an inch. |
| 17:45 | Let's go and add that in. |
| 17:47 | So we're going to add that in, 0.0010 So that's our 1000th of an inch point. |
| 17:55 | And to get our fourth decimal place, what we want to do is have a look at our vernier scale. |
| 18:01 | So in order to do that, I'll flip this over and we'll have a look at this on our iPhone camera. |
| 18:06 | So with our vernier scale what we're trying to do is align the marks on our vernier scale, we're trying to find the mark that aligns closest. |
| 18:19 | I'm just trying to get this so we can actually see it. |
| 18:22 | Now in this case we are right on our 3/10000th of an inch mark. |
| 18:31 | These ones here, hopefully there's no parallax error showing here, these ones actually align perfectly. |
| 18:37 | So we're 3/10000th of an inch. |
| 18:39 | So now what we'll do is we'll write that down. |
| 18:47 | OK so now the process now that we've looked at each of our individual measurements, we can simply go through and add these up. |
| 18:54 | So nothing too difficult here. |
| 19:00 | So the measurement that we just took with our micrometer is 3.4013 inch. |
| 19:07 | So that's as simple as it is and if we initially at least, while we're getting used to reading the micrometer, if we keep the habit of writing down each of the marks on a piece of paper, just like I've done in adding them up, it really does help avoid any chance of confusion creeping in and affecting our actual measurement. |
| 19:28 | OK so we've looked at making one measurement there with our piston skirt. |
| 19:33 | What we'll do is we'll just put the piston off to the side there and we're going to go ahead and make one more measurement just to hopefully really reinforce the process here. |
| 19:44 | OK so this time what we're going to do is we're just going to use our zero to one inch micrometer. |
| 19:51 | And we're going to use this to measure the thickness of a piece of aluminium bar. |
| 19:56 | Now I'll just mention here as well that while I have been using these micrometers in my hand, I've been holding them in my hand, it does get a little bit fiddly. |
| 20:05 | You can also purchase micrometer stands or alternatively you can lightly lock a micrometer into a chuck of a vice and this is going to help keep the micrometer stable, and it's also going to reduce any chance of heat being transferred into the micrometer frame while we're going to through and making our measurement. |
| 20:26 | Alright so what I'll do here is I'll just try and do this on our front camera here. |
| 20:36 | So I'm just going to bring the jaws open and just close them down gently. |
| 20:43 | And again just rocking the micrometer backwards and forwards just tightening the micrometer down until you can hear that ratchet stop clicking, and we'll lock that micrometer in place, and just remove it. |
| 20:57 | So again let's just locate this so we can see it with our overhead camera. |
| 21:13 | Alright so in this instance we've got a micrometer we know is going to measure between zero and one inch. |
| 21:22 | So the first thing we have here is that we can see that we've got the 3/10ths of an inch mark being exposed. |
| 21:31 | So that's gonna be our first thing that we're going to write down so let's write that one down here. |
| 21:37 | So we've got 0.3000, remember again we have four decimal places, so that's our first point there, we've got 3/10th of an inch being measured. |
| 21:45 | Now remember each of the additional increments that we can see here represent 25000ths of an inch. |
| 21:51 | So this is where we need to be a little bit careful. |
| 21:55 | At a casual glance it might look like we've got three of those increments exposed. |
| 22:01 | Now we actually haven't quite completely exposed that third increment. |
| 22:06 | That would happen once we get this zero mark around here to our reference. |
| 22:12 | So we've only exposed two of those full marks so remember they're each 25000th of an inch, two of them obviously would be 50000th of an inch. |
| 22:22 | So we can write that down on our piece of paper. |
| 22:27 | So that's 0.0500 of an inch. |
| 22:32 | So the reason we haven't fully exposed this third mark here, our third 25 thou mark which would have given us 75 thou instead of 50, is because we've only come around to, looks like 22 thou here. |
| 22:47 | So we've gone two marks past our 20 thou mark, so we've got 22 thou. |
| 22:53 | So we can now write that down as well, so 0.0220 Now our last mark that we need to look at of course is our vernier mark. |
| 23:05 | So again we'll do this on our front facing camera. |
| 23:07 | Now first of all what I want to do here, and I didn't really explain this before. |
| 23:12 | Before we look for our vernier mark, we can see, we want to just see how close we are to our two thou mark here. |
| 23:20 | And what we can hopefully see is we are just marginally past this. |
| 23:26 | So what this would mean to me straight away is I'm going to be looking at something that's fairly close to zero. |
| 23:31 | So we want to be looking in the first half of our vernier scale here. |
| 23:35 | And in this case we actually align really nicely here with our 1/10000th mark. |
| 23:42 | So if on the other hand, if I'd been looking at this and we were closer to our 23 thou mark which is up here, I'd be looking further round our vernier scale, maybe in the six, seven, eight, nine region. |
| 23:56 | So in this case we are 1/10000th of an inch, so again we can write that down. |
| 24:03 | 0.0001 of an inch. |
| 24:07 | And again we can now just go through the process of adding these up. |
| 24:11 | So we've got a one, we've got a two, we've got a seven, we've got a three. |
| 24:17 | So our actual measurement there on our piece of aluminium is 0.3721 of an inch. |
| 24:25 | So again as you can see, if you understand the process of using the micrometer, you understand how to read those markings, it's actually relatively quick and easy to do. |
| 24:35 | And it really is going to pay dividends if you go through the trouble of doing that because it's going to save you a lot money over needing to purchase perhaps three or four much more expensive digital vernier micrometers just so that you can have a nice digital number that's going to be easy for you to read. |
| 24:56 | Alright we'll jump into some questions now. |
| 24:58 | And if you do have any more questions, please ask them in the comments and the chat. |
| 25:09 | Yeoh has asked, micrometer from the likes of Mitutoyo are calibrated in a controlled environment of 20 degrees C, wouldn't using it in a non air conditioned room affect the accuracy of the reading? Yeah absolutely that is an aspect. |
| 25:21 | When we are making any measurements, we do need to take into account the temperature that we're going to be making our measurements in. |
| 25:29 | And that doesn't just go for our measuring equipment. |
| 25:32 | If we take for example that measurement that I just took with the aluminium piston, of course aluminium has a relatively high rate of expansion, or higher thermal expansion coefficient I should say, than the material that our micrometer is made from. |
| 25:49 | So not only are we going to potentially see the inaccuracies in our micrometer measurement, we're also going to actually have the component that we are measuring expand. |
| 25:59 | So it all comes down to sort of what accuracy you need to work with. |
| 26:04 | JE with our pistons recommend that the measurements are made at 20 degrees centigrade so it does make some sense to take that on board and try and understand it as well. |
| 26:17 | Barnes has asked, Mitutoyo, Starett, Brown and Sharpe, these are nearly the only tools worthy of accurate measurement regarding micrometers. |
| 26:25 | Using cheap sub standard micrometers, just close your business, just do it, save people's losses. |
| 26:31 | I'm gonna completely disagree with you there. |
| 26:34 | Probably about five or maybe 10 years ago, I would've wholeheartedly agreed. |
| 26:40 | We were seeing a lot of absolute garbage come out of China and obviously unfortunately in the automotive industry, we've been seeing much more Chinese product than probably a lot of the markets. |
| 26:53 | Initially at the start of my career, most of the Chinese stuff was complete garbage. |
| 26:58 | I would not have put it anywhere near any of the cars I was working on. |
| 27:02 | What we have seen though with the Chinese products, a lot of the higher end manufacturers over there quickly cottoned on to the fact that if they continued to produce garbage, their sales were not going to continue. |
| 27:15 | And a lot of them did actually up their game and we are now seeing some quality products come out of there. |
| 27:23 | Now I do wanna be really careful in saying that just because we do have a $300 set of Chinese micrometers that do a good job, that's not to say that they're all going to do a really good job. |
| 27:36 | It's always nice if you do have the ability to back to back test them with a high quality brand like Mitutoyo. |
| 27:43 | And I do agree with you on that basis, those brands that you mentioned are at the upper echelon, but these days as I said, we are seeing some really cheap competition come through that actually still does an excellent job. |
| 28:00 | Barry has asked, do you micro crank pins and then use an inside dial bore gauge, dial bore to determine bearing clearances? So what we do there is we do use the dial gauge on the crank journal that we're interested in measuring the oil clearance on. |
| 28:15 | So what we wanna do there is measure as well, this is one of the advantages with the micrometer over the likes of using Plastigauge. |
| 28:23 | Plastigauge is a product that we've also done webinars on using and it's a great product for the novice engine builder because it is really cheap and it's relatively easy to use but it also does have some limitations. |
| 28:35 | So one of the things we're going to be looking at when we're using a micrometer to measure a crank journal is we can take multiple measurements across the width of the crank journal and also at two points perpendicular to each other. |
| 28:49 | So this allows us to confirm that the crank journal has no taper on it, there's no out of round on it as well so we're able to confirm that that journal is on specification. |
| 29:01 | Once we've got that information, then I use the micrometer to zero a dial bore gauge and use the dial bore gauge to measure the internal or the difference between our outside diameter of our crank journal and the inside diameter of our bearing surfaces, and this gives us our oil clearance. |
| 29:23 | Craig has asked, micrometer maintenance, oiling or professional calibration? Typically as long as the micrometers are well looked after, stored in a clean, dry environment, maintenance isn't generally a huge issue. |
| 29:38 | As I've covered over in this webinar already, we do have the ability before we go ahead and make a measurement with our micrometer, to check and zero the calibration if required. |
| 29:51 | James has asked, are there pros and cons between using a vernier caliper versus a micrometer. |
| 29:56 | Very very different products, suitable for very very different purposes. |
| 30:01 | The micrometer is what we're going to be using if we want absolute precision in our measurements. |
| 30:06 | The vernier caliper is something that's still a very valuable tool to have but you're not going to be able to get accuracy like a micrometer. |
| 30:17 | You're not going to be able to measure accurately down to 1/10000th of an inch for example with repeatability and that's the key point there. |
| 30:24 | One of the reasons for this is with the vernier caliper, we can influence the reading quite significantly by how firmly we close the caliper down on the component we are reading. |
| 30:44 | On the other hand as we've covered, with the ratchet stop on the micrometer, this gives us consistency because no matter who the operator is, we can't over tighten that micrometer on the component we're measuring and get an inaccurate reading. |
| 31:02 | Alright guys that's taken us to the end of our webinar. |
| 31:04 | So as usual for any of our HPA gold members, if you do have questions that come up after this webinar has aired, please ask those in the forum and I'll be happy to answer them there. |


