171 | Configuring the Ultimate RPM Limiter?
Summary
In this webinar we’ll discuss the various options when it comes to controlling and limiting engine rpm. You’ll learn about soft cuts, hard cuts, fuel and ignition limiting, and their affect on the engine. For this webinar we’ll be using a Nissan 350Z fitted with a Link G4+ ECU.
| 00:00 | - Hey guys, Andre from High Performance Academy, welcome along to another webinar. |
| 00:04 | In this webinar we're going to be talking a little bit about our engine rev limit setup. |
| 00:09 | Now specifically for this webinar, we will be focusing on the Link G4 Plus ECU. |
| 00:15 | However a lot of what we're going to be talking about will of course translate across quite nicely to a wide range of aftermarket ECUs. |
| 00:24 | As usual, at the end of our webinar, we will be having a question and answer session so if there's anything related to today's topic that you'd like to know a little bit more about, please ask those questions in the comments and the guys will transfer those through to me and we'll deal with them at the end of the webinar. |
| 00:40 | Now I think it's probably pretty self explanatory what our rev limiter is and what it's there for but I think probably a lot of tuners really overlook just how important the rev limit setup is. |
| 00:53 | And the other aspect that is also overlooked is how the way the rev limiter is set up can influence or affect the reliability of our engine. |
| 01:03 | What I'm talking about here is the ignition cut versus the fuel cut style of rev limit. |
| 01:11 | So today's webinar is designed to really delve into that topic a little bit more, we're going to talk about the differences between those two limiters and we're going to see how changing some of the parameters of our rev limit in the software will affect the way the rev limit operates. |
| 01:28 | Now obviously the rev limiter is there predominantly as an engine safety aspect. |
| 01:33 | What we're doing is trying to use the ECU to clamp the maximum RPM that the engine is capable of running to, and this is in order to protect the engine mechanically. |
| 01:44 | Obviously if we exceed the factory rev limit significantly, we may exceed also the strength of the components inside the engine resulting in an engine failure. |
| 01:54 | So that's obviously our predominant issue there, our predominant concern. |
| 01:57 | But there are other ways that we will also use the rev limit in an aftermarket ECU. |
| 02:03 | Particularly we can induce a rev limit for various aspects to do with engine protection, we'll look at a couple of those a little bit further along. |
| 02:12 | ... our rev limit to help us with aspects such as launch control in order to build boost. |
| 02:21 | And the way we set up the rev limiter is potentially going to be a little bit different for each of those aspects. |
| 02:27 | So our main rev limit options come down to whether we are going to cut fuel or cut ignition. |
| 02:35 | Obviously if we want to prevent the engine RPM from increasing, we need some way of preventing combustion inside of the engine. |
| 02:42 | So in order to do this, we can stop the fuel, we can stop the ignition, or in some cases we may be able to stop both. |
| 02:50 | And there are implications on both of those styles of rev limit, whether we're dropping our fuel, or we're dropping our ignition out, so this is one of the things we're going to be talking about today. |
| 03:00 | Now one of the engines that I've personally had a fair bit of experience with where we really do need to be very careful with the way we've configured our rev limit is the NIssan SR20. |
| 03:12 | Now unfortunately the Nissan SR20 is renowned for a fairly inferior valve train design, particularly it uses a large and relatively heavy rocker assembly that sits on a pedestal up inside the cylinder head. |
| 03:27 | And in particular this is an engine that we've personally witnessed damage on as a result of the rev limit selection. |
| 03:36 | So what I'm talking about here is if we use an ignition cut rev limiter, often this can cause damage. |
| 03:43 | And the way this happens is when the ignition is cut, we end up with a cylinder full of fuel and air, a fresh charge of fuel and air, passing through that cylinder unburned. |
| 03:54 | Now what can happen there, particularly in turbocharged engines where the exhaust temperature is quite high, is that this unburned fuel and air can then combust in the exhaust system. |
| 04:05 | When this happens it causes large pressure pulses in the exhaust manifold. |
| 04:10 | In turn this can then cause the exhaust valves to pop back off their seats. |
| 04:15 | And this is where we get into problems with potential for the rockers to actually fall off inside the cylinder head. |
| 04:23 | When that happens, generally it's not gonna end up with a good result, we're gonna end up with a significant amount of damage to the engine. |
| 04:31 | So this is what we want to avoid. |
| 04:33 | So in general, the safest way of setting up any limiter is by using a fuel cut instead of a ignition cut. |
| 04:42 | Now straight away I know that a lot of novice tuners get a little bit scared off by this, we've all heard horror stories about engines being run lean and the damage that this can result so surely if we are limiting the fuel delivery into the engine then this can't end well. |
| 04:58 | It's important to understand what's actually happening though when we are using a fuel cut. |
| 05:05 | What we're doing, the ECU is not cutting a percentage of fuel to a particular cylinder. |
| 05:11 | That obviously would be dangerous if we are artificially leaning out the amount of fuel being delivered to the cylinder. |
| 05:17 | Instead what it's doing is it's applying a 100% cut to the fuel delivery to individual cylinders and it's cutting a percentage of the cylinders so that it can control the engine speed limit. |
| 05:30 | So obviously if we want to really clamp down on that engine RPM, we're going to need to cut the fuel delivery to more cylinders simultaneously or in order. |
| 05:40 | If the RPM or the engine power is relatively low then we're not going to need to cut the fuel delivery to as many cylinders as often. |
| 05:47 | So this is what we're talking about when we look at the percentage cut that is being applied. |
| 05:54 | So that's an important aspect to understand. |
| 05:57 | Now for today we are going to be going through a demonstration of this using our Link G4 Plus ECU. |
| 06:04 | So what we'll do is we'll just get our engine up and running here. |
| 06:08 | And we can head across to my laptop screen and once we're just up and running we're going to go through a quick tour of our rev limit setup. |
| 06:18 | So let's go through that now. |
| 06:20 | And what we'll do is go over to our main RPM limit configuration. |
| 06:27 | OK so here's one of the aspects we've talked about here is our RPM limit mode, this is the first option we've got available here. |
| 06:36 | We can see that at the moment this is configured as an ignition cut. |
| 06:40 | So as I've said this is potentially dangerous in some types of engine. |
| 06:45 | If we double click on this we've got the option to change the way the rev limit will function in the G4 Plus ECU. |
| 06:51 | So we've got our ignition cut, we've got our fuel cut, and Link also include this mode called rotary only. |
| 06:58 | As its name implies it is designed around rotary engines. |
| 07:01 | Rotary engines, as some of you may already be aware, are pretty fussy about any sort of popping or banging in the engine, this can potentially cause damage to the apex seal, so it's really important with a rotary engine, if you wanna ensure engine reliability, to use a very soft cut style. |
| 07:21 | So this is what the rotary only strategy is all about. |
| 07:26 | So that's our main rev limit setup where we can select the type of cut. |
| 07:30 | Now I've talked about fuel cut being the preferable method there, particularly on engines that have sensitive valve trains. |
| 07:39 | There is a problem with this though. |
| 07:41 | If you are using a rev limiter for launch control, often referred to as two step launch control, and you're trying to spool a very large turbocharger, then the technique that we'll usually use here is to couple an ignition cut rev limit with a reasonable amount of ignition retard. |
| 08:00 | So this has the effect of first of all cutting the ignition, so we're sending unburned fuel and air charge out into the exhaust system. |
| 08:09 | But then it's also coupling the cylinders that are still firing with a lot of ignition retard so that the combustion process is still occurring very late in the engine cycle and out into the exhaust stroke. |
| 08:21 | So this actually then has the effect of combusting the remaining fuel and air charge out in the exhaust system. |
| 08:28 | So on the plus side this is a great way of spooling a really large turbocharger. |
| 08:32 | With our old drag car we were running an HKS T51R turbocharger which is a 1000 horsepower rated turbo on a Mitsubishi 4G63, which is a two litre engine. |
| 08:45 | Now if you were just to hold the engine on a normal fuel cut rev limiter with no ignition retard at let's say 7000 RPM, you would probably get maybe two or five psi of boost, very little boost, certainly not enough to launch off the start line at a drag strip. |
| 09:03 | With an ignition cut rev limit and a significant amount of ignition retard, we're able to build essentially any amount of boost we wanted and we were usually leaving the line with that particular car between 20 and 25 psi of boost. |
| 09:18 | So this will not work effectively if you are using a fuel cut rev limit. |
| 09:23 | So you need to keep this in mind when you're deciding how to set up your limiters. |
| 09:28 | Obviously the caveat here is if you do wanna build boost like this, you are going to need to ensure that your engine mechanically of in particular your valve train, is up to the task. |
| 09:39 | This may require a conversion from a hydraulic lifter to a solid lifter. |
| 09:44 | It may also require stiffer valve springs, all of that's starting to get a little bit beyond the aspect of today's webinar but just understand that it can potentially be dangerous on some engines. |
| 09:57 | Now just to move back to the fuel cut. |
| 10:00 | Now I've kind of talked about the fact that we are cutting a percentage of fuel into an individual cylinder so technically we're not really risking the engine, we're not causing any potential for the engine to run lean. |
| 10:13 | I will just expand on this a little bit though. |
| 10:16 | An aspect that is often overlooked or misunderstood is the fact that in a port injected engine, some amount of the fuel delivered by the fuel injectors will end up wetting out the port wall. |
| 10:28 | It forms what is referred to as a fuel film. |
| 10:32 | So when we actually cut off the injector, there is still some amount of fuel making up this fuel film on the port wall, which will still be drawn into the cylinder. |
| 10:43 | So it is possible to end up with one engine cycle where we may end up with some combustion. |
| 10:50 | It is likely to form a very lean mixture, if it does combust at all. |
| 10:54 | And it's also just a brief one cycle, we're not going to end up with a continuous lean condition but just to explain what will happen with that fuel cut. |
| 11:05 | Also when we then reinstate the injection, we also ned to initially build up that fuel film, so on the first couple of injection events after the injection is reinstated, it's again likely that we may be very marginally lean, and this is really exactly the same situation that we have when we go through a transient or acceleration enrichment event, we've got that effect of the fuel fill being built up or depleted. |
| 11:32 | So that is one consideration there. |
| 11:34 | In reality and in my experience, it's not something we need to worry about when it comes to the configuration of our rev limit. |
| 11:44 | OK now I'll just also note here, I've mentioned that the fuel cut is the preferable option unless there's a very specific reason why we don't want to use that. |
| 11:59 | With the Link G4 Plus or Link G4 in general, there are a couple of aspects or subtle differences there. |
| 12:05 | If you do through the help file, you will find that if you are using either group fire injection or also auxiliary injection, then they do recommend that you use ignition cutting for your rev limit, so just couple of things to keep in mind there just to do with the way the ECU works. |
| 12:23 | Alright let's move back into our laptop software again. |
| 12:25 | And we'll move into this next function here which is our table allocation. |
| 12:30 | So in this case we can see that we've got selected a two dimensional table, if we double click on this, we can also set up a three dimensional table. |
| 12:38 | This just depends how you actually want to set up your main rev limit table. |
| 12:42 | So in normal circumstances, certainly almost every circumstance I've been in myself tuning, I'll be using a two dimensional table with engine coolant temperature as the axis on that table. |
| 12:54 | It may be however that you want to include another axis maybe relative to ground speed or a gear for some reason, so you've got that option by selecting three dimensional table. |
| 13:07 | So for most people at this point, this is sufficient to get your rev limiter up and running. |
| 13:14 | And from here we obviously need to set our rev limit. |
| 13:16 | We can do that again by heading over to our ECU settings drop down menu. |
| 13:22 | And if we go to our rev limit table, I've actually obviously been already playing with this so I'll just get this out of the way back to how it was set up. |
| 13:30 | So we've got our two dimensional table here of our rev limit versus our engine coolant temperature. |
| 13:36 | Now there's a couple of safety aspects we can include here which i think are often overlooked. |
| 13:41 | You'll see that particularly from 110 degrees and above there, I've actually set my rev limit to 3500 RPM So this is a subtle protection aspect that I typically program into the rev limit tables on most of the engines I tune. |
| 13:56 | And the idea here is that often if the driver is out on a racetrack and probably not paying as much attention as they should be to what's going on on the instrument cluster, it's quite possible that the engine may actually start to overheat without the driver being aware of it. |
| 14:11 | Now obviously if it gets too hot and the driver still doesn't take any notice, this could end up quickly destroying an expensive engine. |
| 14:18 | So it's much easier or much more preferable in my opinion to instigate a lower rev limit. |
| 14:24 | Now if the driver's driving that car hard, it's obviously gonna start misfiring or potentially that's what it will look like to the driver because it won't pull past 3500 RPM in this case. |
| 14:34 | This is gonna bring the driver's attention to the fact something isn't right. |
| 14:37 | Probably the driver's not gonna be that happy about it but again it may just be enough to make the driver have a look around the instrument cluster, notice that something isn't right and come into the pits and save the engine. |
| 14:49 | Likewise another option we can instigate here is to also include a lower rev limit down when the engine is very cold. |
| 14:56 | So this is something that I have used on a few of the engines that we've built through my old shop, where we want to protect our reputation and make sure that the customer gets a good long life expectancy out of the engine that we've built. |
| 15:11 | So rather than allowing the customer to start the engine from stone cold in the middle of winter, head out of the garage door and then floor it straight onto the normal engine rev limit, we're gonna potentially restrict that rev range until the engine is up to temperature. |
| 15:28 | So again there's no right or wrong way of approaching this, it really comes down to the individual and what you want to try, what you want to achieve here. |
| 15:38 | Now another subtle aspect which is specific as far as my experience has shown so far, to the Link range of ECUs, is where abouts that rev limit is going to actually come in. |
| 15:51 | We're gonna talk about this in a little bit more detail shortly. |
| 15:54 | Essentially what you need to understand is that the way the Link G4 Plus ECU works is that it uses a control range for our rev limit. |
| 16:03 | So it starts limiting initially and then as the RPM continues through that control range, it progressively increases the amount of cut that's being applied. |
| 16:12 | Be that fuel, be that ignition, depending on what you've chosen. |
| 16:15 | So when we choose for example in my table there, a rev limit of 6800 RPM, this is actually the end of the control range. |
| 16:26 | This is the subtle bit that trips up a lot of people. |
| 16:28 | By default the normal control range is 200 RPM. |
| 16:31 | So what this is actually going to do is start cutting or start rev limiting 200 RPM earlier than whatever I put in that table. |
| 16:40 | So this is where we get a lot of tuners that are new to the Link platform, will start scratching their head and going why is my engine rev limiting earlier than the numbers that I've got in that table. |
| 16:51 | So this is why, by default that's 200 RPM so we need to understand that and take that into account when we are tuning or setting our rev limit table. |
| 17:00 | OK so that works in conjunction with what we've just talked about here with our control range. |
| 17:07 | So what we're going to do now, as I've said what we've looked at so far is probably about as much input as most tuners are ever going to need. |
| 17:15 | This will get you a rev limit setup that is going to function correctly, be it on fuel or ignition depending on what you've selected. |
| 17:23 | And limit the engine RPM to whatever you've got in that table. |
| 17:27 | So most people as I say, they're not gonna need to think too much more about that but if you wanna be a little bit more specific with your setup and get a little bit more control over that setup, this is where our advanced mode comes in. |
| 17:38 | So by default this is off. |
| 17:40 | If we turn this to on, what it's going to do is give us a range of additional functions or parameters that we can adjust and tune. |
| 17:49 | I'm gonna jump a little bit out of order and just because we have just finished talking about it, we're going to actually start by talking about our limit control range and as we can see there by default, this is set to 200 RPM. |
| 18:03 | We'll come back up now and we're going to go through these in order. |
| 18:08 | We have our hard limit. |
| 18:10 | So this is something we can turn on or off. |
| 18:14 | We've got it off again by default, if we double click we can choose what will happen when we hit our hard limit point. |
| 18:22 | So we can obviously use an ignition cut which will be 100% cut, so a hard cut as its name implies, it's just a full cut of whatever we choose be it ignition, fuel, or in this case we can also choose fuel and ignition cut. |
| 18:37 | This particular function, our hard limit, also works in conjunction with this parameter here, our hard limit activation. |
| 18:45 | So this is the RPM range above the end of our control range where that hard limit will become active. |
| 18:54 | So in this case, if we did turn our hard limit on, we selected for example, 100% fuel cut, and we had our hard limit activation set at zero RPM there, we will hit that hard limit at the end of our control range, or in other words, at the point that we've actually set in our RPM table. |
| 19:14 | So that's just important to understand. |
| 19:16 | Now this can get a little bit confusing here particularly as we move into these next parameters here. |
| 19:22 | I'm gonna quickly talk about them, then we're gonna have a look at a little graphical representation, which hopefully is gonna make it really easy to understand what's happening. |
| 19:29 | We've got our end cut, we've got our start cut for 100% throttle, we've got our start cut for TP low or low throttle, and then we've got what exactly our low throttle percentage is. |
| 19:43 | So I know that all probably sounds like complete rubbish. |
| 19:46 | So let's have a look at a little diagram that's going to show you exactly what's going on in there. |
| 19:51 | By the way this comes straight out of the Link help file which you can access by pressing F1 any time you're using the ECU. |
| 19:59 | In my opinion the help file, the built in help file on the Link ECU is probably one of its strongest features because it is so complete. |
| 20:07 | This is where a lot of ECU manufacturers actually let themselves down. |
| 20:11 | So if you wanna see this for yourself at a later point, that's how you can access it. |
| 20:15 | But it really explains exactly what's going on. |
| 20:17 | So I'll just talk about the axis here. |
| 20:19 | So first of all if we look at our axis here we've got our engine RPM, obviously from zero to whatever our maximum may be. |
| 20:28 | And then this axis here we've got our throttle position, again moving from 0% to 100%. |
| 20:34 | And finally we've also got on our vertical axis here, we've got our cut set, just so you understand what's going on. |
| 20:41 | Inside here we've also go exactly how much cut is being applied in various situations So this is where our TP low and our TP 100 cut start, percentages come in. |
| 20:55 | What we're trying to do is anticipate how much cut the ECU is going to need to apply in order to control the RPM of the engine as we come up to the rev limiter. |
| 21:07 | So what I mean by this is if we approach the rev limiter with a really small amount of throttle onboard and we just start to brush up against the rev limit, well understandably the ECU is not going to need to apply very much cutting in order to control that rev limit or control the engine speed. |
| 21:24 | If on the other hand we smash the throttle straight to the floor, and we come up onto that rev limit very quickly, the engine's also now producing more power for each combustion event, so obviously we're going to need to be a little bit more aggressive with our cut strategy in order to maintain our engine speed and prevent it from exceeding our rev limit. |
| 21:45 | OK so first thing I wanna show you here on this is we've got our RPM limit. |
| 21:50 | So this, I'll just try and draw roughly what we've got going on in here, goes through this point here. |
| 21:58 | So remember this is the number that comes from the RPM limit table. |
| 22:02 | So this is the end of our control range and this is going to affect where our full cut or end cut percentage comes in. |
| 22:12 | Then we've got our control range. |
| 22:14 | So basically our control range is going to start from the 200 RPM in this case that we've got before we get to our RPM limit. |
| 22:23 | So again as we progress through that control range, in order to prevent the engine RPM from continuing to climb, the ECU is going to progressively add more and more cut to prevent it exceeding the maximum rev limit. |
| 22:37 | So we've got our throttle position settings, so we've got our TP low here. |
| 22:42 | So what we can do there is set a throttle position that the ECU will use as its TP low setting. |
| 22:48 | This is right here. |
| 22:50 | And then we can also set what amount of cut will initially be used as we come into the beginning of our control range when we are at or below or TP low setting. |
| 22:59 | So that will give us this amount of cut that we've got there. |
| 23:03 | Then we've also got our start cut at TP 100 so that's this here. |
| 23:09 | So this is the initial amount of cut that the ECU will provide when we first reach the beginning of our RPM limit control range, when we are at wide open throttle. |
| 23:21 | OK so that's what happens at the start of the cut. |
| 23:23 | Obviously as you can see here, there is a linear interpolation provided between our start cut at TP low and our start cut at TP 100. |
| 23:33 | We will have a look at a couple of these aspects in terms of a practical demonstration shortly. |
| 23:38 | Then we can also program our end cut. |
| 23:41 | So that's shown here in blue, so our end cut is essentially the amount of cut that the ECU will be able to apply, the maximum amount of cut that the ECU will be able to apply when we get through to the end of our RPM limit. |
| 23:57 | So when we get to the actual values that we've programmed into our RPM limit table. |
| 24:02 | Now if that isn't sufficient, if our end cut percentage is not sufficient, then the RPM will continue to climb past our RPM limit value, and that's where our hard cut can come in. |
| 24:15 | We can see here at the bottom, we've got our hard cut addition. |
| 24:19 | So remember if we had our hard cut addition at zero, it occurs right on our RPM limit, if we've got maybe 50 or 200 RPM there, the ECU will allow the RPM range to exceed the RPM limit by that amount before that hard cut will come in. |
| 24:36 | And then our hard cut applies either 100% fuel cut, ignition cut, or both, depending on how we've set it up. |
| 24:42 | So hopefully that diagram there has made things a little bit clearer there. |
| 24:47 | It is quite a complex system and I think this is the neatest way of describing exactly what's going on in the background of the ECU. |
| 24:55 | It isn't necessary to have a full understanding of this. |
| 24:59 | As I've said, we're looking at the advanced mode here, so if you are already a little bit worried about this and maybe it's scared you off, don't be put off here. |
| 25:08 | In most instances we're not going to need to worry about this. |
| 25:11 | But it's important just to go through these features so that if you are gonna delve into them, you do know exactly what they're doing. |
| 25:18 | OK so now that we know a little bit more about these aspects here such as our end cut, start cut, et cetera, we'll talk about those. |
| 25:26 | I will just jump back to one that we've overlooked here first though, which is our cut effect. |
| 25:32 | So if we double click on this we can choose between adaptive and constant. |
| 25:36 | I don't think I've ever set up an engine where I haven't been using an adaptive cut effect. |
| 25:44 | So really in plain english this is just talking about the process that the ECU uses to cut different cylinders during the rev limiting. |
| 25:51 | So in an adaptive cut what it's going to do is apply a random strategy and cutting different cylinders. |
| 25:58 | And the idea here is to try and prevent the same cylinder being cut too many times in a row. |
| 26:04 | In some instances, particularly if you're using ignition cutting, you may get into a circumstance where this causes fouling in the engine. |
| 26:09 | So a constant cut effect will just use a repeated pattern over and over again, repeating it faster and faster as we need more and more cut. |
| 26:18 | So again that's just what that does, whether or not you need to use it is completely up to you. |
| 26:24 | We've got our end cut there, so what we need to understand here is that our end cut value is going to have an influence on what happens when we get to our RPM limit. |
| 26:36 | So right now you can see that I've got that value set at 100%. |
| 26:39 | Essentially right now this has the end cut effectively working like a hard cut. |
| 26:46 | We are doing a complete cut there. |
| 26:48 | So turning the hard cut on in this instance would have little effect. |
| 26:53 | Let's have a quick look so we can see some of these functions in action. |
| 26:58 | We'll go back to our rev limit table and just so that I'm not really banging our engine out at 6800 RPM for this demonstration, we'll just temporarily lower everything down to 4000 RPM. |
| 27:10 | We'll also go back to our RPM limit table there, RPM limit setup. |
| 27:17 | So we'll just do a quick test there at 4000 RPM. |
| 27:21 | And we'll go straight to full throttle and see what happens. |
| 27:25 | So let's have a look over our logging, we'll start our logging, and we'll pause this once we've done our demonstration and I'll talk about what we're looking at. |
| 27:38 | OK let's just zoom in on a little bit of this so we can look at it in a little bit more detail. |
| 27:45 | OK so at the top of our groups here, we've got our engine speed in green, and then straight below this we've got our RPM limit. |
| 27:52 | Just so we can see what our RPM limit is currently doing and how close we're getting to this. |
| 27:58 | In our next group of parameters we've got our throttle position in blue, it's about the only one that you really need to know about there. |
| 28:05 | I've got a group here that's doing nothing so let's just get rid of that. |
| 28:10 | Just to make everything look a little bit neater. |
| 28:12 | We've got our air fuel ratio and our air fuel ratio target. |
| 28:16 | And that's just worth quickly talking about while it doesn't really have too much effect on our rev limit action. |
| 28:22 | What is often overlooked is that when the engine is experiencing a cut on a rev limiter, we can't take any notice of the air fuel ratio reading from our wideband sensor. |
| 28:33 | This is actually exactly the same scenario if we also have our engine suffer from a misfire. |
| 28:38 | What you're going to get is a momentary lean spike and this is because we've got unburned fuel and oxygen going through the combustion chamber. |
| 28:48 | And it's the oxygen that the lambda sensor or wideband sensor is detecting and measuring. |
| 28:54 | So we can see here that we're sitting prior to our test, right on our target, or pretty close to our target. |
| 29:00 | And as we go through onto full throttle, we can see that our air fuel ratio disappears off the top of our graph lean, and it's sitting at about 19.8:1 So this isn't indicative of a problem, this just simply means that there's a lot of unburned oxygen and fuel going past the sensor and it's detecting lean so just an important aspect to understand there. |
| 29:25 | In terms of our RPM itself, we can see that this is sitting, it's obviously always moving around, but we're sitting at about 3900 RPM, so we're approximately halfway through our limit range. |
| 29:38 | It is moving around all of the time though, it's never 100% constant. |
| 29:42 | And likewise we can see down the bottom here we've got our percentage fuel cut and our percentage ignition cut. |
| 29:49 | Remembering this time I am using an ignition cut on our VQ35. |
| 29:52 | And what we can see is the cut being added or removed as need be, in order to control that engine RPM. |
| 30:01 | Alright let's just head back to our tuning here. |
| 30:03 | What I'm going to do for the moment, you can see that at the moment our end cut is set to 100% so the ECU has full range of control over the amount of cut being applied, it can completely cut our ignition in order to control engine RPM. |
| 30:18 | Let's just see what happens if we set that down, probably 50 might be a little bit light, let's set that down to 60% and we'll just bring that down a little bit as well and we'll go back to our logging, we'll start our logging again, and I'm just going to go to full throttle and we'll see the effect. |
| 30:39 | Alright so let's just zoom in on our logging again so you can see what's happened there. |
| 30:45 | Now we can see this time if we look at our RPM versus our limit, we get up to our RPM limit. |
| 30:52 | The ECU has jumped to our maximum cut percent of 60%. |
| 30:59 | That's not been enough to limit the engine power so this is why you can see that the engine power simply, engine RPM I should say, simply continues to climb past our RPM limit. |
| 31:10 | So this could be potentially really dangerous if we didn't have a hard cut set up. |
| 31:16 | So you do need to be very careful if you are limiting the range in terms of the cut that can be applied, but you're not using a hard limit. |
| 31:24 | And if we actually just go back to our last log as well, we will see that even there where I'm using only around about 42% throttle, at 4000 RPM, the ECU is using 70% to 80% cut in order to control the engine RPM. |
| 31:46 | So you actually may need a reasonably, a significant amount of cut in order to control things. |
| 31:53 | Alright so that's an aspect of our limit there so what we'll do now is we'll just turn on our hard limit just so we can see exactly how that works. |
| 32:02 | In order to demonstrate this, what I'll do is I'll just change the hard limit so it's using fuel cutting and we'll add a 200 RPM range over and above our normal rev limit. |
| 32:15 | And we're gonna go and do another test there so we can see how our hard cut works. |
| 32:19 | So again I'll just rev the engine up and we'll look at the results. |
| 32:27 | Alright let's just zoom in on a little bit of that detail there. |
| 32:30 | Alright so just as before we've got our ignition cut maxing out at 60% as I've said in there. |
| 32:38 | This time though we can now see that once we get past our rev limit control range plus our hard limit activation range, in this case we're at 4300 RPM, we can see that 100% fuel cut is being brought in and we can see the spiky nature of that as that fuel cut is brought in and out and the RPM drop jumps up and down. |
| 32:58 | So this is the interaction there with our hard limit. |
| 33:01 | And really with this, again just like I spoke about earlier, there is no right and wrong or 100% way that we must set this up, it really comes down to your own personal preference and what you're actually trying to do. |
| 33:15 | So I'll just talk a little bit about an experience that I had in a race class here in New Zealand. |
| 33:21 | At one point I was a parity manager for a touring car series here in New Zealand. |
| 33:27 | And when we had professional drivers in that class with a class limit on the engine revs, what we find is that those drivers want to use every bit of that RPM range that they can get. |
| 33:38 | So in this instance it's quite typical to do away with the soft limit that we've looked at there with our control range. |
| 33:45 | We would then instigate just a 100% hard cut right at the RPM limit that the class allows. |
| 33:52 | And then it's up to the driver to control the engine RPM, to change gear just prior to that rev cut. |
| 33:58 | Now the pro of this is that it allows the driver to use all of the available rev range that is designed within the rules or regulations for that class. |
| 34:08 | The downside is that if the driver does end up misshifting or hanging up on the rev limiter for any reason, we do tend to find that a hard cut is a lot harsher than a soft cut. |
| 34:20 | So that's just one aspect there that you may need to consider depending on the driver's personal preferences. |
| 34:27 | OK what we'll do now is we'll just turn off our hard cut here and we'll turn off our hard limit activation. |
| 34:36 | So the aim here with this is to always set up our rev limits so that we've got relatively smooth control of the amount of cut being applied. |
| 34:47 | What we're trying to do is get a smooth amount of cut without large spiking, and this is going to help prevent large changes in our engine RPM. |
| 34:58 | Now particularly again just drawing back from my experience with drag racing, this was really important to ensure that we had a consistent amount of engine power when the driver actually dropped the clutch at the start of the run. |
| 35:10 | What we're trying to do is get a perfectly flat RPM line on our limiter and control our RPM very very accurately. |
| 35:18 | If we're seeing a 200 RPM change on our limiter, then the difference between the driver dropping the clutch when the RPM is at the peak of that 200 RPM range versus when it's at the trough, is actually a significant effect on our engine power and it's really really hard to get consistent starts or consistent launches when that is the case. |
| 35:41 | OK so what we're going to do here is just go through, let's jump back into our software, go through and have a look at how that can be affected, how our cut can be affected based on the amount of cut needed for a certain power application. |
| 35:55 | So what we're going to do is start by increasing our TP low setting. |
| 36:00 | So this is the throttle position setting at and below which the ECU will initially use the start cut TP low. |
| 36:10 | So what I'll do is we'll just set this to 30% throttle. |
| 36:12 | Now just so that you're familiar with that again, what I'm talking about here is this amount of initial cut that will be applied. |
| 36:19 | So again just remembering that we shouldn't need as much cut in order to control our engine RPM when we're just coming into the RPM control range with very very light throttle. |
| 36:31 | Now we have the actual amount of cut that will be applied there. |
| 36:36 | So what I'm gonna do is set that at 40%. |
| 36:39 | And we'll just bring the start cut there for 100% throttle up to 60%. |
| 36:47 | Now let's just go into our logging, we'll start our logging, and what I'm gonna do is just bring the engine up onto that rev limit relatively slowly with a little bit of throttle and we'll see what the effect of the cut is. |
| 37:03 | Alright we'll just pause our logging there and have a look at it. |
| 37:07 | Now I actually went a little bit far just to start with and a little bit more cut was needed but what we're looking at here, I'll just try and zoom in if I can on the bit that I'm actually interested in. |
| 37:22 | OK so what we're looking at here is this spiking. |
| 37:25 | So this isn't what we want. |
| 37:27 | This is where the initial cut on that TP low is quite high. |
| 37:32 | So we're jumping up to the 40% cut that I programmed there. |
| 37:37 | That's what we can see this line essentially through here, that's our 40% cut. |
| 37:42 | But as soon as that happens, the RPM, that's too much cut, so the RPM's gonna drop away, and that's gonna allow the RPM to drop which bring the cut back up which is why we're seeing these quite sharp drops in our cut right back down. |
| 37:56 | So this is going to control our engine RPM, it's gonna get the right results in terms of controlling our engine RPM, there's nothing dangerous happening there for our engine but it's going to result in a less smooth actual RPM while we're on the limiter. |
| 38:11 | So if on the other hand we go back and basically re run that test, but in this case we'll change our start cut to let's say 20% and we'll see how that works. |
| 38:23 | We'll start our logging again and we'll re run exactly that same test. |
| 38:35 | OK I'll just also give a brief blip to full throttle here. |
| 38:41 | Alright the reason I just went to full throttle is I just wanted to show you a full range there. |
| 38:47 | What we find is that the axis for this particular group will auto scale, so we're only seeing a relatively low percentage cut, it's a bit harder to read. |
| 38:59 | So let's just zoom in a little bit on this and what we can see now is two things. |
| 39:04 | First of all our cut is sitting much lower in this case we're probably sitting on average through around about 25% to 30%. |
| 39:12 | So my guess there was actually probably pretty good. |
| 39:15 | And the other aspect that's important to note is that our actual cut is nice and smooth now, we're not seeing those big spikes in the cut that's being applied. |
| 39:26 | The upshot of this is that the actual engine RPM is going to remain more constant. |
| 39:32 | It's a little bit hard to really show you that but that's exactly what is happening if we look up at our RPM trace. |
| 39:37 | Now of course because I am applying a relatively low amount of throttle here, there's not a lot of engine power, you can see the particular point that I've just picked out there, we're sitting at 3824 RPM, 3824 RPM, so the point is that we're sitting really close to the start of our RPM limit control range as would be expected. |
| 39:58 | When we go through to full throttle, I'll just jump across to the right hand side of this, we see that our RPM actually increases. |
| 40:09 | In this case because I'm limiting the maximum cut to 80%, we actually still see that we draw past that limit. |
| 40:16 | OK so we'll go back here, hopefully this is all sort of making sense Remember we will have questions and answer fairly shortly so if there is anything that you want me to explain in more detail, please ask those in the comments and in the chat and we'll deal with those shortly. |
| 40:34 | So the way we wanna deal with this end cut is really dependent on what we're going to do with our hard cut. |
| 40:41 | If there is a reason why you want to have a hard cut come in later, then you would want to control your end cut a little bit below 100%, maybe 80%, 90% like I've got there. |
| 40:53 | As we've just seen, this has been enough that's allowed the RPM to pull past, and then you can control it by using your hard cut. |
| 41:00 | Personally, my own preference, I just set the end cut to 100%, and this really gives us the same amount of control as using the hard cut, it's just that it is gonna be using whatever RPM limit mode we've chosen, which in this case is ignition cut. |
| 41:17 | The benefit I guess if you want to mix it up is that by using the main limiter along with the hard cut addition, then you can use initially fuel cutting with perhaps ignition cut added on the top or vice versa like we are. |
| 41:31 | But it is important to know this because if you don't set it up correctly, you may think that you've got an RPM limit set up that's gonna work and find that it won't. |
| 41:41 | OK the next thing we're going to talk about here is our limit control range and the effect on the cut profile. |
| 41:49 | So this is, obviously we've talked about what this does, it's that range prior to the value that we've got in our RPM limit table. |
| 41:59 | This will again have an influence or effect on the way the cut behaves. |
| 42:04 | So what we're going to do here is have a look at how that works. |
| 42:07 | We're gonna do a couple of tests here. |
| 42:09 | First of all let's go with our 200 RPM default, and what I'm gonna do is just go straight to full throttle and we'll have a look at a little bit of logging and we'll see what our RPM is doing along with our cut so let's do that now. |
| 42:27 | OK we'll just pause our logging there and jump in and have a look. |
| 42:32 | OK so we've got pretty good control over our RPM. |
| 42:35 | But again if we were being reasonably fussy, our RPM is jumping around quite a bit so we're going obviously across a 200 RPM range. |
| 42:43 | We aren't really seeing the RPM exceed our limit. |
| 42:47 | About the most I've seen there is about 3970 RPM. |
| 42:52 | So we've got pretty good control and we've got a little bit of spiking here in our cut being applied. |
| 42:59 | But basically pretty good control of our RPM range. |
| 43:03 | What I'll do now is we'll take our limit control range down to let's say 20 RPM. |
| 43:09 | So we're gonna set a really tight control range. |
| 43:12 | We'll re run our test and see what the effect on our cut is. |
| 43:20 | OK now again we'll have a look at this. |
| 43:22 | I'm not 100% sure if you would actually be able to hear the difference there, but when we set a really tight control range like that, what we end up with is quite a large oscillation audibly in our RPM. |
| 43:35 | We're actually getting quite a lot more movement up and down, it's quite a lot more aggressive. |
| 43:40 | So we can see this as well because if we look at our RPM now, and it may be a little bit hard for you guys to see at home. |
| 43:48 | We are now seeing the RPM occasionally exceed our limit. |
| 43:51 | So in this case as we first came onto the limiter, we ended up with our RPM spiking to 4133 RPM. |
| 43:59 | And we're quite consistently seeing our RPM now spike slightly above the control range. |
| 44:06 | We're also seeing a lot more spiking here in our actual cut that's being applied. |
| 44:12 | So it's not as smooth. |
| 44:14 | Let's just show the other extreme of that range and we'll go to 500 RPM for our control range. |
| 44:21 | We'll go across and we'll log a little bit more. |
| 44:29 | OK so let's have a look at that, and in contrast to our earlier test, we're now seeing that our RPM is a lot smoother. |
| 44:37 | Again I'm not sure if you could hear that audibly from your end, but our engine physically sounds smoother when we extend our control range out. |
| 44:47 | The thing to keep in mind here though is with that wider control range, it does affect where our engine RPM will actually stabilise when we're at full throttle relative to our RPM limit. |
| 44:59 | So in this case it looks like we're stabilising around about 3800, 3850 RPM. |
| 45:07 | So we're around about 100, maybe 150 RPM I should say, lower than our actual RPM limit. |
| 45:15 | And again we can also see that our cut profile, our actual, what the ECU is doing there, the cut being applied is much smoother. |
| 45:24 | So when I'm trying to tune a rev limiter, what I'm trying to do is get really good control over the RPM, and a good indicator of that is where we have a relatively smooth shape to our ignition cut or fuel cut in our logging. |
| 45:39 | If we're seeing large spikes, then the ECU is working harder to control that engine RPM, and that's likely to also show up in the RPM moving around a lot. |
| 45:49 | The other thing you do need to be a little bit aware of here as well, is the type of engine you're tuning as this will have an influence on how smooth and accurate your RPM control can be. |
| 46:01 | So for example if you're talking about a four cylinder engine, then just cutting one cylinder, obviously that's going to cut 25% of the engine's torque, and that's going to be quite a coarse change in engine torque. |
| 46:19 | Whereas if we were for example to have an eight cylinder engine, we're going to have finer control over exactly how much torque we are reducing from the engine. |
| 46:30 | So you've gotta be a little bit realistic about what you are going to be able to achieve. |
| 46:35 | Alright we will move into some questions and answers really shortly as I mentioned. |
| 46:39 | Just one last topic that I did want to talk about though, is the safety aspects of the rev limiter. |
| 46:47 | So in this case I wanna show you a couple of aspects that I've got set up inside of the G4 Plus ECU on our 350z. |
| 46:56 | While the z does spend the majority of its life sitting right here on our Mainline dyno for presenting webinars or filming course material, it does also occasionally make its way out to the racetrack. |
| 47:07 | And a common way of protecting engines on a racetrack is to incorporate a general purpose RPM limit that can be activated off oil pressure. |
| 47:18 | So this is helpful in preventing engine damage as a result of oil surge. |
| 47:23 | So let's head back into our laptop software again. |
| 47:26 | And I'm gonna show you two limiters that I've got set up here. |
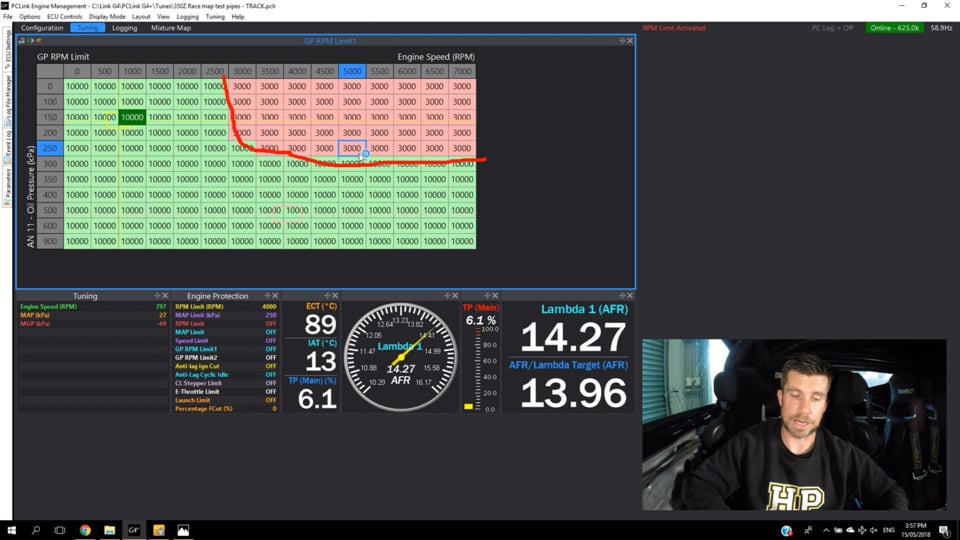
| 47:29 | First one here we're going to do to is our GP limit one. |
| 47:33 | So this table here's set up as a three dimensional limit table. |
| 47:37 | We've got our engine RPM on our horizontal axis, and we've got our oil pressure and kPa on the vertical axis. |
| 47:43 | So you can see that for the majority of this table, it is set to a rev limit of 10000 RPM. |
| 47:48 | Important to note here that I'm not trying to rev our VQ35 to 10000 RPM, the ECU will always use the lowest of the rev limiters from any of the available tables. |
| 48:00 | So in this case 10000 RPM just means that it's going to be focusing on the main RPM limit table. |
| 48:06 | What we've got here though is this section where as the RPM increases, if the oil pressure drops, we're going to end up dropping our rev limit. |
| 48:15 | So in this case for example, if our oil pressure dropped to 250 kPa at 5000 RPM, it would bring in a rev limit at 3000 RPM. |
| 48:25 | That's probably actually not conservative enough for some particular engines, but obviously you can set this sort of table up however you want. |
| 48:35 | OK and the reason we use this three dimensional table as well, is that generally our oil pressure rises as the engine speed increases. |
| 48:44 | General rule of thumb for most engines we try or expect to see around about 10 psi per 1000 RPM. |
| 48:51 | So the reason we use this rather than a simple switch is because at 6000 RPM, we may be hoping to see 50 to 60 psi of oil pressure, and if the oil pressure dropped below maybe 30 or 40 psi, this could be indicative of a problem. |
| 49:06 | However at idle we're probably only likely to see maybe 15 or 20 psi and in that instance if we were using a simple switch for 40 psi, it would trigger at idle. |
| 49:19 | So this allows us to be really precise with how we instigate that rev limit. |
| 49:23 | One more that I'll just quickly show you that we've just recently set up as well was for a pit lane limiter. |
| 49:31 | Now there's a variety of ways that this can be done, this definitely isn't the only way. |
| 49:35 | So what we're using is a CAN based digital switch input to the ECU. |
| 49:38 | And when that is inactive we can see that we're in our zero position there, our rev limit is 8000 RPM, again just simply means that it reverts to the main engine rev limit. |
| 49:50 | However when our CAN based switch, I'll just switch that off now, and we can see that we've jumped to our position one which is on. |
| 49:58 | When we're in that situation, we end up with a variable rev limit depending on what gear we're in. |
| 50:05 | So all this has done is programmed to achieve 40 kilometres an hour which is the pit lane speed limit. |
| 50:12 | OK so just a few things that we can do there. |
| 50:16 | I'll also mention that no rev limiter in the world can save you in all instances. |
| 50:23 | So I think a lot of people believe that once the rev limiter's set up in their ECU that it is infallible, there's no way of ending up with the engine RPM exceeding that rev limit, and that isn't always the case. |
| 50:36 | Even with a rev limit that's doing its job perfectly, cutting all of the fuel and all of the spark, if the driver of the car physically selects a gear that's too low, this will pull the engine past the engine RPM limit. |
| 50:50 | It's called a mechanical over rev and nothing that the ECU can do in that instance can save you. |
| 50:56 | So a little bit of mechanical sympathy is still required. |
| 51:03 | Alright we'll jump into some questions and answers now. |
| 51:06 | As usual if you do have any more, please ask them and I'll do my best to answer them. |
| 51:14 | Craig has asked, setting limits for a newly built engine, what's the recommended way of doing so so as to not cause problems with ambitious driving? Yeah that's a bit of a problem. |
| 51:26 | Generally when I was in a situation of building an engine, installing it in the car and then sending the driver our on his way to maybe do a couple of hundred kilometres of breaking in the engine, I would generally set a rev limiter at maybe 4000 or 4500 RPM. |
| 51:41 | And I would also explain to the driver that I had done so and why I'd done so. |
| 51:46 | Likewise on turbocharged engines, I'd often set a boost cut as well. |
| 51:51 | And what we're trying to do is just safeguard the investment that we've made in our own time and protect our name as I sort of alluded to a little bit earlier in the webinar. |
| 51:59 | Some drivers will be really mechanically sympathetic and understand the process of breaking in that fresh engine, others really, despite maybe just shelling over thousands of dollars for your work, just don't care, or don't understand and are likely to try and find the limiter in top gear as soon as they're away from your workshop so that's a pretty good way of doing so. |
| 52:24 | Our next question comes from Marcus who's asked, why would you use ignition and fuel hard cut? For that particular demonstration, I was simply showing the two so we could see the difference between the fuel cut and the hard cut. |
| 52:39 | That's not necessarily a way I would set up the engine management typically. |
| 52:44 | In most instances as I alluded to again in the webinar itself, I'm going to be setting most engine management systems up on the fuel cut, because this is safer. |
| 52:54 | In this instance with the G4 Plus, I typically will leave my control range, my cut limit I should say, at the end of the control range, to be 100% which has the same effect as a hard cut anyway. |
| 53:08 | And I've never found an issue with the ECU allowing the RPM to pull past that point if I do so. |
| 53:16 | You could on the other hand though, set up a fuel cut with a 100% ignition cut as a hard cut as well. |
| 53:23 | Then essentially when we get to that point we've got full cut of fuel and ignition, there is no way that the engine can continue to run. |
| 53:31 | Yeoh has asked, does the rotary mode work in the same way in terms of how we set up the cuts? So with the rotary mode, this is specific to Link, they use a special way of limiting both fuel and ignition together. |
| 53:45 | So again it's just trying to basically eliminate any combustion on one rotor or one phase of each rotor when the engine is on that rev limiter. |
| 53:56 | As I sort of mentioned as well in the webinar, in most instances the advanced mode is not going to be somthing that we're going to need. |
| 54:05 | However it still does work on that rotary only mode. |
| 54:08 | Alright as usual for our HPA members, if you do have any other questions that crop up after this webinar has aired, please feel free to ask them in the forum and I'll be happy to answer them there. |
| 54:20 | Thanks to everyone for joining us, I hope you enjoyed today's webinar, and I look forward to seeing you again soon. |


