211 | Tuning Open Loop Boost Control Haltech
Summary
Getting accurate and stable boost control in turbocharged vehicles can be challenging. In this webinar we’ll discuss why stable boost control is difficult in the first place and then we’ll see how to correctly set up an open loop boost control strategy using the Haltech Elite 2500.
| 00:00 | - Hey guys it's Andre from High Performance Academy, welcome along to another one of our webinars. |
| 00:05 | This time we're going to be talking about boost control and specifically we're going to be looking at open loop boost control on a Haltech Elite ECU. |
| 00:13 | While we are focusing on the Elite, a lot of what we're going to be talking about today is going to be more widely applicable to just about any aftermarket standalone ECU. |
| 00:22 | So don't think you're going to be missing out. |
| 00:25 | As usual, at the end of our webinar, we will be having questions and answers, so if there's anything that I talk about today that you'd like me to go into more detail on or anything related to the topic in general, please ask those in the chat and the team will transfer those through to me. |
| 00:40 | Now I think it's fair to say that when it comes to getting good accurate, stable electronic boost control, this is an area that a lot of tuners, both novice and professional alike really struggle with. |
| 00:51 | And it is a deceptively complex task. |
| 00:55 | The reason that it's a complex task is that the operating conditions around the turbocharger are constantly changing. |
| 01:03 | So in a way we're kind of chasing a moving target, and we'll talk about some of those considerations as we get through this webinar but in general, the amount of load on the engine or what gear we're operating in, the exhaust gas temperature, the atmospheric conditions that we're operating in, all of these will affect the boost control or the way the turbocharger operates and these need to be factored in. |
| 01:26 | So it's really important to have a good understanding of the fundamentals of getting good boost control. |
| 01:32 | If you understand those fundamentals, and you understand how the turbo system is going to be affected by our outside considerations, this is going to put you in a really good position to do a great job and get nice stable boost control that's not going to vary day to day and is not going to end up overboosting and potentially damaging your engine. |
| 01:51 | So what I think we're going to do here is we're just going to get started with a quick dyno run here on our Subaru STi. |
| 01:59 | Now what I'll do for a start is we'll just, because this is a really big consideration here, particularly on a Subaru engine where we've got a relatively long exhaust manifold, what we're going to do is just give the engine a little bit of opportunity to run under steady state conditions. |
| 02:17 | So I'm up at about 2700 RPM right now and I've just got about 30% or 40% throttle on and what I'm doing here is just holding, in this case about 60 kPa of positive boost pressure and the reason I'm doing this is I'm just building up a little bit of heat into the exhaust manifold. |
| 02:33 | And what this is going to do is it's going to mean that when I do the ramp run that you're about to see, we're not going to be starting with all of the exhaust components cold and that's going to tend to have the effect of making everything a lot laggier if we start where we've just been idling the car, everything's stone cold and we jump into a ramp run. |
| 02:51 | So that's enough with some steady state running here so let's head across to our dyno screen and here what we're going to see is at the bottom, obviously we've got our power, at the top of our graph here we're going to have our boost, you're going to be able to watch this in real time. |
| 03:06 | So you can see we've got a dotted line in there that is sitting at 22 psi, 150 kPa, positive boost pressure. |
| 03:13 | So that's going to be our target. |
| 03:15 | What you will see is that at higher RPM, the boost does drop off, this is simply turbo sizing related. |
| 03:20 | So let's get our run underway and we'll see what we've got. |
| 03:39 | Alright so we'll just let the dyno come back down to a stop here and we'll see what we've got. |
| 03:45 | So our power, which we're not really too concerned about, we can see 182 kilowatts at the wheels, that's not really that helpful, let's just save that, and we'll have a look at it in a little bit more detail on our second screen here. |
| 04:00 | So what we've got is our boost pressure, which is a little bit hard to see here, but we're sitting at around about 22.5, 23 psi. |
| 04:08 | We've got a tiny little bit of a spike there as we come up onto boost, but I wanted to show you how we can manage that. |
| 04:14 | And what we can see is we hold that through to about 4500 RPM and then just due to our turbo sizing, our boost drops away, by the time we're at 7000 RPM we're down to about 16 psi. |
| 04:27 | So again this isn't our boost control, we're doing that on purpose just due to the sizing of the turbocharger, it's not possible for us to hold 22 psi all the way through the rev range there. |
| 04:36 | Alright so that's just a quick demonstration, what we're going to do now is jump into the body of our webinar where we're going to find out exactly what went on during that ramp run and why we are doing what we're doing. |
| 04:47 | But before we can do that, what we need to do is rewind a little bit and talk about some of the fundamentals behind our boost control. |
| 04:54 | So first of all, the challenges I've already mentioned, we're chasing a constantly moving system there and that's what I was trying to talk about while I was warming the car up under steady state conditions. |
| 05:05 | If we had just gone ahead and done that ramp run, having the engine sitting here idling for 10 or 15 minutes, we're gonna have very little temperature in our exhaust manifold and our turbine housing and what we would find as a result is that that first hit on the dyno, we're going to end up with our boost coming in very late. |
| 05:23 | Now if we were to do a ramp run, a lot of tuners maybe watching this would have already seen this phenomenon, where we do a ramp run, we get a very slow boost response like I've just talked about, and if we stop and just immediately do another ramp run, we'd find that because we've now got a lot of heat built into the exhaust manifold in the turbocharger, our second run, the turbo's gonna come on boost a lot earlier. |
| 05:44 | And this is just simply because the turbocharger, as we'll deal with in a bit more detail shortly, is driven by both exhaust mass flow as well as heat. |
| 05:53 | So the more heat we can provide, the more energy essentially we are providing to spool that turbocharger up, so that's why we see those sorts of conditions. |
| 06:02 | But of course the challenge there is we need to manage this in our boost control strategy as well because the exhaust gas temperature is going to be changing depending on the operating conditions of the engine. |
| 06:14 | So what we want to talk about next is what is open loop, what is closed loop, what's the difference, why do we need to care about those things and which is the best? So open loop and closed loop, this is a control strategy that you're going to hear applied to a wide variety of aspects of our automotive applications. |
| 06:31 | So boost control, idle speed control, maybe cam control and drive by wire throttle body control, all come into those categories. |
| 06:40 | And essentially in a nutshell, closed loop control is where the ECU is monitoring our target as well as our positon. |
| 06:49 | And if the two don't match, it's actually able to jump in there and pull some strings and make some changes to get us onto our target. |
| 06:56 | So a good example of that is in our boost control example, if we were targeting 22 psi and we actually find that our boost pressure is a little bit high, what the boost control system, if it's closed loop, can do is it can go in there and it can reduce the duty cycle being sent to the wastegate solenoid a little bit and that will allow us to get that boost back to where it should be. |
| 07:15 | So this on paper, sounds ideal. |
| 07:18 | Obviously if you've got something there that's capable of correcting any errors in our boost control then happy days, this should be able to give us the best possible results. |
| 07:27 | And the reality is that when properly tuned, yes, it definitely can. |
| 07:31 | However what I see is that in 95% of circumstances, tuners dealing with boot control don't properly understand the strategy of tuning closed loop control. |
| 07:42 | And there are some tricks to it. |
| 07:44 | The reason there are some tricks to it is that in order to get the control really really stable and accurate under a wide variety of operating conditions, we need to know how to properly tune the PID control gains. |
| 07:57 | And that in itself is quite complex, so what I am going to do today is we're going to ignore closed loop control because of that problem, and the fact that most people set it up wrong, and we're going to look at a really really straightforward open loop system which can still give us really great results, even when our boost is above or below our target. |
| 08:18 | So this is what I refer to as my passive closed loop system. |
| 08:23 | So we'll find out what that means. |
| 08:24 | In general though, we've talked about closed loop, open loop of course means that the ECU is essentially sending out a signal, in this case to our boost control solenoid and regardless whether our boost is 30 psi above our target or it's right on our target, the ECU's just going to do exactly the same thing every time. |
| 08:40 | Pulsing that solenoid at exactly the designated duty cycle. |
| 08:44 | So that's open loop versus closed loop. |
| 08:47 | Now for those of you who are losing interest because you're only interested in closed loop tuning of your boost control strategy, don't worry, you're still gonna get a lot of value out of this webinar because in order to develop a really really good closed loop strategy, you're still going to need to start with a really well developed open loop duty cycle table. |
| 09:06 | What this means is that if our open loop target table or duty cycle table is already tuned really accurately, our boost pressure is always going to be really really close to our target and this means that if we are running closed loop, that closed loop control system has got less work to do. |
| 09:20 | So this is really one of the keys to a good closed loop strategy anyway, still lots to take away. |
| 09:27 | So what we'll do is we'll start by talking about what you're actually going to need in order to get good boost control in the first place. |
| 09:34 | And I think this is probably the first place a lot of people go wrong. |
| 09:38 | What they'll end up with is a mechanical configuration that's simply not capable of controlling boost pressure, and then they're going to try and fix a mechanical issue with electronic control. |
| 09:51 | Now of course you've got to have those fundamentals right if you want any chance of being able to get good stable control with your ECU. |
| 09:57 | So need to get that right in the first place and a good test of this, to make sure that you've got something that you can control boost with, simply disable all of your electronic control, remove the boost control solenoid out of the system completely and just plumb the wastegates directly up to pressure. |
| 10:15 | Now what that should do is give you the minimal available boost, the minimal boost that you can actually achieve with that particular system. |
| 10:22 | Run the car through a full power ramp run on the dyno or out on the road in a relatively high gear and log to see what your boost pressure is doing. |
| 10:29 | What we should be seeing is a relatively stable boost, it might drop off a little bit as we've already seen at high RPM with our STi but if we've got a boost pressure curve that's sort of looking like Mount Everest, or something that's climbing really really high at high RPM, where the boost is actually creeping. |
| 10:48 | These are indications of massive problems that we're not going to be able to fix with electronic control. |
| 10:54 | So you need to get that right, otherwise you're going to be really dissapointed in your results. |
| 10:59 | So in short, I'll just cover the main things there that you need to consider. |
| 11:01 | The first of these that I see frequently done incorrectly in an aftermarket sense is poor integration of the external wastegate into the exhaust manifold. |
| 11:10 | So what I'm meaning here is the external wastegate is integrated in the exhaust manifold in such a way as the exhaust gas is going to really struggle to flow out the external wastegate. |
| 11:22 | So exhaust gas is pretty lazy and it doesn't really like changing direction. |
| 11:26 | So what we want to do is just look at it from a common sense perspective, you don't need to have a degree in computational fluid dynamics, just a little bit of common senso. |
| 11:35 | What we're trying to get is a smooth integration so it's really easy for the exhaust gases to move out and go through the wastegate rather than going directly into the turbine housing. |
| 11:44 | So in general if we need to have that wastegate come off the collector or the exhaust manifold at an angle that's more than about 45 degrees, that's sub par, you're probably going to have some impact in your boost control. |
| 11:58 | Once you get past about 90 degrees, you're almost certainly going to have some problems with boost control and boost creep at high RPM. |
| 12:06 | Now it's all well and good saying this, obviously one of the main drivers with how we can integrate our wastegate is the room that we've got available, but it is a big consideration and it's going to make a massive difference. |
| 12:16 | Now just as important as that is your wastegate sizing. |
| 12:19 | And this is pretty complex because the wastegate sizing depends on that wastegate integration or how easily the exhaust gas can flow into the wastegate. |
| 12:28 | It's also going to depend on your turbo sizing versus your engine sizing. |
| 12:31 | And it's going to depend on what sort of boost pressure you want to be running. |
| 12:35 | But you need to have that right. |
| 12:37 | Also of course you need your spring selection in the wastegate correct. |
| 12:40 | And what we want to do here is decide on what amount of boost pressure we want as our minimum viable boost pressure. |
| 12:47 | And we're generally going to want to select a base spring pressure that's there or there abouts. |
| 12:53 | And all of the wastegate manufacturers have a handy little sizing chart that tells you basically what spring to use for what application. |
| 13:00 | One thing that's often overlooked here though is that those numbers aren't set in stone. |
| 13:06 | So you can fit a seven psi spring to your wastegate and depending on the exhaust back pressure, which is very dependent on your turbo sizing, if you've got a lot of exhaust back pressure, that's going to help force the wastegate open. |
| 13:19 | However if you've got a really large turbo setup where there's low exhaust back pressure, you don't have so much pressure forcing the wastegate open, so even with a seven psi spring, you may find that your base boost pressure actually does end up being maybe more like 10 psi, something like that. |
| 13:33 | So a little bit of trial and error is required there. |
| 13:37 | On top of this we need our boost control valve plumbed in. |
| 13:41 | And probably in my career as a professional tuner, this was the number one frustration for me. |
| 13:48 | When I was delivered a car that had been built by an owner or built by another workshop and I would say probably greater than 80% of installations, they've just simply plumbed the wastegate boost control solenoid incorrectly. |
| 14:02 | So it's that solenoid that the ECU is controlling and pulsing in order to adjust our boost pressure. |
| 14:08 | It's relatively straightforward. |
| 14:10 | I mean read the instruction manual is pretty much the simple way of putting it there, it's really not rocket science. |
| 14:17 | So read the instruction manual, make sure you've got the wastegate plumbed, regardless if this is an internal or an external wastegate, there are techniques for plumbing either one to a boost control solenoid but make sure you've got the pressure and the top and the bottom of the wastegate basically plumbed up the correct way. |
| 14:33 | Otherwise the problem is going to be that you'll jump on the dyno or the tuner jumps on the dyno, does the first pull where they're expecting minimal boost and instead what they're actually getting is the maximum boost pressure the system can provide and of course even with the boost cut in place, this can potentially be dangerous. |
| 14:49 | So that covers our main aspects there. |
| 14:52 | Basically once we've got the system installed though, as I mentioned, we really want to just do a base run with no electronic control at all active and just make sure that we are getting nice stable control and that's going to give us a pretty good opportunity to know that we've got a workable system that we're going to be able to tune. |
| 15:13 | Alright so on top of this, once we've got our system that we know that we're getting good boost control with, it's important to understand the sort of aspects that can affect our boost pressure. |
| 15:25 | So we want to be able to take these into account when we are developing our boost control strategy. |
| 15:31 | And I've sort of touched on this already, basically the turbocharger is provided energy in two forms by exhaust mass flow as well as exhaust gas temperature. |
| 15:40 | So if we increase the exhaust mass flow, or we increase the exhaust gas temperature, both of these aspects tend to drive the turbocharger harder. |
| 15:48 | The key one, which we've already talked about is when the exhaust manifold and turbine housing is cold, it doesn't have as much heat in the system so it will tend to spool a little bit slower compared to once we've got everything up to normal operating temperature. |
| 16:02 | The other aspect that's really obvious is that the turbocharger tends to be a little bit slower to spool up in the lower gears. |
| 16:09 | So this is engine load related. |
| 16:11 | So you'll probably find that your boost control, you won't maybe hit your peak target boost pressure in first and second gear where the engine's less heavily loaded, we're running through that rev range much more quickly. |
| 16:22 | On the other hand you're just as likely to find that in fifth and sixth gear, particularly if you're going up an incline where the engine is really heavily loaded, you're getting closer to almost operating under steady state conditions on a dyno, and under those conditions we're more likely to see overboost. |
| 16:37 | So these are things we need to take into consideration. |
| 16:40 | Then on top of that we've got our atmospheric conditions. |
| 16:43 | I'm talking here about temperature and pressure. |
| 16:45 | Some of you with turbocharged cars may have noticed that your boost pressure tends to run a little bit higher on a cold night or in winter. |
| 16:52 | Likewise you may find that your boost pressure tends to wander a little bit if you're seeing very large atmospheric pressure changes, this normally comes about with changes in altitude. |
| 17:02 | So all of these factors can come into play. |
| 17:04 | And in some instances we can deal with a lot of these inside our ECU software in order to actually get the control as stable as we can as all of these conditions change. |
| 17:16 | Alright so on top of this, once we know what we're looking for here, the basis of getting a good set up for our open loop boost control is first of all a solid mechanical configuration. |
| 17:29 | So in other words what we've talked about there, a mechanical installation that can achieve good stable boost control before we worry about adding any electronic control to it. |
| 17:39 | We also need a well tuned base duty cycle table and we're going to talk about that in a second. |
| 17:45 | A base duty cycle table just is what is output to our boost control solenoid. |
| 17:50 | And then on top of that we want to add in correction parameters as applicable to help give us stable control as those aspects we've just talked about change, so I'm talking here about our atmospheric conditions, maybe our engine load et cetera. |
| 18:04 | Alright so we're going to go through a bit of a tour of our tuning software in a second and we're going to go through an example of our passive open loop control strategy. |
| 18:14 | And this is a good time to ask if you've got any questions, please put those into the chat and we'll deal with those shortly. |
| 18:22 | For now let's just jump into our tuning software and we'll see what we've actually got to deal with here under our boost control strategy. |
| 18:29 | So what we'll do is we'll head across to our main set up and we're looking at our functions here in our Haltech Elite and what we want to do here is look at our boost control. |
| 18:41 | So we'll start actually over on our wiring tab here and we've got the option here to have one solenoid or two, we're only running a single solenoid on our single turbo system here. |
| 18:54 | We've also got some other options which we can enable for an arming switch trim and scramble boost but not really too important to our considerations today. |
| 19:02 | And then of course we've got the wiring for our boost control solenoid. |
| 19:05 | So this is what the ECU is actually wired up to, or the boost control solenoid is wired up to, I should say, on our ECU header. |
| 19:13 | These are pretty straightforward, it's just a two wire solenoid. |
| 19:16 | We're using the very common Mac three port solenoid. |
| 19:19 | We need to wire 12 volts to one side of this and we wire the other side to a auxiliary output, in this case we're using ignition six on our Haltech Elite. |
| 19:30 | So we'll move across to our boost control tab here. |
| 19:34 | And we can see that in this case we can choose between open loop or closed loop control. |
| 19:40 | So we're of course dealing with open loop but I would urge you, even if you are developing a closed loop control strategy, there are a couple of ways of doing this, we can start with closed loop enabled and just zero out our PID gains. |
| 19:52 | But we also at the same time can simply start in open loop, develop our duty cycle table, get that all accurately dialled in and then convert across to closed loop. |
| 20:03 | So we've got the other aspect that's important to mention here is our output frequency. |
| 20:09 | So this is the frequency that the solenoid will be pulsed at. |
| 20:13 | And this is one that does actually have quite an important different effect on our boost control. |
| 20:19 | Generally with the Mac three port solenoids that I use, I generally find that they work between about 20 and 30 hertz. |
| 20:26 | I've actually got this set to 33 hertz, I think off the top of my head, that is the default value from Haltech. |
| 20:33 | Where you can get into problems is if you start increasing the duty cycle at the upper frequency and make that too high. |
| 20:41 | What you can find is that the solenoid will actually struggle to operate, so you're going to end up with the solenoid not opening and closing accurately and this can affect the boost control obviously. |
| 20:52 | Likewise at very low frequencies, maybe if you set this down at 10 or 15 hertz, the solenoid can work there. |
| 20:59 | But it's quite a slow oscillation of that solenoid. |
| 21:02 | You're likely to see that result in an actual noticeable oscillation in our boost pressure and certainly if you've got an external wastegate venting to atmosphere, at lower frequencies you'll actually hear the pulsation of the wastegate as that solenoid cycles open and closed. |
| 21:18 | So if you are noticing an audible oscillation with your boost control system, one of the first places to try is just increasing the output frequency there. |
| 21:26 | We've also got the minimum and maximum duty cycles here. |
| 21:29 | So zero obviously minimum, 100% maximum, no rocket science there. |
| 21:34 | What I will mention though, and this again is something that's often overlooked, is that there is dead band with these solenoids, regardless which one you're using. |
| 21:43 | And what I mean by this is between, with the Mac 3 port, between about zero and about 12 to maybe 15% duty cycle, you're going to find that really it has no effect or very limited effect on raising our boost pressure. |
| 21:55 | Once you get up above that 12% threshold, you're gonna start seeing that every time you make a 2% or 5% increase in duty cycle, we see a noticeable increase in our boost pressure correspond to that. |
| 22:06 | Likewise at the very top end of the duty cycle range, up above about 85% to 88% between there and 100%, again, we're going to see no change, so that's just an aspect of the solenoid's operation, just understand that at very small duty cycles and very high duty cycles, you're going to lose control there. |
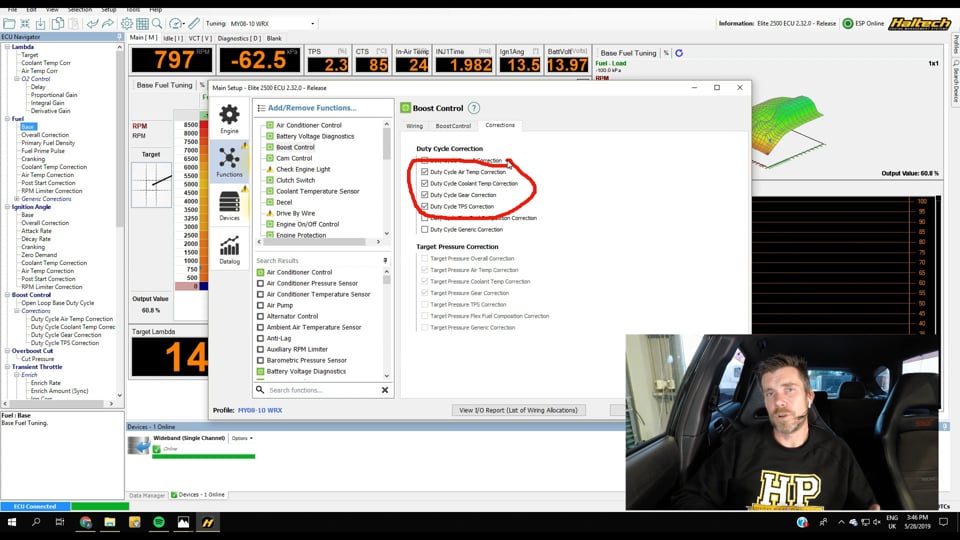
| 22:23 | Now we'll move over to our corrections, so here we can choose a range of corrections that we want to make. |
| 22:30 | So in this case we can see the ones I've got ticked off here which are, we've got an air temp correction, we have got a coolant temp correction. |
| 22:41 | Those allow me to make some changes to the boost duty cycle based on the engine's temperature. |
| 22:48 | So we're trying to compensate for some of those aspects of the boost control. |
| 22:51 | We've got gear correction, this is really important because this helps the aspect I've already mentioned whereby when we are in a low gear we tend to see the boost undershoot whereas if we're in fifth or sixth gear, we may see our boost overshoot so we can correct for some of that. |
| 23:06 | We've got the ability to run a flex fuel composition correction and also a generic correction which we can basically make do whatever we want. |
| 23:15 | So that's our basic strategy there that we've got set up so we'll get out of that now. |
| 23:21 | And what we're going to do is just move down and actually have a look at our boost control settings. |
| 23:25 | So we start with our open loop boost duty cycle table. |
| 23:29 | Now in its simplest form, this can be a simple two dimensional table relative to engine RPM. |
| 23:37 | And actually perhaps I should've started with that but I haven't, I've jumped ahead so we're going to carry on with what we've got set up there. |
| 23:44 | So this is pretty simple, I've got a load axis here for manifold pressure and this is one of the aspects where we're trying to, we're using an open loop system but we're actually getting some passive correction if we overboost or underboost even with this system. |
| 24:01 | So the duty cycles in here correspond to what's being sent out to our boost control solenoid and really, in basic numbers here, the higher the duty cycle, the more boost we can expect. |
| 24:13 | Now if we look at this graphically over on the right hand side, and what we can see is that if we look at our general trend with RPM, we can see that as we move to the right of this table, our boost control duty cycle numbers increase. |
| 24:27 | And that's just to really combat the fact that we've got a small turbo here, factory size turbo on a factory engine. |
| 24:34 | They're sized for fast spool, good response at low RPM but they do become restrictive at high RPM and this is why we start to see that boost drop off. |
| 24:43 | So what we're doing there is combatting some of that by increasing the duty cycle, to try and hold as much boost pressure as we safely can. |
| 24:51 | You will also notice here I've got this section of the map set to 0% duty cycle. |
| 24:56 | And this is simply because with this open loop system, the Haltech ECU will just apply whatever duty cycle is in this table to the solenoid and what we can see is with this system in place, at idle, the solenoid will sit there ticking. |
| 25:14 | And that can be audible in some installations. |
| 25:17 | So that's why I've got this all set to zero but you will notice that this is all in an area of the table or should be in an area of the table where we aren't actually affecting our boost control. |
| 25:28 | What we've got is the numbers in here, we're going to just simply start, and it actually is easier to start with this setup as two dimensional. |
| 25:36 | And what we're going to do is basically tune this table until we've got our boost control where we want it to be. |
| 25:44 | So maybe using a fourth gear run on our dyno with about a 500 RPM ramp rate. |
| 25:49 | And we want to start with this table set to zero. |
| 25:52 | So we should be getting our minimum boost pressure and then what we want to do is just start by increasing in probably 5% to 10% increments initially, remembering we've got that dead zone at the low range of our solenoid so we're not going to see any difference up until about 10% to 12% anyway. |
| 26:08 | Once we've actually started seeing some movement in our boost, we can basically work out over testing from a couple of runs on our dyno, what sort of magnitude change we need to make to this table in order to affect a boost control change of let's say two psi. |
| 26:25 | And this will vary with every installation, we can't say for a given boost control solenoid that a 10% change in duty cycle equals 5 psi, it's not that easy. |
| 26:35 | We need to actually test and find out how that works for ourself. |
| 26:39 | And we just want to essentially iteratively creep up on our target boost pressure. |
| 26:44 | So as I've said, I would recommend starting with this set to a two dimensional table while we're doing that and once you've got your boost pressure where you want it to be, then we can add in this three dimensional axis, our load axis here of manifold pressure. |
| 27:00 | And why we're doing this is that it allows us to make some changes or manipulate the boost control if we go over our target. |
| 27:08 | So let's look at our target boost pressure here, so between about 3000 and 5000 RPM we are targeting 150 kPa. |
| 27:19 | So I've just drawn a line in there of where I want the boost pressure to be. |
| 27:22 | What you can see though is I've got quite close break points in my vertical axis there in my manifold pressure, I've got break points at 140, 145, 150, 155, 160 kPa. |
| 27:35 | So what that means is that, let's say 3500 RPM here, we'll just highlight a few cells. |
| 27:41 | So if we were at 150 kPa, we would have 50% duty cycle. |
| 27:46 | That's our target remember. |
| 27:47 | If on the other hand, we are just a little bit below our target, we can see that at 145 kPa, we're going to actually just passively add 1% duty cycle to our boost control solenoid. |
| 27:59 | Likewise if we overshoot a little bit and we end up at 155 kPa, you can see that we've slightly more aggressively reduced our boost control solenoid duty cycle, we've gone from 50% down to 47%. |
| 28:11 | Now if things start really getting out of hand and we get up to 160 kPa, now we've pulled out another 3%, we're down to 44% duty cycle, and basically you can see this top row in here at 170 kPa, if I'm up that high, something's really gone pear shaped, I don't want to be running that sort of level of boost so we're just dropping the duty cycle completely down to zero. |
| 28:33 | This of course is coupled with an overboost cut out so we've got a safety precaution in case we've actually got a mechanical failure of the boost control system. |
| 28:41 | So this just allows us to use an open loop control strategy without the complexity of a PID algorithm. |
| 28:48 | But we do have the ability still to manipulate the boost within reason if it's above or below our target. |
| 28:54 | Now a couple of tips when we are setting this up, what we want to do is make small changes, so you might think that well if we go above 150 kPa, let's say we get up to 155, well let's just drop out 10% duty cycle. |
| 29:09 | That would guarantee that our boost is going to drop back down to our target. |
| 29:12 | And while yes, that is the case, the system does have some latency in it, so it doesn't respond instantly. |
| 29:19 | And what I mean by this is if we make large changes in this passive open loop table, what we're going to end up doing is inevitably setting up a bit of an oscillation and our boost pressure's just going to be jumping up and down around our target so we don't want that. |
| 29:35 | So generally I find a control change per five kPa around our target of between 1% and about 2-3% maximum is going to give us good stable control and the ability of that system to react to our changes. |
| 29:48 | Now of course the wheels kind of fall off in this application once we go past around about 5000 RPM because as we know, by the time we're down to, actually that's a pretty poor example, we're actually down to about 110 kPa by 7000 RPM. |
| 30:06 | So we're sort of moving through that table. |
| 30:08 | There's a very short range of the RPM band where we are at that 150 kPa target before falling away but we can still manipulate the table in exactly the same way. |
| 30:18 | It's less important at higher RPM because as you can see, the numbers in the table already, up in this region, we're already sort of right up at the upper range of what we can achieve with that solenoid, up around that 78, 80% duty cycle range, so we're not going to be able to get much more boost out of it anyway. |
| 30:35 | We're basically all in at that point. |
| 30:37 | So this is our first place to do our tuning, getting our open loop target table set up and getting really good control. |
| 30:44 | Once we've done that though, we do have our corrections that we can use, in order to help correct for some of those atmospheric conditions. |
| 30:51 | So again really just trying to give the boost control solenoid the correct information for the current operating conditions so we can get as close to our target as we can. |
| 31:02 | So we've got our corrections here, we've got our air temp correction, and particularly what we can see here, most of this table's set to zero, particularly above 20 degrees C, but at lower temperatures you can see I'm pulling duty cycle, particularly down around zero degrees C, and we do get those sort of temperatures over winter here in Queenstown, pulling 15% duty cycle out. |
| 31:23 | So that's pretty significant. |
| 31:25 | So that's just going to help prevent overboost in those colder conditions, colder night time conditions. |
| 31:30 | Once we're up in the 30 plus degrees C range, which is what we'd normally expect our air temperature to be when we're running, we see we're back up to zero so we're back to our base duty cycle positions. |
| 31:42 | We've got coolant temp correction here as well. |
| 31:44 | This is less of an issue generally in terms of our boost control but more to do with an engine protection strategy. |
| 31:52 | So you can see that down at zero degrees C and even 10 degrees C, I'm pulling a lot of duty cycle out. |
| 31:59 | 100% at zero and 50% at 10 degrees. |
| 32:02 | And really this is because I don't want a huge amount of boost when the engine is absolutely stone cold. |
| 32:07 | This way, if someone drives the car who's maybe a little less mechanically sympathetic than we are, it means that it's not going to be beat up on really hard until it gets up to operating temperature. |
| 32:17 | Likewise we can see right up at the upper extreme here at 120 C, I don't want to be operating there, the engine is clearly overheating if we're there. |
| 32:26 | So again just to safeguard the engine, if the driver can't figure that out for themselves, we've pulled out 50% boost duty cycle as well. |
| 32:33 | That'd probably be couple with some additional fuelling and maybe reducing our rev limiter as well just to really make sure that the engine isn't going to get damaged. |
| 32:43 | And the next one's probably one of the more important ones which is our duty cycle gear correction. |
| 32:48 | And this allows us to really make up for some of those boost changes we see based on which gear we're operating in. |
| 32:54 | So what we can see is that in third and fourth gear, where our load is pretty stable and comparable to what we're seeing on the dyno, we're making no changes here, so we're just using our duty cycle table. |
| 33:06 | In first and second gear we can see that we're increasing our duty cycle and it may be that particularly with a larger turbo, no amount of work from you as a tuner is going to get you your target boost pressure in first and maybe even second gear. |
| 33:20 | We're just going to go through the RPM range so quickly that the turbo really doesn't get a chance to reach full boost. |
| 33:25 | And then conversely in fifth and sixth gear, you can see I'm pulling 10% and then 12.5% duty cycle. |
| 33:32 | So all of this really needs to be done through some logging and testing. |
| 33:35 | And of course this has to be real world stuff as well. |
| 33:38 | We can't just run the car on the dyno in first gear and call our results good. |
| 33:43 | We actually need to go out on the road out in the real world and actually gather some data and see what these need to be set up as. |
| 33:49 | The last one that I'm going to show you here, and this is one I think is quite often overlooked and I want to give you a quick demonstration of this. |
| 33:56 | So this is our throttle position correction. |
| 33:59 | So I've started off purposefully here with our throttle position correction set to zero, so it's having no influence. |
| 34:06 | So what I'm going to do here, let's just get oursevles up and running and we're going to go to fourth gear and we'll go up to some RPM range where we can actually get our full 150 kPa of boost. |
| 34:18 | So we'll come up to a bit over 3000 RPM here and just before I do this demonstration, we'll just explain what's going on on the left hand side here. |
| 34:26 | So I've got this graph logger set up, just so you can see the relationship between our boost pressure which is in blue and our throttle position which is in red. |
| 34:36 | Now if you want a little bit more detail, both of those numbers are also up here, the boost pressure sitting 35 kPa at the moment, our throttle position at 23 kPa. |
| 34:46 | So what I'm going to do is we're just going to climb up to our full throttle and remembering we're targeting 150 kPa and you can see everything's doing a pretty nice job, we're within 1 kPa of that target. |
| 35:00 | So what I'm going to do now is I'm going to drop our throttle down. |
| 35:04 | Look on the graph logger of what our boost pressure's doing, it hasn't changed, in fact we're actually up to 154 kPa. |
| 35:12 | So I've jumped to 60% throttle at the moment, our boost pressure has not changed, let's continue to drop the throttle down, we're down to 50% throttle and we're still at 150 kPa. |
| 35:25 | We'll continue to drop the throttle and now as I come down to 40% throttle, we're just starting to see our boost drop off, but we've only dropped off about six or seven kPa. |
| 35:35 | We'll keep coming down, and obviously as we start getting down towards closed throttle, our boost drops rapidly. |
| 35:41 | So that may seem pretty irrelevant but it's really important, particularly if you've got a two wheel drive competition car that has a lot of power and has limited traction. |
| 35:50 | The reason for this is that if we looked at what the torque was doing on our dyno while we're doing that test, we'd see that between 100% throttle and maybe 50% throttle, our torque would drop away but only marginally, it might only drop away 10 or 15%. |
| 36:05 | This gives a very non linear feel to our engine torque and it makes it hard again in those light two wheel drive cars with a lot of power and low traction, makes it very hard for the driver to get good modulation of the engine power. |
| 36:17 | But we can fix that quite easily, so let's head back across to our table here. |
| 36:22 | So what we're going to do is obviously at 100% throttle we want to be all in, we want all of the boost that we're asking for here, so we're going to leave that alone. |
| 36:31 | However at 75% throttle we're going to start by pulling out quite aggressively 30%. |
| 36:35 | At 50% throttle we might pull out 60%, and then at 25% throttle, no not plus 100, we're going to pull out 80%. |
| 36:46 | So now what we're doing is we're purposely pulling duty cycle away from the boost control solenoid as we close our throttle. |
| 36:52 | Let's just repeat that test and we'll see how well that actually pans out. |
| 36:56 | Now of course this does require some testing and developing to suit the specific requirements or preferences of the driver as well. |
| 37:04 | But it can be very very powerful so we'll just get back up to our 3500 RPM set point. |
| 37:10 | We'll go back up to full throttle here, and we're sitting at 150 kPa, our target, 100% throttle. |
| 37:17 | Now what I'll do is I'll pull our throttle back down to 75%. |
| 37:21 | So we can see straight away our boost pressure has already dropped down to 135 kPa, let's come down to 50% throttle. |
| 37:27 | And you can see now at 50% throttle we're down to about, what's that, about 80 kPa. |
| 37:36 | So that's a dramatic difference compared to before when we still had 150 kPa all the way down at I think it was about 40% throttle opening or thereabouts. |
| 37:44 | So that is a really powerful table that you can use to have a huge effect over the control of the car and in particular the modulation of the engine torque. |
| 37:55 | And again, play with that, get something that is going to be nice and manageable and something that is going to make the car a lot easier to drive. |
| 38:04 | Alright that brings us to the end of our webinar so we'll jump across and we'll have a look at some questions and if you do have any further questions, please continue asking them, we'll see what we've got. |
| 38:19 | James has asked, if running two wastegates, is it recommended to run two boost control solenoids or a single boost control solenoid? James that's a good question, that's actually something we've just gone through on our FD RX7, given that we are running two wastegates. |
| 38:34 | And a lot of people do think that you need twin solenoids and the reality is that it's actually not the case, you can still get good boost control using a single boost control solenoid on twin wastegates so definitely not necessary to go to two. |
| 38:50 | Sometimes from a packaging perspective it can be easier to run two solenoids though so really just a personal preference there. |
| 38:58 | Darius has asked, what would a boost tuning strategy be when using wastegate with a position sensor? OK so while it's not, how would I put it, it's not impossible to incorporate the wastegate position sensor into the boost control strategy, generally the wastegate position sensors are there more for fault finding and diagnostic purposes. |
| 39:22 | So we can look at what the two wastegates were doing, if we've got two wastegates or if we've got a boost control issue, we can look at what our wastegate was doing and quickly determine from the wastegate position if the issue is there or somewhere else in our boost control system. |
| 39:37 | Now that being said, it is possible with some ECUs to incorporate wastegate position into the boost control strategy so this is where it gets a little bit murky. |
| 39:46 | One of the examples of this, it was actually brought to my attention just recently, the brand new Honda Civic type R turbo engine uses an electronic wastegate actuator. |
| 39:57 | So the wastegate as far as the mechanical side of that goes is the same as a conventional internal wastegate, we've still got the little internal flap valve that opens and closes, however instead of using a pneumatic control valve, this is now just done electronically. |
| 40:11 | So the advantage with that Honda part is that it actually has an internal position sensor. |
| 40:16 | So some of the ECUs such as MoTeC who do a plug and play for that particular model, they incorporate the wastegate position into the boost control strategy. |
| 40:24 | But as I say, in general terms that's not how we would be using it. |
| 40:30 | Zav, I think it is, has asked is 22 psi secure for a standard EJ25 STi? This engine has got a bad reputation about head gasket failures under boost. |
| 40:40 | So little subtle aspect here, this is not a US domestic market or a European domestic market 2.5 litre engine, this is still the two litre engine. |
| 40:52 | And yeah the EJ25 I think generally does have a bit of a checkered reputation for head gasket integrity along with a bunch of other things. |
| 41:01 | The EJ20, we've proven time and time again that well tuned, 22 psi peak on our local 98 octane fuel is quite reliable. |
| 41:10 | Now a little aspect that I'll just mention here, it is a little bit off course but quite often we do get asked, what is a safe boost pressure for a particular engine? And there's all sorts of examples of some tuners getting away with running huge boost pressure with what seems like great reliability while other tuners are damaging engines left right and centre at much lower boost levels. |
| 41:31 | And the key here is that the boost pressure is only one metric that we need to understand. |
| 41:36 | And we can often get great results running quite high boost pressures with reliability, provided that we take into consideration the rest of the tuning parameters, and what I'm getting at here, make sure that your engine is running a good safe air fuel ratio and make sure that it's not suffering from knock or detonation. |
| 41:53 | Particularly just in reference to your head gasket issues, or head gasket comment I should say, the pressure spikes in the combustion chamber that are resultant from detonation occurring, these will definitely cause head gasket reliability problems on an engine where the head gasket integrity is suspect in the first place. |
| 42:11 | On the other hand, if your engine was tuned and no knock was occurring, you'd probably be absolutely fine. |
| 42:19 | Emmanuel has asked, can you place a wastegate before the intercooler for safety? You can place a wastegate before the intercooler or post intercooler. |
| 42:29 | Generally the only place I see that done is with drag cars, they're used for a very specific purpose which is control over the boost pressure, specifically during staging. |
| 42:39 | So from a safety perspective I'm guessing what you're talking about here is to combat the potential for an overboost causing engine damage. |
| 42:47 | I wouldn't be using a wastegate for that, it could be used, you could set it with a certain spring pressure to basically act as a pop off valve. |
| 42:56 | But the reality is we have the ability to implement control strategies within our ECU with boost cuts, that's what we should be using as a safety strategy. |
| 43:05 | When we've done that properly, there's no damage, there's no harm from that as long as it's set within a safe realm and it's very simple to do so that's what I'd be expecting there. |
| 43:17 | 1000 Horsepower XR6 has asked, do you need to retune if you plumb an external wastegate that was once just venting to atmosphere and is now plumbed back into the exhaust system? That's actually a really good question and there's a bit of misinformation around this question and the answer that I'm going to give, so let's talk about that. |
| 43:34 | On face value you would think that no, plumbing the wastegate back into the exhaust should have really no effect on our tune, so we don't need to check. |
| 43:45 | What we need to consider though is that that wastegate venting to atmosphere is actually dumping a reasonable amount of exhaust gas, obviously depending on how open or closed our wastegate is, that's bypassing the exhaust system. |
| 43:57 | So particularly if you've got an exhaust system that offers a reasonable level of restriction to flow, if you plumb that exhaust gas from your wastegates back into the exhaust system, that exhaust gas from the wastegate now has to flow through the rest of the exhaust system so we can see exhaust gas back pressure climb as a result. |
| 44:17 | And this is another aspect that affects our boost control. |
| 44:20 | What we need to consider is the pressure differential essentially across the turbine wheel, that will affect our boost. |
| 44:28 | So absolutely yes it can affect both your boost control as well as the volumetric efficiency of the engine, probably I would hope, to a very small percentage. |
| 44:37 | But always best to check those things and make sure. |
| 44:41 | Doctor Rolly has asked, which is better, open loop or closed loop, or is it just a personal preference? Look there is no question that a properly tuned closed loop control system is potentially the better option. |
| 44:55 | When it's all set up correctly, you can have really rock solid boost control and almost irrespective of your operating conditions, your atmospheric temperature, and pressure in it, it's really quite amazing to see how well a properly tuned boost control system can work. |
| 45:10 | So I don't say that open loop is better, that's not really the point of this webinar, my point was that unfortunately while closed loop control is great, getting really stable closed loop control can be problematic. |
| 45:22 | And if you don't really know what you're doing with the closed loop tuning, then it's very easy to end up with a boost control strategy that is absolute garbage. |
| 45:31 | In that instance, open loop, tuned properly, using those tips that I've given you in this webinar today, definitely going to give you a better result. |
| 45:40 | So yeah personal preferance but really comes down to your level of knowledge, the ECU you're tuning and your ability to actually set up closed loop in the first place. |
| 45:47 | Alright guys that has brought us to the end of our webinar. |
| 45:50 | Hopefully everyone now has a better understanding of boost control and some of the aspects that make it a little bit tricky for us to get it really stable and accurate all of the time. |
| 45:59 | As usual if you've got any other questions, please ask those in our forum and I'll be happy to jump in and answer them there. |
| 46:05 | Thanks for joining us, hope to see you all next week. |


