216 | Introduction to MegaSquirt
Summary
The MegaSquirt ECU has long been a popular option when it comes to aftermarket standalone ECUs. In particular, MegaSquirt offers an extensive feature set in a cost-effective package. In this webinar, we’ll take an introductory look at the MS3 Pro ECU fitted to a Mazda MX5/Miata and explain the tuning process using TunerStudio MS software.
| 00:00 | - Hey guys, Andre from High Performance Academy, welcome along to another webinar. |
| 00:03 | Now today we're going to be having an introductory look at the MegaSquirt MS3 Pro plug and play ECU that we've got fitted up to our Mazda MX-5. |
| 00:14 | Now the MegaSquirt ECU is one that on this side of the world, back here in New Zealand, and I think even in Australia, hasn't really seen the sort of penetration that it's seen, particularly in the U.S. market. |
| 00:28 | So a lot of tuners in the Southern Hemisphere haven't actually been exposed to the MS3 Pro ECU that much and I'll put my hand up and say that I'm definitely one of those tuners. |
| 00:38 | However, we're about to change that. |
| 00:40 | We've just got this car up and running with the MS3 Pro in it. |
| 00:44 | And we're going to be using it as the basis for some development for some more of our course material. |
| 00:49 | So you're going to see a lot more webinars come out on the MS3 Pro platform over the coming months. |
| 00:55 | We're also going to be adding a worked example into our practical standalone tuning course, using this particular ECU. |
| 01:02 | Now I think that a little bit of brief history is worth going into here. |
| 01:07 | The MegaSquirt product has been around for a very long time and in initial format, essentially a DIY based kit-set that a talented home enthusiast could assemble themselves. |
| 01:20 | Basically giving themselves a very cost effective ECU. |
| 01:24 | Another aspect there was the open source code to make the ECU work, the firmware, which allowed the enthusiast community to basically modify the way the ECU operates and add features et cetera. |
| 01:41 | We've seen the ECU develop and mature over the coming years and now we've got essentially a off the shelf item, a professionally packaged off the shelf item that is, as I've said in this case, a plug and play replacement for the Mazda Miata or MX-5 platform. |
| 01:59 | This makes it still a very cost effective option to get a fully programmable ECU into your car. |
| 02:06 | Now I think that a lot of tuners and enthusiasts may consider, because of the DIY aspect of the MegaSquirt product originally, that maybe it's not up to modern standard and it's not a sophisticated ECU. |
| 02:21 | And the reality is that that couldn't be further from the truth. |
| 02:24 | The modern MS3 Pro is actually a pretty advanced ECU and you can make it as simple or as complex as you want to, depending on the particular platform and application you're working with. |
| 02:37 | So a couple of examples of that just to give you some idea, are capable of running individual cylinder close loop lambda control air fuel ratio control on engines. |
| 02:47 | So if you have a V8 and you want to fit eight individual cylinder lambda sensors into the exhaust headers, then you can use the ECU to close loop control the air fuel ratio on each cylinder. |
| 03:00 | Now that's a feature that I've found is quite rare, even in some of the very high end ECUs. |
| 03:06 | Another option would be of course individual cylinder knock control. |
| 03:10 | Maybe a little bit more mainstream but still a very powerful function to add into your ECU. |
| 03:17 | I should have mentioned here as well that as we go through this demonstration, if you've got any questions, anything that you'd like me to dive into in a little bit more detail, then please feel free to ask those questions in the comments and the team will transfer those through to me. |
| 03:30 | I'll do my best to answer them. |
| 03:32 | I will be the first to put my hand up and say that at the moment, we are still familiarising ourselves with the MS3 Pro product so I'm definitely not sitting here to tell you today that I am a complete expert in the product. |
| 03:46 | But as we become more familiar, we're going to be bringing you more and more content on some of the more advanced functions. |
| 03:52 | Now to start with, we need the software package to allow you to tune the MS3 Pro ECU and this is where there are actually a few options. |
| 04:02 | So for example the product that we're going to be using here is called Tuner Studio. |
| 04:06 | There are three variants of tuner studio with a variety of different options, depending on which version you've got. |
| 04:13 | So free to download is the Tuner Studio MS Lite. |
| 04:18 | Then if you want a little bit more functionality and you'll get a registration to allow you to use this with the purchase of the ECU, there is the tuner studio MS. |
| 04:29 | And then if you want to pay a little bit more money and get a little bit more functionality, you can move into the Tuner Studio Ultra which is what we are running today. |
| 04:38 | So we'll have a quick look through that software package. |
| 04:40 | So if we head across to my laptop screen. |
| 04:43 | So this is the Tuner Studio MS Ultra version. |
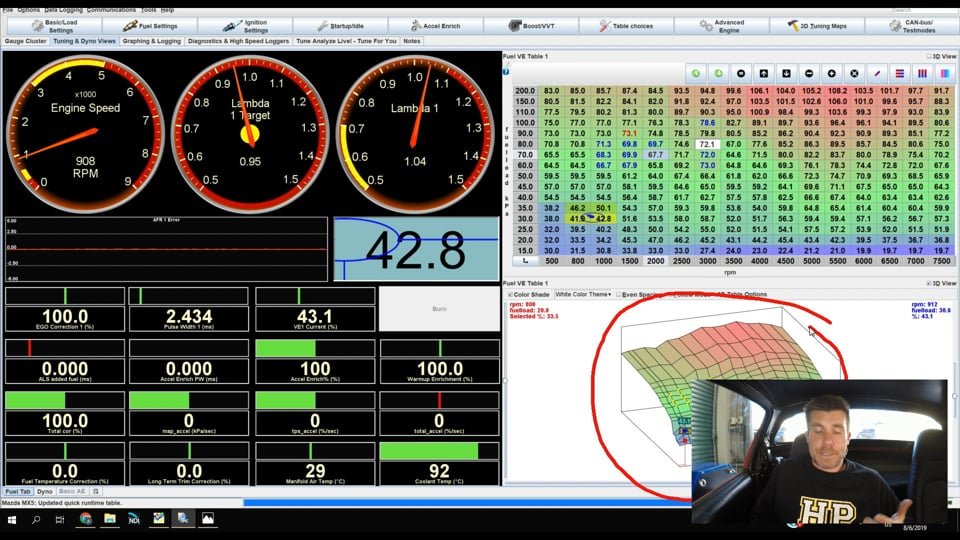
| 04:47 | And we're on our gauge page at the moment. |
| 04:51 | So we can configure this to show whatever gauges we want. |
| 04:56 | For example, some of the key ones we can see at the moment, we are sitting at idle. |
| 05:00 | We've got our RPM over here. |
| 05:02 | We've got our lambda, which is currently sitting a little bit leaner than we'd like, but that's OK, we'll get into that shortly. |
| 05:07 | And engine coolant temperature. |
| 05:09 | Again we can configure these with whatever gauges we want to see depending on our task at the time. |
| 05:16 | We've also got, because we're running the Ultra software, we've got the ability to provide a couple of tabs that aren't available in the Lite and the MS version. |
| 05:27 | So for example we've got tuning and dyno views. |
| 05:29 | We'll just click onto that. |
| 05:31 | So this gives us a nice layout with a little bit more information that may be relevant to what we're doing at the time. |
| 05:38 | On the right hand side out here, we've got our fuel table, which is what we're going to be tuning. |
| 05:44 | We've got a 3D graphical display of that particular table there. |
| 05:48 | We've got a couple of the gauges that we're interested in. |
| 05:52 | So for example when we're fuel tuning, obviously we're going to be looking at our measured air fuel ratio. |
| 05:57 | I should mention I am looking at this in lambda. |
| 06:00 | Of course if you prefer air fuel ratio units, you can set this up to display in units of AFR. |
| 06:06 | Likewise if you want to work in imperial units instead of metric, that's fine too. |
| 06:11 | And beside this, we've got our target lambda, so this is our target or desired air fuel ratio. |
| 06:18 | So what we'll do is we'll just get our fan up and running here and we'll get our engine up and running on our Mainline hub dyno. |
| 06:26 | And as we move around, what we can see on the right hand side here is that our little cursor moves around to follow exactly where abouts we're accessing in the table. |
| 06:36 | Now as I, I'll just actually bring my RPM back down. |
| 06:40 | I'll just let it come back down to idle. |
| 06:43 | If you watch, as we come back up to that set point, you can see there is a snake trail that follows that cursor around, which is kind of handy because this allows you to see where you've been tracking through the fuel table or VE table while the engine is running. |
| 07:00 | Now a really important aspect here, we're sort of getting ahead of ourselves, but I'll just show you this and we'll get back to some of the more basic aspects. |
| 07:07 | A really important aspect of tuning any ECU is making sure that before you make tuning changes, you're central on the cell that you are looking at. |
| 07:16 | So you can see out here, on our grid of numbers, our three dimensional numeric table, it's a little bit tricky to see exactly how central we are. |
| 07:26 | So the particular cell that I've chosen there just randomly is 3000 RPM and 60 kPa. |
| 07:32 | But if we look here, we can see we've got a slightly zoomed in idea of exactly how close we are to that cell. |
| 07:40 | So if I add a little bit of throttle, we'll see that our cursor moves up and away from the centre of that cell, back off the throttle a little bit and we see we come back down central. |
| 07:49 | So when that cell turns red, it shows us essentially, it's close enough to the centre of that cell to make tuning changes. |
| 07:57 | We can actually see that our RPM is a little bit below 3000. |
| 08:00 | Now that's indicated in two separate ways. |
| 08:02 | We can see that that cursor at the moment is a little bit offset. |
| 08:06 | So we're not quite in the centre of the cell, though it's moving around a little bit. |
| 08:11 | Also if we look at our RPM we're sitting at around about 2960, 2980 RPM. |
| 08:19 | So again we can just use our dyno control here and by just stepping that up a little bit, we'll get ourselves right into the centre of that cell. |
| 08:27 | So really important there because if you don't make tuning changes when you are in the centre of the cell, then you're going to end up with an interpolation affecting the accuracy of those changes. |
| 08:39 | So really really important just to make sure that you are central before making those changes. |
| 08:46 | So the amount of information that we've got here, or what you're wanting to see really is going to depend on the individual. |
| 08:52 | Really the sort of things that I want to keep an eye on, my main inputs of course are my air fuel ratio target and my measured air fuel ratio. |
| 09:01 | So we've got those two obviously, as we've already seen, here and here. |
| 09:06 | The other aspect is that MS3 Pro will give us an AFR error. |
| 09:11 | So it actually calculates the error for us between our measured air fuel ratio and our target using our measured over desired equation to give us a correction factor that we can straight away apply. |
| 09:26 | We're also going to have a look during this demonstration today of how we can use some of the auto tuning or tune analyser function in the MegaSquirt software to help us really quickly dial in our fuel table. |
| 09:39 | Other aspects I want to look at here, we've got our coolant temperature down the bottom right hand corner here. |
| 09:46 | I just want to make sure that while I am tuning that we are controlling our engine coolant temperature. |
| 09:53 | It's really easy, particularly when you're getting really focused on tuning your fuel table, particularly at higher load and higher RPM, if you haven't got sufficient dyno air flow across the engine bay, it can be really easy to have that coolant temperature start to creep up on you. |
| 10:08 | So you may have also noticed that this is colour coded. |
| 10:11 | At the moment we're sitting at 87 degrees C. |
| 10:13 | Before when I was running it, we got into the 90s and it turns yellow. |
| 10:16 | So it's a good visual indication at a glance of what the coolant temperature is doing. |
| 10:22 | Likewise we have our manifold air temperature. |
| 10:25 | Good idea, particularly on turbocharged cars just to keep an eye on that because if we're doing multiple back to back runs, we're going to potentially see our manifold air temperature creep up and we want to make sure that when we're making our tuning changes, that the numbers we are seeing, are realistic compared to what the engine is actually going to experience out on the road. |
| 10:45 | Again, it really comes down to the fact that on the dyno, it can be quite difficult to adequately replicate the air flow that the car will really see out at high speed on the road. |
| 10:56 | So a couple of things we want to look at there. |
| 10:58 | We've got our pulse width being delivered to our injectors. |
| 11:02 | We've also got another few aspects we can monitor. |
| 11:05 | So we can see we've got exhaust gas oxygen correction. |
| 11:08 | If we're running closed loop air fuel ratio control or EGO control, then there will be some activity from this. |
| 11:15 | And this is one of those things that's really easy sometimes to overlook. |
| 11:19 | If we've got our exhaust gas oxygen correction functioning, the job of that correction of course is to correct any errors between our target and our measured air fuel ratio. |
| 11:32 | So if we are ignoring that, we don't notice anything going on there, and we're just simply looking at our target and our measured lambda. |
| 11:38 | They're obviously going to be the same thing, they're going to be doing what they should and matching because the close loop control's taking care of that. |
| 11:44 | However if we maybe then have a look at our close loop control and find that it's adding 10% or 15% fuel, then obviously there's work for us to do in our VE table. |
| 11:55 | So a good idea to watch that. |
| 11:57 | Likewise we've got another couple of corrections that we want to watch here. |
| 12:00 | We've got our acceleration enrichment, we've got our warm up enrichment and we just again want to make sure that when we are making tuning changes here, we're in steady state conditions and the actual fuel delivery is not being affected by aspects such as our warm up enrichment or our acceleration enrichment. |
| 12:20 | And it's a good idea to make sure that when the engine is up to a normal operating temperature, I'm going to say generally above about 65, maybe 70 degrees C, and up to maybe about 105, 106 degrees C, over that area of your map you want to make sure that you've got no warm up enrichment active. |
| 12:40 | Otherwise it can really throw your fuel tuning and if you're not noticing that you've got that problem there, it can be really tricky for you to diagnose why your fuelling appears to change. |
| 12:53 | Alright so that's our tuning and dyno view tab that we've got there. |
| 12:56 | We'll move across, we've got graphing and logging here. |
| 12:59 | And this is an aspect that is only available on the Ultra, the Tuner Studio MS Ultra version of the software. |
| 13:08 | That's not to say that you've got no options but this software does work quite closely with the MegaLogViewer HD software, another software product coming from the same manufacturer, EFI Analytics. |
| 13:21 | So they do go hand in hand and the MegaLogViewer HD software, which we've also talked about previously in other webinars, really powerful data analysis software package and it can essentially analyse data from any ECU provided it can put out a comma separated CSV format file. |
| 13:43 | In this case, obviously it't basically made to work with the Tuner Studio files anyway, nice and easy. |
| 13:51 | However if you've got the Ultra version, this allows you to datalog directly within the software, we're going to have a look at a live demonstration of how that works really shortly. |
| 14:01 | Now for me, that's really powerful because it means that I can do all of my data analysis from within the tuning software. |
| 14:09 | I don't need to go out to a third party piece of software and it's also nice and easy because actually if we look at the log file that I've got active now, we can click, this was a ramp run that I did just before we went live. |
| 14:23 | So here on the bottom we've got our RPM from that ramp run in purple. |
| 14:28 | Above this we've got our measured lambda as well as our target lambda. |
| 14:32 | And what we can do is when we click at any particular point in the log file, we can see a ghost trace of exactly where abouts we were in the VE table. |
| 14:42 | So it makes it nice and easy for us to define exactly where we need to make changes. |
| 14:47 | If, for example, we're too lean or we're too rich, we can really be pinpoint accurate in making those changes. |
| 14:53 | Now that can be done using a MegaLogViewer HD software. |
| 14:56 | It's just another step in the process. |
| 14:59 | So if you're interested in upgrading to the Ultra version of the tuner studio software, I'd say that it's money well spent and it is going to pay dividends because it's going to save you time in the end. |
| 15:12 | Alright so what we'll do is I think we'll step back and we'll also have a look at some of the more basic aspects that go into the MS3 Pro. |
| 15:25 | So there are a variety of ways we can set this particular ECU up. |
| 15:29 | What we'll do is we'll head back to our gauge cluster on my laptop screen. |
| 15:32 | And if we click on our basic load settings tab up the left hand side, we can see some of our fundamental settings that we need to go through. |
| 15:42 | So for example if we come down to engine and sequential settings. |
| 15:45 | I'm not going to go through all of these, again this is an introductory demonstration of the software and we're not trying to get too in depth. |
| 15:53 | It's more an overview of some of the key functionality here. |
| 15:57 | So for example we've got our control algorithm here. |
| 16:00 | So how the ECU is operating. |
| 16:02 | In this case, in speed density mode. |
| 16:04 | Which is probably going to be the normal mode of operation most people will be using. |
| 16:10 | There are also options for what MegaSquirt call a percent baro. |
| 16:16 | Which is essentially speed density but also takes into account a barometric air pressure correction. |
| 16:22 | Possibly useful for those of you who are expecting to see large altitude changes. |
| 16:25 | Alpha N, which is a TPS based load axis. |
| 16:31 | We've got mass air flow sensor, if you are running a mass air flow system. |
| 16:36 | And ITB which is another mode specifically designed for engines that are using individual throttle bodies. |
| 16:44 | We have our engine stroke, so in this case we've got a four stroke engine and we have four cylinders. |
| 16:51 | We've got four injectors fitted. |
| 16:53 | It is also an even fire engine so it's possible here if you are running an off fire engine, to define individual TDCs for each of your cylinders. |
| 17:04 | So of course we are even fire there. |
| 17:06 | We've also got our engine and our injector size here. |
| 17:09 | Now in this case we can see we've got our fuel main outputs and our sequential selection here. |
| 17:15 | So in this particular instance, because of the factory design of the Mazda harness, we actually can't run sequential injection without making some wiring changes. |
| 17:26 | So this is actually running batch fire, which is a little bit of a shame, but that's just a simple limitation there with the factory hardware that we've got to work with. |
| 17:36 | Alright we'll close that down, or actually I'll just mention here we can see at the bottom here we've got this little burn icon. |
| 17:42 | If we make any changes then we do need to actually burn those changes into the ECU otherwise they won't remain active. |
| 17:51 | I should also have mentioned there, pretty self explanatory, but we've got the ability to change our firing order. |
| 17:57 | So that burn function though, that is one of the key things that we do need to keep in mind because if we make tuning changes and we don't burn them in, if we disconnect, those changes will be lost. |
| 18:08 | So what I'm going to do here, we'll just bring up our fuel table. |
| 18:11 | I'll show you how I got there. |
| 18:13 | If we go into our fuel settings tab which we'll find up the top here, we click on that, it's got all of the relevant fuel settings, and we want to come down here to our fuel VE table one. |
| 18:24 | Now I just want to make this change here because, as I mentioned, alluded to, we are running a little bit lean here at idle, 1.05, 1.06. |
| 18:32 | So pretty self explanatory really, we've got our VE table here. |
| 18:37 | We've got manifold pressure on our vertical axis and we've got our engine RPM on our horizontal axis. |
| 18:43 | We can see from our little cursor where abouts in the table we are accessing. |
| 18:47 | At the moment we're interpolating a little bit because we are at idle. |
| 18:50 | So what I'm going to do is highlight those two cells. |
| 18:53 | I can do that just by clicking on the cell that I want, and then if I hold down the shift key I can move around and highlight the next cell beside that as well. |
| 19:00 | So we want to add some fuel here and there are a variety of options on how you can manipulate the numbers in the table here. |
| 19:08 | So if we right click, 'cause if you ever forget, this is a perfect way to find out your options, this will give you all of the different options on how you can make your changes. |
| 19:19 | So probably one of the key ways we're going to be making changes is by using the comma and full stop keys. |
| 19:25 | So if we hold down, if we press the full stop key on the keyboard we'll see that those numbers there, I'll just highlight the cells that we're changing again. |
| 19:33 | Those numbers will increment by 0.1 As soon as I make a change here as well, I just want to show you that the little status flag here lights up in red saying "need burn". |
| 19:46 | At the same time we can also see that the little burn icon which was previously greyed out is now coloured in. |
| 19:53 | So this is just a visual indication that we've made a change and that change will not be locked into the ECU or burnt into the ECU until we press the burn button and that's as simple as doing exactly that. |
| 20:05 | So we'll see, when I press that, those changes are now locked in. |
| 20:08 | If we power cycle the ECU, we will not lose them. |
| 20:11 | However that was a pretty small change and we need to go a little bit further. |
| 20:15 | So the full stop and comma keys on their own, at 0.1% change, it's going to be great if you're trying to make really fine changes but in most instances, particularly if you're a little way away from the ballpark, you're probably going to want to make larger changes. |
| 20:29 | So if we hold down the control key and we press the comma or the full stop, that's now going to make a 0.5% change every time I press it. |
| 20:38 | So we were previously idling at around about 1.05, and you can see that I've stepped that up and we're now about 0.95, so pretty easy to make our changes. |
| 20:51 | Now the other ways we're going to probably want to make changes, particularly I like to use percentage changes. |
| 20:58 | That's a really helpful way of adding fuel or subtracting fuel. |
| 21:03 | So we can do that. |
| 21:05 | If we hold down the shift key and press the asterisk key or the 8 key on our number keypad, that's going to bring up our multiply selected cells by box. |
| 21:15 | So we can now make a percentage change, and what we need to keep in mind here is that if we want to add fuel, or 1.0 I should start with, is going to make no change at all. |
| 21:27 | Essentially that's going to leave the number unchanged. |
| 21:29 | So if we want to add fuel, we're going to need to enter a number larger than one. |
| 21:33 | And it gives you a little hint there, it says example 1.2 is going to add 20% fuel. |
| 21:37 | So if we want to add 5% fuel there, we're going to enter a number of 1.05, that's going to add 5% to our fuelling. |
| 21:46 | And we see our fuelling moves richer. |
| 21:49 | Tracking our target slowly but surely. |
| 21:51 | Likewise if we want to remove some fuelling, we can enter, oh let's try that again, 0.95 and that would have the effect of removing 5% of fuel. |
| 22:03 | So that's probably one of my more common ways that I'm going to make tuning changes. |
| 22:08 | Of course you can also direct enter numbers as well. |
| 22:12 | So let's say we want to set these cells here that we've just changed. |
| 22:17 | Let's say we want to change those to 50. |
| 22:20 | If we press the equals key we can now directly enter a number of 50 and that's going to make that change straight away. |
| 22:26 | So a few options depending on what you're trying to do there. |
| 22:31 | Now another option you've got here is interpolating. |
| 22:34 | So this is a great way of quickly smoothing some of your data. |
| 22:38 | If you've tuned a couple of cells then there's a gap of a couple of cells in between that you've missed. |
| 22:44 | So let's say for example we've tuned our cell at 2500 and 80 kPa there and we've found that that needs to be 80%. |
| 22:53 | And we've also tuned our cell down here at 50 kPa and 2500 and we've found that that needs to be 72%. |
| 23:03 | So what we can do there, rather than tune every cell, if you want to save a little bit of time and you're not so worried about the accuracy, we can highlight, using the shift key and using the arrow keys to move around, highlight the range of cells there and if we use the, I'll show you because it's hard to explain. |
| 23:19 | If we use the diagonal key on our keyboard there. |
| 23:23 | Not quite sure actually what you call that key but anyway. |
| 23:25 | If you press that key, that's going to do exactly that, it will interpolate between those cells. |
| 23:32 | So those are probably the key ones that I'd probably suggest that you want to lock into your memory. |
| 23:38 | But again, if you even forget that, you're trying to navigate around and you're not quite sure what exactly you want to do there, right click is going to bring up all of that information. |
| 23:47 | You can also use, as we can see down here, copy and paste, the other functions there if you want to copy between different calibrations or different tables, you can import and export those tables. |
| 23:59 | So the usual ways that we would expect to be able to manipulate that data. |
| 24:04 | The other aspect here is that you can change your load and your RPM axes. |
| 24:12 | So if you're not happy with the break points on any of your axes, if you want to manipulate where those are, you can change those. |
| 24:20 | Now interestingly, quite smartly, there is, once you've made those changes, there is a little button here, apply new x and y values and interpolate the z numbers. |
| 24:29 | So basically that will allow you to make changes to your break points on your axes but that doesn't mean that you need to go and then completely recalibrate the VE table, it will do that for you in the background, so that's a pretty smart way of making those changes. |
| 24:46 | So again we can see while we've been talking we've been making some changes and that little burn icon is lit up. |
| 24:53 | Letting us know that we need to burn those changes into the ECU. |
| 24:58 | So I'll do exactly that, those changes have been made. |
| 25:01 | Now if you want to, if you are only running the Tuner Studio MS Lite or MS then you don't have access to the tuning and dyno views tab. |
| 25:11 | You'll be making your tuning changes from this VE table that I've just picked up now. |
| 25:16 | You can also view it, if you click the little 3D view icon there, tick box, that will give you a 3D view of that table. |
| 25:25 | It's always a good idea, no matter what software you're using, to just have a look at your tables in a 3D graphical view. |
| 25:34 | It's really easy, when you're looking at a table of numbers, even though these are coloured, giving you some indication at a glance of the magnitude of the numbers, it can be really easy to overlook one particular oddball site that may end up causing a bit of grief with drivability or potentially risking damage to your engine, maybe if you've got an over-advanced ignition cell. |
| 25:57 | So clicking on that 3D view, this is straight away going to give you a really quick idea if you've got any problems there. |
| 26:04 | Alright so remembering we're going to move into questions and answers in the not too distant future so remembering just if you've got any questions there, this would be a good time to ask those in the chat. |
| 26:17 | Now I will mention, this is probably getting a little bit more advanced, but just because we are using it, I just wanted to mention it here. |
| 26:22 | On the right hand side we've got our CAN bus and test modes tab. |
| 26:26 | And what we are doing here is communicating data from the MS3 Pro out to our Mainline hub dyno. |
| 26:34 | We're going to be using that as we usually do with our other development cars. |
| 26:38 | So we can get all of the data from the ECU and display it on the dyno. |
| 26:42 | In particular that's really useful for the likes of our torque optimisation test where we are sending the ignition timing values from the MS3 Pro into the dyno. |
| 26:52 | It can be plotted in relation to our torque values. |
| 26:57 | So I'll have a really quick look at that in a second. |
| 26:59 | So we've got CAN parameters, we have actually and that's not really what I wanted to show you, the part that I'm interested in here is our CAN real time data broadcasting. |
| 27:10 | So we can see that we've got that turned on for a start and we have got the ability to set up a base message address for the data to be sent out on. |
| 27:22 | So that's 15, 20 decimal. |
| 27:25 | So this is going to be helpful, obviously not all of you are going to be using your MS3 Pro to communicate to a Mainline dyno but a more mainstream use is this is where you can set up a CAN communication to an aftermarket dash logger. |
| 27:37 | And once you've got that set up you can then decide on what data is going to be sent. |
| 27:42 | So for example, I'm only sending a little bit of data here, we've got for example our ignition advance, our air fuel ratio targets et cetera being sent out. |
| 27:51 | You can also select the speed that that data's going to be sent out on. |
| 27:56 | So I've selected 20 hertz there. |
| 27:58 | You just need to be a little bit sensible about the sort of data you're sending out. |
| 28:01 | Obviously data such as RPM, manifold pressure, throttle position that can move quite quickly, we want to send that our relatively quickly. |
| 28:09 | Things that move a little bit slower, maybe coolant temperature, air temperature, those don't need to be sent our quite so quickly. |
| 28:15 | So we've got all of that data and you can essentially send out what you want. |
| 28:19 | And then you can use an aftermarket dash to read that information in. |
| 28:24 | So we'll just have a quick look at that. |
| 28:27 | Hopefully Jono's got the ability to bring up our torque optimisation test here on the dyno, I've sort of thrown him under the bus a little bit. |
| 28:35 | But I figure if I spend a few moments delaying everything here, he might be able to get it sorted. |
| 28:41 | But over on our dyno screen here, I'm not going to do a full torque optimisation test because it's not really necessary for this demonstration. |
| 28:48 | But on the vertical axis here we've got the torque that's being registered by the dyno, the load cells in the rear hub unit, so I'll just get us up and running. |
| 29:00 | There we go. |
| 29:02 | And then on the horizontal axis we've got the ignition advance being transferred through from the ECU. |
| 29:09 | So we can see that that's being shown here on the top right corner of the dyno screen as well and that's just the ignition advance angle that is being sent through. |
| 29:19 | So we can make changes in real time in our ignition tables and those will be transferred through straight into our Mainline dyno. |
| 29:27 | Or of course for most people, the relevance there will be sent through into your aftermarket dash or logger. |
| 29:35 | Now I'll just quickly show you through our ignition settings. |
| 29:39 | Nothing particularly unusual here. |
| 29:41 | If we click on our ignition settings tab, we've got the settings available. |
| 29:46 | What I'm really interested in here, where we're going to be making most of our changes here is in our ignition table one. |
| 29:52 | And I should have also mentioned, we can see we've got, they're greyed out at the moment 'cause we haven't got them enabled but up to four different tables there. |
| 29:58 | Essentially we've got the same ability with our fuel VE table as well. |
| 30:03 | So we'll click on that. |
| 30:05 | Again, pretty much set up exactly like you would expect. |
| 30:08 | We've got our three dimensional table. |
| 30:10 | In this case our axes is load in manifold pressure versus RPM. |
| 30:15 | We've got exactly the same functionality here, being able to view that map in three dimensions. |
| 30:20 | We can drag it around so we can actually view the information in a way that makes sense. |
| 30:25 | And again, same things here, we can make all of the same tuning changes using the same keyboard shortcuts. |
| 30:33 | Once we've made the changes, again as soon as we've made any change we will also need to burn those changes into our ECU to make them stay. |
| 30:44 | Now one of the things that is important to understand is just the implications of the way the MS3 Pro has been configured. |
| 30:52 | So again if we come back to our basic settings and we go across to general settings here. |
| 30:58 | We've got our fuel load, we've got speed density, we've already talked about our speed density. |
| 31:05 | We've got this other setting here which is our multiply map. |
| 31:08 | So this is important and it does tell you that in 99% of cases, you're going to want to leave this set to multiply. |
| 31:16 | Your other option is don't multiply. |
| 31:18 | So essentially what this is is a background calculation here based on manifold pressure. |
| 31:22 | We go on the basis that if we double manifold pressure, we double fuelling, we keep our same air fuel ratio. |
| 31:29 | So what this does is it does a bit of background heavy lifting for us, making our tuning changes a little bit easier. |
| 31:36 | We also have these options which are really important to understand here. |
| 31:39 | So for example we've got the option here for incorporate air fuel ratio target. |
| 31:45 | So we can choose to either include the air fuel ratio target or not. |
| 31:48 | Now if we choose to include the air fuel ratio target, we're also going to need to include our stoichiometric air fuel ratio which we can see below, 14.7:1 for pump fuel. |
| 31:57 | Now if we've got this set up, essentially the ECU is working as a volumetric efficiency based ECU. |
| 32:04 | And with a VE based ECU we do need to understand the way, the correct way of making our tuning changes. |
| 32:11 | When we've got that set up, if we come back to our fuel settings here, click on that tab, we've got two tables here. |
| 32:18 | And this is a place that is an easy place to make some mistakes. |
| 32:21 | We've already looked at our fuel VE table one. |
| 32:23 | We've also got our AFR table one. |
| 32:26 | Now our AFR table one here, we need to start by setting up some realistic air fuel ratio or in this case lambda targets. |
| 32:35 | In other words, what we actually want the air fuel ratio target to be for a specific combination of load and RPM. |
| 32:41 | Now for those of you who aren't familiar with a volumetric efficiency based ECU, our VE table is really telling us how completely the cylinders are able to be filled with air at any particular combination of load and RPM. |
| 32:56 | And the process there is that if the ECU knows how much air is entering the cylinders, we've also got some settings which we already looked at for our injector size, it knows essentially what amount of fuel will be delivered for a given pulse width. |
| 33:09 | Then it's really easy for the ECU to calculate what the required pulse width will be to get a specific air fuel ratio. |
| 33:18 | So when we are tuning the VE based ECUs like this, what we want to do is start by making sure that all of these targets here in our air fuel ratio target table are set to our desired targets. |
| 33:31 | I've already gone ahead and done this, we've got a naturally aspirated engine, so we're really only running up around 100 kPa maximum load. |
| 33:38 | So you can see that I've got an across the board 0.90 lambda set there, pretty safe air fuel ratio target for a relatively low powered NA engine like this. |
| 33:49 | We can see that in the idle areas in particular I've set it a little bit richer, 0.95 lambda, and then in the cruise areas of our map we're obviously wanting good fuel economy so I've got those set to lambda one. |
| 34:03 | So the process is that once we've got our air fuel ratio targets set to where we want them to be, then we can go ahead and tune our VE table numbers so that they get us onto our air fuel ratio target. |
| 34:16 | Now once the, the theory here is once the VE table numbers have been adjusted and optimised, we don't need to touch that table again. |
| 34:24 | If in future we want to make changes to our air fuel ratio target, we come back to here instead, we change our air fuel ratio target numbers and if everything is working the way it should, we should get straight onto our target. |
| 34:37 | So that's just an important thing to just always keep in the back of your mind because if you don't know the correlation or the relationship I should say, between the air fuel ratio target table and the fuel or VE table, then you can end up getting yourself into a bit of a mess and basically the ECU's just not going to be able to work the way it should. |
| 34:59 | Particularly if you want to use closed loop control, goes without saying that your air fuel ratio target table needs to be set up properly as well. |
| 35:07 | Now we are going to move into those questions really shortly. |
| 35:11 | I have shown you the graphing and logging here really quickly. |
| 35:16 | I was going to do a ramp run but realistically I've got that data here, I don't think there's a need to show you much more. |
| 35:24 | And this really isn't a case of how to use the logging software. |
| 35:29 | That might be a topic for another webinar. |
| 35:33 | But as I've already discussed, the ability to log directly into the Tuner Studio software means that you can straight away see within the same software package, exactly where abouts you were accessing. |
| 35:44 | Alternatively you can also directly exit that and load it up in MegaLogViewer. |
| 35:51 | There is a little icon for opening that up and that's going to give you a more advanced ability to analyse that log file in detail if you require. |
| 36:00 | The other thing I wanted to show you here is the tune analyse live, which is a pretty cool feature of auto tuning. |
| 36:07 | So what I'm going to do, I'll just explain what we've got here, we've got essentially our VE table here. |
| 36:14 | On the left hand side we've got a few key gauges including our lambda at the bottom, we've also got RPM and we've got our manifold pressure. |
| 36:22 | And I'll just get our fan up and running. |
| 36:25 | And what we can do here, at the moment our auto tune is disabled. |
| 36:29 | So what we're going to do is just get ourselves up and running and we'll come to the area that I made some wholesale changes. |
| 36:38 | So 2500 RPM, so I'll just use our dyno to get us down to 2500 RPM. |
| 36:43 | Now again when we are auto tuning or when we are manually tuning, it doesn't matter, it's a case of garbage in, garbage out. |
| 36:53 | So we always want to try and be as close to the centre of a cell as we can. |
| 36:58 | We want to be nice and smooth on our throttle. |
| 37:01 | So what the tune analyser will do, or auto tune functionality will do, is it'll look at our measured air fuel ratio and our target air fuel ratio and automatically make adjustments to the VE numbers, in order to get us onto our target. |
| 37:17 | Alright so while I've been talking, I've got us to 2500 RPM. |
| 37:20 | And what we'll do is we'll just click over here on the right hand side on start auto tune. |
| 37:27 | And what we're going to do is see the numbers in the table will change. |
| 37:33 | And you can see it's also showing you, it's showing you here that it's correcting the table, that's flashing red. |
| 37:40 | And we can see this cell waiting here, we can see what is actually happening there. |
| 37:44 | Once we get into our target, once our measured air fuel ratio matches our target, the cell becomes green, meaning that we can move on. |
| 37:53 | So I'm just applying a little bit more throttle, moving up to the next cell which is our 50 kPa cell. |
| 37:58 | That's doing exactly the same thing, adjusting that cell. |
| 38:01 | You can also see, if you're watching carefully that as it makes changes, it will also tune ahead, so it's tuning the cells that it's interpolating to on out to the right and above in terms of load. |
| 38:14 | So the idea here is that as we increase our load point and move into an untuned area, we're already going to be really close to our target. |
| 38:23 | So at the moment we're at relatively light load so we're just targeting lambda one and we can see that's essentially exactly what we've got, so I'll just apply a little bit more load. |
| 38:32 | We'll come up to that 80, the 80 kPa cell that I previously adjusted. |
| 38:37 | And again when we're trying to do this we just want to be as close to the centre of the cell as we can. |
| 38:43 | Allow the software enough time just to correct the cell and once it stabilises, we can apply a little bit more throttle, smoothly move up into our next untuned area So quite a powerful way, if you are smart with it, in terms of allowing you to fill out your VE table. |
| 39:05 | I'm usually reasonably careful with the way I use auto tune functionality, just about irrespective of the ECU. |
| 39:12 | Because I think a lot of tuners come in thinking that it is a cure all for not being able to do your job properly. |
| 39:19 | And there are two things we need to understand. |
| 39:21 | As I've already mentioned, it is a case of garbage in, garbage out. |
| 39:24 | So we need to be really mindful of the way we drive the car. |
| 39:27 | We need to be mindful of the operating conditions while we are driving the car. |
| 39:31 | For example using this when the engine is heat soaked badly or alternatively still in warm up enrichment isn't going to give us great results. |
| 39:40 | Likewise abrupt movements on the throttle where we are going to be seeing acceleration enrichment events, that's also going to affect our results. |
| 39:48 | So a little bit of common sense there generally. |
| 39:51 | On the dyno, pretty easy to achieve. |
| 39:54 | Out there on the road can be a little bit trickier but you do have the ability to start and stop the auto tune system as you see fit. |
| 40:02 | Also, I'll just mention here, there is an advanced settings tab as well. |
| 40:07 | So you can apply some control on when and where the auto tune functionality will occur. |
| 40:14 | In particular you can filter for maximum and minimum RPM, load and coolant temperature, or alternatively you can also make up your own custom filters if you want to get smart. |
| 40:25 | Maybe you want to bring up a custom filter to eliminate any changes being made when acceleration enrichment is active for example. |
| 40:34 | Alright so I think we're going to stop there. |
| 40:36 | As I've said, definitely wasn't planning on making this an all encompassing webinar on the MS3 Pro platform but hopefully a good introduction so you've got a bit more familiarity around the product and what it is. |
| 40:50 | And we look forward to bringing you a lot more information over the coming months as we get more time with the system. |
| 40:58 | For now, we'll jump into our questions and see what we've got. |
| 41:01 | If you do have any further questions, please ask them and I'll see how many of those we can get through. |
| 41:10 | Craig has asked, how was the engine safety package in MS3 Pro compared to other ECU makers? At the moment Craig, I'll be perfectly honest, it's not a function that I have even looked into. |
| 41:21 | So leave it with me, we'll see once we actually get the opportunity to get stuck in and use some of the safety parameters, we'll see exactly how much control they've got. |
| 41:31 | We have done safety strategy webinars in the past so again that may be something that we bring out on the MS3 Pro. |
| 41:39 | Motor Ray has also asked, how good is the built in knock monitoring? So at the moment, we haven only just got the knock sensor wired up so that is not a function that I have had the time to set up and validate. |
| 41:52 | However from my understanding, they're using the same Texas Instruments, knock processing chip that essentially every other ECU manufacturer is using. |
| 42:04 | All I can tell you at the moment is on paper, it should be a very very fully functioned knock control strategy. |
| 42:12 | You've got the ability to focus on a specific frequency, as well as window the area relative to TDC that you're looking for knock. |
| 42:20 | So this just allows you to get a better signal to noise ratio into the ECU. |
| 42:26 | Close loop knock control on individual cylinders with the ability to do individual cylinder gain. |
| 42:32 | So again on paper, it's got everything that I would expect. |
| 42:34 | At the moment I just haven't had the opportunity to actually put that to the test. |
| 42:37 | And I'd be honest, our little MX-5, it's a pretty easy going engine. |
| 42:43 | You've got to work pretty hard to make it knock, so it's not the best engine to be testing out a functionality like that sadly. |
| 42:53 | Mister All Chevy has asked, how good is the EGO correction with the MegaSquirt? I've had a brief chance to play around with the close loop control and I've found it pretty good. |
| 43:04 | We've got all of the sort of functionality that you would expect. |
| 43:07 | There is the ability to run sort of a relatively simple system where you don't have to make too many parameter changes. |
| 43:14 | Or if you are feeling adventurous and you've got a little bit more understanding of the system, you do have the ability to control the individual proportional, integral and derivative gains and really fine tune the control. |
| 43:25 | One of the features that is nice is that you do have the ability to clamp the minimum and maximum correction possible. |
| 43:33 | That's something I'm quite careful of when I'm setting up any close loop control system. |
| 43:37 | Again for me it isn't a bandaid for not doing my job properly in the first place. |
| 43:43 | We really still need to tune the VE table and get our air fuel ratio targets on track and we're not expecting our close loop control to need to do wholesale changes. |
| 43:54 | So generally I'll set my maximum limits at maybe plus or minus 5% or maybe if I want a little bit more headway, maybe plus or minus 10%. |
| 44:04 | That should be more than adequate to pick up the pieces if there are any small fluctuations in the air fuel ratio day to day for example. |
| 44:14 | GK23 has asked, how did you guys set up the base map of the tune? In this case, plug and play, comes with a base map that literally was good enough to start and run the engine. |
| 44:26 | I was actually quite surprised how seamlessly that all worked out. |
| 44:30 | Few changes that we need to make, in particular we've added a wideband module that is communicating to the MS3 Pro via CAN. |
| 44:38 | Anyone who's followed us for a while will know that I'm not a huge fan of analog voltage based wideband controllers. |
| 44:46 | While they can be effective, you do need to be really careful with ground offsets. |
| 44:51 | So for me, the CAN based wideband controller is a no brainer because it ensures the integrity of the air fuel ratio data being transmitted. |
| 44:59 | The only other change we ended up making was to add a proper potentiometer style throttle position sensor. |
| 45:07 | The MX-5 Mazda B6 engine comes out from the factory with essentially a throttle close switch which really isn't a much use to us, if you want to use that TPS input for the likes of acceleration enrichment, so we changed that over. |
| 45:21 | What we will be doing, just because I think I know the direction of your question, we will be going through, in our worked example, which will be added into the course, the practical standalone course in time, for those of you watching this in our archive at a later point, check the practical standalone tuning course worked example, see if it's there yet. |
| 45:39 | And in that worked example, we will be essentially treated this MS3 Pro like a blank box with no base map and showing you step by step how to configure everything, including all of the inputs, outputs, trigger pattern et cetera. |
| 45:51 | Travis has asked, on the air fuel ratio target setup, how would that look for flex fuels? You've got the ability to run two AFR maps. |
| 46:02 | Again, not that we have set up flex fuel on the MS3 Pro yet, so I don't want to really talk out of turn here. |
| 46:11 | They do have flex fuel functionality. |
| 46:13 | In general with the flex fuel functionality you're going to need to define the stoichiometric air fuel ratio of the two different fuels and you can have a blend table between the two AFR target map depending on what your ethanol content is. |
| 46:29 | Alright that's brought us to the end of our questions there. |
| 46:32 | So hopefully everyone's enjoyed that introductory look at the MS3 Pro. |
| 46:36 | We look forward to bringing you more content on that in the not too distant future. |
| 46:40 | And for our members, if you do have any questions after this webinar has aired, please feel free to ask those in the forum and I'll do my best to answer them there. |
| 46:48 | Thanks. |
Timestamps
0:00 - Introduction
1:00 - MegaSquirt history
3:50 - Software options
4:35 - Software overview
6:15 - Fuel tuning
9:40 - Parameters to keep an eye on
12:55 - Graphing and logging
15:10 - Basic/load settings overview
18:10 - Making fuel tuning changes
24:00 - Changing axis break points
25:15 - CAN bus/test modes overview
28:25 - Torque optimisation
29:30 - Ignition settings
30:40 - Additional general settings
35:05 - Auto tuning
41:05 - Questions


