233 | Haltech Elite Transient Fuel Tuning
Summary
While it’s important to properly tune your fuel and ignition tables, an area a lot of tuners struggle with is transient enrichment. In this webinar we’ll discuss why the engine’s fuel requirements differ during transient conditions and look at how to tune the available settings in the Haltech Elite ECU.
| 00:00 | - Hey guys, it's Andre from High Performance Academy here, welcome to another one of our webinars where this time we're going to be delving into transient enrichment on the Haltech Elite 2500 platform. |
| 00:10 | This will also translate across to any of the Elite ECUs. |
| 00:15 | Now transient enrichment is one of those topics that I know a lot of enthusiasts and professional tuners alike struggle with. |
| 00:23 | It can be one of those things that really does make the difference between a car that's nice and smooth to drive just like a factory tune and one that's absolutely terrible, bunny hopping and hesitating every time you stab the throttle. |
| 00:37 | So it's one of those things that we really want to focus on getting right, it can make a massive difference to the enjoyment of your car. |
| 00:44 | If it's a racecar it's also going to make the car potentially quite significantly faster and easier to control out on the racetrack. |
| 00:52 | Now the reason that a lot of people I think struggle with transient tuning is that it can be a little bit challenging to understand first of all what is actually going on inside the engine and why we require transient enrichment or additional fuel on a throttle input anyway in the first place. |
| 01:11 | And I think just like anything, if we don't understand what's going on, it's really hard to wrap our head around the correct approach to fixing that problem or tuning out that particular problem. |
| 01:22 | The other aspect of course here is that it's important to not only understand what you're trying to do, it's important to understand the correct technique or correct process to go through in order to optimise each paramter in turn, in the right order to get the right result. |
| 01:39 | Now as usual, we will be having questions and answers at the end of today's lesson so if there's anything I talk about here that you want me to dive into a bit more detail on please feel free to ask those questions in the chat. |
| 01:50 | Alright so what we're going to do is start with the basics of why do we need acceleration enrichment in the first place? And this also really coincides with while we're talking here about enrichment or additional fuel when we stab the throttle, what we're also going to find is that if we are at high load and then we tip out of the throttle or close the throttle sharply, we're going to see exactly the opposite situation where the air/fuel ratio will momentarily go quite rich. |
| 02:17 | So it's actually an acceleration enrichment and a deceleration enleanment situation that is occurring. |
| 02:25 | So in order to understand this, what we're going to do is start by heading across to my laptop screen. |
| 02:31 | Now for anyone who wants a little bit more understanding, a little bit more detail around this, I'm only going to be covering off the key topics here. |
| 02:38 | This is actually a slide taken out of our EFI Tuning Fundamentals course, so if you own that course, head across, there is an eight minute long module on transient enrichment so it goes into a lot more detail than I'll be going into here. |
| 02:51 | But essentially, as you can see, we've got a cut away of our intake port here. |
| 02:56 | And I just want to explain what's actually happening inside the port because it probably doesn't go quite like you'd expect. |
| 03:04 | So of course we've got our fuel injector located here and it's spraying the fuel down into the intake port. |
| 03:11 | We've got our valve, our valve is located over here of course as well, the intake valve, opening and closing, allowing the fuel and air to enter the port. |
| 03:20 | And most people think that when the fuel is injected, it simply all enters the combustion chamber and is burned. |
| 03:28 | And that's actually not quite the situation we get. |
| 03:30 | Instead what we end up with is this film of fuel that sits on the port wall. |
| 03:36 | So this fuel film actually involves quite a reasonable volume of the fuel being delivered by the injector. |
| 03:43 | And the size of that fuel film is constantly changing. |
| 03:46 | The size of that fuel film will be affected by the air speed, the air temperature. |
| 03:50 | A really big factor of the size of the fuel film will be our air pressure, so our manifold absolute pressure. |
| 03:58 | And it's also going to be affected by things like our port temperature as well. |
| 04:01 | So under steady state conditions when we are tuning, the effect of the fuel film is basically insignificant because what's happening is that the fuel is being delivered by the injector, it's being used to top up and establish the volume of that fuel film, but once we're under equilibrium or steady state conditions, what's going to happen is that that fuel film will start to evaporate off so the heat of the cylinder wall will essentially vapourise that fuel off the port wall where it's then introduced back into the intake or into the combustion chamber. |
| 04:35 | You're also going to get droplets that will fall into the combustion chamber in a liquid format. |
| 04:41 | So essentially what I'm getting at here is that under steady state conditions, the entire volume of fuel that is delivered by the injector does make its way into the combustion chamber, but it's in a round about way. |
| 04:52 | Some of the fuel goes to topping up that fuel film as some of the fuel film is vapourised and enters the combustion chamber. |
| 05:00 | So under steady state conditions, don't really need to worry too much about our fuel film, it has no effect. |
| 05:05 | Where it really does have a big effect though is under transient conditions. |
| 05:10 | And if we take, for a moment, the RPM out of the equation, we're at a steady RPM and we're at light throttle, what we're going to have is a relatively low air pressure. |
| 05:21 | What this results in, with our low air pressure is our fuel film will establish, I can't tell you what size it's going to be, because that's going to depend on so many factors specific to your engine. |
| 05:32 | What's important to understand is that when we go from basically a closed throttle, steady state conditions and we mash that throttle open, the manifold pressure understandably is going to rise really sharply. |
| 05:44 | As that manifold pressure increases sharply, what happens is that the size of the fuel film will increase. |
| 05:51 | So what we then have is a situation where momentarily the fuel that's coming out of the injector, instead of being injected and then making its way into the cylinder, what it does is it goes into increasing the size of that fuel film. |
| 06:08 | And at the same time, while that fuel film is increasing in size, we've got less of our fuel vapour being vapourised off, our fuel being vapourised off I should say. |
| 06:17 | So essentially for a very short period of time until that fuel film reaches equilibrium again or it reaches a constant size, the fuel or a portion of the fuel that's being injected, actually isn't making its way into the cylinder, instead it's being used to increase the volume of that fuel film. |
| 06:33 | So this is why we see a lean condition during tip in, even when our fuel table or our VE table is correctly calibrated. |
| 06:41 | Now we get exactly the opposite situation occurring when we tip out of the throttle. |
| 06:46 | So we're now at high manifold pressure, wide open throttle, we're still at 2000 RPM, we take our foot out of the throttle and what we find is as the manifold pressure decreases, we get the exact opposite effect. |
| 06:59 | Now what's happening is that the size of that puddle or fuel film on the port wall is going to decrease. |
| 07:05 | And in order for it to decrease, it doesn't need to be topped up by the injector, so now we get an excess of fuel entering the cylinder, some of the fuel is still vapourising off our fuel puddle or fuel film, it's entering the cylinder, but now because the fuel from the injector isn't necessary to top up that fuel film, we're also getting additional fuel from the injector going into the cylinder and that ends up with our engine running rich. |
| 07:28 | So that's the sort of situation that we're likely to see. |
| 07:32 | Now what we'll find is that there are a number of ECUs out there in the market now which actually attempt to properly model the size of that fuel film in order to basically model the required additional fuel under tip in and reduce the fuel under tip out or decelleration. |
| 07:53 | The MoTeC M1 is one example, there is an option to run this in the MegaSquirt ECU as well. |
| 08:00 | When set up correctly, understandably it can do a pretty great job. |
| 08:04 | But the problem is, it's quite complex, it's quite difficult I think for a lot of tuners to get their head around and it requires quite a lot of fiddly work in order for us to do a good job of that. |
| 08:14 | So for this reason, the majority of ECUs still work on a relatively basic strategy when it comes to transient enrichment. |
| 08:22 | Essentially the options we've got available are to use the throttle position sensor as the parameter to activate acceleration enrichment, or alternatively we can use manifold pressure. |
| 08:37 | So that's what we've got in the Haltech Elite ECU. |
| 08:42 | What we'll do now is we will head across to our Elite ECU and we'll have a quick look at a couple of aspects first. |
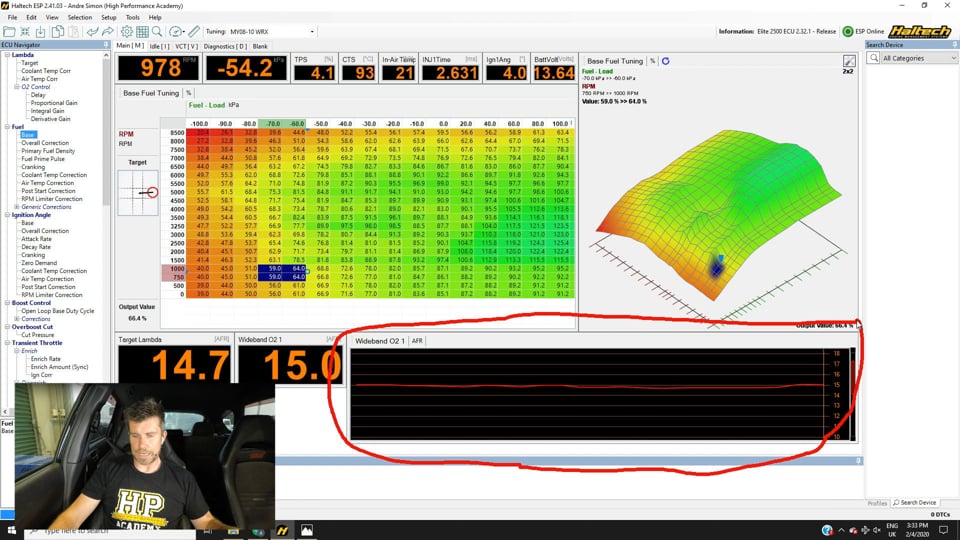
| 08:49 | So what I've got here, just for the purposes of this demonstration, I've actually added in a little time graph here and I find that this is quite a nice easy way to visualise what's going on when we are tuning our transient enrichment. |
| 09:03 | This is just logging our wideband air/fuel ratio over time. |
| 09:07 | We can see it's moving around a little bit because right now while I'm just talking, I've just got the air conditioning running so that's why we can see it sort of moving a little bit rich and a little bit lean at idle. |
| 09:15 | When we get into this I will disable the air conditioning so we don't have anything upsetting what's going on. |
| 09:22 | So before we attempt to tune our transient enrichment, and I think this is probably the area that most tuners sort of go wrong to start with, it's really important to understand that our transient enrichment parameters basically act as an adder or multiplier over and above the existing or main fuel injector pulse width anyway. |
| 09:44 | So in a round about way what I'm saying is we need to actually start with the basics which is making sure that our fuel table, or in this case our VE table is correctly calibrated, correctly tuned. |
| 09:56 | So what I mean there is that there's no point trying to chase down a lean hole, let's say we're at 4000 RPM and we're at cruise so we might be down somewhere around about this area, minus 60 to minus 50 kPa, we smash the throttle, the manifold pressure's going to increase, in this case we're turbocharged so we might momentarily end up somewhere around about 20 to 40 kPa after we initially smash the throttle open before the turbocharger starts building boost. |
| 10:25 | So what's important here is to make sure that under steady state conditions, we've done a really good job of thoroughly filling in all of the area that the ECU is going to access so basically we're going to be moving through about that slice of the table there. |
| 10:42 | So I want to make sure that each of those individual cells has been properly calibrated under steady state conditions. |
| 10:47 | Remember under steady state conditions, that fuel film plays no role because it's been topped up at exactly the same rate that it is being vapourised off as well and entering the cylinder. |
| 10:58 | So if you don't have this right, you kind of get into a situation where you're chasing your tail, you might have a lean hesitation or something like that on tip in and you're trying to fix this with your acceleration enrichment but the real problem is that you might have a lean hole in your fuel map and essentially in order to try and combat that, you've got to overcompensate with the acceleration enrichment, then you get to an area where your fuel table's actually right and now your acceleration enrichment is overkill and you're all of a sudden too rich. |
| 11:26 | So this is the most common problem, trying to fix issues in your VE or fuel table with your transient enrichment. |
| 11:34 | Don't do that, get your basics right first, tune your fuel, tune your ignition, once you've got those right, then you can start moving on to your transient enrichment. |
| 11:43 | Now I've talked here about the transient enrichment and transient enleanment. |
| 11:48 | So as we tip out removing fuel. |
| 11:50 | The other aspect that is worth considering here as well, I think probably in the 18 odd years I've been in this industry now I've only needed to use this on about three engines but I'll deal with it, which is transient ignition trimming. |
| 12:04 | Now obviously just what I've said there, it is very rare in my own personal experience to need it. |
| 12:10 | I have had a couple of turbocharged race engines where for no obvious reason, on tip in at medium RPM, so let's say 4000-5000 RPM, where we are in a situation where the turbocharger can produce boost very quickly, we'll find that on a sharp throttle input the engine suffers momentarily from a couple of hits of detonation, you can audibly hear that. |
| 12:38 | Now despite that happening, if we go back and steady state tune all of those ignition cells, under steady state conditions we see no knock occurring. |
| 12:47 | So again, rare but some ECUs including the Haltech Elite do give you the ability to retard the ignition timing as required. |
| 12:54 | Alright so what we're going to do now is go through and have a look at the setup for some of these parameters. |
| 13:00 | So what we want to do is start by heading across to our main setup. |
| 13:04 | And we're going to be on our functions menu which we're already on and we can see we've got our transient throttle function. |
| 13:14 | Obviously if you want to use that, you're going to need that enabled. |
| 13:17 | So we'll go through each of the settings. |
| 13:20 | And to start with you can select your load type. |
| 13:22 | So the options there, we can use our throttle position or manifold pressure. |
| 13:27 | In almost all instances, I've found better results using a throttle position sensor. |
| 13:33 | The only time that I would consider manifold pressure is if you simply don't have a throttle position sensor. |
| 13:40 | It's been a long time since I've even tuned an engine where no throttle position sensor was included, it's one of the, basically what I'd consider an essential input sensor, can't really do as good a job without that throttle position sensor. |
| 13:53 | So by all means, try each option but generally in my experience you're going to get a better result using throttle position. |
| 14:00 | Now we also have the ability here, we've got a little tick box for enable disenrich so this is Haltech's term for tip out enleanment or in other words, removing fuel when we back out of the throttle. |
| 14:12 | So you can see that I've got that enabled there, that's absolutely up to you. |
| 14:16 | What you will find is that while the engine is incredibly sensitive to transient enrichment on acceleration, so when we tip into the throttle, if that isn't right you're going to feel the car hesitate, it's not going to be smooth, it's going to be horrible to drive. |
| 14:29 | Generally the engine is going to be much less sensitive to that overly rich situation we see on tip out. |
| 14:36 | So while it's nice to have everything rock solid, do the job as well as we can, it's definitely not as important with the disenrichment as it is with the tip in enrichment. |
| 14:47 | We've also got the ability to enable an overall correction which I am not using in this situation. |
| 14:52 | We're going to go through our enrichment parameters, so what we've got available here. |
| 14:57 | Now if you do need more information on this, it is all available in the Haltech information but I'm just going to explain it in my own language here. |
| 15:06 | So the first thing we've got here is our load rate deadband. |
| 15:10 | You can see this is at 20% per second. |
| 15:12 | Pretty straightforward, basically is defines a value or a rate of change of our input, throttle position or manfold pressure depending which we've selected, which we need to be above before the Elite ECU will actually allow any transient enrichment. |
| 15:29 | Now this is quite important and it's actually something that's tripped me up, not with the Elite, but with a couple of other ECUs where essentially this deadband was a little too small, a little too sensitive and particularly with some older engines, we may find that as the throttle position sensors age, they can be prone to a slightly erratic signal and what this can give if we've got the sensitivity set too high, basically under steady state conditions, we might be getting momentary hits of acceleration enrichment so you might be wondering, why under steady state conditions you're seeing erratic air/fuel ratios, this can be why. |
| 16:07 | It's always a good idea for this very reason to actually inspect or log your acceleration enrichment paramenters so you can see if you're getting uncalled for accel enrichment. |
| 16:18 | Off the top of my head I think the parameter I'm using, the number that I'm using here, 20% per second, is pretty close to the default Haltech value so there or there abouts should be a good place to get started. |
| 16:30 | The next parameter which is our load acceleration dead band. |
| 16:34 | Now not a particularly well explained term in my opinion. |
| 16:38 | Let me break that down, essentially this is a decay parameter. |
| 16:41 | So basically it defines how quickly the additional acceleration enrichment fuelling can be removed and you can see this is in percent per second squared or percent per second per second. |
| 16:53 | So basically in this case it's allowing 100% of the fuelling to be removed per second. |
| 16:59 | So the smaller the number you put in there, the longer the acceleration enrichment will remain active, the bigger the number the quicker that acceleration enrichment will be removed. |
| 17:13 | Next we've got our detect duration and this is essentially a filtering if you like, so how long the signal must be active above that parameter for before any transient enrichment will be added in. |
| 17:27 | So the danger here is if we set this too high, it's going to naturally create a latency before any transient enrichment will be used. |
| 17:36 | So you want to keep this as low as you can, you can see that I've got one millisecond. |
| 17:41 | We've got our ignition correction decay time, we're not going to be talking here much more about our ignition correction but that, as its name implies, is how long our ignition retard will be decayed over, in this case, 500 milliseconds or half a second. |
| 17:57 | Now the next aspect here, our little tick box, our little enable box for enable Async, so this is another thing that I think is probably in my experience peculiar to the Haltech platform. |
| 18:07 | When it comes to the acceleration enrichment there's two ways you can add it in with the Haltech platform, through either synchronous or asynchronous transient enrichment pulses. |
| 18:17 | So let's break that down and explain what it means. |
| 18:20 | So normally in almost all instances, we will be able to use just the synchronous acceleration enrichment and what that means is that basically the existing injector pulse widths are extended. |
| 18:33 | So the amount of normal fuel that will be injected, let's say that that might be a six millisecond injector pulse width, all the ECU does is just extend that six millisecond pulse width to provide whatever additional fuelling that is calculated to be required. |
| 18:47 | So this is timed with the existing injection events. |
| 18:50 | Asynchronous on the other hand gives you the ability to actually add additional injection events. |
| 18:57 | So we then have the option of both synchronous and asynchronous, can get a little bit confusing and just a couple of times I have played with this, it can be a little bit hard or a little bit challenging to know where best to add your acceleration enrichment, do you do it with your asynchronous or your synchronous enrichment? Don't worry if that's already scared you off, the reality is that in 99% of situations, you're going to get away just find solely using the synchronous acceleration enrichment, this is also how the majority of aftermarket ECUs deal with their transient enrichment. |
| 19:32 | The couple of times where asynchronous can be an advantage would be peculiar engine setups. |
| 19:38 | Maybe you've got a situation where the injectors are fitted a long way away from the intake ports, obviously under that circumstance there is a transport time for the fuel to actually be delivered to the cylinder. |
| 19:51 | So it can actually be an advantage for the ECU to provide straight away some additional injector pulses to get that fuel delivered into the combustion chamber as quickly as possible. |
| 20:03 | So rotary engines and engines where the injectors are a long way away from the ports, probably about the only times you really need to worry about the asynchronous injection. |
| 20:14 | We've got the disenrichment which is essentially the exact same parameters that we've looked at with enrichment, this time just removing our fuel. |
| 20:23 | So those are our key parameters. |
| 20:25 | Now important to understand here that the default values from Haltech are going to be a pretty good place to get started and it seems from my experience so far with Haltech that if you have got your main fuelling under control with your VE table then the default values are actually going to provide you with a pretty good starting point for getting the fuelling dialled in. |
| 20:49 | Alright so what we can do now is close that down and now that we've got those parameters discussed, we can move down and we can actually have a look at the transient throttle control parameters here. |
| 21:02 | We'll find these in our ECU navigator out on the left. |
| 21:05 | So we obviously have our parameters for enrichment, we've got enrich rate, enrich amount synchronous and we've got our ignition correction. |
| 21:14 | We've also got our disenrich rate, disenrich amount and importantly here we've also got a coolant temperature correction. |
| 21:22 | Now I'll just touch on the coolant temperature correction first because it is relatively easy to explain. |
| 21:27 | Essentially all we need to understand here is that the size of that fuel puddle, the fuel from on the port wall is also going to be affected by the port temperature, I mentioned that when we were looking at that little slide of what's going on in there. |
| 21:41 | So what we need to understand is that at cold startup when the engine is warming up, we are going to require additional acceleration enrichment so that's what this table is enabling us to do. |
| 21:52 | We can see that this is a two dimensional table versus our engine coolant temperature. |
| 21:58 | And we are simply increasing the amount of fuel added through our transient enrichment as our engine cools down. |
| 22:07 | So the way we go about doing this is we would start with our engine at operating temperature, we can see that that's where we are now, we're sitting up above that 80 degree site, actually at 95°C. |
| 22:17 | And we want to start by dialling in our transient enrichment parameters with the engine at operating condition. |
| 22:24 | Once that's done then we can come back, do a cold restart and we're obviously, depending on our ambient temperature, going to be somewhere down in the lower cells of this table and we can manipulate those as required if we've got too much or too little transient enrichment. |
| 22:41 | So this is the table that we're going to deal with last. |
| 22:43 | Let's head across now and we'll have a look at our other parameters. |
| 22:50 | So we've got our enrichment rate. |
| 22:52 | So it's really important just to understand what these tables mean and the interaction between these tables. |
| 22:58 | So starting with our enrichment rate here. |
| 23:00 | This is how quickly the fuelling is going to be delivered. |
| 23:05 | So actually it works in conjunction with our enrichment amount, the two tables, two parameters are multiplied together to give us the final amount of additional fuel. |
| 23:14 | And what we need to understand here is that this table, we've got our current throttle position on the vertical axis and we've got our rate of change of throttle position on the horizontal axis. |
| 23:26 | So if I just move through this table we can see we do have a little blue circle, I'm trying to highlight in red over the top of that, not working too well but let's try that again. |
| 23:37 | You can see we've got our little blue circle showing where abouts we're accessing. |
| 23:39 | So at the moment this is drive by wire so we're sitting at around about 2.5 - 3% throttle in order to make the engine idle at 800 RPM. |
| 23:47 | So as I increase my throttle opening we can see that we're going to end up moving up through this table. |
| 23:56 | Got a little bit of latency in that. |
| 23:58 | We moved up through that table just a little bit there. |
| 24:01 | And what that allows us to do essentially we're going to need more transient fuelling when we are at a closed throttle. |
| 24:14 | So if we mash the throttle to the floor from closed throttle, we're going to need to add more fuel than if we were already at 70 or 80% throttle and we just smashed the throttle the rest of the way. |
| 24:25 | So the other access here, this is the rate of change of throttle so again the more quickly and more aggressively we open the throttle, the more fuelling we're instantaneously going to need. |
| 24:36 | So again if I just smash the throttle open, hopefully what you're going to be able to see is that that little blue circle's going to move out here to I think, depending how quickly I do it, around about 200%, so let's just try that. |
| 24:49 | OK did exactly that. |
| 24:51 | Alright and at the same time just to show that we need a little bit of work here, we can see we've got this big dip rich in our fuelling. |
| 24:57 | So that's how this particular table works. |
| 25:00 | So it gives us the ability to add more acceleration enrichment down where we need it which is where we've started from closed throttle and we've been really aggressive with our throttle stab. |
| 25:10 | If we've started from a high throttle setting and we've only just moved the throttle slightly, we can see that we've got much less down to basically no acceleration enrichment. |
| 25:21 | So this table, as I said, works in conjunction with our next table which is our enrich amount synchronous. |
| 25:28 | Two dimensional table this time relative to engine RPM. |
| 25:31 | And essentially within this table we are defining how much additional fuel is going to be delivered and this as I mentioned gets multiplied by the value from our enrich rate to define the final amount of fuel to be delivered. |
| 25:47 | Sounds a little bit complex but when you actually go through the process, reasonably easy. |
| 25:51 | Just need to understand the interaction between those two tables and in other words where abouts you want to make your adjustments. |
| 25:59 | Now we've done a similar webinar on this topic in the past and one of the questions that came up was why are the numbers as they are in this table? Generally what we find is that with acceleration enrichment in any ECU, standard, factory or aftermarket, what we find is that the amount of additional enrichment is the most, or required I should say, is maximum at low RPM. |
| 26:26 | And as the RPM increases we generally find that we need less and less transient or acceleration enrichment. |
| 26:32 | To the point where generally once we're past about 4500, 5000 RPM, we need little to no acceleration enrichment just due to that fuel film. |
| 26:40 | So this seems to be a little bit counter intuitive because we can see here our numbers are actually maximum at high RPM. |
| 26:47 | This is a relatively default table and you can see the numbers in there from 4000 RPM and above, 160%. |
| 26:55 | So in order to get some clarity on this and make sure that I am giving you completely accurate information, I actually went to the trouble of having an in depth chat with the tech team at Haltech earlier today. |
| 27:06 | Now this is a little bit complex and there's a few things to understand here but essentially what it's explained is that this is a pseudo VE number. |
| 27:15 | So this is looking at an assumed volumetric efficiency number from the engine. |
| 27:21 | So understandably as our engine RPM increases, our volumetric efficiency also increases, within reason. |
| 27:29 | It's not going to increase forever. |
| 27:30 | So that's why we start seeing those numbers actually increase with RPM rather than decrease like we'd traditionally expect. |
| 27:37 | Now I have used that term pseudo VE. |
| 27:40 | So it is not a true VE number, it just works in essentially the same way as a VE number and that's why we've got that default value. |
| 27:49 | So again, the default value's not a terrible place to get started and what I would suggest is that provided you've got your volumetric efficiency table dialled in properly, what I'd do is start by making wholesale changes to the entire table, rather than trying to tune individual cells. |
| 28:07 | What we can do is we can find that by increasing or decreasing the overall table, generally this is going to be enough to get us into the ballpark of where we need to be. |
| 28:15 | Alright we're going to go through a quick tuning demonstration and once we've gone through this, we're going to get into our questions so if you've got any other questions right now, this is a good time to remind you to ask those. |
| 28:27 | So what we're going to do here is we're going to start by getting up and running on our Mainline dyno and we're going to come up in fourth gear here to 2000 RPM and we're just going to get running under steady state conditions. |
| 28:39 | And what I'm going to do is come up to a point where let's say we're at around about, let's say try and get us to about -15 kPa. |
| 28:48 | So light load here and what we want to do is initially just wait until our engine has stabilised, reached equilibrium, we can see that our measured air/fuel ratio here, sitting between 14.6, 14.7:1, we've obviously got pretty good control over that right now. |
| 29:04 | And that's being shown also in our time graph to the right with a nice flat line. |
| 29:08 | So the next process here, I'm going to simply stab the throttle, I'm going to move it as quickly as I can to wide open throttle. |
| 29:15 | When we're starting with our transient enrichment, I always start with the largest, sharpest throttle change I can initially and then work back from that. |
| 29:24 | And I'll explain why that's the case in a moment. |
| 29:26 | So what we're going to do is we're just going to stab the throttle and we're going to look at what happens to that time graph, let's do that now. |
| 29:34 | OK so that's actually not been too bad, so I'll just back off and we'll look at it. |
| 29:38 | Unfortunately I can't pause it there but what we saw is that initially on that stab, we went from 14.7:1 up to about 15-15.5:1 thereabouts. |
| 29:49 | Now it is important also to mention here that we are going to be using our air/fuel ratio plot as a metric when we are tuning our transient enrichment. |
| 29:59 | However to me that's actually not the most important aspect. |
| 30:03 | What I'm looking for above all else is smooth and crisp response to the throttle input. |
| 30:09 | So actually while you wouldn't have been able to notice this from the other side of the GoPro, the car responded crisply, there was no hesitation, everything was nice. |
| 30:17 | So I already know that I'm pretty much there or thereabouts in terms of that fuel tuning but what we did see was that the air/fuel ratio moved a little bit lean before the boost started to climb and then we saw the air/fuel ratio dip down and get back to where it should be for the sort of load we were seeing. |
| 30:34 | Now the other aspect that goes hand in hand with that is even when our transient enrichment is dialled in really really nicely, we're almost always going to see a brief lean spot on that initial tip in. |
| 30:48 | Now again over my experience with 18 odd years in a career now, I would not suggest trying to chase a situation where we get a perfect line from our partial throttle, low load air/fuel ratio, down to our wide open throttle. |
| 31:04 | If we do that, generally you're almost certainly going to end up putting in excessive fuel and while on a graph it might look nice and crisp, nice and clean, generally I find that that actually results in a doughy response from the engine. |
| 31:17 | So remember the key parameter that you're looking for, the key metric is how does the engine feel, how does it actually respond to that throttle input and if everything's nice and crisp and you've got that slight lean spike, happy days, I'm quite OK with that. |
| 31:30 | Alright let's go back to our same operating point, so we know that we ended up going a little bit lean there, little bit leaner than I'd like, we'll try and get back to our same operating point and we'll go back and try and get into steady state conditions there. |
| 31:47 | Now we are at 2000 RPM right now so for the moment, even though I said initially I'd suggest making broad sweeping changes to this entire table, let's just focus on our 2000 RPM cell. |
| 31:58 | What we want to do, let's make a reasonably big change for a start. |
| 32:01 | So if I press the P key, that'll allow us to enter a percentage change. |
| 32:05 | What we're going to do is start by actually just adding 50% to that value. |
| 32:08 | So again initially when you're setting this up, make a reasonably big change. |
| 32:12 | Don't mess around with 2-3%, that's once you're actually starting to really fine tune things and frankly, you're probably never going to be in a situation where 2-3% is going to be make or break. |
| 32:23 | So we're at that same point now where we were, we're under stable conditions, our air/fuel ratio's under control. |
| 32:29 | Now because again I can't pause this little graph down the bottom, I want you to take note of what happens as I punch that throttle, we'll do that in three, two, one, now. |
| 32:41 | OK so what we can see there is we've still got that lean initial spike, again not too worried about that. |
| 32:46 | The engine's still responded quite crisply and then unlike last time we actually start to move down towards our target air/fuel ratio. |
| 32:52 | So that's actually probably a step in the right direction. |
| 32:55 | Now the problem is that there are two parameters that coincide here. |
| 33:00 | The first is our fuel enrichment synchronous amount and this also gets affected by our decay time. |
| 33:08 | So in that instance it actually looked like, to me, it pulled out the additional enrichment just a touch too early. |
| 33:16 | So let's see if we can address that and get that a little bit better. |
| 33:19 | So we'll go to our main setup and we're going to go through to our load acceleration deadband, now remember this is essentially our decay parameter. |
| 33:28 | Again, initially let's make a wholesale change, let's just halve that value, doesn't matter, we can always come back and make a change to that later, so we'll apply that change, let's go through and we'll have one final look at that value there. |
| 33:43 | Now it is also worth mentioning here that the PC logging for the Haltech Elite is actually at a really low sample rate Off the top of my head, it's only sampling somewhere between about 2-4 Hz, so it's a nice quick way of getting an idea of what's going on but it's actually going to mask some of the real data which in order to analyse that, you're actually going to need to take an ECU log and analyse that separately. |
| 34:07 | Anyway, we're back to about that same operating point, let's just again smash that throttle open, again looking for what happens in our trace. |
| 34:14 | Let's do that in three, two, one. |
| 34:19 | Alright so what we've got there, we do have a little bit of improvement, again I can't pause it, we see that slight leak spike, moves rich, probably if anything our decay time could be increased slightly more but again at this point I am still getting nice crisp response. |
| 34:36 | So the thing that I try and stay away from is adding more acceleration enrichment than I need. |
| 34:43 | This actually can be problematic and particularly on multiple stabs of the throttle, if you've got too much fuel going in, this is where we can really get the car, the engine start to bog down. |
| 34:54 | So I will err on the side of basically adding as little transient enrichment as I can get away with in order to get control over my fuelling. |
| 35:03 | Again, using the air/fuel ratio trace as an input to help guide me with my tuning, but realistically the one that I'm most worried about is how the engine actually feels, how it responds to that throttle input. |
| 35:16 | Alright we'll head across now and we'll have a look at our questions and if you've got any more, please feel free to keep asking them. |
| 35:31 | Our first question comes from Vikrant, I think it is, who's asked, how is the fuel load on the x axis of the table calculated? OK so on the volumetric efficiency or fuel table, that fuel load is simply the manifold pressure. |
| 35:46 | The reason it's called fuel load is that depending how we've got the ECU set up, we could have that as throttle position for example. |
| 35:52 | So it's just generically referred to as fuel load but in this case, manifold pressure. |
| 35:58 | Looks like that is the only question that we've got. |
| 36:00 | So obviously I've done an outstanding, stellar job on explaining everything and everyone who has been watching now has a full understanding of how to correctly dial in their fuelling or their transient enrichment on their Haltech Elite platform. |
| 36:15 | Doesn't look like we've got any more coming through so I will end it there but if you do have any questions that crop up after this webinar has aired then please feel free to ask those questions in the forum and I'll be happy to answer them there. |
| 36:30 | Thanks for watching and hope to see you all in our next webinar. |
| 36:35 | Now for those who are watching today on our YouTube channel, this is just a little insight into what we do every week for our HPA gold members. |
| 36:42 | We choose a particular topic, we vary those topics between engine tuning, engine building and wiring and we dive in deep for around about an hour and if you can watch live, you can ask questions and get answers in real time. |
| 36:53 | Now HPA gold members get to review these webinars in our archive where currently we've got over 230 hours of existing webinar content. |
| 37:02 | This is one of the best ways to expand your knowledge on a wide range of tuning, engine building and wiring topics as well as to stay up to date on the latest tools, trends and techniques in those industries. |
| 37:14 | Now our HPA gold members not only get access to the webinar archive, they'll also get access to our private member's only forum which is the best place to get answers to your specific questions. |
| 37:25 | Now if you are interested in gold membership then that can be purchased on its own for $19 USD a month, however you will get three months of free access with the purchase of any of our courses. |
| 37:36 | If you want to learn more, check out those courses at hpacademy.com/courses. |
| 37:40 | Alright thanks team, thanks for watching and hope to see you again next time, cheers. |


