239 | Basic Logging Setup
Summary
Data analysis is a very powerful tool for analysing and improving the engine, the driver, and the chassis. In order to make sense of the data though we need to understand what channels to log, what logging rates to use and how to make sure all the channels are properly setup and calibrated prior to hitting the track. In this webinar we’ll cover these fundamentals using the MoTeC C125 dash logger.
| 00:00 | - Hey guys it's Andre from High Performance Academy, welcome along to another one of our webinars. |
| 00:05 | Now today we're going to be talking a little bit about the basics of data analysis, or we're really going to be focusing on setting up your data analysis package or datalogger. |
| 00:14 | So that you can make sure that you're going to be getting good, solid, meaningful data that's then actually going to help you improve your car, your driving, or maybe your engine tuning depending on specifically what you're going to be looking at. |
| 00:27 | There are a variety of options now when it comes to datalogging and how you can receive that data so we'll have a look at those. |
| 00:34 | We're going to be focusing a little bit today on the MoTeC package but really everything we're going to be talking about is going to translate pretty nicely across regardless what you are using. |
| 00:44 | I guess we start with why do we need data analysis or datalogging, what's it all about and I mean probably not rocket science to figure this out but let's start with the basics. |
| 00:55 | Obviously when you're out on the racetrack, no matter whether you're interested in circuit racing, rallying or drifting, it really doesn't matter, there's a lot going on and obviously as a driver the main aim is to maintain control of the car and focus on what you're actually doing so there's not really a whole lot of time to take in the intricacies of what's actually going on and it's hard also to really keep an eye on the gauges, if you're interested in engine performance, maybe your oil pressure or your engine coolant temperature, unless you've got some warnings set up it's really hard to actually pay attention to the gauge in a meaningful way the whole way through the lap of a racetrack. |
| 01:32 | And we shouldn't really need to because that's where the datalogger comes in. |
| 01:34 | So the idea behind the datalogger is it's kind of a big brother that's sitting there watching over everything that's going on and gathering all that data so that we can then make sense of it when we get back to the pits and everything's calmed down and we're a little bit less stressed. |
| 01:51 | The advantage with a datalogger is it can store and analyse or store and log I should say, a huge number of channels, only really limited by your logging memory and the specifics of the logger that you're using. |
| 02:04 | It can log samples, usually at very high frequencies which can be important for some channels and then the other aspect, it doesn't lie and it doesn't forget what happened so it's a pretty impartial judge of what went on out on the racetrack. |
| 02:18 | Now while today we're not really focusing on the analysis side of things, let's just jump into my laptop software again for a moment and we'll have a quick look, this is the sort of data that you're likely to get out of a fully featured datalogging package and depending on what we're actually interested in looking at here, let's just go across to our driver and we've got the ability to also analyse where abouts a particular sample was from the racetrack. |
| 02:45 | I'm not going to dive too deep into this sort of information right now. |
| 02:49 | There's a couple of things that are useful though if we just head back over to our engine. |
| 02:54 | One of the things we can do here is basically develop different worksheets for analysing different aspects so all of the parameters that we want to analyse the engine performance, we can keep in one place, everything for the driver, the chassis, maybe suspension et cetera, so that we can basically filter through the non essential channels for analysing that particular piece of the puzzle. |
| 03:19 | One of the things that's really important as well when we are looking at the health of the vehicle is this aspect here which is often referred to as a channel report. |
| 03:28 | So what we're looking here is at the data from a range of different laps. |
| 03:34 | So when we bring the car back into the pits, no matter what form of motorsport you're interested in, obviously one of the aspects is trying to improve the performance of the car, the driver et cetera, but it doesn't really matter how well the driver's performing if the engine is low on oil pressure and is about to throw all the rods out the side of the block. |
| 03:54 | So engine health and health of other aspects of the car are really one of the first places you want to check but we want to be able to do this really quickly so this is where a channel report such as this comes in. |
| 04:04 | This is only a quick session out on the track so we've only got seven laps but what we've got here is one little table and it shows some of the key aspects that I'm interested in. |
| 04:14 | We've got our engine RPM, we've got our engine temperature, oil pressure, fuel pressure, battery voltage, our diff temperature and our transmission temperature. |
| 04:22 | And at a glance, what this will show us is the minimum and the maximum as well as in this case the average values for each lap so we can straight away see at a glance that if we're interested for example in our maximum diff temperature we could see that that occurred on lap seven and it got to 100°C. |
| 04:43 | On the other hand if we are interested in our maximum engine RPM, we can see that we actually achieved that on lap one here, sorry let's actually circle the right piece of data there, that one there. |
| 04:56 | 8742 RPM so it's really easy at a glance for all of those key parameters just to see what the minimum and maximum was. |
| 05:03 | Oil pressure's a great one there because obviously if we've got low oil pressure, we want to dig in a little bit deeper and find out why that occurred so once you know where it occurs, you can then go to that particular lap and see the circumstances that resulted in that so that's one aspect there when you've got a good data analysis package set up. |
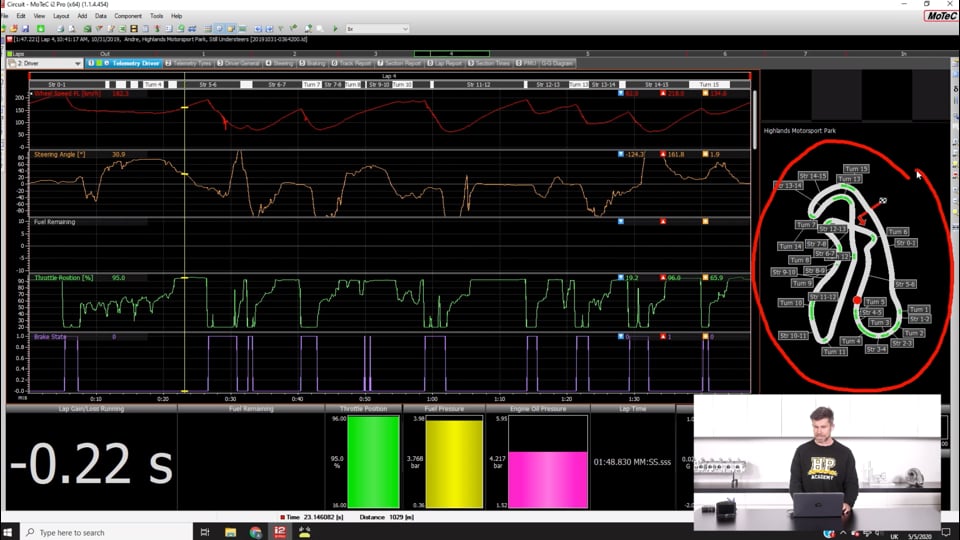
| 05:22 | The other aspect there as well is it allows you to then overlay different laps and see why one lap was faster than another. |
| 05:29 | So if we click on the left hand side here, we can see straight away, we've opened the package, we've reverted to the fastest lap, in this case it was 1:47.221. |
| 05:40 | What we can do is then overlay, let's have a look at lap three which was a little bit slower at 1:48.835. |
| 05:46 | So we've now overlaid that data and we're now looking, actually foolishly at time, let's look at distance. |
| 05:52 | We're now looking at the two laps overlaid and what we want to do is see maybe why one lap was faster than the other. |
| 05:59 | So again this is going to be available on every analysis package, we can use a variance channel, whoops not that one. |
| 06:07 | There we go. |
| 06:08 | And this variance channel which has now just popped up up the top here, this shows us where abouts on that lap we were losing time. |
| 06:15 | And what we want to do is look at the areas where we've got the biggest gradient, so the biggest change in our variance channel. |
| 06:24 | And that's the area where we were losing the most time. |
| 06:27 | We can then narrow in on that particular part of the track and find out exactly what caused that. |
| 06:31 | Was the driver maybe a little bit early on the brakes or a little bit later on the brakes? Maybe they carried too much speed into the corner and couldn't quite make the apex but that's where you can sort of dive in really deep. |
| 06:40 | So there's a quick look at our analysis and this is really the end result if we get all of this next part right but we are going to now dive into what you actually need to get this data and to make sure that it's going to be accurate. |
| 06:54 | The first place to start obviously, how do you get this data and there are now various logging options on the market. |
| 07:01 | I kind of break them down into a few different types of logger. |
| 07:06 | So here we've got a dash logger, so this is a MoTeC C125 dash logger. |
| 07:11 | This acts as a logging hub but also acts as a driver display so we can display any key pieces of information to the driver as well as it's got a shift light module across the top. |
| 07:24 | Obviously for signalling a shift point as well as bringing the driver's attention to a warning. |
| 07:31 | So quite a fully featured unit, these are again available from dozens of different manufacturers at all different price points. |
| 07:36 | So our dash logger is one of the first options that I would look at. |
| 07:41 | The advantage with it is just what I said, you've got the driver display as an aspect of it, you've got the ability to have driver warnings actually come up and tell the driver if something is wrong and that can quickly pay for itself, particularly if you've got an expensive engine. |
| 07:57 | However the dash logger generally is a reasonably expensive component. |
| 08:03 | You're probably going to be looking at somewhere around about a $1500 USD starting point depending on the brand you're going for and they can go up to well over $3000 or $4000 USD so definitely can be quite pricey. |
| 08:15 | Another one that we've been using a bit that I quite like, actually we'll have a look at this under our overhead camera. |
| 08:21 | Which is this AiM Solo 2 DL. |
| 08:24 | So the idea behind this unit is that it is standalone. |
| 08:27 | And in its simplest form it doesn't even need to connect to an ECU, you can mount this to a roll cage mount or it can even suction cup straight to the windscreen. |
| 08:37 | You can charge it up an then it's got a battery in it so it's literally self contained. |
| 08:42 | The nice thing about that is it's really easy to share between a couple of mates at the racetrack and these are pretty well priced, I think off the top of my head, depending where you're getting them, around about maybe the $450, maybe $500 USD mark. |
| 08:55 | There's two options there in the AiM range, there's the Solo 2 which is purely standalone and then there's the DL model which we've got which allows you to then integrate ECU data into it regardless whether you're running a standalone, you can bring in the ECU channels via CAN, pretty easy to set up, it's just a two wire bus that runs up to the AiM Solo 2 DL. |
| 09:19 | Or alternatively if you are running a stock ECU they do this nice little OBD2 adapter as well so you can get some of the key channels from your factory ECU. |
| 09:29 | So this would be definitely the cheapest option, and it is still really powerful, particularly at the entry level. |
| 09:38 | We'll go onto some of the aspects that it will help you with. |
| 09:42 | The dash logger obviously at the higher end, for professional motorsport there are also enclosed loggers which are kind of like a standalone logging hub that's central to the car that logs everything from the ECU and chassis, often at very high rates, usually with a lot of logging memory but these tend to be quite expensive. |
| 09:59 | The downside as well is that they don't have a driver display. |
| 10:04 | One of the reasons I want to driver display, we've talked about the warnings but the other aspect there is that it will display your lap time so it's really good as you go across the start/finish line so you know exactly what you've got and you can also load in a reference lap to these units and basically as you drive around the track it'll show you whether you're going faster or slower than the reference lap so that's really powerful as well. |
| 10:25 | You can almost do driver training while you're out on the track, trying different lines, different braking points and seeing how that results in your gain/loss. |
| 10:34 | The last option that I'll talk about here is using your ECU, if you're running an aftermarket standalone, most often these come with some level of logging memory. |
| 10:42 | This can be an option for logging in terms of racetrack driving and performance but generally and understandably so, the ECU logging is more geared around optimising the performance of the engine, so often it's difficult with some ECUs to integrate a way of getting a timing beacon so you don't actually get lap times and it may also be difficult to bring in some of the other sensors that we need but it is an option that you can consider. |
| 11:11 | Alright so when we are talking about datalogging, we want to understand what we're trying to analyse so that we can group our sensors as well as the way we're analysing that data together. |
| 11:22 | And basically I break this down into three areas, we're going to be dealing with engine and chassis health so I've already talked about that in that brief view that we looked at in the i2 analysis software. |
| 11:33 | Doesn't really matter what we're doing if the engine isn't going to hold together or maybe diff temperature is just about to melt all the diff bushes out of the car, we really need to understand that there's a problem there so we can address it. |
| 11:43 | So engine and chassis health is key. |
| 11:46 | From there, once we know that everything's holding together, then we move onto driver performance, so we want to actually analyse the way the driver is using the car. |
| 11:54 | Are they optimising it, are they getting the most out of the car in terms of the potential for cornering speed, braking performance et cetera. |
| 12:02 | And then the third aspect which starts to get a little bit more advanced is the chassis performance. |
| 12:07 | Now this is sort of where you really need to decide what level you want to operate at because the type of analysis you're going to need to do, the technicalities involved and also the sensors required obviously vary as we move through these. |
| 12:22 | Basically I'm going to be focusing here on the low hanging fruit, so this is the sort of stuff that you don't need to go and spend thousands of dollars on specialised sensors, often you're going to be able to get all of this data already from the car and this is going to give you the biggest gains for the least amount of money and that's really what we want obviously. |
| 12:46 | So in order to actually get some data we need to understand what channels we want to log and here we're sort of going to work through our basic setup first which might be the likes of something like a standalone logger like our AiM Solo 2 here. |
| 13:02 | In its simplest form we can get away with just simply having a GPS based logger like that AiM Solo 2 so that GPS logging is going to give us speed, it's also going to give us a course that we've driven around the racetrack so this allows us to then do track mapping which we looked at in the i2 software so we know where abouts something happened and it's also got a built in G sensor as well so we've got our lateral and longitudinal G forces. |
| 13:33 | So that seems like a pretty simple dataset, we've got basically speed, our track map and G force but when it comes to datalogging, we can find that sometimes less is more. |
| 13:45 | As we add more channels is does give us more ability to analyse the performance in more detail but it's also really easy, particularly if you are new to data analysis to get yourself confused and lost. |
| 13:57 | So I always prefer to start with a really minimal set of channels and then build up from that as your skills start to increase. |
| 14:06 | Now definitely it is an advantage though to have a couple more channels with that and this is where either adding in additional sensors to the unit or getting communications to an ECU that already has these channels is helpful. |
| 14:19 | That's why I said with the AiM Solo 2 DL we can connect this via CAN to our ECU and get all of those channels in. |
| 14:27 | So here what we might like to have included is engine RPM. |
| 14:31 | That's quite helpful, we can then sort of analyse our shift points and how we're using the gearbox. |
| 14:40 | We can also bring in wheel speed, that's really helpful for quickly analysing wheel spin and brake lock up. |
| 14:47 | Important to mention though you can still see brake lock up and wheel spin usually in the RPM trace. |
| 14:54 | This is a situation where if you are limited on your channel, sometimes you can still infer certain pieces of information out of a channel that you've already got. |
| 15:05 | It'd also be helpful to have brake pressure or at least a brake status, whether the brake pedal is on or off. |
| 15:11 | Again not essential, we can see from our longitudinal G force when the driver is on the brakes but having that brake pressure in there allows us to actually see how the driver is modulating the brake, how they're using the brake pedal but even a brake switch gives us an instant indication of when the driver's first touched the brakes and that then allows us to see how quickly the driver is able to achieve maximum braking force. |
| 15:37 | Steering angle's another useful input and this will allow us to see how the driver is actually using the steering and one of the reasons we want this is it's quite a good input to see if the driver is actually inducing some handling problems with the car. |
| 15:53 | Quite often we'll have a situation where a driver is complaining that the car is understeering but this could be a combination of the driver braking too late, actually carrying too much speed into the corner or then actually cheating turning into the corner and not actually using the correct apex. |
| 16:09 | So again having steering angle gives us some indication on what the driver's doing there. |
| 16:15 | If the car is understeering we'll also quite often see a situation where the throttle position trace can help us with this. |
| 16:22 | Particularly on corner exit you'll often see a situation where the car won't take throttle, maybe the driver starts to go into the throttle and then you see the driver back out of the throttle before having another stab at it because as the driver starts to apply throttle, the weight transfers off the front wheels, this reduces the grip and then can have the car start to run wide so gives us a lot more ability to sort of analyse fully what's actually happening there. |
| 16:49 | Then once you've gone through those basics there, those would be what I consider to be the bare minimum, we can start looking at the advanced sensors and this is really going to be for those who want to go to that next level. |
| 17:02 | Definitely not an entry level set but I just want to talk about what is available there. |
| 17:08 | We could be including there shock travel potentiometers, tyre pressure monitoring systems, tyre temperature, infrared tyre temperature sensors fitted to the car, laser ride height sensors, basically the sky is the limit there it's really just down to cost and your ability to interpret the data and this is really important to understand. |
| 17:28 | I know when you are looking at datalogging packages online and you're deciding on what you want to use and all the sensors that are available can be really tempting if your budget allows to really stack that system up with all of the option boxes ticked. |
| 17:43 | However, again it comes back to what I was saying, too much data, particularly if you aren't confident in how to analyse it can actually serve to to confuse and you can actually do better with a simpler set of channels, more limited set of channels that are easier to interpret and that's how you're going to get that low hanging fruit. |
| 18:03 | So let's have a quick look at the logging setup so we'll jump across to my laptop screen. |
| 18:10 | I've said that I'm using the C125 here but this is actually a setup for our CDL3 logger that's in our other Toyota 86, this is going to be much the same anyway so basically there's two ways we can get data into this dash logger. |
| 18:23 | We can either bring it in directly through a sensor that's wired into the back of the dash or via communications, we'll have a quick look at that. |
| 18:31 | So to look at our wired inputs we can have a look at our input setup here. |
| 18:36 | We'll click on that. |
| 18:37 | And this gives us all of the inputs to the dash here, we've got our connection point on the connector on the back of the dash as well as what that particular input is. |
| 18:47 | This is a relatively entry level dash logger so we've only got a handful of inputs. |
| 18:52 | We've got four analog voltage inputs, two analog temperature inputs, a couple of digital or switched inputs and then three speed inputs. |
| 19:00 | And it's important to understand what sort of sensors work with what sort of input. |
| 19:06 | An analog voltage input, what that's looking for is a variable voltage as a sensor moves or changes. |
| 19:15 | So we might use this for a throttle position sensor, we might use this for a pressure sensor for example. |
| 19:23 | You can see here that I've actually got two damper position sensors wired up to those analog voltage inputs. |
| 19:29 | Analog temperature on the other hand, no big surprises here, these are designed for a temperature sensor and the temperature sensor is a two wire sensor, it has what is called a thermistor and basically the resistance of that sensor changes as the temperature it is detecting changes. |
| 19:48 | And what the dash logger does here is it uses an internal pull up resistor to five volts to basically turn that, turns it into a voltage that the dash logger can then detect. |
| 20:00 | It's really important with all of these inputs to make sure that they are also calibrated correctly. |
| 20:08 | We can click on the calibration here for our damper position. |
| 20:11 | And for common sensors, maybe a pressure sensor for example, you can load in a pre calibrated definition and there we've just got a simple calibration between our voltage and our damper position so pretty straightforward there. |
| 20:28 | Now it is really important though just to reiterate here that one of the first things we need to focus on when we are setting up our dash logger is making sure that all of the inputs are correctly defined like this and correctly calibrated. |
| 20:43 | It's really easy to overlook this or accidentally load in the wrong calibration and then just blindly trust the data and obviously this can be incredibly misleading. |
| 20:53 | At best it could end up meaning that the data you're looking at doesn't actually help you and at worst if the calibration is something mission critical, you could end up in a situation where you unknowingly have a problem going on that you could have addressed if the data had been correct. |
| 21:13 | Moving on, we've got the digital and speed inputs, so digital, pretty simple, these are for a switched input. |
| 21:18 | The speed inputs are looking at the likes of a wheel speed sensor so a frequency input, now these can be used for a variety of different things, anything that basically produces a frequency, ethanol content sensor would be another example. |
| 21:31 | We've also got the ability on these dash loggers to output something as well. |
| 21:38 | I don't think I'm using any of these, no I'm not, but you could use that for controlling a relay that switches on a thermofan or maybe a diff pump, basically the sky's the limit there. |
| 21:50 | So that's our first way of getting data into the dash logger. |
| 21:54 | The other aspect here, and this is something we're using is to bring information into the dash via a CAN bus. |
| 22:01 | So if we look at our communications setup here, there are three ways of getting data in, we've got two CAN buses and a serial connection on the dash logger. |
| 22:12 | If we start with our serial, we're using this to communicate to a GPS antennae, pretty straightforward. |
| 22:18 | So this brings in the GPS data, from this we can do the track mapping like I've already talked about and by configuring a GPS location or beacon for the start/finish line this is also how we get lap time so really important when we are heading to a track to also make sure that the timing beacon is set for the correct coordinates otherwise you're probably going to waste a session with no lap times. |
| 22:44 | We'll head back to our CAN bus zero, not going to really swell on this too much but this is just how we're getting the information into the dash logger. |
| 22:52 | So for example, our first communication bus here or our first communication template here is M1 general cruise, so this is bringing in information from the M1 MoTeC ECU and we can see over here on the right hand side, these are all of the channels that are being brought in. |
| 23:10 | Now obviously here I am communicating with a MoTeC ECU. |
| 23:13 | You could expect that the MoTeC dash would rightly communicate pretty easily with the MoTeC ECU, that's a given but these days with CAN bus it is a universal protocol so these dash loggers are able to communicate with any ECU and it can be as simple as just selecting from a drop down menu, actually let's just go here, here are just a range of the available communication templates that are set up for a range of different ECUs so you don't actually have to do a lot of the hard work yourself, it's just as simple as choosing that from this drop down menu and everything will just work. |
| 23:54 | So once we've got all of our parameters, or all of our channels coming in we also need to set up our logging and this is another area that's really easy to overlook. |
| 24:03 | We'll go to our logging setup here and basically these are all of the channels that we are going to be logging, I've got a bunch of them here, we're doing some reasonably complex stuff in the background with this particular car but that doesn't really matter, I just want to concentrate on a couple of aspects here. |
| 24:22 | First of all, obviously you want to select all of the channels that you want to log. |
| 24:27 | There's not much point getting all of your sensors set up and nicely calibrated and then actually forgetting to log them. |
| 24:34 | So that's the first place, making sure that we've got all of the parameters in here, all of those channels set up. |
| 24:41 | Let's look at engine speed for example and we've got that being logged here, actually a little bit too slow which is awkward. |
| 24:47 | We've got, on the right hand side here, the rate that each of those channels is going to be logged. |
| 24:54 | So this is simple how many times per second each of those channels is going to be sampled. |
| 25:00 | And it's really important to make sure that our sample rate is suited to the particular sensor that we're looking at. |
| 25:07 | So what I mean by this is there's no point sampling something too fast or too many times per second if it doesn't change very often. |
| 25:15 | A good example of this, if we head back up, I just saw where have we got, our diff temperature. |
| 25:23 | Let's have a look at that. |
| 25:24 | So diff temperature, obviously temperatures don't tend to change too quickly so there's no real sense in logging these at 10 or 20 times a second. |
| 25:32 | Generally one or two times per second is absolutely ample for our diff temperature, our engine coolant temperature and even our intake air temperature. |
| 25:41 | Maybe intake temperature I might log a little bit faster than that, particularly on a turbocharged engine but once a second, twice a second for the rest of those channels is absolutely fine. |
| 25:54 | On the other hand, the RPM that I just looked at before, 10 times a second, that's probably a little bit slow for RPM. |
| 26:00 | You're going to potentially miss some of the nuances of what's actually happening because you're only sampling there every 10th of a second and quite a lot can change from one sample to the next, particularly, we talked about brake lockup or wheel spin in the RPM trace, you may lose some of the subtleties of that so generally for those faster moving samples, wheel speed, engine RPM, boost pressure, I'd be sampling those typically at around about 25 Hz, 25 samples a second. |
| 26:30 | I just use the term hertz there, that is just the frequency so how many samples per second, same thing just a different terminology there. |
| 26:42 | So for the most part, generally the samples, the channels I'll be logging, all except for our temperatures, I'll be logging at 20 to 25 samples per second. |
| 26:52 | The only other thing that we might want to look at there is some of the specialist sensors such as damper position, you need to log these quite a lot faster to get good solid data our of there so damper position, we're probably going to need to be logging up around 250 samples per second. |
| 27:08 | Almost done here, so we're going to get into some questions and answers really shortly. |
| 27:12 | I just want to also talk here about our start and stop conditions. |
| 27:16 | So again this can generally be automated these days, we don't really want to have to think about this and actually push a button to start the datalogger and push a button to turn it off again. |
| 27:27 | So you can see here, I've got this set up so that we'll start logging straight away as soon as the engine RPM exceeds 2000 RPM and the logging will stop once the RPM reaches zero and stays at zero for 10 seconds so basically once the engine's shut off. |
| 27:40 | So basically this setup is going to ensure that I'm logging just about any time the car is being driven. |
| 27:47 | It won't start logging if I just start the car up and have it idling but as soon as I head out on the track we're automatically going to be logging. |
| 27:54 | Now between this, the start/stop conditions and also our logging setup in terms of how quickly, how many times we're going to be sampling, we also obviously are going to fill up our memory, our logging memory quicker if we're logging more channels more quickly. |
| 28:12 | So that's the other consideration here. |
| 28:14 | This used to be a bigger deal than it is now, we're regularly seeing loggers with huge amounts of logging memory but if you are logging a huge number of channels at high frequencies then it is something that you do need to consider. |
| 28:28 | There's not much point taking a car out on a racetrack and competing in a one hour race and finding out that your logger was full after the first three laps. |
| 28:37 | So it is something that you do need to bear in mind. |
| 28:41 | Right so last thing I want to just talk about here, or two things I want to talk about here is first of all, how we get that lap timing information. |
| 28:48 | So so far I've been talking pretty much about using GPS. |
| 28:51 | And prior to GPS becoming so common these days, the way of getting that lap timing data was to use an infrared timing beacon that we placed on the side of the racetrack and that pointed across the track and it triggered a receiver that was mounted in the car. |
| 29:07 | That is undeniably still the most accurate way to get lap times. |
| 29:11 | There are some accuracy issues with GPS which I'll touch on but there are some problems with using a timing beacon as well. |
| 29:19 | The first one is that it's costly, you physically need the timing beacon, the transmitter and the receiver. |
| 29:25 | You also need to go and set that up on the side of the racetrack, you need to make sure that the battery for the transmitter is charged, most importantly you also need to remember to pick that thing up while you're packing up at the end of the day, otherwise you've just lost a pretty costly transmitter. |
| 29:40 | The other thing is that the receiver in the car may need to be swapped from one side to the other depending on where the pit wall is and whether the tracks are a clockwise or anticlockwise configuration. |
| 29:52 | So not insurmountable but a few considerations there. |
| 29:55 | GPS on the other hand, all you need is a simple cost effective antennae, normally you want to mount that on the roof so it's got an unobstructed view up towards the sky and even a 10 Hz GPS which is what we use with our MoTeC C125 and CDL3 dash does a really really good job. |
| 30:14 | Now as I said though, there are some accuracy potential problems there. |
| 30:17 | Generally I find that my GPS lap times will be within a few hundredths of a second of the official track timing from the MYLAPS transponder. |
| 30:29 | And for our purposes that's absolutely good enough. |
| 30:32 | Also gives you the ability to straight away generate track maps without needing to do any work, it's just all there for you, really nice and easy. |
| 30:40 | Another feature as well, because the GPS antennae knows where abouts in the world it is, once you're set up, particularly some of the units like the AiM Solo 2 DL, once you go to a particular track is straight away knows where you are, it knows where the start/finish line is and it can automatically start generating data in the correct location for you. |
| 31:01 | Last thing I want to talk about though is calibrating our sensor. |
| 31:05 | So I've talked about the, sorry zeroing our sensors, I've talked about calibrating the sensors but the other thing we need to do as well is make sure that before we go out on track, all of the sensors are reading correctly. |
| 31:17 | So we looked at how to get the data in, we looked at the directly wired sensors and how we physically set up a calibration for those, we've talked about bringing information in via CAN, there are some intricacies there as well and it's always a good idea to just make sure that each of the channels that you are bringing in via CAN, that the readings match whatever you're expecting. |
| 31:36 | So a great way to do this if you're running an aftermarket ECU, look on the laptop tuning software and make sure for example the engine coolant temperature or throttle position are reading the same as what your logger is seeing. |
| 31:47 | However there will also be some sensors that need to be zeroed before you head out on the track so this might be steering angle, damper position, and even G force. |
| 31:57 | So the likes of these dash loggers will actually have a three axis G sensor built into the dash and we need to make sure that that's zeroed because depending on the orientation of how the dash is mounted, that will affect our lateral longitudinal and vertical G force readings so that's pretty simple to do, I can't do it live because I'm not connected but if we head back to my laptop software, we've got another little tool in our task bar here. |
| 32:22 | We'll click on that and again obviously I'm not live here but basically within this we can go through and zero individual sensors or zero all of our sensors really quickly and easily. |
| 32:34 | That wants to obviously be done in race conditions, so we want the car fuelled ready to go, driver in it and also on a flat piece of ground so ideally somewhere maybe where we're doing our setup as well in terms of our wheel alignment. |
| 32:49 | Alright so we'll have a look and see if we've got any questions and I don't think we have so obviously I've explained everything there to perfection. |
| 32:57 | For our members though, if you do have any questions after this webinar has aired, please feel free to ask those questions in the forum and I'll be happy to answer them there. |
| 33:08 | Thanks everyone for joining us and hopefully we'll see you next time. |


