248 | Engine Blueprinting. What You Need to Know
Summary
If you’re considering building a performance engine, one of the terms you’ll most likely encounter is ‘blue printing’. This has become one of the most misunderstood and misused terms in the engine building industry and in this webinar we’ll discuss what blueprinting is, what it isn’t, and why in most instances true blueprinting isn’t required.
| 00:00 | - It's Andre from High Performance Academy, welcome along to another one of our webinars and this time we're going to be talking about the topic of engine blueprinting. |
| 00:09 | This is something you're going to be hearing a lot of around the performance engine building world, probably you'll see people listing blueprinted race engines for sale on the likes of eBay or Trademe and this is a term that is heavily misunderstood and heavily miused. |
| 00:27 | So it's worth understanding what the term really means, how it applies to our performance engine builds and what we actually need to know about engine blueprinting when it comes time to building our own engines. |
| 00:40 | As usual, we're going to be having a question and answer session at the end so if there's anything I talk about today or anything related specifically to this topic, please feel free to ask in the questions and we'll jump into those at the end. |
| 00:52 | So for a start, what is blueprinting, what does that term mean? In essence, what it's talking about is making sure that every single measurement and specification on our engine matches a specification that we've got given for that engine. |
| 01:09 | Now generally this might be the OE manufacturer's specifications. |
| 01:14 | However particularly when we move into building race engines we might find that the specifications that we want to use will be vastly different, we're going to talk about that as well. |
| 01:24 | In the older engines, where technology wasn't quite where it is today, the casting technology, the machining technology wasn't quite as good as we've got today, what you would find is that there were significant variations from part to part from block to block, cylinder head etc. |
| 01:43 | And blueprinting when applied to these engines, which is kind of where the term came from, was where the machinist would spend a lot of time, which obviously adds up to a huge amount of money, correcting all of the errors in the factory castings and getting them back to what they actually should be. |
| 02:01 | Now that's not to say that those engines as they were, were no good. |
| 02:06 | They might be within a tolerance but when we are trying to build a race engine, we're generally working to tighter tolerances than what the factory would allow. |
| 02:16 | So what I'm talking about here is, let's look at two examples, one might be, we've got a V8 engine, we may actually find that the V configuration where it should be 90°, maybe, due to the casting and machining tolerances, isn't quite exactly 90°. |
| 02:33 | We might also find that the bores don't line up perfectly overhead with the crankshaft centreline, might be very slightly offset. |
| 02:41 | And I'm talking thousandths of an inch here but when we are trying to get the most out of an engine, thousandths of an inch really add up. |
| 02:49 | So when blueprinting an engine like that, it's the machinist's job to go ahead and first of all start by finding a block that's as close to perfect as possible. |
| 02:59 | So this is where the expense adds up and particularly in controlled race classes, this is the difference between potentially winning and potentially being middle of the pack. |
| 03:09 | We might start by finding maybe five or six engine blocks and checking thoroughly through each of those blocks, measuring all of the key clearances, measuring the thickness of the bores etc to find the best block to start your build with. |
| 03:23 | Likewise if you're restricted to factory pistons, it'd be a case of finding a set of factory pistons that perhaps matched up perfectly on weight or diameter or both of those parameters, these are the sort of aspects that went into blueprinting back with our older engines. |
| 03:40 | Likewise this also involves a lot of cost because some of the machining operations to properly blueprint an engine require specialist jigs to hold the components, the blocks, the cylinder heads, etc while the machinist was actually performing the corrective action required. |
| 03:56 | So as you can sort of hopefully understand here, blueprinting in its pure form is a very very time consuming process, again that adds up to large amounts of money and particularly when we're talking about our more modern engines, obviously the manufacturing technology has come a long way, we find that the tolerances are much better, the base engine is much closer to what we need straight off the showroom floor so the requirements to go to the lengths that were required 20 or 30 or 40 years ago, it's not really quite the same these days and this is why now these days the term blueprinting as it used to be applied, has kind of lost its meaning a little bit. |
| 04:39 | Now also we're going to talk here about factory tolerances because regardless if we're just building a performance engine or we are in fact trying to blueprint that engine, we obviously need tolerances and specifications to work to. |
| 04:53 | So first of all if we get a factory workshop manual, we are going to find that there are tolerances for basically everything, specifications, clearances and tolerances for everything. |
| 05:04 | And what we'll do is we'll just jump across to my laptop screen here for a moment. |
| 05:08 | No that's not actually going to work that well. |
| 05:10 | This is just a workshop manual for a Honda K20 just to highlight some of the aspects here that we would generally see. |
| 05:19 | So here we've got tightening torque for our rod bearings. |
| 05:24 | So not a big deal there but we've also got the actual rod bearing to journal clearances so we've got the range that is acceptable or the range that is expected and then a service limit at which point the components need to be replaced. |
| 05:38 | Now probably a little bit hard to see there but for example here for the K20A3 engine, the clearance should be between 0.0008 and 0.002 of an inch so just under one thou through to two thou so that's actually quite a wide tolerance range. |
| 06:00 | So first of all, generally when we're building a race engine, we're going to be trying to work to tighter tolerances than that. |
| 06:07 | And also the other aspect is we may find that the factory tolerances aren't actually what we want to run. |
| 06:14 | For example if we are building a factory engine, unless there's a known problem with the factory oil clearances for example, there'd be little reason to adjust them and essentially as long as we were within that specification, that Honda give us, we're probably going to be pretty confident that we're good to go. |
| 06:31 | However if we take that standard Honda K20A engine and now we add a turbocharger, some big cams and we push 40 or 50 psi of boost through it and rev it to 10,000 RPM, at that point, chances are that the factory clearances aren't actually going to be adequate, particularly if we were at the low side there, just under one thousandths of an inch clearance, that's probably going to be way too tight for our big end bearings, we probably almost certainly want to be right at the high limit of those clearances. |
| 07:04 | So this is why again when we are considering that task of blueprinting, we really need to be very clear on what we're trying to achieve and what specifications we are trying to work with, what clearances we are trying to work with. |
| 07:19 | The other aspect there, we've talked about our bearing clearances but the other aspect is the factory specification for the likes of our piston to cylinder wall clearance. |
| 07:28 | So for a cast piston, we're going to find that the piston expands very little as it heats up. |
| 07:33 | With a 2618 forging on the other hand, due to the silicon content in the alloy that's used, these are going to expand much more. |
| 07:44 | So while a factory piston may have a clearance of something in the range of maybe one thousandth of an inch, wouldn't be uncommon to need three to maybe four thousandths of an inch when using an aftermarket forged piston. |
| 07:57 | So the factory clearances, the factory specifications are useful to a point. |
| 08:02 | We always want to start by getting that factory workshop manual anyway. |
| 08:07 | Reason for this is specifications and clearances aside, this is going to give us torque specs for some of the fasteners that we're going to be reusing and it's also going to give us torque sequences for the likes of our cylinder head and our main bearings. |
| 08:22 | And sometimes there are some special service items that we have to do on a particular engine, maybe for example the way a cam chain gets installed to time the engine correctly. |
| 08:33 | All of that information is in that factory workshop manual so that's our first port of call before we start building our engine. |
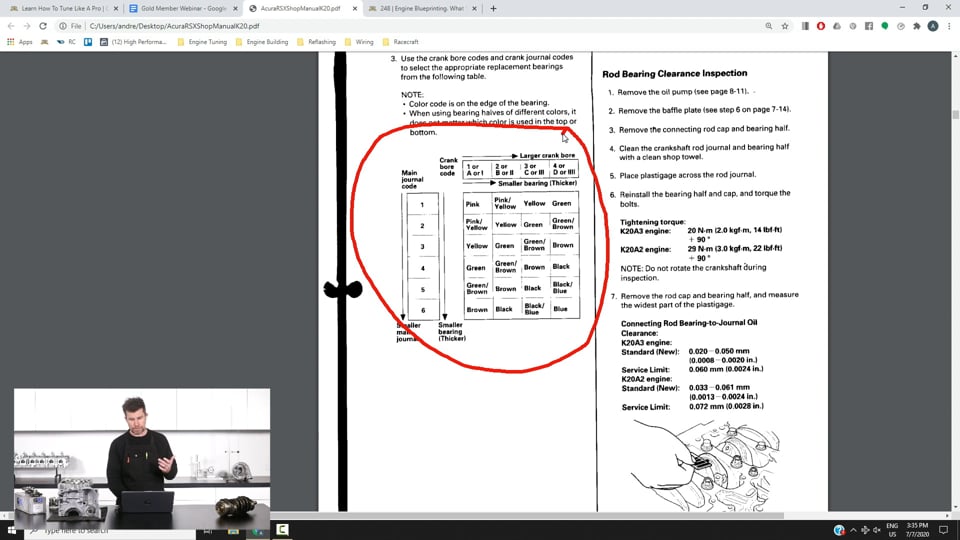
| 08:39 | Now if we just jump back to my laptop screen again for a second, interestingly, and this is something we see on a lot of late model, performance orientated engines, the factory actually goes some way to providing their own blueprinting. |
| 08:51 | And what we can see here is we've got this little grid. |
| 08:54 | So what we'll find on a lot of factory engines is that the crankshaft, the connecting rods and the block have numbers stamped into them. |
| 09:04 | And this basically is where abouts for example the crankshaft journal diameter sits in the range of tolerable specifications. |
| 09:13 | So obviously there is a range of sizes for our bearing journals that are allowable and whether we're at the low side of that range or the high side or whereabouts we are in the middle. |
| 09:26 | So what we've got here, for example, there will be a number on our main bearing journal and we can see that sits through one through to six. |
| 09:34 | Likewise we've got another number on our crank bore and what we can do then is match those up, so let's say we've got a three and a four. |
| 09:45 | We would know that for that particular journal, we want to install the brown bearing set. |
| 09:50 | So this is a factory way of getting our oil clearances onto specification. |
| 09:55 | it's important to understand though, that's all well and good when all of the parts are brand new. |
| 10:00 | Of course if there's any wear present on the journal then this does end up affecting our final tolerances, always advisable to do a final check and just make sure that you are actually where the clearances suggest that you should be. |
| 10:16 | So basically the question comes down to now having a big of an understanding of what blueprinting is and it's really important to also mention that at the highest levels of motorsport, Formula 1 etc, Le Mans prototype engines, yes they are fully blueprinted, obviously they're operating in an environment where first of all, really money doesn't count, there's no expense spared and this is why some of these engines are cringingly expensive. |
| 10:41 | Also most importantly there, particularly at that level, every horsepower counts and engine reliability is absolutely critical. |
| 10:49 | Teams also want to know for sure that when they replace a power unit, that the replacement power unit is going to produce exactly the same results and this is where the blueprinting comes in, we want to make sure that every single measurement inside the engine is absolutely identical. |
| 11:05 | If we've got that right, we can be pretty confident that two engines should deliver exactly the same results. |
| 11:11 | However, of course then goes into the expense of getting to that point. |
| 11:15 | So at our level, the enthusiast market, street level, semi professional motorsport, even up to professional motorsport, the budget probably isn't there most of the time to go to those extremes and also the results probably don't warrant the sort of expense that is required to that. |
| 11:34 | So what we generally do is use a significantly dumbed down version of blueprinting and I want to cover off what we would typically focus on when we are going through a performance engine build. |
| 11:48 | So what we want to do is sort of focus on the low hanging fruit here, the main elements that are really critical to getting a good result and making sure that our engine's going to produce great power and reliability. |
| 12:00 | Without going overboard and needlessly checking and adjusting every single measurement on every component that we are dealing with. |
| 12:08 | So we'll start with probably what is the more critical aspects which is our bearing clearances. |
| 12:13 | So in order to do that, we really start with our crankshaft and I've just got a Subaru FA20 crankshaft here. |
| 12:20 | So this relies on us, first of all making sure that our main journals as well as our big end journals are all measuring on specification. |
| 12:28 | It's not only that though, we want to make sure that they are not showing any taper or any out of round. |
| 12:34 | Pretty easy to do using a micrometer, we're going to jump into the tools that you're going to need to do this if you want to take it on yourself in just a moment. |
| 12:41 | Other aspect with our crankshaft and you can have your machinist easily check all of this as well if you don't want to, just make sure that it has no bend in it. |
| 12:51 | Particularly with a used crankshaft or if a crankshaft has accidentally taken a tumble off a workbench, it's very easy to have a bend in that crankshaft. |
| 12:59 | And that can be checked by placing the front and rear journals in V blocks, using a dial indicator on the centre main and just rotating it, again if you don't have the equipment or you don't want to do it, this is something that the engine machinist can do and you should be asking them to do. |
| 13:15 | It's one of those essential aspects when we are dealing with second hand parts in particular to make sure that we are dealing with a good component but even when you are buying brand new components straight out of the box it's always a good idea to verify that those parts are actually fit for use. |
| 13:30 | Another aspect which is a little bit off the topic today is when we are dealing with a used crankshaft, it's always a good idea as well to have that crankshaft crack tested and this will in particular be looking for any signs of cracking in the fillet radius of the journals. |
| 13:47 | Really important to pick that up before a failure actually occurs. |
| 13:51 | Now at the same time that's only one part of the puzzle so now we know that our journals are on size and that there's no taper there. |
| 13:58 | The other aspect that also comes into this is we need to be measuring our bearing journals in the crankshaft as well as in our connecting rods, making sure that those are all on size as well. |
| 14:11 | Particularly one of the common tasks that we will be doing with a performance build is to fit aftermarket stud kits, main studs and head studs. |
| 14:19 | These can provide superior clamping, particularly with our FA20 or the Subaru engines in particular, because of the way the two halves of the case bolt together, they are quite prone to fretting if the clamping force isn't sufficient. |
| 14:34 | This is because essentially the two halves of the engine are trying to tear themselves apart. |
| 14:38 | So what we can get is basically over time the two halves will sort of flex apart and just move and this actually ends up affecting the mating surfaces. |
| 14:47 | So upgrading the fasteners, great idea. |
| 14:50 | However particularly with an alloy block, when we upgrade the fasteners, because of the additional clamping force, this actually can distort the main bearing tunnel through the engine block and if we don't correct that, that's going to definitely affect our bearing clearances so the common one with Subaru engines is going to the likes of an ARP main stud kit, people bolt the engine together, torque everything up and find that the crankshaft physically won't turn in the block, that's how much it's distorted that main bearing tunnel. |
| 15:20 | So if you are doing this, another machining operation that you'll have your machinist do is check that, and perform what's referred to as line honing and this just gets that tunnel back to being on the correct size and making sure that everything is perfectly round. |
| 15:35 | So once we've got that, we've got a good starting point, this is our basis, we should now know that we've got a good starting point and then we can check our bearing clearances. |
| 15:43 | We can manipulate the bearing clearances in a variety of ways, we already saw in that Honda workshop manual, a lot of factory bearings come graded so by using different grades we can manipulate the bearing clearance, maybe not to the factory specification but to get where we want it to be. |
| 16:00 | Another way we can get our clearances to, or adjust our clearances slightly, in some instances there will be aftermarket bearing shells that will give us an extra small amount of clearance, maybe a thousandth of an inch clearance, or something of that nature. |
| 16:16 | Or alternatively small amounts of material can actually be polished off the crankshaft journals to get our clearance where we want it to be. |
| 16:22 | So bearing clearance is probably one of the key ones, another one to check though here is the thrust clearance. |
| 16:28 | This is less critical, generally the thrust clearance is also a little bit broader than what we'd allow for our main and big end bearing clearances. |
| 16:38 | The thrust clearance for those who don't know, basically is what supports the crankshaft for and aft in the engine. |
| 16:44 | Particularly if you have a manual transmission car, when you put your foot on the clutch, there is physically a force trying to force the crankshaft forward for a push type clutch, obviously backwards for a pull type clutch and it's the thrust bearing that supports that so we want to make sure that we've got sufficient clearance, otherwise we're really quickly going to destroy that thrust face on the crankshaft and destroy the thrust bearing, it's going to overheat and overload. |
| 17:09 | Next we also need to check our piston to cylinder wall clearance so this is probably in my opinion the, all of these obviously are critical, we can't have one without the other but in order here, this is the next one that we really want to focus on. |
| 17:22 | So as its name implies, this is just the clearance between the skirt of the piston and the outside of the bore. |
| 17:29 | We will be checking here with our piston manufacturer's recommendations if you're using an aftermarket piston, as I've mentioned earlier, the sort of clearances that we see for a forged piston dramatically different to a factory cast piston. |
| 17:42 | It's also important to understand where these clearances are going to be measured. |
| 17:46 | So while the skirt of our piston looks like the two sides are parallel to each other, the reality is that they're not, there is actually a barrel shape machined into this and the piston manufacturer will give you what's referred to as a gauge point, where on the piston to actually measure with a micrometer. |
| 18:03 | Alternatively again, this is something that we can have our engine machinist do. |
| 18:08 | And ultimately we will have to have the machinist do this because we aren't doing the boring and honing ourselves, we're relying on our machinist to do that. |
| 18:16 | It's always a good idea again, trust but verify. |
| 18:19 | If we've got the ability to double check the machinist's work, we know that everything's right and ultimately the responsibility is on the person assembling the engine to check and know that everything is correct. |
| 18:31 | There's no point going back and blaming the engine machinist because you haven't checked their work. |
| 18:37 | Machinists are human too and maybe they've had a bad day, maybe something's gone wrong so always check that work. |
| 18:43 | As an upshot, I also tend to find that without being smart and without being cocky, if you build a relationship with an engine builder and they know that you're actually going to be checking their work and all of the clearances when you get the components back from them, they don't like to be shown up so they tend to do a better job so you're actually going to get a better result if you're doing that measuring yourself generally as well. |
| 19:07 | Now it's not just the piston to cylinder wall clearance we need to worry about as well. |
| 19:11 | The other aspect here is we want to check our bores and make sure that our bores are round. |
| 19:17 | Again there'll be a specification in our workshop manual of what is allowable and this is another one of those areas where ultimately for a performance engine, ideally we don't want any amount of out of round at all so the closer we can get to zero, the better and this is where we would definitely try and tighten up that tolerance over what the factory allow. |
| 19:38 | Consideration here as well though is are we going to be torque plate honing the engine block? Quite common with most blocks, when we bolt the cylinder head on, the bores will actually distort. |
| 19:50 | So what we could end up with here at room temperature with the head off the block, we might have a perfectly round bore. |
| 19:55 | No out of round measurable at all but when we actually bolt the head in place we'll find that things distort quite significantly, all of a sudden we might have a thousandth of an inch out of round. |
| 20:06 | That's actually something we can check, in this case with our FA20, we can bolt the cylinder head on with the head gasket in place, turn the block upside down and we can insert our dial bore gauge from the underside and actually measure to see what's going on there. |
| 20:19 | This of course is why we do use a torque plate so that we're replicating that. |
| 20:22 | If we are using a torque plate during the boring and honing process, understandably we also want that torque plate on when we're checking our piston to cylinder wall clearance and out of round with our block. |
| 20:34 | Another aspect with that last one with our bores as well, we also want to actually check from the top of the bore to the bottom and what we're looking for here is any taper or any belling and this comes down to the boring and honing process. |
| 20:47 | Depending on how the hone is used, it's very easy to end up focusing on one area of the bore and that will increase the clearance there relative to another part so again obviously in the perfect world we want the bores to be perfectly parallel from the top to the bottom. |
| 21:04 | Next one is deck clearance so this is basically where the piston sits relative to the top deck surface of the block. |
| 21:13 | This is important because if affects our compression ratio, if affects our piston to cylinder head clearance and ultimately it also affects our piston to valve clearance so we want to be fairly careful with that. |
| 21:25 | This can also be a place where error does tend to creep in, particularly with an engine that's been rebuilt a few times, it's pretty common as one of the machining operations to have the deck surface of the block machined so this is called decking the block. |
| 21:39 | Only a minor amount of material is removed here, maybe a thousandth of an inch or thereabouts depending on how much cleaning up is required. |
| 21:47 | One of the parts of this is also making sure that the deck surface of the block is parallel to the sump rails, that's important there, otherwise if we exaggerate that you can understand if one end of the block was higher than the other, that's going to affect the deck clearance of the pistons from one end of the block to the other and then we'll have different compression ratios across all of the cylinders. |
| 22:11 | But we do want to check that and make sure that that's all OK and that leads us into the next aspect which is our compression ratio. |
| 22:17 | So again we might expect that our compression ratio's going to be the same across all cylinders but that's not necessarily the case. |
| 22:25 | We could find that the combustion chamber volume is different from one end of the cylinder head to the other, after all these are a casting. |
| 22:33 | We may also find that for example the dish or dome on our pistons varies. |
| 22:38 | Probably unlikely with a CNC machined piston dome or dish but it's still something that we want to check out. |
| 22:47 | And again if we've obviously got any variations in our deck surface height from one end of the block to the other, well that's definitely going to add up to problems. |
| 22:56 | Lastly there, the other aspect we definitely want to focus on is our cam timing and our valve lift. |
| 23:03 | So it's pretty common with an aftermarket cam to degree or dial in the cam, make sure that the cam opening and closing events are where they should be. |
| 23:13 | Traditionally though that's most often done just by checking one lobe of the cam, generally we're going to be doing that on number on cylinder, on one inlet valve and one exhaust valve. |
| 23:23 | And here we are then assuming that the cam grinder has done a perfect job and that each of the subsequent cylinders, the offset of the cam and the lift is exactly the same and of course again, that should be the case but it's not always going to be so if we want to get a little bit more pedantic, it's a good idea to actually check our cam timing and valve timing events on each cylinder on the engine, that way we know everything is where it should be. |
| 23:51 | So that's kind of our condensed list, what I'd consider to be the must dos when we're building a performance engine. |
| 23:58 | It goes, probably a little bit further than what most people would be going, particularly when we're looking at degreeing the cam on each cylinder or each valve. |
| 24:08 | And looking at aspects such as our deck height. |
| 24:12 | A lot of these things tend to get assumed or get eyeballed and then we'll move on but if we want to really do the job properly and know what we've got, those are the sort of essential things that we need to be doing. |
| 24:23 | However, what the next part comes down to, what we're actually going to need in order to do that job, so we're going to talk about that and we're going to then move into some questions so this is probably a good time to just suggest, if you've got questions on anything I've talked about, please ask them now. |
| 24:38 | So the first place is, we don't necessarily need to be doing any of this work ourselves because as you'll see, it does require some specialist tooling to do all of this, to do all of these measurements. |
| 24:52 | So we can rely on our engine machinist and if we're relying on a good quality engine machinist then they should be turning out good work that we can rely on, still comes back to what I was saying earlier, trust but verify where possible and also the onus ultimately is on the person that's assembling the engine to pick up any problems as we go through. |
| 25:12 | However some of these tools now are getting quite affordable and particularly if you are considering building multiple engines, then it's probably an investment in your future to start considering some of these tools. |
| 25:25 | So let's go over what we will require. |
| 25:28 | We start with one of the basic pinnacles of engine building which is a good quality set of micrometers. |
| 25:35 | And you can purchase these in either metric or imperial. |
| 25:39 | You're going to need probably between three and five micrometers in order to measure all of the different diameters that you're going to come across inside your engine. |
| 25:48 | These ones are imperial and they only measure across a range of one inch so this is a one to two inch, this is three to four inch so again this is why we're going to need multiple to do the job. |
| 25:59 | Now particularly for novice engine builders coming into this, it can be tempting when you're looking at a vernier micrometer like this, if you don't know how to read these, they do look a little bit complicated and it can be tempting to instead, use a digital version. |
| 26:15 | They are available, they do a great job, the problem with the digital micrometers is they add significantly to your expense so it's a good idea to learn how to read a vernier micrometer, we teach that in our engine building fundamentals course. |
| 26:29 | I think we've also got a webinar in the archive covering that as well. |
| 26:33 | So that's the first tool, that'll allow you to measure for example our journal diameters on our crankshaft, you'll be able to measure your piston skirt diameter and you're also going to be able to use these in conjunction with our next tool which is our dial bore gauge for checking aspects such as our piston to cylinder wall clearance. |
| 26:54 | If you haven't seen one of these before, in a nutshell what we do is we set the micrometer to the outside diameter of our piston skirt if we're measuring piston to cylinder wall, we then zero our micrometer between the two anvils of our, sorry we zero our dial bore gauge between the two anvils of our micrometer. |
| 27:12 | Once that's zeroed we can then place that into the bore and our little dial indicator is going to show us what our clearance is. |
| 27:19 | We can also use this for checking our bearing clearances in exactly the same way. |
| 27:24 | Important when you are shopping for one of these dial bore gauges as well, make sure that you are using one or buying one that has little teflon buttons at the end of it and this will help reduce the scoring that will be present on both your freshly honed bore as well as your bearing surfaces. |
| 27:43 | Next there's a variety of ways of doing this but when we're checking our deck clearance, we can use a deck bridge like this so this is simply a bridge that goes either side of the block and we bring our piston up to TDC, we've got a dial indicator and we can zero this before we bring the piston up to TDC and that will show us how much clearance we've got, either positive or negative between the piston and the deck surface of the block. |
| 28:10 | Pretty cheap tool so it's a good one to have in your arsenal. |
| 28:14 | Another one, when we are using, when we are degreeing cams, and these are useful for a variety of tasks actually, we want to have a dial indicator with a magnetic base like this. |
| 28:25 | Also a good idea to have a variety of extensions for the dial indicator so we can get down onto the retainer on the top of the valve so we can actually measure the valve lift really accurately. |
| 28:36 | And you'll be using one of these in conjunction with a degree wheel on the crankshaft. |
| 28:42 | If you do want to learn more about camshaft degreeing, we do have our camshaft degreeing course out as well. |
| 28:48 | The last aspect that really comes into engine blueprinting, actually I haven't talked about it up to this point really, is balancing the components as well. |
| 28:55 | When it comes to the crankshaft that's not something we can do ourselves, you're going to need to leave that to your engine machinist. |
| 29:02 | However you can balance at least your pistons and your conrods yourself. |
| 29:07 | Doing that is going to require, for the pistons just a simple digital scale like this one here. |
| 29:15 | You want something that will measure up to about 2000 g and down to a 10th of a gram in terms of precision. |
| 29:21 | We just simply put our piston and our wrist pin on top of the scales, we'll find our lightest piston and then we're going to remove weight from the heavier pistons until they match. |
| 29:31 | When it comes to doing that for our connecting rod though it's a little bit more complex, we're going to actually need a conrod balancing fixture like this. |
| 29:39 | Due to the way the conrod operates inside the engine, part of the mass of the conrod is considered to be rotating, part of it's considered to be reciprocating so it's not just enough to take the overall weight and remove material until all of the rods weigh the same, we actually need to remove material so that all of the big ends weigh the same and all of the pin ends weigh the same. |
| 30:02 | Little caveat with this as well, if you are balancing a V configuration engine, then the weight of the piston and rod assembly needs to be taken into account when the crankshaft is being balanced. |
| 30:14 | This goes into a calculation called a bob weight which is then a physical mass attached to the big end journal on the crankshaft. |
| 30:21 | So what I'm getting at here is if you're going to have a machinist balance the crankshaft assembly, what you need to do if you're going to balance the rods and pistons yourself is balance those before you supply them to the machinist, otherwise you could actually affect the accuracy there. |
| 30:38 | Last aspect there, I've talked about making sure our compression ratio is the same across all cylinders. |
| 30:45 | Now what we're going to need to do in particular to get this measurement is we're going to need to cc our combustion chambers as well as potentially the dish or dome on our pistons. |
| 30:56 | The easiest way of doing this is to buy yourself one of these here. |
| 31:01 | You can buy kits to cc your combustion chambers off the likes of JEGS and Summit. |
| 31:07 | They come with a little plexiglass plate that you seal to the combustion chamber using vaseline. |
| 31:13 | It's got a little hole in it and then you're going to just allow coloured fluid, water with food colouring in it works pretty well, into the combustion chamber until it's full and then you'll know exactly how much fluid has got into that. |
| 31:26 | So that allows you to measure the combustion chamber cc as well as to correct if required. |
| 31:33 | So there you go, there's some of the basic things that you're going to need to consider when it comes to blueprinting and hopefully a better understanding of what blueprinting is and what it isn't. |
| 31:44 | As I say, probably one of the most misused terms out there and I guarantee you that 99% of the engines that are advertised as being fully blueprinted, really are not, probably got a couple of clearances that were checked and sent out the door. |
| 31:59 | Let's get into our questions. |
| 32:01 | And first one comes from Manitou Black who's asked, wouldn't you consider doing valve lash, key clearance to get right. |
| 32:08 | Yeah so I haven't definitely covered every single aspect. |
| 32:12 | Valve last, yes obviously you need to get that right, that's one of the aspects of setting up your cylinder head. |
| 32:17 | The reason I haven't covered that is because these days we are seeing more and more engines also using hydraulic lash adjusters which obviously we can't change but yes you do need to set your valve lash as well. |
| 32:31 | Cmelle has asked, do you have a favourite blueprinting form or record book for recording the blueprinting, something available for us? - Yeah we do have an engine building documentation sheet in our practical engine building course which is a great way of documenting your build and the clearances etc. |
| 32:47 | And this is really important as well, it's not just the clearances, it's also the part numbers and the components that you've used. |
| 32:53 | Particularly if you are building a few engines, over time they're going to end up coming back for a freshen up and sometimes it can be a little bit hard after you've built 20 or 30 engines in between, to remember exactly what part number, piston or bearing or whatever you ended up putting in that so having all of that information on a sheet in one place is really valuable. |
| 33:13 | Manitou Black's asked, what would you consider the minimum safe clearance between piston crown and quench pad on the cylinder head. |
| 33:19 | Yeah that's actually up for debate. |
| 33:21 | A lot of this really comes down to the bore diameter as well as the piston to cylinder wall clearance and why I say that is because those two elements will affect the amount of rock in the piston as it goes past top dead centre. |
| 33:35 | So generally somewhere around about 40 to 60 thousandths of an inch would be what I'd consider to be super safe, however we're seeing a lot of the engines these days where we're pushing the boundaries of that, it might be down as low as 30 thousandths of an inch. |
| 33:52 | So yeah very dependent on the particular application so last thing you really want though is the piston tapping into the cylinder head. |
| 33:59 | Tayden's asked, when installing new standard sized rings onto an engine with OEM pistons and OEM bore size, should they be measured and filed if necessary or are they generally an install and that's it item? Yeah if you are using factory components, generally they are gapped to basically install, it's always a good idea as I've just mentioned throughout this webinar to just confirm the piston ring end gap is where the manufacturer specifies it to be but yeah they're not supplied with a file fit piston ring set like we see in the aftermarket. |
| 34:32 | Alright looks like that's all the questions we've got there so thanks everyone for joining us, hopefully that gives you a bit more insight into blueprinting. |
| 34:39 | If you are watching this in our archive after it's aired and you've got any questions, please ask those in our forum and I'll be happy to answer them there, thanks for joining us and hopefully we'll see you next time. |


