266 | Idle Speed Control - MegaSquirt
Summary
Solid and stable idle control is one of those aspects of a tune that makes a real difference to the drivability of a car when using an aftermarket ECU like MegaSquirts MS3 Pro ECU and TunerStudio platform. It is however an aspect that is often overlooked or incorrectly tuned, leading to unstable idle and stalling. In this webinar we’ll discuss what you need to know to get a rock solid idle, what hardware is required, and how to approach the tuning on the Megasquirt MS3Pro, TunerStudio software and a Mazda Miata/MX5.
| 00:00 | - Hey team, Andre here from High Performance Academy, welcome to another one of our webinars and in this webinar we're going to be diving into idle speed control tuning on the MegaSquirt MS3 Pro platform. |
| 00:11 | Specifically for our example here we are going to be using our Mazda MX5 but essentially within reason, what we're going to be covering here is applicable to any engine or any vehicle running on the MegaSquirt platform. |
| 00:24 | Now as usual, we will have questions and answers at the end of the webinar so if you've got anything that I cover during today's lesson that you'd like me to dive into a bit more detail on then please feel free to ask those in the comments and the team will get those through to me. |
| 00:40 | Now I think it's fair to say that idle speed control is one of those areas that a lot of mainstream tuners really don't spend enough time on. |
| 00:48 | Possibly a lot of this comes down to a lack of understanding about the idle speed control strategies and the options that are available. |
| 00:56 | I'd say unfortunately a little of this does also come down to laziness because it does take a little bit of time to really dial in your idle speed control tuning. |
| 01:04 | Particularly when you take into account that your idle speed control tuning will be affected by the operating conditions and what I mean by this is, we're going to need to look at how this works when the engine is hot, when the engine's cold and also our atmospheric conditions may mean that our optimal idle speed control settings will be different in the middle of summer compared to what we might see in winter if we're in a climate where we're starting to see sub zero temperatures and snow on the ground. |
| 01:32 | So it does take a little bit of work to get them all dialled in and get the best possible results. |
| 01:37 | It is however worth it, particularly if you are tuning a street driven car, particularly if it's your daily driver. |
| 01:44 | What I'm always trying to do when I'm optimising the idle speed control tuning and this kind of really goes hand in hand with our cold start tuning, what I'm trying to do is basically replicate the way a factory car would operate. |
| 01:59 | Now what I mean by this is essentially irrespective of the conditions outside, irrespective of if the engine is hot or cold, we should be able to reach through the window, turn the key and have the engine start and idle smoothly with no hunting without any dipping and definitely without any stalling. |
| 02:16 | So that's the ideal, that's what we want to try and achieve. |
| 02:19 | It's worth also mentioning that maybe in some situations that's not what we'd strictly need. |
| 02:27 | Particularly if you are tuning a competition only car then often sacrifices will be made in terms of cold start and idle speed control performance, in terms of aiding simplicity. |
| 02:40 | Basically if we can get rid of the likes of an idle speed control solenoid or stepper motor, that's one less potential thing to go wrong and it's going to also improve the, or reduce the complexity of our wiring harness. |
| 02:53 | So these are the things that we need to weigh up, obviously there isn't a one size fits all rule and what's right for one situation may not be right for everyone. |
| 03:02 | But it is just worth mentioning here that if you don't have an idle speed control system, you are going to need to manually nurse the throttle for the first 3-5 minutes when the engine is cold in order to get it to a point where it's going to idle by itself. |
| 03:16 | Alright so enough talk about the background, probably pretty self explanatory for most but worth just mentioning there. |
| 03:23 | What we're going to do is dive into our Tuner Studio software and have a look at some of our settings. |
| 03:29 | And interestingly what we're going to do is actually start by dealing with our fuel tuning. |
| 03:34 | So if we come up here to our fuel settings, and we're going to come down to our fuel VE table one. |
| 03:39 | Now this might seem a little bit unusual but it is actually really important for our idle speed control to make sure that we're starting with a fuel volumetric efficiency table that is properly dialled in, particularly here we can see in our idle areas and my little pointer is not going to work on the Tuner Studio software, but basically where we can see that blue circle there this is what we're going to need to be focusing on here. |
| 04:05 | Oops, in order to make sure that our tuning, our volumetric efficiency is dialled in in these zones. |
| 04:12 | If we don't have this right, if we've got an air/fuel ratio here that is either too rich or it's too lean, what we're going to end up with is a situation where the engine's not going to be running smoothly, it's not going to be running comfortably and we can end up trying to put a bandaid fix on this by adjusting incorrectly our idle speed control settings. |
| 04:33 | So really important to start with our VE table and make sure that that's dialled in and this should really go wtihout saying. |
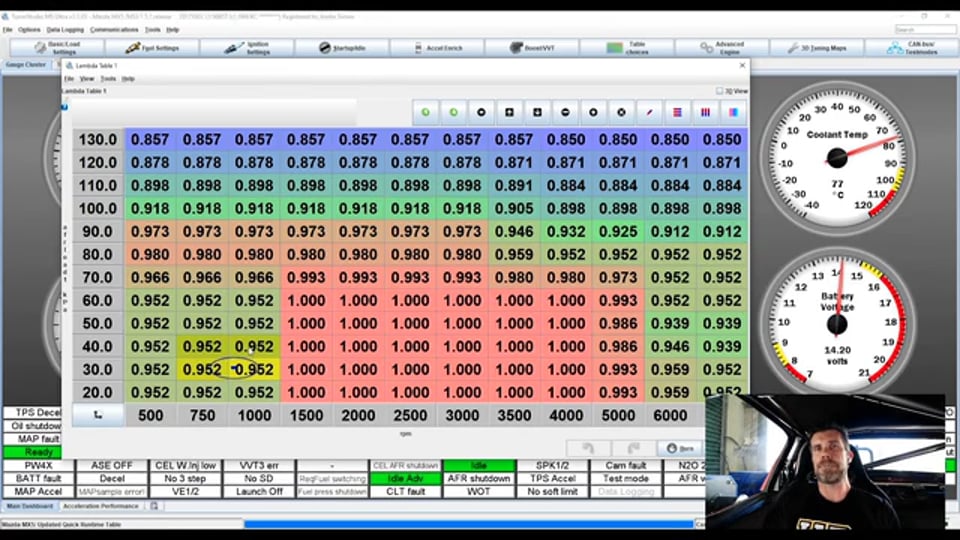
| 04:39 | And likewise because our idle speed control settings will vary with our engine temperature, we also need to consider our cold start warmup enrichment, making sure basically that our fuelling is under control and within fairly tight bounds basically from stone cold up to operating temperature so we're going to assume that that is the case here and again I can't unfortunately draw on this screen for some unusual reason but we can see that we actually have in our live gauges here on the bottom row we've got lambda one which is showing our current air/fuel ratio, in this case showing that we're sitting at 0.95 lambda. |
| 05:17 | Now it's actually worth just talking about that as well while we're talking about our fuel settings so we'll come back across to our fuel settings and we'll come down to our AFR table one. |
| 05:25 | So what we can see here again in the highlighted areas, we've got our air/fuel ratio target set to 0.95. |
| 05:33 | And this is something that does require a little bit of experimentation depending on the specifics of your engine you may find that the engine actually idles more comfortably and more stably with a slightly richer than stoich air/fuel ratio. |
| 05:47 | Typically in particular if we look at a factory tune, we're always going to find that the air/fuel ratio target is typically lambda one, this is important for emissions. |
| 05:55 | And if we don't need to meet emissions, we may find particularly with a small capacity engine like our Mazda MX5, Mazda B6 1.6 litre engine here, just a slightly richer idle target can help stabilise the idle quality which is also going to help with our idle tuning. |
| 06:13 | The same can also be said with an engine that has been fitted with cams. |
| 06:16 | With a mild cam, sometimes a slightly richer than stoich air/fuel ratio target will help stabilise our idle control. |
| 06:26 | Alright so that's as far as we're going to go with our fuelling there. |
| 06:30 | What we're going to do now is come up to our startup and our idle menu. |
| 06:36 | And we're going to ignore our startup, we're going to come down to our idle speed control and this is our basic setup for our idle speed control and we start here with our settings for our idle valve type. |
| 06:47 | Obviously this is an essential place to get started, there are a variety of different idle speed control systems available depending on the particular engine you are dealing with. |
| 06:58 | In this case, the Mazda B6 engine uses a very simple 2 wire solenoid that's fitted underneath the throttle body. |
| 07:05 | This is just pulse width modulated, essentially the higher the duty cycle, the more air is bypassed around the throttle plate the lower the duty cycle, the less so pretty straightforward there. |
| 07:15 | We've also got the option for a stepper valve or stepper motor as well, 4-6 wire or an on/off valve so in this case we've got that set up there already. |
| 07:25 | This is just going to be based purely on the type of engine that you are tuning, unless you are fitting an aftermarket valve or a valve from a different manufacturer so you should pretty much know what you're dealing with there. |
| 07:39 | Moving down, the next option we have here is our algorithm so essentially this is just how the idle speed control is going to operate. |
| 07:48 | So in this case, we've got the option, if we click on the drop down menu, open loop or closed loop so in open loop essentially it's just going to be looking at a lookup table of duty cycle or step position versus our operating temperature. |
| 08:03 | And it's really really simple, it's not going to make any corrections so essentially if we aren't meeting our target idle speed, the ECU's not going to do anything to try and correct that. |
| 08:13 | Not my preferred method so we are closed loop here which simply put, closed loop we are going to have the ECU making corrections if our idle speed is not on our target to get it where we want it to be. |
| 08:27 | We've got a bunch of settings here for stepper idle control, only relevant if we do have a stepper motor, we don't have that here so I can't show them to you but we do have over on the right hand side, our pulse width modulated idle. |
| 08:41 | So first of all the first option there is our crank to run taper time. |
| 08:46 | So from, there's a cranking duty cycle table and basically that's just simply the time it's going to smoothly transition from that to our run duty cycle. |
| 08:59 | So we can use this to avoid getting a flare on our initial startup and allowing good stable control during that initial startup phase. |
| 09:07 | We've got our valve mode which is our next option here. |
| 09:10 | So this is just dependent on the type of valve and the way it is set up. |
| 09:14 | Typically what we're going to have there is 0% duty cycle is going to be the valve completely closed or minimal bypass, there may be some instances, not that I've come across them, where it will be inverted from and 100% duty will have that valve off but if you're finding that your table's going the opposite way or the closed loop control's going the opposite direction to what you want, that would be where you'd want to head there. |
| 09:40 | Next we'll come down to our output port, again pretty self explanatory just where we've got that wired, so we are on our pulse width modulated idle output one. |
| 09:49 | This is actually pre wired because this is a plug and play MS3 Pro for our particular model. |
| 09:56 | We've got the option, because this is a pulse width modulated 2 or 3 wire output we can define here whether we are 2 wire or 3 wire. |
| 10:04 | Ours is a 2 wire solenoid so that's what we've got there and then we've got the frequency that the solenoid is going to be pulsed at. |
| 10:12 | This is going to be again very dependent on the specific solenoid we are using. |
| 10:20 | One little trick there, and if we close that down we can see that there is a note below this, it says the frequency is going to be shared with your boost control. |
| 10:27 | So that actually may be a driving factor because the boost control solenoid is probably going to be more sensitive to this duty cycle than the idle speed control. |
| 10:35 | Typically most boost control 3 port max style solenoids, typically going to run somewhere in the region of about 20 - 30 Hz so that's going to really limit what you can do with your idle speed control. |
| 10:46 | As you can see here, we're at 99 Hz so bit of testing to find out what is going to work well for your particular system is useful there. |
| 10:54 | We'll close that down and we'll come back to our other settings. |
| 10:59 | So our cranking duty and steps, that's our next option here. |
| 11:05 | So this is simply the duty cycle that will be applied during our cranking stage. |
| 11:10 | So we can see at the moment we're showing that we are operating in the 70° plus cell and I've got a value in there of 40% duty cycle. |
| 11:19 | I'll just try and demonstrate this, it's going to possibly be a little bit hard. |
| 11:22 | But what I want you to do, in the gauges panel behind here, at the top left you can see we've got our engine RPM so what I'm going to do is I'll just turn this off and we're going to go back online, wait for it to come online. |
| 11:34 | Obviously engine's not running at the moment so we're at 0 RPM. |
| 11:37 | I'm just going to start this, I want you to try and watch carefully what actually happens to our engine RPM during that initial startup so I'lll do that now. |
| 11:46 | OK so it started up and the idle speed ended up sitting at around about 800 RPM, no overshoot, pretty much what you'd expect. |
| 11:57 | What we'll do here is we'll just demonstrate how this particular setting works. |
| 12:01 | So we'll change it to a value of 60%. |
| 12:04 | With the MS3 Pro or MegaSquirt in general we have to burn these changes to make them actually remain active. |
| 12:11 | So we'll turn that off again and we'll repeat that process, again just let it come back online, so what we're expecting here, this should involve an over rev when we first start it up, so we'll see if that's the case. |
| 12:24 | And you can see that's exactly what happens, we go up to 1600, 1700 RPM. |
| 12:28 | Now it's going through that taper back to our idle speed control. |
| 12:31 | So what I generally try and do with this table is I will tune it so that we've got a very slight overshoot during the startup, I'm talking here typically in the region of maybe 100, maybe 200 RPM. |
| 12:45 | Obviously that was excessive just to show you the sort of effect of that so we'll bring that back down to 40, we'll burn that change and we will also find that as we've got a 2D table here, we can adjust that cranking duty cycle versus our coolant temperature so again this is something you're going to have to manipulate when the engine's cold and when the engine's hot. |
| 13:05 | Generally it's enough here to do a straight line interpolation between maybe your values that you find work at 10 or 15°C when the engine is cold and 70 or 80°C when the engine is up and running. |
| 13:17 | So that's the first part, that's going to affect our cranking. |
| 13:20 | What we'll do is come back up to our start and idle settings and we've got our closed loop idle settings here. |
| 13:27 | So this is basically the closed loop control option, so how the closed loop system is going to work. |
| 13:37 | And here for the most part I've actually stuck pretty closely to the control settings from the base map for the Mazda MX5, again this is a plug and play ECU pretty well developed as a plug and play model so everything is already pretty close in the base settings. |
| 13:53 | I'll just go through some of these settings here for a start though. |
| 13:56 | And again unfortunately I can't highlight them, just starting at the top here we've got our idle valve minimum duty cycle and maximum so just setting the absolute limits of what the closed loop control strategy is going to use. |
| 14:08 | And what you will generally find is that the idle speed control solenoid's going to have a much broader range than what we actually need so giving the closed loop control too much power can actually be detrimental. |
| 14:20 | So generally what I want to do is make sure that in the coldest situation I've got enough duty cycle range that I'm going to get, be able to get up and above my target idle speed. |
| 14:30 | So maximum there, 85% and that's probably still pretty generous to be fair. |
| 14:35 | And then our minimum, we want to make sure that that's set somewhere probably 5-10% below the minimum duty cycle we're actually using when the engine is up and running. |
| 14:46 | We'll come down to our gains here, so we've got the ability to set our gains. |
| 14:52 | So our PID control gains, proportional and integral and derivative. |
| 14:57 | Basically sets the response of the system. |
| 15:00 | We do need to be a little bit mindful here, again I'm starting from the PID gains, the settings that we are using from the stock map, but essentially we've got this little slider here that we can adjust the sensitivity so in one way this actually makes things a little bit easier for most people to get their head around rather than tuning individual gains. |
| 15:21 | And basically the larger we make that gain the more responsive this system will be to error but if we do too far we're going to get into a situation where the idle speed control will actually start to hunt and oscillate so if we get to that situation, we've gone too far and we want to back that off. |
| 15:36 | Generally what I do with any closed loop control tuning is I'll initially try and find the sort of range where I'm getting good control. |
| 15:45 | So what I want to do is basically get to a point where I'm actually over shooting and getting oscillation. |
| 15:53 | That gives me sort of a limit, the upper limit of what that range is going to be and then I'll sort of halve my values and come back. |
| 15:59 | So we can see while we've got this little slider, we do actually have a number off to the right. |
| 16:03 | So at the moment that's the basic tuning mode and we can go to advanced which will then give us the ability to control our proportional, integral and derivative gains individually but in general I've found that the basic mode actually is quite effective and also much simpler for most people to tune so we'll close that down there, come back up to our startup and idle and what we want to do next is come down to our target idle curve, so this is really important, this is a good place to get started, once we've got our PID set up for our closed loop control. |
| 16:36 | Basically setting our target idle speed versus coolant temperature. |
| 16:40 | And we need to be realistic here as well, one of the areas a lot of people go wrong is by trying to get the engine to idle at a idle speed that it's not comfortable with. |
| 16:51 | So for example a large capacity V8 with a stock cam might quite comfortably idle at maybe 550 RPM or thereabouts. |
| 17:00 | On the other hand with a small capacity 4 cylinder engine such as our Mazda B6, if we tried at 550 RPM idle, it's simply going to hate it, we're going to chase our tail, we're almost certainly not going to get a sensible idle, or good idle quality. |
| 17:15 | So how do we know what our idle target should be? Well a good place to start is by basically replicating what the OE manufacturer is using, we can pretty much guarantee that they've got idle targets that are going to be achievable and they're going to work well so generally for a small capacity 4 cylinder, we'll see our idle speed somewhere between maybe 850 and 950 RPM, we're going to have that higher at lower coolant temperature which is exactly what you can se here. |
| 17:43 | We've got a idle speed target of 1300 RPM down below 32° coolant temperature, we've got a nice linear interpolation down to 900 RPM once we're above 54°C. |
| 17:55 | Now the other thing to consider here as well is the idle speed targets that work with a stock engine may not work once we start modifying that engine, particularly if we are fitting a larger more aggressive cam with a lot more overlap, then this will almost certainly require that we bump up that idle speed so this is one of the first places to get our target idle speeds in the ballpark because if we have these set too low it's just going to cause a lot of frustration and you're going to end up chasing your tail getting poor results. |
| 18:26 | So we've got those dialled in, we know that these are going to work well for our Mazda Miata here. |
| 18:32 | The next is to come down to our closed loop idle initial value. |
| 18:38 | So interestingly named table here but essentially this is our feed forward or our base duty cycle table. |
| 18:46 | And we've got a 2D table here, on the vertical axis we've got our coolant temperature and we've got our closed loop idle target on the horizontal axis here and we've got our pulse width modulated duty cycle values inside of this table. |
| 19:02 | So we can see in the cells that we're at at the moment, we're sitting between the 800 and 1000 RPM cells and we've got our duty cycle sitting at about 34%, sitting between 32 and 36. |
| 19:17 | So one way of filling this in, because at the moment we have got our closed loop enabled. |
| 19:22 | So if we disable closed loop, this table actually goes away and we end up with a separate table, I'll just show you that, I won't actually do it but we end up with our idle warmup duty steps table which at the moment is greyed out. |
| 19:37 | So that's where we set our open loop duty. |
| 19:39 | In most ECUs, we use the same table for closed loop and open loop control. |
| 19:44 | So generally how I start the tuning process is to set the ECU into open loop mode so it's not going to try and make any correction, then I'll tune the base duty cycle table so I've got really good control, basically the gist of this is the closer we've got our idle speed to our target in open loop conditions, then when we enable closed loop it means that the ECU's got less work to do and it's going to allow it to do a better job. |
| 20:07 | We want to get as close to target as we can before we rely on the closed loop control to pick up any error that's there. |
| 20:13 | Unfortunately that's not how the MS3 Pro works, so we've got 2 separate tables. |
| 20:18 | So what we can do though is we can go back to our closed loop idle settings and we can basically set our PID gains to zero while we're going through this process meaning that the closed loop control is not going to be active and then we can come back and we can set our initial value. |
| 20:35 | So what's going to happen with this is when we're out of idle speed control, so we're actually driving the car, it's going to basically when we come back into idle speed control, it's going to look at this table and it's going to initially jump to the duty cycle values in this table and then it's going to take over closed loop control. |
| 20:53 | So if you've got a situation where the engine RPM is hanging and it's not coming back to idle, chances are that the problem there is that your duty cycle in this table is too high. |
| 21:04 | Conversely if you've got problems with the engine RPM dropping too low or stalling, chances are that the duty cycles in this table are too low. |
| 21:14 | So this is really important, this is probably the key place that we want to spend our time, get that open loop duty cycle table dialled in so we've got really good accurate control and our closed loop system has less work to do. |
| 21:28 | We've also got the ability to have a idle voltage compensation, if we just open that. |
| 21:36 | So this allows us to vary the duty cycle based on our operating voltage. |
| 21:41 | Typically we should find that we're sitting pretty accurately at about 13.8 to 14.2 volts, we may find that if we are seeing larger swings in voltage across that, this table can allow us to just help control and maintain the idle speed control as the voltage varies. |
| 22:00 | We've also got the ability to bring in an air conditioning idle up. |
| 22:04 | So if you do have air conditioning, when this switches on, what you're going to end up having is a situation where there's more load on the engine which naturally will end up reducing the RPM. |
| 22:16 | So if you don't deal with this, what you're going to have is as the air conditioning compressor cuts in and out, you're going to have the idle speed drop down and then come back up. |
| 22:26 | Particularly if you are quite low in the idle speed, this can end up causing problems with stalling or at least really rough running so if you are going to run a street car with air conditioning, I'd highly recommend making sure that you do set up the idle, the air conditioning idle up. |
| 22:41 | So we can see that in our case this is turned on. |
| 22:43 | The way that this works is we've got an input that comes from the switch on the dash. |
| 22:47 | So in this case the input's coming from our digital switched input 3 and then the ECU, once it receives that signal it will actuate the air conditioning condenser, compressor I should say on, in this case injector output J. |
| 23:01 | I've got the ability to invert that if required. |
| 23:04 | We've got the ability then to have a delay when this activates, we've got the ability to have an idle up RPM and a few other aspects to control here, our main one here is our idle up duty cycle so because this is closed loop we've got we're asking for an idle up in terms of RPM but we're also able to increase our duty cycle as a result of this. |
| 23:26 | So it's just a case of manipulating these so that we can get nice stable idle control. |
| 23:32 | Of course as the air conditioning is turned off, this reverts as well, goes the opposite way. |
| 23:37 | We've also got the ability here, down the bottom to shut off our air conditioning if required. |
| 23:43 | There's a small but measurable power drop with our air conditioning, particularly on an engine, I think this one puts out just a touch under 100 horsepower on our dyno at the wheels so really we want every last horsepower we can get so in this case, the air conditioning is shut off irrespective of the button on the dash, once we go above 70° throttle. |
| 24:06 | Alright so that covers our bases there, we'll come back up to the other settings here and I'm going to talk a little bit about our idle advance or idle ignition control settings. |
| 24:15 | This is probably a good time to mention that we are going to be moving into our questions and answers really shortly so if you've got anything on the topic so far, please feel free to ask those in the chat and we'll jump into those in just a minute. |
| 24:28 | We'll start with our idle advance settings so basically this allows us to set up the idle advance settings in general allow us to set up idle ignition control if we want to do that. |
| 24:39 | The idea behind the idle ignition control strategy is it's a very quick and effective method of making changes to our idle speed by varying the ignition timing. |
| 24:49 | The theory behind this is that if we advance the ignition timing towards MBT our engine is going to make more torque. |
| 24:57 | If our engine's making more torque and we're sitting at idle of course the idle RPM will naturally increase. |
| 25:03 | Conversely if we retard the ignition timing further from MBT then we're going to end up with our torque reducing and our idle speed dropping. |
| 25:11 | So the ECU is basically advancing and regarding the timing all the time in response to our errors in idle speed and if we come across to the left hand side here we can actually look at the little gauge which is our ignition advance so you can see that the ignition advance is constantly moving, not much, it's moving between about 16 and about 20° depending on our current idle speed. |
| 25:36 | We'll close that one down and we'll just come back up to our startup and idle and we can see our idle RPM timing correction which is the table that allows us to do this. |
| 25:45 | On the X axis of this table we have our RPM delta, basically the error between our target idle speed and our current idle speed and the vertical axis is our timing change. |
| 25:59 | So basically this is the amount of timing advance or retard that will be put in over our base values there. |
| 26:05 | It is really important here when you are using idle ignition control to make sure that your base idle speed idle ignition timing, let's just come back to that, is going to be retarded from MBT. |
| 26:18 | So we can see here, again I can't highlight it for you but we've got our timing table, load versus the ignition, base ignition value, so you can see at the moment we're sitting at a load percentage of about 30 and our base value there is about 18°. |
| 26:34 | Every engine's going to be a little bit different but MBT at idle might be more in line with maybe 25° or thereabouts. |
| 26:40 | So by choosing 18° we're retarded from MBT meaning that we've got the potential to both advance and retard the timing from that base value of 18°, affecting our torque. |
| 26:51 | If on the other hand, we'd set our idle ignition timing to 25° which happened to be MBT, we've got no ability to really increase the engine torque because we're already at MBT so that's just a little trap there, making sure that we are retarded a little bit from MBT. |
| 27:08 | Most of the time I find that most engines will idle reasonably nicely with a base timing of maybe 16 to 18° at idle and that will almost certainly give us the ability to both advance and retard the timing getting the effect of that. |
| 27:22 | So from here it's really just a case of optimising all of these parameters. |
| 27:26 | The process to go through here, just to reiterate, we want to start just by making sure that our base fuelling or volumetric efficiency table as well as our cold start warmup enrichment parameters are all dialled in so that we've got good control over our fuelling. |
| 27:42 | If the fuelling is way too rich or way too lean, it's going to make it very hard for us to get good idle speed control. |
| 27:48 | From here, the process is making sure our base settings for our idle speed control system match the hardware that is installed on the engine, we want to set sensible idle speed targets that are suited to our engine versus coolant temperature and then it's a case of setting our PID gains to zero so that we're not going to be affecting the actual idle speed output and we can set that base duty cycle table to make sure that we are matching our idle speed targets under all conditions. |
| 28:18 | And again this does need to be done at least a couple of times. |
| 28:21 | We're probably going to finish the tuning process with the engine already at operating temperature so at this stage we're probably going to have our hot operating idle speed control parameters pretty closely dialled in. |
| 28:33 | From there we're going to check our operation during cold start, make sure that our cold idle ups are all dialled in and then we can also introduce our PID control getting to a point where we've got good control without getting into a situation where we are running into problems with oscillation. |
| 28:50 | And then of course on top of that we've got our idle ignition control. |
| 28:53 | Generally when I am setting up the idle speed control I'll actually start with an ECU with idle ignition control with that system deactivated. |
| 29:02 | Now the reason for this is that it can mask problems that exist in our base idle speed control system. |
| 29:10 | So I like to start with the idle ignition control deactivated and then once I've got really good control over the idle speed control with the main system, then I'll bring in the idle speed, the idle ignition control and that's going to just pick up the pieces there and do a nice job of making really quick changes if there is a bit of error there. |
| 29:31 | Alright so we'll jump into our questions now and see what we've got, again if you've got more questions, please keep them coming and we'll see what we can get through here. |
| 29:43 | TriniRogue has asked, are you tuning the idle speed using any actuators or just what air is coming through the throttle? No this is through a 2 wire solenoid, so this is a 2 wire pulse width modulated solenoid. |
| 29:56 | You're not really going to get idle speed control as such if you don't have some method of air bypass around the throttle body. |
| 30:04 | You can definitely use idle ignition control on its own but if you use idle ignition control on its own then it's still not going to give you perfect results. |
| 30:14 | This is done on a lot of race only engines where they don't want the complexity of an idle speed control system so instead what happens is the throttle stop is set so that under normal hot operating conditions maybe our idle speed is maybe 300 or 400 RPM higher than we want. |
| 30:33 | So if we're aiming for a 900 RPM idle we might settle for a 1200 RPM hot idle with the throttle butterfly completely closed. |
| 30:41 | Then what we're going to use is the idle ignition control to pull timing at hot operating conditions. |
| 30:47 | Might be a bit of a compromise, instead of a 900 RPM idle we might only get down to 1000. |
| 30:52 | And then advantage with this is then with the additional throttle opening, and using idle ignition control when the engine's cold, we might find that the engine will still idle a little low, maybe it's 800 or 900 RPM when it's cold, but it should usually at least idle on its own, it's not perfect but it is a work around if you don't want idle speed control. |
| 31:14 | AkBarratt has asked, do we want less gain with a big cam or a lopey idle? That's actually a really good question there and one that I should have covered. |
| 31:22 | Yes so this is another trick with a large cam, naturally we're going to end up with a lot of lope at idle so the idle speed is naturally going to oscillate. |
| 31:34 | And if you've got a lot of PID gain added in with this sort of system, with this sort of cam, basically the engine's going to be, or the computer's going to be fighting the natural idle tendency of the engine and that can end up playing havoc with your actual overall idle control strategy. |
| 31:51 | So yes it can be a good idea with a large aggressive cam to actually dull down the PID gains and actually give yourself a slightly slower response. |
| 32:01 | This is where the idle ignition control actually can be really beneficial as well but again we just need to be a little bit mindful of the fact that yes there will naturally be a lope, it's again really coming down to being realistic about what you're expecting out of the systems. |
| 32:16 | Padillah's asked, whats better a stepper or a pulse width modulated idle air control valve? I've heard pulse width modulated but isn't that old tech and most OEMs are using stepper or now no idle air control? I couldn't tell you what's better. |
| 32:31 | Both work really well when set up properly. |
| 32:35 | I guess coming from a Mitsubishi tuning background I kind of got a little bit nervous about using stepper motors just because the factory Mitsubishi 4G63 steppers are inherently a little bit unreliable. |
| 32:50 | Now that's not fair to say that every stepper motor is therefore unreliable but I did have my fair share of faulty Mitsubishi idle steppers. |
| 32:58 | The pulse width modulated solenoid on the other hand, it's pretty simple. |
| 33:04 | There's not a lot to it and it's pretty straightforward and it just works so my pick would probably be a solenoid over a stepper, it's a little bit simpler to wire up as well, particularly if you've got a 2 wire stepper. |
| 33:16 | What you doo need to be a little mindful of, I fall into this trap using a Bosch idle control stepper in the past, these are pretty popular, they're sort of a silver canister stye with a barb fitting on each end. |
| 33:31 | You can plumb these in around your throttle body, the problem with those Bosch solenoids that I've found is that they don't actually fully close. |
| 33:37 | So in a lot of situations you can end up having trouble getting the idle speed down to what you want when the engine is hot. |
| 33:45 | Most OEs these days don't use either, you're right, they now use drive by wire throttle. |
| 33:50 | I don't know if you'd even find an engine these days that doesn't have drive by wire. |
| 33:55 | If you did it'd be very rare so drive by wire yeah don't really need anything else, we just control the throttle opening directly. |
| 34:04 | Got a couple of questions here from Turboyoda as well as Padillah, how do you find MBT at idle? Simply put, you don't. |
| 34:11 | Simply put, it also doesn't really matter. |
| 34:13 | Obviously at idle we can't measure the torque the engine is producing. |
| 34:17 | If you were in a very lucky position where you had in cylinder pressure monitoring then under those circumstances you could but it doesn't really matter. |
| 34:26 | We don't want to be at MBT, you can kind of get a sense of this because as you advance the timing, you're going to find the idle speed will initially climb and then you're going to get to a plateau where you get that plateau and you don't see any change in idle speed. |
| 34:40 | this is there or there abouts where you will be at MBT. |
| 34:44 | Gets a little tricky though because of course as your idle speed increases, naturally we're now moving into different cells as we already know, our MBT timing will vary with RPM. |
| 34:55 | Again though don't get too hung up on this. |
| 34:58 | If we simply use a base value of 16 to 18°, over my 20 odd years in the industry I have yet to find an engine that won't idle really nicely around about that timing, giving us plenty of margin both above and below that base timing for our idle ignition control. |
| 35:17 | Next question comes from Suhas who's asked, I have been tuning a Mitsubishi NA engine for a couple of days. |
| 35:22 | I'm using a G4+ with a modelled fuel equation. |
| 35:24 | Base fuel pressure has to be set at 100kpa else the engine won't start. |
| 35:29 | What would be a good point for minimum effective pulse width for 240cc stock injectors? Look Suhas this is probably something I'm not going to answer here because I do like to keep these really on the topic. |
| 35:40 | That would be a great question for our forum. |
| 35:43 | Next question comes from IsoJam23 who's asked, where should I look if idle's hunting with really hot intake temps? OK if you've got really hot intake air temperatures, the first place I would be looking if you're getting hunting at idle would be looking at what your air/fuel ratio is doing. |
| 36:00 | With a lot of heat soak and hot intake air temperatures, often what we'll get into a situation is that our air/fuel ratio's gone too lean and this can result in hunting and it's not really an idle speed control problem, it comes back to what I was mentioning, get your fuelling right first. |
| 36:17 | Now that might not be the situation you're facing but it definitely would be the most likely scenario so make sure you've got your intake air temperature corrections sorted out and dialled in so that your air/fuel ratio is staying nice and stable across a wide range of intake air temperatures. |
| 36:38 | Next question comes from Padillah who's asked, I've got an issue with the idle closed loop control on the Infinity. |
| 36:45 | It says I'm 75% error and when I correct it to the new corrections it goes a positive error of 75%. |
| 36:50 | I've heard that best error for closed loop is -4% for crisp throttle response, but I can't seem to hit the 4% error, what are your thoughts? It's been a long time since I have dealt with the AEM Infinity unfortunately so it's not fresh on my memory. |
| 37:06 | The only experience we've had with the Infinity has been our old 350Z with the VQ35. |
| 37:11 | That used a drive by wire idle speed control system. |
| 37:15 | I don't recall having any issues with this. |
| 37:19 | Now ideally for basically good control, what we'd like to have is our idle error should be at or very close to zero and it's not always possible, obviously that's why we've got closed loop control anyway. |
| 37:32 | But what I would probably suggest is making smaller changes to your base duty table. |
| 37:39 | It sounds like you're possibly making quite large changes and swinging either side of that zero point so I would probably make smaller changes and try and creep up on it. |
| 37:49 | Hopefully that helps, again I'm sorry it's been a long time since I have dealt with the AEM Infinity so it's just not fresh on my mind. |
| 37:58 | Alright team that brings us to the end of our webinar, thanks to everyone who has joined us today and if you are watching this webinar at a later point in our webinar archive and you've got any questions on today's lesson, please feel free to ask those in the forum and I'll be happy to answer them there, thanks for joining us and we'll see you all next time. |
Timestamps
0:00 - Intro
0:40 - Why many mainstream tuners don't bother tuning it
1:35 - What are we trying to achieve?
3:15 - Fuel settings
5:15 - Lambda value
6:25 - Idle speed control settings
11:00 - Cranking duty/steps
13:20 - Closed loop idle settings
16:20 - Target idle
18:30 - Closed loop idle initial value (base duty cycle)
21:30 - Idle voltage compensation
22:00 - Air conditioning idle up
24:05 - Idle advance
25:35 - Idle RPM timing correction
27:20 - Summary
29:40 - Questions


