268 | Dyno Tuning Without a Dyno
Summary
While the dyno is the best place to perform your tuning, dyno time is expensive and often you may not have access to a local dyno. In this webinar we’ll discuss the options available including software like Virtual Dyno, and the built in dyno mode in the ECU Master EMU Black ECU.
| 00:00 | - Hey team, Andre from High Peformance Academy, welcome along to another one of our webinars. |
| 00:05 | And today we're going to be talking about the topic of tuning without access to a dyno. |
| 00:10 | This is probably one of the more common questions I get asked about any time we're holding one of our webinars, what is the process, can we in fact do this, can we expect even moderately good results from doing so? So we're going to dive into this today, we're going to talk about the dos and don't, we're going to talk about the options that are available and why in a lot of instances we can actually expect to get almost identical results out on the road compared to what we can get on a dyno. |
| 00:38 | As usual, we're going to have questions at the end so if you do have anything along this topic line that you want to ask, please feel free to do that in the chat, we'll jump into those at the end. |
| 00:50 | Now the first place I'm going to start is the fact that there are actually some significant advantages to road tuning over dyno tuning and that might sound a little bit weird but it is true and the reality is that even in a really well designed, really well developed dyno cell, it's difficult if not impossible to accurately replicate the air flow and temperatures that we're going to see when we're driving a car hard either out on the road or the racetrack. |
| 01:18 | And this can be a problem because it can lead to small and sometimes not so small discrepancies between what we see in terms of air/fuel ratio, ignition timing, boost pressure on the dyno compared to what we see out on the road. |
| 01:33 | And if we completely ignore this, we tune the car on the dyno, make sure everything's safe and then send the car out with the customer, if it's your own car, go for a drive in it, you may actually find that everything isn't quite as you expect. |
| 01:47 | So this is where actually tuning the car on the road can often give you some benefits. |
| 01:52 | You can get to see what's happening under real world conditions, under the actual conditions the car is going to be driven under. |
| 01:59 | And if our air/fuel ratio for example is tracking our target, we've got no knock under those conditions and our boost is under control well that really is what we're most interested in, rather than a big number on a dyno screen, that's really meaningless when your engine's fallen to pieces because it was running too lean or it was suffering from knock. |
| 02:18 | I'll give you probably one of the more common scenarios I've seen over two decades now tuning most of which has been using dynos and I've had the benefit of being able to use some really sophisticated top quality dynos. |
| 02:32 | The biggest issue bar none is with boost control and the number of times I've had a car on the dyno, and this isn't restricted to any particular car or any particular ECU, we'll get the car on the dyno and we'll optimise the boost curve and get an absolute rock solid stable boost curve throughout the rev range, something you could essentially run a ruler through and it's absolutely perfectly flat. |
| 02:55 | Get that car out onto the road and I would say in probably 4 out of 5 occasions the boost would be significantly different on the road compared to what we have on the dyno. |
| 03:06 | Sometimes we'd see the boost would be 2-3 psi higher, often it will be lower. |
| 03:11 | The other one which is really concerning is that we'd often see that the boost would overshoot significantly on a gearshift or if we lift to part throttle which is something we're quite often going to do entering a corner or mid corner and then stand on the throttle again once we're beyond the boost threshold RPM range of that turbocharger, we'll often see an overboost. |
| 03:32 | Now granted particularly with that boost control aspect, we can go some way to refining our tuning strategy on the dyno to circumvent some of that but regardless of what we do, it's quite often a situation where we will see discrepancies in our boost. |
| 03:49 | Talking about other aspects of this though we will often find that our air/fuel ratio may vary slightly. |
| 03:57 | Let's say I've tuned to 0.78 lambda on the dyno under wide open throttle in full boost, maybe we'll get it out on the road and find that that 0.78 is actually now 0.80. |
| 04:07 | Sometimes it'll go the other way which is at least safer and it might be slightly richer. |
| 04:10 | But again it wouldn't be uncommon to see a discrepancy of 2-3% with our fuelling once we get out on the road. |
| 04:18 | Likewise a tune that we thought was really safe on the dyno, we've got absolutely not a hint of any detonation occurring. |
| 04:25 | Sometimes out on the road particularly if we are really under load for an extended period of time, we can end up finding that the engine will start to suffer from knock or it will suffer from knock on a gearshuft. |
| 04:38 | Again in term of that there are some aspects we can do on the dyno in terms of very very long, very slow runs on the dyno that will replicate the sort of heat build up inside of the combustion chamber that we'll see under sustained high load operation out on the road or the racetrack so there are some tricks there but these are the sort of things that I think a lot of tuners both experienced and novice do tend to overlook. |
| 05:02 | So there really are some advantages available if we do our tuning on the road but this also comes at a significant downside, the obvious one there is if we're tuning on the road we don't have any feedback in terms of power and torque so what this means is we don't have the ability to see what's going on with our power and torque when we're making a tuning change. |
| 05:27 | If we add 2° of timing, did we pick up any power? Or are we already at or beyond MBT? So these are the things we do need to be mindful of, the other one obviously is that when we're on the dyno, we've got the ability to focus our sole attention on what's happening on the dyno screen or on the laptop screen. |
| 05:44 | On the road we obviously want to maintain control of the car, that needs to be our number one priority so not really the best idea to be driving along with a laptop hovering on your lap there trying to watch the screen, maybe watch your wide band air/fuel ratio and also skirt between pedestrians and animals etc that you're likely to find out on the road under normal conditions so we do need to be mindful of that. |
| 06:09 | The first part I'm going to mention here or the first point I'm going to bring up here is that I often get asked how we can optmise the ignition timing out on the road when we don't have that feedback from the dyno? We don't have the torque and power graphs showing us that that additional 2° did help us. |
| 06:29 | And that is a fair comment. |
| 06:31 | However I would say that in my experience so far, probably around about 85% of the engines that I tune that run on pump gas and probably 98% of the engines that I tune that run on pump gas that are supercharged or turbocharged are what I refer to as knock limited. |
| 06:49 | And this simply means that regardless whether we're on the dyno or out on the road, as we're adding timing and the torque and power is increasing, we get to a point where the engine starts to suffer from knock and this is an abnormal type of combustion if you're not aware, very damaging, we need to make sure that we stay away from knock under all circumstances. |
| 07:08 | So when this happens, this knock limited engine actually reaches that knock threshold. |
| 07:12 | This is where we have to stop adding timing and in fact we want to back it off a little bit maybe give ourselves a 2-3° buffer between the onset of destination and if we don't do that we do risk ending up doing long term damage to the engine so essentially what I'm getting at here is the knock threshold, that point where we first start to detect the onset of light detonation, that is our limiting factor for how much timing we can add and that's going to be the same regardless whether we're on the dyno or the road so we can largely expect almost identical results. |
| 07:44 | The flipside of this though, when we're tuning an engine that is running on a good quality fuel, maybe something like E85, maybe a dedicated race fuel, things here are a little bit different. |
| 07:55 | In most instances with this sort off engine we will not be knock limited, if we are knock limited, it's probably at boost pressures and cylinder pressures above which we will end up getting almost instant damage if we do suffer from knock so in these instances, it can be a little bit trickier, difficult to really get a definitive answer on where MBT is on the road, I'm going to look at some options in terms of virtual dyno software shortly but in my own experience this definitely can be hit and miss. |
| 08:27 | Not quite as accurate as we'd like it to be so the process I use here is to be a little bit conservative, building up a little bit of knowledge for a specific type of engine in terms of approximately what sort of ignition timing values the engine is likely to want to see can be beneficial but of course when you're just getting started, this is tricky, you're not going to have the benefit of the experience there so being conservative is really the key. |
| 08:54 | Also it's worth mentioning here that a lot of our members who don't have their own dynos do use the road tuning additions in our courses to help them rough out their tune, maybe after work on the weekends where their only cost is a tank of fuel and then once they've got everything in the ballpark and pretty close they can hire maybe one or two hours of dyno time and just put the finishing touches on their tune. |
| 09:16 | On that note as well because I know it is an aspect that is quite often overlooked. |
| 09:21 | We'll just head across to my laptop screen, so this is our Practical Standalone Tuning course, I know a lot of you watching will already have access to this course. |
| 09:28 | The other one that includes road tuning is our Practical Reflash Tuning course but if we scroll down past our HPA 10 step tuning process we do have this set of modules here that covers road tuning or tuning without a dyno so it's pretty in depth there. |
| 09:43 | Particularly along the lines of our driving techniques which I'm going to touch on during this lesson here. |
| 09:50 | Driving techniques is really really important there, as well as the table configuration, how we're going to actually configure our base tables because this does change a little bit if we're road tuning compared to tuning on a dyno. |
| 10:02 | And then we also cover the process of steady state fuel tuning or steady state fuel and ignition tuning for that matter and then full power tuning. |
| 10:11 | We'll show you with the driving techniques how you can actually replicate essentially the steady state process that we see on the dyno. |
| 10:17 | It is a little bit more involved, it does take a little bit more time and a little bit more skill to get familiar with but it 100% can be done so if you own either the Practical Reflash Tuning course or Practical Standalone Tuning course, that set of modules is in there, I highly advise you take a look at it. |
| 10:34 | Alright so we'll get into some of the considerations around tuning because one of the aspects that's really important is that the process we go through for tuning under cruise conditions or steady state conditions, transient conditions as well is quite different to ramp runs or wide open throttle. |
| 10:51 | So if we're looking at the process of tuning under wide open throttle ramp run acceleration, really regardless whether we're on the dyno or the road, the process is actually really really similar, on the road all we need is a long straight stretch of road where we can run the car in preferably third or maybe fourth gear if you don't have a speed limit, that would be something to watch out for. |
| 11:14 | So you can run the car from maybe 2000 RPM all the way out through to the rev limiter and when we're doing this on the dyno we're not making tuning changes while we're actually doing the ramp run, we're solely watching the dyno screen or we're watching the laptop screen, monitoring the things that are important, boost pressure, air/fuel ratio, listening for knock. |
| 11:32 | So we're doing exactly the same thing when we're doing this out on the road. |
| 11:36 | We don't need to be looking at the laptop screen, ideally I'd really like it if there was a wideband air/fuel ratio meter that I could see out of my peripheral vision up on the windscreen somewhere, that's how I always tune. |
| 11:49 | This way I can monitor the road, I'm focusing my energy on watching the road, I'm data logging to the laptop so I don't need to watch everything that's going on in the laptop and ideally if it's a turbocharged or supercharged car, turbocharged probably a bit more important, we'd also want to be monitoring our boost pressure so there is a little bit going on there but particularly once we're pretty much in the ballpark we can focus on maintaining control of the car, focus on what's coming up. |
| 12:14 | Datalog everything and then we can analyse what happened in the datalog. |
| 12:18 | And again once you've stopped there, basically if we're looking at optimising our fuelling, we've got everything we need to know in that datalog, we've got our target air/fuel ratio or at least we know what our target air/fuel ratio is, we've got our measured air/fuel ratio we know the manifold pressure and RPM or throttle position and RPM so we know where each of those samples was taken from and we can highlight where abouts in our fuel table we need to make modifications so very very easy to do, exactly the same as the dyno tuning process, we can pull over to the side of the road there and make our changes so we don't need to be functioning the laptop while we're actually driving. |
| 12:54 | Ignition timing, a little bit more tricky and what we're doing here is we're monitoring for knock and this comes back to my previous conversation, I'm assuming here we're dealing with a car that is knock limited because as I said that probably encompasses about 85% of situations. |
| 13:09 | And here ideally I'd like to be audibly listening for knock using a knock headset so I use either the Plex Knock Monitor V2 or the Link G4+ knock block. |
| 13:21 | I can audibly hear if knock is occurring, I can instantly get out of the throttle and I can abort the run, I can again tell from my datalog exactly where abouts I was in that ramp run when that occurred so I know again where to take the timing out and then I can repeat the process again so never want to start in a run, regardless whether we're out on the road or on the dyno we never want to stay in a run if everything isn't exactly where we want it to be. |
| 13:48 | If we're a little bit lean or we do get some knock it can be tempting to stay in the throttle hoping everything will come good. |
| 13:54 | That's never really an advisable approach so always err on the side of caution there, get out of the throttle if you are sensing that something isn't quite right. |
| 14:06 | Now on the other hand, steady state tuning this is where things do get a little bit trickier. |
| 14:10 | On the dyno we've got the ability on a load bearing dyno to set a axle speed limit or a engine speed limit an the dyno will then clamp and apply more or less load as we vary our throttle position and that allows us to move through our fuel and ignition tables in 3D. |
| 14:28 | We'll just come across to my laptop screen again. |
| 14:30 | Every dyno software looks a little bit different but this is the Ecumaster EMU software that we're going to be using today so interestingly they have their RPM on the Y axis on the vertical axis there so let's say we're tuning 4000 RPM, we can come across to 4000 RPM here, set out dyno to hold 4000 and then basically if we just apply just the barest amount of throttle to creep up to that set point, probably gong to find that we're down around maybe 40 to 50 kPa. |
| 15:00 | So we'll sort of end up starting in this cell here and then what we can do, once we've optimised our fuel and ignition at let's say 50 kPa, the one I've highlighted. |
| 15:08 | What we can then do is simply open the throttle a little bit further and what that will naturally do is the engine's going to make more power and torque. |
| 15:16 | So the engine would want to accelerate, that's exactly what's going to happen if we're out on the road. |
| 15:20 | On the dyno though, the dyno simply applies a littlee bit more load to the wheels if it's a rolling dyno, the hubs in the case of an axle dyno and it holds that RPM steady so what it allows us to do is basically move all the way across to the right until we're essentially at wide open throttle and whatever boost pressure that gives us so it is really nice on a dyno having that flexibility it's one less thing we need to worry about. |
| 15:43 | On the road all is not lost though, we can still replicate this but it does take a lot more control from the driver. |
| 15:51 | And the process that I use here is one that I developed when I was just getting started, I was tuning a lot of 4WD rally cars and only had access to a 2WD dyno so I had no option but to road tune. |
| 16:03 | And what I ended up doing there is using the technique of left foot braking. |
| 16:07 | So no big surprises here, as its name would suggest, we are applying the brakes with our left foot and this can be really clunky to start with, it doesn't feel natural. |
| 16:18 | Normally our left foot either just sits against the foot rest if you're driving an automatic transmission car, the manual transmission it's more familiar with the sort of load or the sort of force involved in depressing the clutch and releasing the clutch so using the brake pedal with your left foot does require a little bit more finesse but basically by applying a combination of throttle and brake, we can really accurately move our way through our fuel and ignition tables, accessing and sitting in the middle of individual cells. |
| 16:47 | It does, again it takes a little bit of time to get familiar with, you'll be really really bad at it to start with but with a little bit of practice, little bit of patience, it will pay off and you will be able to really smoothly move through all of those cells. |
| 17:01 | Now one thing that does need to be considered here, if you are using that technique of left foot braking, no big surprises here, it's going to end up producing a lot of heat in the braking system. |
| 17:12 | This does need to be kept in mind and it does need to be managed, otherwise at best you're probably going to end up destroying your brakes pretty quickly and at worst you can actually end up overheating the brakes to the point that you end up losing the brakes so the process I use here is just a bit of common sense. |
| 17:29 | We're applying a little bit of left foot braking, doing a little bit of tuning and then we're going to get off the brakes completely, cruise the car at normal road going speed, the faster here the better because we get more airflow through the brakes and we're going to do this for 2 or 3 minutes, just allow those temperatures to stabilise and then it's a rinse and repeat. |
| 17:48 | The period of time that we can do left foot braking vs the period of time that we need to allow the brakes to cool down, obviously that changes depending if we're at low RPM and low engine power vs higher RPM where the engine is making a bit more power and we need more braking to control that so not something we're going to use for every single cell in the tables but definitely a technique that can be very powerful once we understand how to use it. |
| 18:14 | The other aspect with road tuning which is really really key and I've already touched on the fact that we don't really want to be spending our time trying to stare at the laptop, the key here is datalogging. |
| 18:27 | Understanding what our options are in terms of getting the data that we need in order to make our tuning changes without actually having to stare at the laptop screen. |
| 18:36 | These days just about any ECU that you could come across will have either built in logging system or have the ability to log to your laptop while you're out on the road. |
| 18:47 | This is what we want to take advantage of. |
| 18:50 | In order to do that, it's really important as well with our fuel tuning that we have the ability to get the air/fuel ratio data into either the ECU ideally so it's coming through from the ECU or alternatively, in some instances we can bring in an external air/fuel ratio meter into our laptop and combine this with our other data inside of our logger. |
| 19:10 | There are also some advantages with doing this because it allows us to analyse a large amount of data which can be difficult to do otherwise so what we'll do is have a look at a few of the options here. |
| 19:25 | So first of all what we're going to do is head across to MegaLogViewer HD. |
| 19:29 | This is a product that I only started using a couple of years back and it is one that every time I use it it impresses me with just how powerful it is and how flexible it is. |
| 19:40 | So this is a log file from one of our cars that's been taken out on the racetrack, just a lap around the racetrack, not trying to go for high load and high RPM so much, it's just getting a good idea of the sort of areas of the operation that we would normally use, cruise a little bit of transient, a little bit of acceleration. |
| 20:02 | And when we're doing this as well, when we're trying to optimse an existing tune out on the road, this is the technique I would use if I've taken the car off the dyno so it's already been tuned on the dyno as well just making sure that everything does stack up with what I'm seeing. |
| 20:16 | We want to really focus on the areas that we are going to use the most. |
| 20:20 | And these, there'd be 3 areas that I'd consider here. |
| 20:25 | First of all we're going to spend a lot of time with a road car, particularly idling. |
| 20:28 | That's pretty easy to do, we don't even need to leave the workshop or your driveway in order to do that but basically making sure that we've got good control over the idle mixtures, hot, cold, hot restart when it's heat soaked. |
| 20:40 | So once we've got that dialled in, the next area that we're going to spend the majority of our time particularly in a road car is in the cruise areas. |
| 20:48 | So here this is going to depend a little bit on your engine and your gearing, might be somewhere in the region of maybe 1800 RPM to maybe 3000, 3500 RPM, probably anywhere from about 30 kPa to maybe 70, 80 kPa, that'll vary a little bit depending whether we're talking forced induction or naturally aspirated so if we just head back across to the Ecumaster software again for a moment. |
| 21:12 | So I'd probably be talking on our turbocharged Subaru STi here, the areas that I'd be focusing on, probably encompass this area around about here, probably actually come down a little bit too far in the RPM down to 1500. |
| 21:26 | And obviously I'm on the ignition table here but we'll jump across to fuel and it's all exactly the same. |
| 21:33 | And that's the sort of area that we would be focusing on, actually I will come back to ignition because my table just moved. |
| 21:40 | So as you can see we've got a lot of cells in the table in its entirety but we don't necessarily need to pay the same attention to cells up at 6500, 7000, 7500 RPM and part throttle. |
| 21:55 | Yes we don't want to just have garbage in those cells but we're only going to be passing through those maybe when we lift the throttle on a gearshift or something of that nature, we don't tend to drive our cars out in that high RPM, high vacuum area so focus your energy on the area that the engine is actually going to be operating. |
| 22:12 | So we'll head back across to MegaLogViewer HD. |
| 22:15 | So couple of parameters that I've got here, at the top we've got in red our RPM. |
| 22:20 | We've also got our manifold pressure in green. |
| 22:24 | Throttle position down the bottom so you can see from the throttle position down the bottom there how little throttle I am using so this is genuinely a good indication of cruise conditions. |
| 22:35 | And then we've also got really the keys to this, the 2 traces in graph 3 here. |
| 22:40 | In red we've got our measured air/fuel ratio or lambda and in yellow we've got our target lambda. |
| 22:48 | Now you can see there that for the most part my target lambda is sitting at lambda 1. |
| 22:52 | Again most of this really is purely in cruise conditions so we've got a few little outliers here where our target lambda has just moved a little bit richer but even there we're 0.98 so for all intents and purposes we can say we're at lambda 1 for the entirety of this log. |
| 23:08 | We look at what we've actually got though, we can see that, there's a little bit of scaling error here which is something we do need to be mindful of, just yeah. |
| 23:19 | So if we right click, click on the little hamburger icon here, we've got some options for the way our data is displayed and this can be offputting, can throw you a little bit with MegaLogViewer HD. |
| 23:32 | At face value it looks there that our red trace is actually significantly below our target, our yellow targets so this looks at face value like we're actually a little bit richer than our target just about everywhere, that's not the case though. |
| 23:44 | Let's just go to our lambda and we'll see that our lambda is scaled between a minimum of 0.9 and a maximum of 1.2. |
| 23:51 | What we'll do is we'll just correct this. |
| 23:53 | We'll make that 0.8 I think, yeah now they're both the same and you can see straight away how much closer everything lines up. |
| 24:01 | So again on face value the tune looks pretty good straight off the dyno, we've got these areas here which we do need to be mindful of, got a few of these and these again on face value, you look at them and you go, wow we are seriously lean here. |
| 24:15 | If we click on this particular point here, we can see that we are basically off the scale there about 1.9 lambda I think if I can actually see that properly but we need to take into account why that is the case.. |
| 24:29 | And if we look at our throttle position, our bottom trace, the reason we've got this is because we're on a completely closed throttle but at the top here our RPM we're at 3500 so the ECU will have gone into overrun fuel cut, basically switched off the injectors and what this does is it passes unburned pure oxygen through the cylinders, there's not fuel being mixed, there's not combustion taking place so as far as the lambda sensor in the exhaust is concerned, this reads exceptionally lean. |
| 24:57 | So it's absolutely normal and nothing to be worried about. |
| 25:00 | But even taking this into account, it's a huge amount of information to take in and how can we process this and make sensible decisions on what we need to adjust? Well that's where the histogram and table generator function comes in so we'll head across to that. |
| 25:18 | And this is really flexible, I like this because we can use this with just about any comma separated files, any .CSV file and what we can do is set up this table here with essentially the same break points as our fuel or volumetric efficiency table. |
| 25:33 | So we can see here we've got our RPM sites on the vertical axis, we've got manifold pressure on the horizontal axis so again if we just head back over here, we'll go to our fuel table and we can see that essentially I've replicated what we've got in our fuel or VE table there. |
| 25:52 | Now why that's important is that if we can replicate that it allows us to make really accurate decisions on where to change our VE. |
| 25:59 | We'll head back over here though. |
| 26:01 | So we can, once we've done one of these, if we're dealing with a couple of different ECUs we can actually set up some saved histogram views so basically we don't have to go and reset this every time we come in. |
| 26:13 | We can then set our axis for the fields. |
| 26:17 | So on the X axis here we've got manifold absolute pressure, we've got Y axis is RPM, these are simply just the axes break points that are being used in the volumetric efficiency table. |
| 26:29 | The tricky one here though is the Z axis which is our, the data that's actually going to be presented here and you can see that this says ECU M AFR. |
| 26:39 | Not overly intuitive, not maybe overly useful. |
| 26:42 | We can also select a range so if we just want to look for example at what the actual AFR is, we can see that we can bring that up and everything's sitting for the most point pretty close to stoich, pretty close to 14.7, we've got a few outliers there, we've got a 15.2, we've got a few ugly zones here which we'll talk about shortly, particularly down at very light load in the high 20s. |
| 27:08 | Doesn't sound right does it, don't worry we'll have a look at why that is. |
| 27:11 | But particularly if you are starting to look at some data where you're transitioning up into boost, looking purely at the air/fuel ratio being plotted, it's useful to a point but what we really want to know is how far away from our target air/fuel ratio are we? And that's where our ECU M AFR channel comes in. |
| 27:30 | Alright so what is this and how do we generate it? So this is a user calculated field, so if we come up to calculated fields here I'll show you how to create this. |
| 27:41 | Come down to custom fields, I've got a range of ones here that I've generated for different ECUs that I deal with. |
| 27:47 | The ECU M AFR, this one here, you can see that it shows you what the formula is, so this is lambda divided by our target and then represented as a percentage. |
| 27:59 | So if you've gone through our EFI Tuning Fundamentals you'll know that there is a really handy formula that we can use to generate a correction factor. |
| 28:10 | So if we take our measured air/fuel ratio and we divide it by our desired or target air/fuel ratio, this will give us a factor, it will tell us basically how far away from our desired air/fuel ratio we are. |
| 28:22 | We can multiply our volumetric efficiency number by that factor, that'll get us right onto our target, almost like magic but there is no magic when it comes to tuning, it's simply the physics behind it. |
| 28:34 | And if you understand that, it's pretty straightforward. |
| 28:36 | So if you do need to create one of these, you can add your own custom field up here and basically it's a case, if we just go to edit this, you can basically go through the process here, it tells you what to do, control plus space and then you insert the field names that you want. |
| 28:52 | Basically make a math channel there and that's what you end up with at the other end. |
| 28:56 | So what we now can see is straight away at a glance whether we are richer or leaner than our target. |
| 29:04 | So numbers here that are positive mean that we are leaner than our target, numbers that are negative mean that we're richer than our target and what we can see is, remember I said that my main interest is in that cruise area so sort of highlight that area again and come up to about 3500 and 50 kPa, we can see that within reason, with a few outliers there, we're essentially within that range, we're plus or minus 1% for most of that, with those few outliers. |
| 29:36 | So straight away we get a really good sense of whether our data is solid and if we need to make any changes. |
| 29:42 | It allows us to analyse a huge amount of data very quickly. |
| 29:45 | Now the other aspect is that we do need to keep in mind what we're actually looking at there, what the data is and how much reliance we can take on this. |
| 29:57 | So I mentioned here, we've got these numbers down here at very light load which look like they're a little bit scary. |
| 30:05 | We've got these massive, massive errors, positive errors here, meaning that we're way leaner so what is causing this? Well if we head back across to the log viewer, this is simply these big lean spikes that are being caused due to backing off the throttle, transience or completely being off the throttle. |
| 30:27 | And ideally we want to ignore those. |
| 30:30 | I don't know if I've got this set up, we'll see if it's going to work for me. |
| 30:33 | One of the nice features again with the MegaLogViewer HD software is over on the right hand side we've got all of these filters, we can also add our own ones as well. |
| 30:43 | So we've got there some of these pre defined ones, we've got AFR our of range, we've got cold so basically we can filter out information when the engine is considered to be below operating temperature. |
| 30:54 | We can filter out information in the idle range, we can also filter based on a rate of RPM change and we can filter based on transience and throttle close so it allows us to really dial in on data that actually matters so again, hopefully this is going to work, if we click on our throttle closed one, it is not. |
| 31:14 | We can edit these based on the particular ECU that we are dealing with which is important there, obviously I've made some changes since that but basically by defining these filters and then turning them on or off, we can get rid of all of that data which particularly down here this is the throttle closed data that is really skewing our results, and get rid of that, likewise transience and only get in the solid data that we really want to focus on. |
| 31:39 | Based on that we can then also decide where we want to make our changes in the VE table and what magnitude of change is required. |
| 31:48 | One thing I'll just point out here as well is you can see that these cells are coloured and this is a bit of a guide as to how reliable the data is. |
| 31:59 | So we can see we've got bright green, we've got dark green, we've got yellow and we've got white. |
| 32:03 | So the greener colours, this means we've got a lot more hits in those individual cells, meaning that we've visited that cell a number of times and basically the ECU has gathered samples every time we've been in that cell and it's averaged that data. |
| 32:16 | The yellow data, we haven't been in these cells so many times, the white data we've barely just got a flash in the pan reading from that particular cell so what I'm getting at here is we can use this to help guide us on how reliable that data is and whether we want to take note of the data we're seeing there so particularly the one I've just highlighted there, 90 kPa, 4000 RPM, -3.26%, while it's still pretty much there or there abouts anyway, I probably wouldn't be basing any decisions on that. |
| 32:48 | If I see some outlier data pieces like this, particularly if they are showing a significant error then I would go back and gather some more data focusing my energy on that site and make sure that it is actually accurate reliable data before I take much notice of it. |
| 33:06 | Now regardless how we do this though, even with the filters that are available in MegaLogViewer HD, it does still come down to a bit of a garbage in, garbage out situation so what I mean by this is in order to get the best possible results, it's important to drive the car in a specific way and there are a few things that we can mess up here that will mean that our data's not going to be that useful. |
| 33:34 | Particularly with road tuning, a situation that we get ourselves into quite often is that we will be sitting at the side of the road making tuning changes, often with the engine running, sometimes if we're reflashing we'll have to shut the engine off and then restart it. |
| 33:48 | Then we'll get back up and running and get back out on the road and start gathering some data. |
| 33:52 | However the period while we've got the engine shut off or while we're sitting on the side of the road, this could easily be 3-5 minutes, the engine bay is becoming heavily heat soaked. |
| 34:02 | So this isn't a realistic condition. |
| 34:04 | What I mean by this is when we get up and running again, for the first minute or so after we start moving, we're going to be operating in a heat soaked condition where the intake air temperature is not realistic in normal operating conditions so we want to get rid of that heat soak before we start gathering data again, pretty simple, just spend a minute or two driving at normal motorway speeds to get the airflow through the engine bay and allow that heat soak to dissipate. |
| 34:30 | You can monitor this to a degree as well by looking at your intake air temperature and coolant temperature. |
| 34:36 | We always want to sort of take our data logs when those are under normal operating conditions so that's number one. |
| 34:41 | The second one is how we drive the car and we want to be really nice and smooth here, even if we've got the ability to filter out transience, we want to be as smooth as we possibly can with throttle. |
| 34:53 | So big aggressive stabs at the throttle, that's going to almost invariably end up with errors in our air/fuel ratio almost regardless how good our transient enrichments are and we're not trying to tune our transient stuff here, we want steady state operating conditions so really smooth inputs and the other one of course is gather a huge amount of data. |
| 35:14 | This isn't something where we'd go for a quick drive for 200 m up the road, pull over and call the job done. |
| 35:20 | This is something we're going to generally gather data over maybe 5-10 minutes of driving and constantly trying to access as many cells as you can. |
| 35:30 | We can use this in conjunction with our left foot braking techniques that we can access the higher load, low RPM areas that are a little bit more tricky to get to as well. |
| 35:40 | I should have mentioned as well, when I was talking about the left foot braking, it kind of is like giving yourself a long hill and by varying the amount of brake pressure you're applying, it sort of varies the gradient of the hill so you can imagine if you're driving up a hill, it allows you to be at a combination of load and RPM or throttle position and RPM that you wouldn't be able to get to if you were on flat ground or conversely going downhill. |
| 36:04 | Alright so MegaLogViewer HD, one of the options there. |
| 36:08 | I will actually just head across as well to the VCM scanner software and this is really what introduced me to histograms and their power. |
| 36:17 | The VCM scanner, I use this very extensively on tuning for Ford and GM applications. |
| 36:25 | But it can actually log pretty much anything with an OBD2 port so the histograms, let's actually just have a quick tour of this. |
| 36:35 | This is a log file that I've loaded up, I think it's a dyno run so probably not particularly relevant. |
| 36:41 | But we've got our graph logger there which is how we normally look at a data log but again trying to analyse a huge amount of data using the graph just like we saw with MegalogViewer, very difficult. |
| 36:53 | So here we've got our histograms, they're called graphs here but essentially the same thing. |
| 36:58 | The one that I've highlighted here is equivalence ratio error. |
| 37:00 | Little bit of an unusual term if you haven't come from the HP Tuners world but essentially it's exactly the same as what I just looked at in the MegaLogViewer HD. |
| 37:09 | Just looking at the difference between the air/fuel ratio that the engine is asking for, the ECU is asking for and our wideband air/fuel ratio. |
| 37:17 | This is during a ramp run so we can sort of see where we're transitioning through this particular run, not particularly exciting there. |
| 37:24 | Wide-open throttle there, just this area. |
| 37:26 | We can see just looking at how good everything is, pretty much within about 1% for the most part, got a few outliers here down at very low RPM, 95 kPa, 1200 to 1400 RPM. |
| 37:39 | We can see that they're colour coded red which means they're lean, that's leaner than our target, green is richer than target so 2.7, 3.8%. |
| 37:47 | Straight away we know exactly where abouts we need to do some work and again we don't need to be monitoring anything while we're gathering this data, we can start our logger, we can do our ramp run, stop our logger and then we can analyse the data. |
| 38:02 | Alright so we're going to have a look at a couple of other options here as well and particularly some dyno functions so this is probably a good time to mention if you've got any questions, please get those through now and we'll jump into those in a minute. |
| 38:14 | So first of all what I'm going to do is go through, actually got it hiding in the background here, go through the dyno function on the Ecumaster EMU Black and this is one that's a little bit unique, I haven't seen this on too many ECUs but it is quite a nice feature. |
| 38:32 | It's a bit of a case of garbage in, garbage out like I mentioned with the histogram data generation though and I wouldn't really be staking my life on the answers that it's going to give you so first of all we bring up the details of how we're going to generate this data or how it's going to be generated from the log file so we need a few bits of information here. |
| 38:57 | Coefficient of drag. |
| 38:58 | Not something that most people are probably going to know about their car. |
| 39:02 | I just Googled Version 11 STi, drag coefficient and I got 0.36, I again would not guarantee that this is absolutely accurate but this is probably, if you're using functionality like this, I wouldn't be focused so much on the specific number that it's punching out, yes I know you want the dyno sheet to brag to your mates but the reality here is when we're tuning, we're more interested in the before and after than the actual specifics of the number so as long as it's the same from run to run, that's really what we're looking for. |
| 39:32 | Likewise frontal area, probably a little bit easier to measure there, car mass, 1200 kg, probably a little bit conservative there, particularly with me driving it so let's take that up to 1400. |
| 39:45 | We've got the RPM ratio, so if you need to know anything about any of this you can click on the little help icon there but the RPM ratio just accounts for basically the rate of speed change which is what the calculation's looking at there. |
| 39:59 | Depending on what gear you're looking at. |
| 40:02 | So the calculation there is speed divided by RPM, multiplied by 100. |
| 40:07 | So for 3rd gear in that particular car it worked out to be 1.88. |
| 40:11 | I did another run in 4th gear as well and that was 2.5 off the top of my head. |
| 40:16 | Filter power, this is pretty important because this has a really big impact on the look of your resulting graph and how useful that's going to be. |
| 40:28 | We'll come back and talk about that in a moment. |
| 40:31 | Got some other parameters about what's going to be shown which doesn't really factor in too much. |
| 40:37 | So let's have a look at how we're going to gather that, we'll just get our VE table out of the way again. |
| 40:43 | And what I've got here is a dyno graph, sorry a log file that we did out on the road a few hours ago. |
| 40:53 | So what I'm looking at here is the RPM in red vs our manifold pressure in the top plot, so it's up here. |
| 41:00 | We've got our lambda vs our target down here. |
| 41:03 | A few other parameters that probably aren't too critical so what we can do here is basically highlight the section of the graph, the log file that we're interested in, basically where we were at full throttle. |
| 41:16 | And all we need to do is hold down the left mouse button and just basically drag across. |
| 41:22 | Once we've done that we can right click on that and we can come down here and create dyno graph. |
| 41:28 | That's going to be conveniently hidden behind so let's just bring that up. |
| 41:32 | So here is our dyno graph. |
| 41:35 | Which shows us that we had a maximum power of 270 horsepower at 6000 RPM maximum torque 336 pound foot at 5300. |
| 41:47 | Now the first thing to note here is the dyno graph is pretty rugged, it's looking pretty shakey, particularly through this area here in our torque graph which obviously transfers to these bumps in our power graph. |
| 42:03 | So not generally what I expect to see from a real dyno graph and just for reference here, we'll just head across, not that one, this one here, this is the power and torque graph that we actually got from this engine, running The Ecumaster EMU ECU on our Mainline dyno. |
| 42:22 | So we can see peak power there which is what I've got highlighted, 316 horsepower made at 6500 RPM give or take so 320 horse. |
| 42:33 | So let's go back to our Ecumaster EMU. |
| 42:36 | We've got 270 horsepower at 6000 RPM so yeah don't know if I'd really say that aligns perfectly. |
| 42:46 | But what we'll do as well is I'll just bring back up the little dyno settings and we'll bring this over, just show you how much this affects what everything looks like. |
| 42:56 | So for a start our filter power, for this particular ECU, that was a default value of two so if we enter than in and you can see that you've now got absolutely useless data, there's nothing we could learn from that. |
| 43:11 | Particularly if you're trying to do back to back runs there, it's going to be completely hopeless so you can just basically work with this until you get something that ends up reasonably smooth, interestingly if you go too far, you end up going back the other way so I found with this particular vehicle, that about a 11, 12, 13 filter, that was about as smooth as we got. |
| 43:33 | So yeah we've got a general shape to the curve, doesn't really quite match up either number wise with what we saw on the dyno or with the specific shape of where we're making peak power and peak torque. |
| 43:45 | Peak torque for interest sake there, 334 pound foot, 5300 RPM, let's just head back across and see where we've got peak torque. |
| 43:55 | So I can't actually click on this but if we run a line down there, peak torque there, about 4800 so you can see it's not really aligning that well. |
| 44:04 | This is my personal take on virtual dyno software, useful to a point but I would be very very mindful of taking too much notice of the specifics. |
| 44:17 | The other problem we get with this is it's not just a case of the actual number that is being produced, what we're obviously looking for, particularly if we're trying to tune a engine that is not knock limited and we're trying to optimise using virtual dyno software, we may be looking for subtle differences in our power and we may not end up getting the needed repeatability back to back in order to achieve that so let's just head back to our Ecumaster software. |
| 44:48 | What I've actually done is a number of runs here, I don't know if I can load this up, I'll give it a crack, let's get rid of this one here. |
| 44:57 | So this run was done in third gear. |
| 44:59 | Let's just open my fourth gear run here. |
| 45:05 | And see where our run was. |
| 45:12 | Just go over here and highlight that run, basically do the same. |
| 45:15 | So I just want to see if we ended up with a significant difference between using 3rd gear and 4th gear. |
| 45:20 | Now the problem with this of course is we're using higher gears, it does affect the terminal speed that we're going to be getting to and that's something we do need to keep in mind. |
| 45:29 | Again particularly if we are dealing with something where there is a speed limit. |
| 45:34 | So we'll bring that dyno graph up. |
| 45:38 | Oh that hasn't created it, let me try that again. |
| 45:42 | There we go, OK so the other problem we have with this is we do need to also adjust our gearing because this as I've said is done in 4th gear so this was 2.5 and we'll just see what the results look like there, let's just drag that out. |
| 45:59 | So for a start we can see that the power and torque different, max power 280 horsepower, max torque 380 pound foot and we've also seen the power and torque being delivered in different places. |
| 46:16 | So again just really hard I would struggle with this to really stake my reputation on trusting these numbers and where to make tuning changes. |
| 46:26 | I wouldn't necessarily say it's a gimmick but the usefulness is significantly limited. |
| 46:31 | Now before we finish off I just want to quickly touch on another very popular software package which is virtual dyno. |
| 46:38 | This is freely available, if you haven't heard of it and you do want to check it out, go and download that and have a look at it. |
| 46:45 | So I've taken 2 of the log files that we generated here with the Ecumaster EMU, I've exported those as a .CSV file, it won't natively open the Ecumaster log files but it's very easy within the Ecumaster EMU, I'll just show you here, we can use this little feature here, this little icon to export your log file as a .CSV file. |
| 47:13 | And technically you should be able to then just load them directly into virtual dyno, it supports a really extensive range of manufacturers, ECU manufacturers. |
| 47:25 | It is a little bit finicky, at least I've found, I'm not overly experienced in this I'll be up front about that right here and now, I don't use it because I have a dyno. |
| 47:32 | But it is a little bit finicky on the channel names or column names so we need to be mindful of that, making sure that those all match. |
| 47:41 | Anyway, this is our dyno run here. |
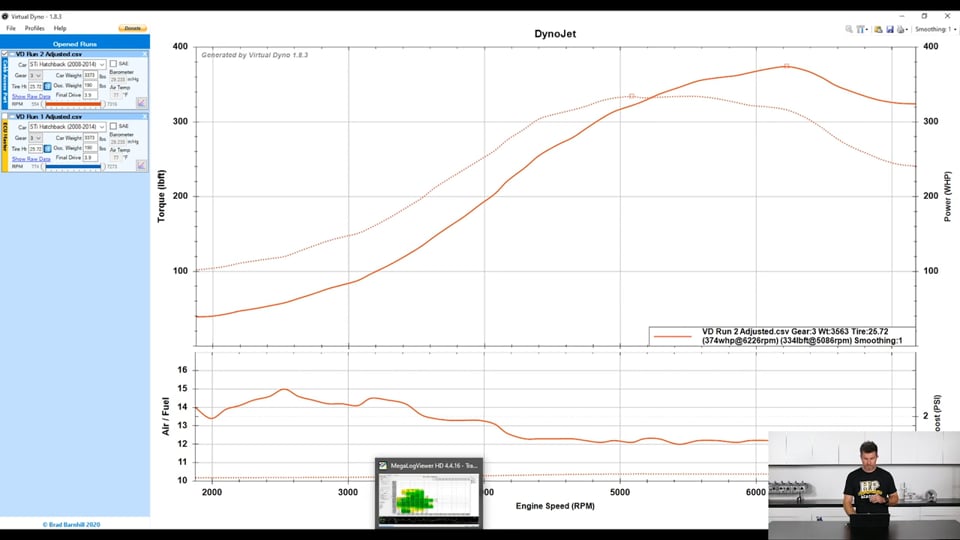
| 47:43 | So we can see that we've ended up with 374 wheel horsepower at 6200 RPM and we've got 334 pound foot at 5000 RPM so let's just see how that relates to our dyno graph. |
| 48:01 | So 370 at 6200, 330 at 5000. |
| 48:05 | Much closer. |
| 48:08 | The specific numbers, a little bit optimistic but it is also comparing, it's generating these in a, it's generating these, let's just let me get back to this so I can actually remember, the Dynajet style. |
| 48:27 | So Dynajet dynos, generally fairly well regarded as reading a little bit high, particularly compared to our Mainline Pro Hub dyno so I wouldn't take too much notice of this, again I'm not worried about the specifics, I'm looking for repeatability but yeah we've got peak power there about actually it does say 6376 so let's call it 6400 RPM and we've got peak torque probably at about 4800 RPM so it's much much closer to the mark and again if we just come back across, the dyno shape does look pretty close to what we've got there. |
| 49:00 | We've got our air/fuel ratio down the bottom and if I had managed to log it in the right format, would also show our boost which is obviously pretty useful. |
| 49:10 | If we bring up our second run here so what I did here, the, no done it around the wrong way but the same result will apply, we'll bring up our second run here. |
| 49:19 | The blue run here is with an additional 4° of ignition timing. |
| 49:24 | So we can see that it is showing an improvement in power and torque as a result of that. |
| 49:31 | In this case it's shown us we're actually at 405 wheel horsepower, again probably a little bit optimistic but there are some other factors we could adjust there that will affect that. |
| 49:40 | Not really too worried so much again about the specific numbers. |
| 49:44 | So it has shown us that 4° of timing there has shown a difference, in this case quite a significant difference, 374 to 405 so around about 30 odd horsepower difference. |
| 49:58 | Probably, just because I know this car fairly well, that's probably a little bit of an overestimation of the effect of 4° of timing, I'd probably expect 4° of timing on this engine to be closer to about 15 to 18 wheel horsepower but again, we've overestimated everything so it's probably fair that we could expect it to overestimate the gains. |
| 50:20 | So I mean I made a big change here purely to show this. |
| 50:24 | Whether or not we can trust on virtual dyno software for back to back runs where we're starting to get down to 1° timing changes, half a psi, 1 psi of boost, injection timing, those sorts of things, I would be far less likely to trust the results and the reason for this is we also have another range of environmental variables that will come into this. |
| 50:49 | It should go without saying that it's critical that we use exactly the same stretch of road every time. |
| 50:55 | There'll be a bit of a gradient on our road even if it looks flat so it's really important that we make sure we're on the same stretch of road. |
| 51:01 | But also other aspects like I've just mentioned earlier in the lesson today on heat soak, those will affect our results so it is very very difficult to get the sort of repeatability if we make no changes to do 2 back to back runs with virtual dyno, we tend to see a discrepancy run to run in our power and torque so if you are interested in using a piece of software like that, I would suggest that you go out, make no changes to the car and just perform 4 or 5 runs out on the road, gather than data and look at the differences you're going to see between those 4 or 5 runs and that will just give you the margin of error in how much weight you can really put on the usefulness of that data. |
| 51:45 | Alright we've gone a little bit long so let's jump into our questions. |
| 51:49 | If you've got any more on the topic, please keep them coming. |
| 51:58 | Alright, first question comes from Bjorn who's asked, when road tuning would it be better to build the Ignition map from scratch like with a dyno or would it be beneficial or better to start with the ignition table in a base map for your particular engine? It's a good question Bjorn, in the road tuning additions I actually recommend that if you are dealing with a standalone that we start with a developed ignition table with a conventional shape to it. |
| 52:20 | Now doesn't mean it's going to be absolutely perfect but we can't do the part throttle MBT tuning that we'd do on the dyno so what we're really doing is trying to get a general shape to our ignition curve, we know what it's going to look like, we know that as we increase RPM in general, we're going to advance the timing, we know that as we increase load, throttle position, boost pressure, we're going to retard the timing. |
| 52:42 | So we get that general trend, this could come from a base map, it could come from our experience. |
| 52:47 | And then what we're looking at is what's happening under wide open throttle on our ramp run conditions, we're going to optimise that to our knock threshold, retarded from the knock threshold and basically we're going to use the changes that we make under those areas of the map and we're going to filter those down and extrapolate those into the cruise or light load areas. |
| 53:06 | Bjorn's also asked, tuning a knock limited engine on pump gas, how would one go about safely tuning using the knock sensor feedback if the knock parameters aren't set up yet in a tune? I think you'd build it up from engine noise from the sensor and work your way up but could be wrong, how do you go about doing this? Ah yeah it is a good question Bjorn, so regardless if you've got knock control in your particular ECU, I always advise using audio knock detection. |
| 53:30 | And basically you're going to be able to hear when the engine starts to suffer from knock through that audio knock detection system. |
| 53:37 | So this is really critical, I don't consider tuning any engine if I don't have audio knock detection on it unless I've already proven that knock control strategy in the ECU is set up and is validated correctly. |
| 53:53 | Suhas has asked, are calculated values of power and torque using a math channel in a dash logger like AiM or MoTeC or any others useful as a guide? Well basically it's the same deal, they're looking, there's different ways of doing this. |
| 54:07 | So with a MoTeC ECU often that will be based on aspects such as the calculated airflow into the engine. |
| 54:16 | Other times with dashes, they will calculate that based on rate of acceleration and taking into account things like the weight of the car, drag from the frontal area etc so basically that's the way the virtual dyno software does it so yeah will be very dependent but there's room for error in either of those calculations anyway, it's not going to be an accurate science unfortunately. |
| 54:44 | One of the reasons with the calculated power from airflow for example, what we can expect from a given mass of air on a pump fuel that is knock limited, very different to what we could get on E85 for example where we can optimise the timing to MBT. |
| 55:04 | Bjorn's asked, there's cases where tuners have remotely road tuned street cars down here that did not have knock sensor data. |
| 55:13 | How safe is this in a road tuning scenario and would you advise against this or if the desired airfuel ratio is in target would it be safe? OK I'm hoping by now you understand what my answer is going to be. |
| 55:23 | Under no circumstances do I believe this is safe, yes I know that many tuners do this. |
| 55:29 | I've had the benefit of 2 decades or so now tuning cars with knock detection equipment. |
| 55:36 | I know on pump gas how prone engines are to detonation, it is so common and the fact is if you are remotely tuning using something like virtual dyno, you don't have knock sensor data, you're absolutely blind to that and it can end up being a very expensive mistake to make so knock detection equipment is an essential element, it's just as important as your air/fuel ratio meter if you're a tuner. |
| 56:02 | OLDTOYOTA's asked, when tuning light load ignition timing, is it possible to use the left foot braking technique and monitor the MAP to record changes in torque? No unfortunately it's not, you're just not going to have the sensitivity to do this on the road, even on a long stretch of what seems to be straight road, you're still going to have undulations, if you look at what actually happens with the MAP signal, you cannot keep everything stable enough to really see what's going on solely with the manifold pressure signal so yeah it's nice in theory but unfortunately the reality is somewhat different. |
| 56:39 | Fortunately if you are close to MBT though you find that there is that plateau both above and beyond MBT so if you're within a few degrees of MBT, the amount of torque that you're actually going to be sacrificing is generally only in the region of maybe 1-2% so you're going to be there or there abouts anyway. |
| 56:59 | Rikko has asked, how does one get on about road tuning a freshly built engine, piston rings not bedded yet? Now this one's a little bit trickier. |
| 57:06 | I wouldn't really be too worried about trying to optimise anything with a freshly built engine. |
| 57:10 | What I'm going to do is basically go through the process of breaking the engine in while I'm optimising the fuelling. |
| 57:16 | So getting the fuelling in the ballpark, that's important, we don't want excessive fuelling going into the engine. |
| 57:21 | The ignition timing, I'd be using my own experience and basically going with conservative and safe ignition timing, I don't really are about being anywhere near MBT and basically by building up the areas of the map, maybe between cruise and 4000 RPM, maybe moderate load, it's actually relatively quick and safe to do that while you're breaking in the engine. |
| 57:42 | It actually works really nicely because when you break in the engine and you're varying the load and RPM, this allows you to sort of move backwards and forwards through the areas of the map while you are doing that. |
| 57:53 | R Tuned Media's asked, when street tuning steady state, how high up in the rev range would you work before then beginning ramp runs? I tend to go to 4000 to 5000 as the road/track will allow. |
| 58:04 | Yeah 100% with you, I will add a caveat here, I mean it does depend a little bit on the rev limit of your engine. |
| 58:11 | If you're looking at a high revving JDM style engine that might go to 7000, 7500, 8000 RPM, I'd probably be out 4000, 4500 RPM. |
| 58:19 | On the other hand, a low revving V8 that only goes out to 5500 RPM, probably going out to the 3000, 3500 RPM in steady state, absolutely sufficient. |
| 58:30 | We're focusing on the areas that we are going to simply be using the most. |
| 58:34 | Bjorn's asked, when road tuning with most of the map dialled in, how safe is it to do ramp runs to the rev limiter? The fuel table will of course be richer, following the existing VE pattern but what would be safety features to look at for such a situation where you need to go to redline without causing damage to get your log data? OK so the key here that's so easy to overlook is we don't need to go to the rev limiter on our very first pull. |
| 59:02 | So if we've got the engine dialled in pretty well out to maybe 3500, 4000, 4500 RPM under steady state, start there, do a small ramp run, go out to 4000 RPM, gather that data, have a look at it, is everything OK? If it is, fine, let's go another 500 RPM, another 1000 RPM. |
| 59:17 | Basically we can just creep up on it so there's absolutely no need to do your very first pull all the way through to the rev limiter. |
| 59:24 | Likewise if everything's looking good, if you can monitor your air/fuel ratio out of your peripheral vision, basically if your air/fuel ratio's on track and you've got no sign of any knock, then obviously there's no need to pull out of the run but my advice, the common error I see is people rushing the tune, trying to get ahead of themselves, get the tune completed and rushed through faster than they need to, there's no rush here, take your time, you're dealing with an expensive engine, treat it with a little bit of respect. |
| 59:53 | Take it slowly, build up your ramp runs in 500 to 1000 RPM increments and over the course of maybe 4 or 5 runs you're going to get yourself out to the rev limiter and you're going to have the confidence when you get there that your fuelling and your ignition is going to be safe and you're not going to cause any damage and the other thing that would go along with this is if I am starting to do this with an existing tune, I would also be starting by pulling out a little bit of timing and maybe adding a little bit of fuel so I'm coming at it from a position of safety and then I can start, once I've got an established run from 2000 to 7000 RPM, I can start dialling that fuelling in, getting it where I want it to be, once I've got my fuelling dialled in, I can then start adding some timing and seeing how the engine responds, obviously monitoring for knock. |
| 01:00:38 | Alright that's all we've got time for team, thanks to everyone who has joined us, if you are watching this after the webinar has aired, please feel free to ask any additional questions in our forum and I'll be happy to answer them there. |
| 01:00:50 | Thanks and look forward to seeing you next time. |
Timestamps
0:00 - Introduction
0:50 - Advantages of road tuning
5:05 - Disadvantages of road tuning
6:05 - Optimising ignition timing
8:55 - Course overview
10:35 - WOT and steady state considerations
15:40 - Steady state tuning on the road
18:15 - Datalogging
25:00 - MegaLogViewer HD histograms
36:05 - VCM Scanner histograms
38:15 - Dyno function
46:30 - Virtual dyno
51:55 - Questions


