271 | Improving Oil Supply - 4G63
Summary
Lubrication related failures are one of the most common reasons for engine failure in modified engines. While there are expensive options such as dry sump systems available, there are often some cheap or free improvements we can make while the engine is being assembled. For this webinar we’ll be looking at the EVO 9 4G63 engine.
| 00:00 | - Hey team, it's Andre from High Performance Academy, welcome along to another one of our webinars. |
| 00:04 | This time we're going to be diving into the oil system on the Mitsubishi 4G63 engine. |
| 00:10 | There are a few key areas that are so important to understand that are peculiar to the 4G63 and the 4G63, one of the engines I probably know the most, it's probably what we were best known for through my old workshop and for those who maybe aren't aware of our past endeavours, we'll just jump across to my laptop screen for a moment and I'll show you a couple of the cars we were involved with. |
| 00:37 | The one on the screen at the moment is my old shop car, this is a Mitsubishi Lancer Evo 3. |
| 00:43 | And at the time this was retired it held the world record for the fastest Mitsubishi Evo 4WD, it went as quick as 8.23 at 180 mph. |
| 00:53 | From our perspective though it's the engine that we're most interested in. |
| 00:57 | This still used the cast iron block factory block 4G63. |
| 01:00 | For this engine we still kept the capacity at 2 litres and this engine produced 1166 wheel horsepower running 54 psi of boost on methanol fuel. |
| 01:13 | We also revved this to 10500 RPM, occasionally it even saw 11 so understandably keeping the engine alive, the oil control was really critical. |
| 01:24 | Another engine that we were really proud of or car that we were really proud of, this one here we built for one of our customers. |
| 01:31 | This is an Evo 9 and it was built to claim the late model Evo 4WD world record. |
| 01:36 | It did exactly that, at the time this was retired it held that record with an 8.34 at 169.7 mph. |
| 01:44 | For this engine, we used a 2.2 litre stroker kit, made 1001 wheel horsepower running 42 psi of boost on Q16 fuel and again we revved this to 10500 RPM. |
| 01:57 | A few considerations there with drag racing that are a little peculiar and you're not going to see these in most instances but the G forces, longitudinal G forces that that car was subjected to are really problematic. |
| 02:10 | With my own car we saw peak G exceed 2G when we left the line so obviously what that's doing is forcing all of the oil towards the back of the sump, we'll talk a little bit more about the sump shortly, and then another area which was just as problematic, even though the engine was not making power at the time is that when I pulled the chute at the end of the strip, 170, 180 mph, and got on the clutch the engine was still doing about 10,000 RPM. |
| 02:37 | But we would see momentarily the oil pressure drop away down to about 10 or 12 psi. |
| 02:42 | Obviously not something we want to see, even though as I've said, off the clutch there, so the engine is no longer producing boost, the actual pressure, cylinder pressure is much lower but still we're spinning that thing at 10,500 RPM. |
| 02:56 | Anyway just a little bit of insight into the background so you've got some idea of why I've got a couple of qualifications here to talk about some of the aspects with the 4G63. |
| 03:05 | And I'm not going to be able to deal with absolutely everything but I'm going to deal with what I would consider to be the key problems. |
| 03:13 | And one of the first places to start is with an aspect that is common with the 4G63 which is crank walk. |
| 03:23 | Now that term simply means that we're actually suffering from a thrust failure, thrust bearing failure in the engine and that thrust bearing is there in order to support the crankshaft longituinally. |
| 03:36 | So we've got a crankshaft set up here on the bench inside of the cradle and basically the thrust bearing is there to support the crankshaft so that when the driver puts his foot on the clutch, if it's a push style clutch there's going to be a longitudinal force basically trying to force the crankshaft forward in the engine block so that thrust bearing is there to support that kind of movement. |
| 03:59 | What we see with the 4G63, this was really prevalent in the 1G 6 bolt, not that I dealt with those engines very much but lot of reports of problems with those, particularly from engine builders over in the US where they were in the Talon Eclipse and very very popular. |
| 04:15 | What we generally worked on was the Japanese domestic market 7 bolt engine. |
| 04:21 | So these started in the Evo 1 and continued through to the Evo 9. |
| 04:26 | However I think Mitsubishi cottoned onto the fact that there was some inherent design flaws with the earlier 7 bolt engines because there was a considerable design rethink when they went from the Evo 4 engine to the Evo 5. |
| 04:41 | Particularly they went to a completely different style of thrust bearing which we'll look at shortly. |
| 04:46 | I never ever saw thrust bearing failure from the Evo 5 engines onwards, it was really just down to the Evo 1 through to Evo 4 engines. |
| 04:57 | For a reason I can't put my finger on, the Evo 4 engine was the one that seemed to suffer from this worst. |
| 05:04 | So what actually happens with this? Well essentially what we get a situation is the thrust bearing in the engine wears out and as it's doing this it's also wearing a groove into the thrust surface on the crankshaft and what this does is over time it allows the crankshaft to move forwards and backwards in the block more than it should. |
| 05:24 | And you get into some really nasty situations where in time it can actually take out the crank sensor on the bottom pulley as well, for the Evo 4 onwards, they went away from a cam angle sensor to a crank trigger and basically the pickup wheel can move enough that it'll actually take out the sensor. |
| 05:44 | You can also get into situations where the clutch becomes difficult to engage and disengage as well and that can be a real danger sign. |
| 05:54 | So let's have a quick look here at what this looks like. |
| 05:58 | And I've got a really bad condition Evo engine here which is going to be perfect. |
| 06:02 | I'm just going to grab myself a pointer so that I can actually point in the right spot so we can see what's going on. |
| 06:09 | This will have to do. |
| 06:12 | Alright so we'll jump over to our iPhone camera and what we're looking at here is the thrust surface on the crankshaft and it is going to be a little bit difficult to tell here, we've got this polished surface that I'm just pointing out and that's what runs against the thrust bearing. |
| 06:28 | Now on this particular example, like I say, it's going to be a little bit difficult for you to visually see this but there is actually a noticeable groove in this surface and that is indicative that we've got a significant amount of wear there. |
| 06:41 | Now the problem with this as well is this something that can be quite easy to overlook if you're not aware that you do need to look for it. |
| 06:50 | So you can go through and inspect the bearings on the rest of the engine and basically if everything there's looking good, it can be easy to ignore the thrust surface on the crankshaft. |
| 07:02 | So it's one of the first things we want to look at on any of these engines that have a known problem with crank walk. |
| 07:08 | So in that case I'm already seeing that problem. |
| 07:11 | The other issue we do need to consider is that the Evo 1 through to Evo 3 engines were a push style clutch. |
| 07:18 | Just need to be a little bit sensible, understanding where the load is going to be applied. |
| 07:22 | With a push style clutch when the driver puts his foot on the clutch, what that's going to do is apply a load in through the back of the crankshaft so it's going to force the crankshaft towards the front of the engine. |
| 07:32 | Understandably then it's the rear thrust face on the crankshaft that is the one that is most prone to wear and that's exactly the situation we've got here. |
| 07:41 | I haven't got the camera set up on it but the opposing thrust surface on the crankshaft in this one, absolutely perfect condition. |
| 07:48 | On the other hand from the Evo 4 through to Evo 9 they switched to a pull style clutch. |
| 07:53 | I'm not entirely sure why they did that but of course with a pull style clutch, when the driver disengages the clutch, the force is in the opposite direction, it's pulling the crankshaft or trying to pull the crankshaft back through the engine. |
| 08:05 | So of course with that style of engine we'd be looking at the opposite thrust face to make sure that that is in good condition. |
| 08:12 | Now the other problem with thrust wear like this is it's difficult to recover. |
| 08:19 | In my opinion, it's probably not something, unless you've got very very insignificant amount of wear, it's probably not something that you really want to try having your machinist repair. |
| 08:31 | The problem is that when we do this, we're going to end up increasing the end flow to the engine and the other problem is it's very difficult to get a good surface finish on this thrust face because it's so tricky to machine. |
| 08:44 | I have had it done a couple of times with mixed results. |
| 08:48 | In all honestly, if I'm facing this sort of problem with a crankshaft, I would bin the crankshaft and source a second hand or new unit that was showing no problems. |
| 08:58 | So that's what we're looking for there. |
| 09:01 | It also shows up with the bearings itself. |
| 09:04 | So I do have the opposing thrust bearing, or bearing itself from this engine and what we'll do is get this under our overhead camera here. |
| 09:14 | And what we can see, this bearing actually is unfortunately in terrible condition so fortunately we're only actually looking to reuse the block in this case but it's showing a lot of wear. |
| 09:27 | If you've never seen a bearing that's been used, we should not be seeing this copper colour. |
| 09:31 | That's an indication of severe wear. |
| 09:34 | But what we want to do is basically inspect the thrust surface, the wear surface of the thrust bearing as well. |
| 09:41 | With the Evo 1 through to 4, the centre main bearing was in integral thrust which is what we can see here, that's what we're looking at so the thrust bearing is contained along with the main bearing itself. |
| 09:52 | We'll look at how that's done in the 5 onwards in a second. |
| 09:55 | So that's the thrust surface, that's the one that actually wears and while this one's not really looking too flash either, if we turn this over you can sort of see that the wear on the opposing side, definitely nowhere near as significant. |
| 10:07 | So those are the sort of inspections that I'd be wanting to do. |
| 10:10 | Very carefully inspect the thrust bearing, looking for any gouging, any significant scoring, any sign of copper, discolouration coming through the bearing shell. |
| 10:21 | That would be a very very clear sign that you've got a problem and then if you do see that, match that up with looking at the thrust surface on the crankshaft and that will indicate whether you've got a unit that is going to be recoverable or not. |
| 10:36 | In severe instances I've actually seen the crankshaft actually wear into the crank case and the girdle as well, basically wearing right through that thrust bearing so this can get really really nasty if you don't pick it up in time. |
| 10:52 | Alright so what causes it? That's obviously the main problem here, if we know what causes it, we can fix it. |
| 10:59 | And this is an area where there's actually a lot of debate and not a lot of consensus opinion on what it is. |
| 11:07 | I've got my own opinion and I'm going to present that here. |
| 11:11 | I think it stacks up pretty well because when we found these issues, we fixed them and we built literally 100s of engines and really never suffered from crank walk issues once we addressed them so I think everything that we've found stacks up as the root cause but I know that I've read a lot of information online which claims other reasons for it. |
| 11:32 | But let's go over it. |
| 11:34 | So the first problem is you are going to exasperate this issue when you fit a heavy duty clutch. |
| 11:40 | So in stock form with everything going well, a stock Evo 1 through to Evo 4 engine, normally will lead a relatively long and healthy life but of course when we modify the engines and we want to make more power we need a stronger clutch that's going to be able to support that. |
| 11:55 | So going to a heavy duty pressure plate, essentially what that does is when the driver depresses the clutch pedal, it's putting more force on that thrust bearing. |
| 12:03 | So it's obviously going to create more wear. |
| 12:06 | The other issue which is something I see a lot is a clutch which hasn't been adjusted properly and doesn't properly disengage. |
| 12:15 | So this is something you should always keep in mind anyway. |
| 12:18 | Basically at the top of the clutch pedal, if you just gently depress the pedal, you should get between maybe 10 and 15 mm of free play before you actually feel any resistance at all. |
| 12:30 | That free play at the top of the clutch pedal is so critical and essentially if we haven't got that free play, if the clutch pedal is solid from the moment you touch it, what that means is that there's always going to be force placed on the thrust bearing through the release bearing, there's always going to be force placed through the clutch fork into the release bearing and then into the pressure plate so it's always going to be loading this crankshaft and of course that's just going to speed up that wear as well. |
| 12:59 | If you're rebuilding the engine, you're going to want to obviously, as I mentioned, look at those thrust surfaces because if they are already badly worn, unfortunately, just replacing the thrust bearing, you're going to end up with a failure happening really quickly. |
| 13:14 | So critical that those surfaces are in good condition. |
| 13:19 | The other issue is incorrect end float. |
| 13:22 | Now the end float is the amount of free play that the crankshaft has longitudinally fore and aft in the engine. |
| 13:29 | You'll find that there will be a specification for every engine. |
| 13:31 | Normally it's not quite so critical as the likes of an engine bearing clearance and normally it's a little bit looser. |
| 13:38 | Maybe it's going to be something in the region of maybe 8 to 12 thou or something of that nature so that's quite important because particularly if we don't have sufficient end float, again we get into this situation where we can end up with that thrust surface of the crankshaft essentially constantly in contact with the bearing and that's going to accelerate our wear as well. |
| 13:58 | This actually goes hand in hand with the other problem though which is misalignment of the main cradle. |
| 14:05 | So I've got the engine, the crankshaft sitting on a cradle at the moment. |
| 14:08 | I'll just grab our Evo 9 cradle and show you. |
| 14:12 | This is a little bit different because as I'll show you shortly, the Evo 5-9 uses a different style of thrust bearing but for all intents and purposes, the cradle, very similar to what we're looking at here from the Evo 1 through to Evo 4. |
| 14:26 | Now generally the Evo 1-4, the thrust bearing is two piece. |
| 14:30 | So we've got this bearing, we've got one half of it sits down in the engine block and the other half sits inside the cradle and basically it gives full 360° support to the crankshaft in that thrust surface. |
| 14:43 | Which is good and you would think that more contact there would be beneficial and it can be. |
| 14:49 | The problem is that when we install our cradle and we basically pull this down into the register in the engine block, we actually have a little bit of flexibility in where that locates. |
| 15:00 | It's got a little bit of tolerance between the inside diameter of the holes there and the outside diameter of the studs or bolts that will be holding it in place. |
| 15:10 | So what I'm getting at here is if you don't have the cradle aligned properly with the engine block, what we an actually do is artificially reduce our amount of end float so it's really really important if you're using, assembling that style of engine, that you check your end float and you make sure that you've aligned that cradle so that you've got full contact with the thrust bearing. |
| 15:33 | Couple of other issues, poor oil supply, poor oil quality and dirt and debris in the oil, these really go without saying and I mean they're going to do damage irrespective of the engine so it's definitely not a 4G63 problem. |
| 15:45 | Now what did we do to fix this? Well there's a couple of issues that we did find. |
| 15:52 | I've already kind of highlighted some of them but if we jump across to my laptop screen, this, in my opinion is the key one. |
| 15:59 | So this is the opposite side of the thrust bearing that we've just looked at which is still installed in the engine block that I stripped just before this webinar. |
| 16:08 | So what we can see is we've got two oil supply holes. |
| 16:13 | Now in the back of the bearing or on the back of the bearing in the engine block itself we can also see there is a groove machined into the block. |
| 16:21 | The idea here is basically the oil comes through the main oil gallery and then there's a hole that's drilled down through that groove, through the block and into the main oil gallery so the oil gets supplied up. |
| 16:32 | Now the oil will end up flowing into the bearing via this radial groove that runs around the back of the bearing so it is going to find its way out through these two holes. |
| 16:45 | That's going to allow it to lubricate the bearing and from there it's going to sort of run down the sides of the thrust face. |
| 16:50 | So it does work but I don't believe that it's a well designed oil feed and what we'll actually, if we look at, if we just jump to our overhead here, you can actually see, if I get this out of the light, you can actually see the problem here. |
| 17:07 | This little witness mark here which we can see, this is actually where the oil feed comes out from the block so you can see it actually, instead of aligning directly with the hole in the bearing, it actually hits the back of the bearing shell. |
| 17:20 | So it's forced to run down this radial groove and then come out through these holes. |
| 17:23 | So it's going to get there but it's a bit of a convoluted path. |
| 17:27 | I don't know if this is a design problem or someone wasn't talking to the other department but in my opinion, that was really the crux of this whole issue. |
| 17:37 | And if we just jump across to our remote camera here for a moment. |
| 17:41 | We've got our Evo 9 block set up over here. |
| 17:43 | And we can actually see with the Evo 9 block that this hole here, does align perfectly with that oil gallery, that main oil gallery so we've got a straight shot for that oil to come straight from that main oil gallery out into this main bearing. |
| 17:58 | So we wanted to fix that and I went one step further as well and also provided superior flow or improved flow to the thrust surface on the bearing. |
| 18:09 | So let's have a look at that again. |
| 18:11 | So what we did was twofold, we'll go to our overhead camera. |
| 18:14 | It's a little bit hard to see here, I've just drawn a bit of an oval shape on this bearing surface in vivid but basically we had our machinist mill a slot which just extended that oil hole down, basically got to the position here which we've looked at on the back of the bearing where we now had a straight shot just like the Evo 5 onwards bearing already does straight out of the pack. |
| 18:38 | Interestingly this is the only bearing in the Evo 1 through to Evo 4 main bearing set where this oil hole is raised. |
| 18:46 | All of the other ones actually already align with that oil gallery so like I say, don't know what the thinking was there but in my opinion, definitely an issue. |
| 18:54 | The other aspect that we changed here was, and I've again just drawn this in. |
| 19:00 | We had our machinist use a milling bit here and basically mill little slots on the thrust surface here which look like little Ts so I've just drawn those in so you can see what that looks like and what that does is it allows a better feed, because it connected straight up here, we've got an oil path so that the oil can flow straight in and get spread along that thrust surface of the bearing. |
| 19:23 | So that really was our main fix and as I've said, once we went to that solution with our bearings, really I don't think we ever saw another issue with crank walk again. |
| 19:37 | There are other issues though that do go along with this, the alignment of our cradle, I've already mentioned that, that is absolutely critical so what I do there is basically I'll pull the cradle down into the register in the block and then I'll loosen the fasteners again so I'm always doing this with ARP studs so the stud still provides some alignment. |
| 19:56 | We can then actually check our end float using a dial gauge and that can be quite telling but quite often we'll find that as we naturally pull everything down, we end up with little to no end float. |
| 20:08 | A good way of aligning this is just to use a rubber mallet or plastic mallet and once we've loosened all those fasteners we can tap the back of the crankshaft and that will force the crankshaft forward and that will basically also move the cradle forward and that aligns the thrust faces and then we'll find that if we check our end float again, we'll probably have the specification that Mitsubishi give so really simple little step during the engine building process that I know a lot of people don't consider, they overlook. |
| 20:39 | But if we don't have the upper and lower halves of those thrust bearings basically lined up with each other, we're going to be artificially limiting our end float and basically determining we're going to end up with a thrust bearing failure in time. |
| 20:53 | Proper clutch adjustment as well, I've already mentioned that, that's critical. |
| 20:58 | The other thing is clutch selection, we want to give ourselves the best chance possible here. |
| 21:02 | So obviously when we're going to make more power as I mentioned, we do need a clutch that can take the torque. |
| 21:07 | What I find is that if we go to a good quality twin plate, because we've got the two friction surfaces or friction plates in the clutch, we can generally get away with not needing such a heavy duty pressure plate. |
| 21:21 | There's two advantages with this. |
| 21:23 | First of all, the lighter duty pressure plate means that we're not putting as much load on that thrust bearing inside the engine. |
| 21:29 | The other aspect with this as well is it makes the car easier to drive so particularly for a daily driver, I don't personally like driving a car with a very heavy clutch in stop start traffic, gets pretty tiring. |
| 21:41 | So few considerations there. |
| 21:43 | Alright so that's our first one, crank walk, what it is, what causes it and what we found to fix it. |
| 21:50 | The next one we're going to talk about is oil surge. |
| 21:54 | This definitely is not particular to Mitsubishi, it's a problem with just about any production engine, particularly if you are going to be taking the engine on a racetrack where you're going to be generating a lot of lateral force. |
| 22:06 | I talked previously about longitudinal force but drag racing is quite specific there. |
| 22:12 | Normally it's going to be people taking their road car onto a racetrack. |
| 22:16 | There's a few solutions there. |
| 22:18 | At the top of the list would be a dry sump system but that is obviously very very expensive and getting one fitted to a modified street car can also be problematic. |
| 22:32 | If it's a modified street car, if it's not a dedicated racecar, then a modified sump can be a really good interim step so what we are going to be running in our own Evo 9 that we're building here for one of our in house project cars is a sump from Race Fab here in New Zealand, we'll jump across to my laptop screen. |
| 22:52 | This is basically what it looks like. |
| 22:55 | Can't give you too much more detail on it unfortunately but essentially you can see that first of all, Rob increases the capacity of the sump so it physically just holds more oil. |
| 23:06 | The other aspect which is really the key point though is there is a little baffle box that is made up and welded in here. |
| 23:13 | And this essentially has some little trap doors in it. |
| 23:16 | Nothing particularly new or groundbreaking here, the idea is to trap the oil around the oil pickup. |
| 23:22 | And basically the oil can flow into that baffle box but it makes it very difficult for it to flow away. |
| 23:28 | This is not in itself a bullet proof solution so if you were building an all out racecar, then I'd definitely consider the additional cost and hassle factor of going dry sump but for a lightly modified or moderately modified street car, this has proven to be very very reliable. |
| 23:48 | What I'd generally do as well, and it's a little outside of the engine building topic but I always add in an oil pressure sensor into the sensor package on the engine and incorporate this into the ECU with some safety parameters around oil pressure. |
| 24:03 | Basically what I'll do is map the minimum oil pressure I'm comfortable with vs engine RPM and basically if the oil pressure drops below that we'll use that to instigate a fuel cut or ignition cut or both and it can be frustrating, doesn't feel great for the driver but it's also going to be a lot cheaper than an engine that's thrown a rod so that's one way of at least highlighting, doing the best job possible on a relative budget of getting a solution there and improving your oil supply and reducing surge but also building in some safeties there so that if oil surge does still become a problem, you're going to be covered there. |
| 24:46 | Right there are a couple of other little free modifications that we can make and what I'm going to do here is I'll just move our Evo 9 block and I'm going to try and set up our iPhone camera or hold our iPhone camera so we can see this. |
| 25:04 | So bear with me, let's just see what we can do here. |
| 25:10 | Alright so we're looking here at the front of the engine block and this particular groove here is basically where the oil supply comes back from the oil pump after it's gone through the filter and this is our main oil gallery down through here. |
| 25:25 | A little hard to see here but what we end up with is a situation right here where the oil needs to go through 90° and we've actually got a very sharp edge right here inside the block and what I generally like to do is basically use a die grinder and just take the sharp edge off that and what it's going to do is just allow the oil to more smoothly turn that 90° sharp corner. |
| 25:49 | At the same time, we can also use our die grinder to actually just smooth the inside surface here which you can see is just a rough cast finish. |
| 25:56 | Now that's not going to create a massive improvement in our oil system performance but oil is pretty lazy and it doesn't like turning corners sharply so anything we can do that's going to smooth out that path for our oil and make it easier for it to get where it's needing to go, is only going to be a good thing so couple of little things there that we can do, it's not going to really cost you anything, it's just going to take a little bit of time. |
| 26:27 | At the same time, there are basically the same issues we can do to our front cover, so let's just get this under our overhead. |
| 26:38 | Let me see, alright so basically we can see the path that the oil takes, this is coming out of the pump here. |
| 26:46 | Again we've got a 90° sharp corner here. |
| 26:48 | Runs down here, this is where it goes out to the oil filter, another 90° sharp corner, comes back from the oil filter, another 90° sharp corner and then it runs back to that point which we just looked at in the block. |
| 26:59 | So again just a little bit of time with a die grinder on all 3 of those surfaces there is going to just help smooth those out and make it a little bit easier for our oil to get to where we want it to go. |
| 27:12 | Right we've got one more topic we're going to cover off here and then we're going to get into our questions so this is a good time to mention if you've got any questions on anything we've discussed so far, please start asking those in the chat. |
| 27:24 | The last topic I'm going to go over here with the 4G63 is balance shafts and balance shaft removal. |
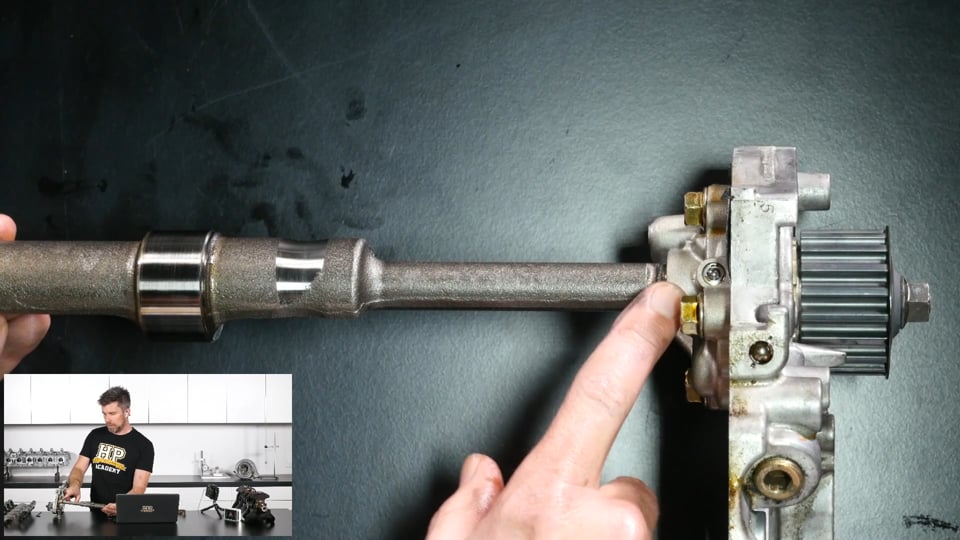
| 27:31 | So we'll just flip our front cover over here and let's just get to our overhead camera and I'll talk about what we're looking at here. |
| 27:40 | So this is our oil pump assembly. |
| 27:42 | This is the drive pulley, so this is actually driven by the cam belt and that drives the gears inside here which is the actual pump assembly. |
| 27:50 | Inside the pump assembly we've got our little driven gear here and that attaches to this balance shaft. |
| 27:59 | Now there's also another balance shaft which runs independently, I'll just get this over a little bit, that runs over here and that's driven off a separate belt. |
| 28:10 | Less of an issue here, we're going to remove that one as a matter of course and we generally will turn the balance shaft bearing inside the engine block to block off the oil hole. |
| 28:21 | You might be wondering, why do we remove the balance shafts? Well it's definitely not an essential element. |
| 28:27 | There have been some reliability problems with the 4G63 engine in terms of the balance shafts. |
| 28:34 | Generally in my opinion, this is probably from very high mileage engines with poor maintenance so inherently they're not a massive problem but removing them can free up a little bit of power and particularly in a race application, it just removes any potential for the balance shafts failing. |
| 28:53 | So two key elements, first of all, the balance shaft that I just talked about that's separately driven from a belt straight off the nose of the crankshaft, this balance shaft runs in a bearing in the block and that bearing has an oil feed coming from the oil gallery so it actually feeds oil internally from the engine block to lubricate this balance shaft. |
| 29:16 | So number one mistake which admittedly I don't see too many people making but it is a potential mistake is to not realise that you need to block off that oil feed. |
| 29:27 | So what we take this balance shaft out, we've basically got an oil leak internally inside the engine block. |
| 29:33 | So there are several ways of dealing with this, the cheapest and dirtiest is simply to press the bearing out, turn it any number of degrees but basically press it back in so that the bearing itself blocks off that oil feed hole. |
| 29:46 | So that one is normally pretty well understood. |
| 29:52 | The other issue though that I saw a lot of, and I've had my own set of failures with this, is the way that we remove this balance shaft that's driven off the back of the oil pump. |
| 30:02 | Unlike the other balance shaft, this one the rear bearing surface on the balance shaft is supplied oil via a hole that runs through the balance shaft. |
| 30:12 | So it's basically being fed oil straight from the oil pump. |
| 30:16 | So the technique that was common for a number of years was essentially just to cut this balance shaft off where it protrudes out the back of the oil pump and then you'd be left with a hole which would obviously be a leak, you'd drill and tap that for a pressure plug, job done. |
| 30:34 | And that can work however I saw that probably about 1 in 5 or 1 in 6 instances when this was done. |
| 30:43 | In time, sometimes a short time, sometimes 20 or 30,000 km of use, we'd end up with an oil pump failure. |
| 30:50 | And the reason for this is that this balance shaft actually does 2 tasks. |
| 30:55 | One of them obviously is to act as a balance shaft but due to the length of it and the fact that it is supported here in the back of the oil pump assembly and then here in the block, it also actually supports that little driven gear in the oil pump. |
| 31:09 | So when we remove this, we don't have the support for the gear and generally when we had these sorts of failures, you'd pull the pump apart and you could see that the oil pump gear in the housing, it had actually been chewing into the housing and it had been removing material, aluminium material from the housing and then pumping it through the engine. |
| 31:27 | So when we sort of saw this was a problem, occasionally, for me I'm not going to take any chances, I want a bulletproof solution and what we did with this is we took this balance shaft here and we had our machinist basically machine off the counter weights. |
| 31:46 | So we'll get this one out of the way because they're basically, for all intents and purposes, the same, let's have a look at this other balance shaft. |
| 31:54 | So you can see the counter weight there on the balance shaft, how it's offset from the centre of the shaft and basically we'd have the machinist just machine everything down so all it left was a shaft that ran up to the back of the oil pump and then we had the support for the shaft that ran in that bearing in the block. |
| 32:15 | So basically a little more work involved in doing that. |
| 32:20 | These days there are companies, I think STM over in the US, STM tune and also GSC both actually provide aftermarket billet options if you don't want to take the existing shaft to a machinist. |
| 32:33 | They certainly look a little bit nicer but for all intents and purposes, they're achieving exactly the same aim. |
| 32:40 | So that's just going to give you that support and that piece of mind that you're not going to end up an expensive oil pump failure. |
| 32:47 | I've seen this happen on engines where essentially it's cost the entire engine so it doesn't end particular well and it's something we definitely want to make sure that we're on top of. |
| 32:59 | Alright so that concludes the lesson there. |
| 33:02 | Those are my pro tips from the 100s of 4G63s we've been involved with over the years. |
| 33:08 | Nothing particularly earth shattering but definitely some little tips and tricks that you can apply. |
| 33:16 | Actually there is one more topic I just briefly will talk about here, which is also our oil grade and our bearing clearance. |
| 33:23 | So this is again not Mitsubishi specific, this is really across any performance engine. |
| 33:28 | If we're building an engine that's going to be at or relatively close to stock power and RPM levels, typically, unless there is a known problem with the engine, and the 4G63 there simply isn't, there's really no reason to stray from the manufacturer's recommendations in terms of our bearing clearances. |
| 33:47 | On the other hand, when we start really increasing the power levels and RPM, what we find is that the components, the block, the crankshaft etc, will end up flexing much more and we can be, there can be a benefit here to increase the bearing clearance a little bit and when we do this, just gives a little bit more room for those components to flex without metal to metal contact. |
| 34:10 | When we do this though we do need to also consider the grade or weight of oil that we're running because the oil clearance, the bearing clearance does dictate to a degree, in conjunction with the viscosity of oil we're running, what the oil pressure is going be. |
| 34:26 | So generally with the drag engine program that we were running, we were running the clearances somewhere in the region of about two thousandths of an inch on the big end and two to 2.5 thousandths of an inch on the mains which is around about, just a bit over half a thou looser than Mitsubishi's recommendations, although still within the upper limit. |
| 34:48 | And with that we would generally go one or two steps thicker in the oil viscosity and what we're generally doing here is aiming for something that would give us around about the old golden rule of thumb of 10 psi oil pressure per 1000 RPM so generally 6000, 7000 RPM I'd like to see about 60 maybe 70 psi and that's something we can obviously monitor and adjust as we actually see what oil pressure we're getting. |
| 35:14 | Alright so let's get into our questions now, first one from Damian, is it possible to check the crank walk while the engine is in the car or does it require a certain amount of disassembly? No it can be done, it's a pain in the ass to be fair but what we can do if we can a dial gauge onto the end of the crank snout which in itself is problematic when it's in the car and we can get a pry bar between the fly wheel and the back of the block which requires the inspection plate being removed from the transmission. |
| 35:45 | And likewise we can get a pry bar at the front of the engine in behind the crank pulley. |
| 35:50 | We can do a pretty thorough job of checking the end float with the engine in place. |
| 35:57 | It's not quite as accurate as doing it with the engine disassembled in the workshop but it's definitely going to tell you accurately enough whether you've got a problem. |
| 36:10 | On that note, when you do have a thrust bearing problem, thrust wear crank walk problem, instead of maybe the 8-10 thou of end float that you should have, you're going to be ending up with 20, 30, 40 thou or more so I mean it's not a small difference, this is a lot of wear, this is a lot of movement. |
| 36:30 | HAC has asked, thoughts on alleviating over oiling into the head and reducing blow by? OK in the 4G63 we do run a hydraulic lifter so the oil supply to the cylinder head is quite critical to the hydraulic lifter so I do think that a little care is needed here. |
| 36:53 | I know that this is a common problem with a lot of popular engines, the Nissan RB26 is a classic one there where in stock form we've got an over supply of oil up into the cylinder head, this is made worse by the fact that it's got relatively poor oil drain back out of the head so one of the common modifications there is to fit a restrictor into the oil gallery feeding to the cylinder head. |
| 37:18 | I have never done that with the 4G63, even in the drag engines that we have converted to solid lifter so in my opinion it's less of an issue for the 4G63 and I don't see the problems with oil drain back into the crank case with the 4G63 either. |
| 37:34 | Just something I haven't done myself. |
| 37:36 | Alvin has asked, is it possible to have your machinist modify an Evo 1-4 block to replicate the 5-9 style thrust bearing? And would this probably fix the issue as well? It's quite possible you could do. |
| 37:50 | I haven't looked into doing it myself basically we came up with the solution that I've gone over here. |
| 37:59 | It worked, it was in my opinion bullet proof so I kind of didn't really see the need to reinvent the wheel and try and go further. |
| 38:07 | I was also doing this when the Evo 1, 2, 3 and 4 were still relatively new so we hadn't moved into the point of modifying the Evo 5 onwards engine and realising that Mitsubishi had solved this problem themselves either so yeah I can't say it wouldn't be possible. |
| 38:26 | There's not really a lot to it, actually I'm just trying to think now, it may be an issue because I don't know if there would be enough material on the Evo 1 through to 4 block to actually machine the recess into the block to support that thrust washer but again haven't looked into it too much further so I can't give you a solid answer on that sorry. |
| 38:49 | Chris has asked, can you address restricting oil to the cam buckets when one converts from hydraulic to solid? OK so I've already really answered this, 4G63 does not run a bucket, it is a roller rocker so yeah again answered that question already. |
| 39:08 | Mind block, what do I think about Peterson external drill oil priming pump or something like an Accusump for start ups? In terms of a dry sump pump, once I had one of those on an engine where we could drop the belt off and actually spin the pump over, absolutely great for priming the oil system prior to the first start up. |
| 39:34 | Or if you've done an oil change. |
| 39:35 | The reality is once you've got the engine primed for the first time, it is a little bit less of an issue but it is still nice to have. |
| 39:42 | I haven't run the product you're talking about with the external drill oil priming pump. |
| 39:48 | Accusump will do the same thing as well and the Accusump is a nice safety parameter I didn't talk about with the modifications there to the sump as well but yep absolutely that would help. |
| 39:59 | One of the things I would say is that the worst thing I think you can do with any of those engines that are prone for thrust bearing failure, the Evo 1 through to Evo 4, is start the engine with your foot on the clutch. |
| 40:16 | This is obviously something that now a lot of cars actually have an inhibitor and you can't start the engine, it won't crank over until you've got your foot on the clutch but particularly that is a habit that a lot of drivers get themselves into, they'll also sit at a set of lights stationary for an extended period of time with their foot on the clutch, I try and educate people out of doing that on those particular engines because obviously they've already got a known problem so we want to do everything in our power to reduce the potential for that sort of issue. |
| 40:49 | Next question comes from Suhas who's asked, how was my flight exam? It was great thank you, I passed so pretty stoked on that, one step closer to my pilot's license. |
| 40:58 | What is the ideal location to mount your oil pressure and temperature sensor? Can you reiterate about the crank sensor you mentioned? OK I'll get to your questions individually so the best location to mount the oil pressure sensor, generally a position which is easy to get to, you're really wanting to monitor the oil pressure that you're getting at the main oil gallery. |
| 41:20 | Now sometimes that's easy because there will be a fitting directly on the block that gets access to that main oil gallery but the reality is in most instances what we're going to be doing when we're fitting an oil pressure sensor is replacing the factory oil pressure switch so that's the factory switch that just brings on your low oil pressure light on the dash, that's normally something that will trigger at about 10 or 15 psi. |
| 41:44 | That's normally a good enough location, often that will be either on the main gallery on the block or it will be on our oil filter housing. |
| 41:51 | Temperature, again sometimes just where you can get access to it. |
| 41:57 | I generally like to monitor the temperature of the oil in the sump, that's a pretty good indication of what's going on there. |
| 42:04 | The sensor that I mentioned, I'm guessing what you're talking about here was the crank sensor, so Evo 4 onwards run a crank sensor so they also run a camshaft sensor for engine position but the crank sensor essentially is a 4 tooth trigger. |
| 42:20 | It's got a optical trigger I think from memory, that bolts to the oil front cover assembly. |
| 42:27 | So actually we'll be able to see down here that's where that sensor bolts on, those two bolts there. |
| 42:35 | The plate bolts to the front of the crankshaft or is sandwiched to the front of the crankshaft and spins through that sensor so if you get enough end float, you're going to end up with that chopper disc essentially taking out that crank sensor. |
| 42:50 | Going with Suhas's other questions, will oil gear upgrade improve the condition? I think the oil gears are one of the most, market pushed parts. |
| 42:58 | I have never run anything other than factory oil pump gears for the 4G63. |
| 43:04 | I'm not entirely sure if aftermarket gears are even available. |
| 43:09 | I could be wrong but basically we ran these in engines making over 1000 wheel horsepower and up to 10,000, 11,000 RPM and had no trouble with them so my opinion, if it isn't broken, don't fix it. |
| 43:20 | There are a couple of reasons why oil pump gears on other engines are problematic. |
| 43:25 | A lot of them are made out of relatively cheap to manufacturer sintered material and it's also driven off the crankshaft and in that case, harmonics from the crankshaft can actually cause those to shatter so again going off our topic today, the RB26 is a really good example, if you take that factory oil pump and you spin it above about 8000 RPM, they are known to fail. |
| 43:48 | So yeah not an issue with the 4G63. |
| 43:53 | Jeremy's asked, does modifying the oil passages reduce oil pressure? No it won't reduce the oil pressure, the only thing that will reduce oil pressure is if we introduce a larger leak, basically make it easier for the oil to get out which will happen if we increase our bearing clearance. |
| 44:09 | Barry's asked, what are your views on running the stock oil pump up past 10,500 RPM? How is your oi pressure at those RPMs? The stock oil pump gears just seem to tap out whenever I've tried it. |
| 44:20 | OK so what I actually did with my own engine when I was still running wet sump is I was a little concerned at this, I've since proven that it does still work but obviously we've got an engine with an oil pump that was designed to spin at 7000, 7500 RPM maximum so we're taking that 3000 odd RPM beyond where it was intended. |
| 44:44 | So what we did was we actually had a machinist make up a larger diameter drive pulley for the oil pump and basically slowed the oil pump down. |
| 44:57 | There is a bit of a balancing act here because obviously you're slowing it down which works great at the higher RPM but you still want to be able to generate enough oil pressure at idle. |
| 45:08 | There's an argument that the oil pump actually over supplies oil anyway. |
| 45:12 | In my instance I had an idle speed of about 1800, 1900 RPM with our methanol fueled 4G63 so oil supply at idle, not an issue but yeah I did actually find that it worked really well. |
| 45:26 | The 2.2 litre stroke 4G63 we built to claim the late model Evo world record though, that actually retained a factory oil pump gear and again we revved that to 10,500, no problems. |
| 45:41 | Next question, what's your take on redirecting or even using the OE oil jets? OK so the factory under piston oil jets, there's a lot of debate here, should we keep them, should we remove them? The argument for removing them is that removing those means there's more oil available for the bearings. |
| 46:01 | The argument for keeping them is that they do a pretty good job of cooling the underside of the piston. |
| 46:08 | I have retained those in all the 4G63 engines I've built, I don't have bearing problems so I don't see the necessity for removing them if you are trying to increase the oil pressure so that's my take on it. |
| 46:23 | I don't see a reason to remove them. |
| 46:29 | Next question comes from Matt who's asked does running big cams reduce vacuum that prevents oil getting back into the sump? OK so if you're running large cams with a lot of overlap, that will reduce your inlet manifold pressure, particularly at idle you're likely to have a reduction in inlet manifold pressure. |
| 46:51 | But I can't see a correlation with the oil getting back into the sump. |
| 46:56 | That's really the pressure in the sump that's a consideration there so yeah I'm not sure if that's the angle you're taking with that question there. |
| 47:07 | Barry's asked, have you considered increasing the diameter of the oil pickup tube and widening the gallery to the oil pump gears in the pump itself to improve the oil flow? I haven't seen a need to do this, again I sort of work on the basis of if it isn't broken, don't fix it. |
| 47:26 | I address the problems that I see and I haven't really seen problems with actually getting the oil from the sump into the oil pump itself. |
| 47:38 | Provided that the issue is more about keeping oil around the pickup so yeah not a modification I've made sorry Barry. |
| 47:50 | The next question, what is your take on moving the oil feed for the turbo from up top to below at the filter? Yeah so the oil feed in stock situation is from the cylinder head. |
| 48:05 | Yeah we can remove it, one of the problems which we do see a lot with turbochargers is an over supply of oil so Mitsubishi have obviously done the sums there and worked out what volume flow of oil was required for the turbocharger. |
| 48:21 | Basically the location they take that off at the head, there is going to be a reduction compared to if you were taking that from the oil filter housing for example. |
| 48:32 | You're going to have higher pressure at that point. |
| 48:35 | So there's ways around this, there's no right or wrong, it really depends, this is what I would consider normally a packaging consideration you can run restrictors in the turbochargers and a lot of them come with restrictors in order to do that. |
| 48:48 | Alternatively Turbosmart even make a oil pressure regulator for the turbocharger itself to maintain a consistent oil pressure and bypass extra oil back down into the sump. |
| 49:00 | Next question comes from Shotas who's asked, did I ever grind the oil galleries on the block to improve oil pressure? So no the oil gallery in the 4G63 is more than ample. |
| 49:13 | There are a few engines where the factory oil gallery size is a little bit marginal and yes it's a really good idea to enlarge that and improve it, the 3SGTE is one of those engines where that is a common upgrade but not on the 4G63, more than adequate in stock form. |
| 49:35 | Next question comes from Kenny who's asked, at what level are the basic 4G63 oil upgrades in terms of crank scraper, pan etc, not enough and a dry sump's needed. |
| 49:48 | It's not really the engine that is the consideration here. |
| 49:54 | It's more around the way the car's going to be used, the way the engine's going to be used. |
| 50:01 | So I mean if you're tracking the car hard and you're consistently pulling 1.4, 1.5 G lateral, maybe 1.6 to 1.8 G under braking, that's the sort of situation which is going to make things harder. |
| 50:16 | It's not to say you can't get around it, you absolutely can, it's just a case of it's going to require a really thorough job of going through and developing the sump in particular in order to make sure that you're always getting oil back around that pickup. |
| 50:35 | Max has asked, I've encountered issues with non OEM oil pump assemblies available for the 63 and 64 engines, have you encountered issues before? I have never ever used an no OE oil pump. |
| 50:49 | It's just not an area that I really want to be rolling the dice and trying to save a few dollars. |
| 50:57 | Yeah the factory parts, I've been building these engines for probably the better part of 20 years, and the factory oil pump has never let me down so I'm a big believer in using factory parts where possible. |
| 51:10 | The obvious exception is where we're looking at upgrade parts but if you're talking about generic, maybe Chinese aftermarket components to replace factory, it's not something I would be risking. |
| 51:24 | Arnold has asked, is it possible to have too much oil pressure by upgrading to a 12 mm pump on a Subaru EJ? So yeah too much flow is definitely a potential issue, you do have an oil pressure regulator built into the sump so the idea with the regulator is it's going to bypass additional oil back into the sump so it should do a reasonably good job of controlling the oil pressure. |
| 51:50 | However by virtue of this, even if you go to a larger pump that's going to be pumping more volume for a given RPM, you will naturally see the engine oil pressure rise. |
| 52:00 | On an EJ series engine that might not be the worst thing in the world but yeah there's just so many other aspects that will depend on this. |
| 52:09 | Remember as well you do have another lever available to pull in terms of adjusting your oil pressure which is also to adjust your oil viscosity so if your oil pressure is a little bit too high, then you may want to drop to a lighter grade of oil. |
| 52:23 | Generally though in a race application, you do also need to, or an engine application which is going to be driven hard, you do need to consider what the oil pressure is going to be doing when the oil is very hot because obviously the oil pressure will drop off. |
| 52:37 | Case in point, our Subaru FA20 in one of our track cars, factory oil viscosity for that engine is a 0W20. |
| 52:46 | Because we're making about twice the factory power, we're running a 10W40. |
| 52:52 | That gives us the oil pressure we want at 110, 115°C oil temperature on track, we're getting around about that 10 psi per 1000 RPM. |
| 53:04 | However, particularly on a very cold day, if we start that engine, if we were to rev it up to 5000 or 6000 RPM, we see the oil pressure spike well over 100, 110 psi so that's a little bit scary and that's a case of understanding what you've got. |
| 53:18 | Obviously that car, we're very thorough about how it's warmed up before it's ever driven at high RPM. |
| 53:24 | Alright that is all the time we've got for questions there. |
| 53:27 | Thanks to everyone who has joined in. |
| 53:29 | And remember if you are watching this in our archive, if you've got further questions, please ask those in the forum, I'll be more than happy to answer them there. |
| 53:37 | Thanks for joining us and we'll see you next time. |


