278 | Using Tyre Pressure Monitoring Systems
Summary
Tyre Pressure Monitoring Systems have become commonplace in both the OEM and motorsport world. In this webinar we’ll discuss what data they can give us and how to make use of it.
| 00:00 | - Hey team, it's Tim here from RaceCraft, welcome to today's member's webinar where we're going to be talking about tyre pressure monitoring systems. |
| 00:07 | Now tyre pressure monitoring systems are something that have become really ubiquitous in both road and racecars as the technology has evolved. |
| 00:14 | It's probably technology that's most firmly rooted in the OEM or the road car world and as the components have become smaller, lighter, more reliable. |
| 00:23 | These naturally bled into the aftermarket motorsport world and it's something you see pretty widely on all sorts of different racecars these days. |
| 00:31 | Now tyre pressure monitoring systems, almost always you'll see them referred to as TPMS systems, the trick to what they're doing is in the name. |
| 00:40 | Their primary purpose is to measure the tyre pressure while you're on track. |
| 00:44 | So there's a couple of different ways that can be used, that can be being displayed to the driver, it can be being displayed to the engineers back in the pits if you've got live telemetry but most of the time it's almost always being logged with the onboard logger. |
| 00:55 | Now there's all sorts of different versions of TPMS, different things they're reading, different ways they can work, different ways they're installed and we'll go through some of those today but it is an exceptionally useful thing when it comes to motorsport data analysis to be able to understand the tyre pressure you've got at every point on track. |
| 01:12 | So obviously conventionally you've usually got, I should say in a more old school perspective the way to keep track of your tyre pressures is to be using a tyre pressure gauge when the car comes back into the pits, so you've gone out, you've done your run, you come back into the pit lane, you've got either yourself or hopefully a helper that can run around straight away and take all the tyre pressures as soon as you arrive back in the pit lane. |
| 01:31 | Now that's absolutely still a valid thing to do, it's something that you'll see done at almost every level of high end motorsport, you'll still see people running around with a tyre pressure gauge, manually checking those things. |
| 01:43 | There's still lots of value in that but a tyre pressure monitoring system is really giving you a different perspective because it's able to give you the whole span of what's happening to the tyre pressures as you move around the track and that ties both to how the tyre pressures are evolving over a run but also what's happening as they're evolving throughout each part of the lap which can be a really interesting piece of data to use. |
| 02:04 | So like I mentioned there are a couple of different ways, a couple of different types of measurements that tyre pressure monitoring systems do. |
| 02:11 | Obviously primarily their first port of call is pressure. |
| 02:14 | They're obviously measuring the tyre pressure. |
| 02:16 | Some of maybe the less obvious ones, and I should preface this by saying, there's all sorts of different tyre pressure monitoring systems out there and all of the different measurements we're going to go through here don't apply to all of them, sometimes it's just the basic ones, sometimes some of these more advanced functions are going to apply to some of the more expensive or more high end sensors. |
| 02:34 | The second thing you'll often see on a tyre pressure monitoring system is the ability to measure temperature. |
| 02:40 | So there's a couple of different types of temperature we need to talk about because that is maybe a little bit ambiguous when I talk about temperature but primarily the most common ones you'll see are either rim temperature or internal air temperature. |
| 02:53 | So rim temperature is a really, can be a really useful metric, probably the primary one in terms of tyre pressure monitoring systems is to make sure that the sensors themselves, because they're mounted to the rim, I will get to some of the practicalities in a second, because they're actually mounted to the rims, they are quite sensitive to temperature, if they get too hot it can damage either the sensor or in particular the batteries internally themselves. |
| 03:15 | But even probably more important than that is the internal air temperature. |
| 03:18 | So probably the most important metric when it comes to monitoring, when it comes to setting your tyre pressures, obviously we're setting a cold pressure normally when we're setting the tyres at the start of the day and then we're anticipating, we're calculating or anticipating what the hot pressures going to be and that's what we're using to set those cold pressures. |
| 03:37 | So the primary metric when it comes to working out the relationship between cold pressure and hot pressure is the change in temperature, the temperature inside the tyre is really the dominant, or the temperature of the gas inside the tyre I should say is really the most dominant thing that's controlling the internal air pressure of the tyre. |
| 03:52 | So being able to measure the exact air temperature we have inside the tyre, it's not only telling us something about how hard the tyre is being worked, it's actually telling us a lot about how the pressure growth relates to the temperature growth and we'll go through all of this data later on in the webinar. |
| 04:07 | Some of the other more interesting things that you'll see in higher end sensors are things like humidity measurement. |
| 04:15 | So if you've got any humidity or the level of humidity you've got inside your tyre makes a massive difference to how much pressure growth you get for a given temperature change. |
| 04:25 | So what I mean by that, if you've got a perfectly dry, zero humidity, theoretical case, it's very easy to calculate the pressure change you'll get for a given temperature change. |
| 04:34 | So if we know the change in gas temperature, then we know what the pressure change will be. |
| 04:39 | Now if you start adding humidity into the mix, that ends up stuffing things up a bit because as you add humidity, you end up getting more pressure growth for a given temperature change. |
| 04:49 | So the reason that's really important is often you'll be in a situation where you've been working through your pressures throughout the weekend, you've been tweaking, throughout the race weekend I should say, you've been tweaking them as you go, maybe you send one set out one new set of tyres out and they have a pressure growth that you didn't expect, maybe you've got one tyre that's got a whole lot more, maybe it's given you a 2 or even 3 pounds higher, a whole lot higher than you expected and you're sort of left thinking, was that a mistake by me? Was it a mistake in the documentation or by the tyre guy or what can often happen is if you've got a whole lot of humidity in that tyre that you didn't expect, that can often be the cause of that unexpected pressure growth. |
| 05:25 | And so that's why being able to measure directly the humidity that you've got inside the tyre is really important because it just helps you troubleshoot the cause of any tyres that are increasing in pressure much more than you expect. |
| 05:37 | The last really useful measurement that they can give you, tyre pressure monitoring systems can give you is actually in using internal infrared sensors to take a scan of the inside surface of the tyre. |
| 05:48 | So we're just going to jump across to the overhead camera here. |
| 05:51 | I just want to talk about, just give you guys a little bit of a sketch and exactly what I mean by that. |
| 05:55 | So if we've got, let's say the, looking from a cross section of the tyre here, so let's say this is the top surface of the tyre here and these are the side walls. |
| 06:04 | And we've got a rim in here, however it looks and the sensor will typically be mounted somewhere in this region here and this will be usually part of the valve stem and I'll go through a couple of examples I've got sitting here on the bench in a second and show you guys those. |
| 06:22 | But essentially, this is the valve stem that you'll be attaching your pressure gauge to or where you'll be inflating and deflating the tyre through. |
| 06:29 | The idea here is that there's an infrared sensor mounted in here and the idea here is that we're measuring the temperature distribution across the inside surface of the construction. |
| 06:38 | The reason that's really important is because the way the construction is loaded and deformed, it's telling us a lot about which part of the tyre is working. |
| 06:44 | This is similar to taking an external measurement with a tyre pyro that you'll be doing, you often see people taking an inside, a middle and an outside measurement with a tyre pyro but this is giving us live on track and it's also measuring the construction so it's actually a lot more useful measurement. |
| 06:59 | so what's going on here, we've got this little sensor that's pointing up at the surface and essentially we've got an array of sensors and depends on the model and the type and brand of the sensor but essentially each one of these bands that's pointing out here is giving us a different measurement. |
| 07:14 | So you can have very few of these of these bands but typically in modern sensors you usually run up to 16 of these bands that are distributed amongst the tyre, that gives you a huge amount of resolution. |
| 07:29 | Typically you'll be maybe practically speaking you'll only be breaking this down into maybe as many as 5 bands across the tyre, 5 sections that we're interested in, so we want an inside, a middle, an outside and a section in between those two, that's giving us plenty of resolution to understanding how the tyre construction temperature is evolving. |
| 07:49 | So typically these sensors have a little bit of adjustability so you can sort of clock them, rotate them around to get these channels pointing in the direction or the part of the tyre that you're wanting. |
| 08:00 | Obviously also having 16 channels is also giving a much range of tyre width and tyre sizes and rim geometries and all sorts of different ways that thing can be mounted, it's giving you much more resolution to being able to reach each different part of the tyre. |
| 08:14 | So that's what I meant by internal infrared temperature measurement which is absolutely a really interesting piece of data and really powerful when it comes to tuning both your wheel alignment and your tyre pressure settings and I've actually got some data that I'll go through a little bit later to give you guys an example of the 16 channel internal infrared tyre temperature measurement. |
| 08:33 | So now I just want to talk about some of the practicalities of a tyre pressure monitoring system. |
| 08:38 | Here I've got a, if we go back to the overhead, I've got a couple of different examples of some tyre pressure sensors. |
| 08:45 | So this is one here fitted with a valve stem that you guys would be probably pretty familiar with already. |
| 08:50 | So the idea here is that you've obviously got the tyre removed, this thing, basically you remove your original valve stem and this entire assembly is going to replace that. |
| 08:57 | So this is the rim surface here, so this part is completely hidden. |
| 09:02 | This is where the tyre will sit over top here normally and the rim and this is the part you'll see from the outside with the valve core and everything. |
| 09:08 | So typically the way they work and the way this one works, this is a completely hollow valve core, you can actually kind of see down there, you can see it goes right through, all the way through to the paper under there. |
| 09:17 | This is a completely hollow valve core and the pressure sensor will be, typically have an inlet somewhere on the body itself and if there's any extra sensors things like temperature, or infrared, they'll be mounted out here and this is where you'd be having that array looking across the tyre surface. |
| 09:34 | This particular one is actually broken which is quite nice because it actually shows the batteries, how the batteries are mounted in there and there's a couple of really simple little NiCad batteries, really old school style battery that typically these are fitted with, that's actually a good point to mention as well is that there are all sorts of different geometries of these sensors and all sorts of different ways that they're powered as well so some of these sensors will have replaceable batteries and some of them will quite often, they won't have replaceable batteries so both of these examples I've got here have built in batteries, essentially you can see that they're permanently epoxied in there, once this thing is manufactured from the, comes from the factory, without a whole lot of work, which is probably not really worth your time considering how much work it takes to reliably change these batteries, once those batteries run out, they are pretty much complete junk. |
| 10:26 | The typical life on these batteries is in the range of sort of 2 to 4 seasons depending on how much you're using them, depending on the sensor and the system itself. |
| 10:36 | The other important thing to understand about this battery life is that there's a whole lot of different logic that different manufacturers will use to control whether the sensor is on or off. |
| 10:45 | So obviously we want these things on when we're on track but when they're in storage or they're not being used, they've usually got some logic to turn themselves off or put themselves into a bit of a sleep mode to save a whole lot of battery life. |
| 10:58 | Now that logic can be based on wheel speed, so they can have a little accelerometer placed on them so that means they won't actually turn on until the wheel starts moving. |
| 11:04 | They can be based on linear accelerations, they can be based on being manually turned on and off with a little hand held remote. |
| 11:14 | They can be based on whether they've got pressure in them so the idea there is that if you want them to be turned off, the idea is that you would either strip the tyres or just remove the pressure from the tyres. |
| 11:25 | So if they sense they're at ambient pressure, then they'll turn themselves off. |
| 11:28 | So there's all sorts of different strategies, every manufacturer's a little bit different but the idea here is to keep the batteries lasting as long as possible. |
| 11:35 | There are also some versions where you can, they're made with a little section that's made to be serviced so you can pull the side off it and they're designed to have the batteries replaced. |
| 11:45 | They're a little bit newer, most of these, in my experience most of these boast in the OEM and certainly in the motorsport world, tend to be a throwaway item, we treat them as a consumable. |
| 11:53 | They can be quite expensive, running between anywhere between $50 and $250 USD per sensor depending on the model so they definitely are a pretty pricey thing but in terms of a racing budget in a professional racing team, that's not actually a particularly big expense even if you're only getting 2 seasons out of them. |
| 12:09 | So that's a little bit of the layout of how these sensors actually work. |
| 12:13 | The other thing I want to talk about is how the, a couple of the sensing technologies, sorry a couple of the wireless technologies that they use. |
| 12:22 | So if we just jump across again to the overhead again. |
| 12:25 | So they're basically 2 different styles, there's a non flexible and a fully flexible system. |
| 12:35 | And I'll go through what I mean by that. |
| 12:36 | So in a non flexible system, we're looking overhead here of all four corners of the car. |
| 12:43 | So that's the front of the car there, all 4 tyres. |
| 12:46 | A non flexible system typically you've got each one of these sensors will be pre programmed as to be working on one corner of the car. |
| 12:55 | So for example if this particular sensor here, if I was fitting it to the left front, I would be taking, usually there's some sort of remote or some sort of interface to access the memory in these and program them. |
| 13:07 | I'd be hard coding that as a left front, I'd be doing the same for the right front and as we move around the car and that means, there's a couple of pros and cons of that, one of the pros is that it means the sensor on the car can be a little bit simpler, the wiring can be simpler, there's less components involved, these are working over a radio frequency. |
| 13:28 | So this means we need a little transmitter and we need a receiver in the car and it's working on a conventional radio frequency band, I think from memory they're in the 300 to 400 MHz range they're normally working in. |
| 13:39 | A non flexible system, because each of these sensors is pre programmed as a left front or a right from or a left rear or whatever it is, that means I need usually one antenna in the car and the idea here is that we've got much less wiring, this can run straight back to the logger or the ECU, however you're doing your logging and you've got a much simpler setup as far as the radio frequency from each one of these corners getting picked up. |
| 14:05 | In a fully flexible system as you might have guessed, that means we've got a completely dynamic system where we have either a front, so there can be a front antenna and a rear antenna but also you've typically got a trigger in each corner of the car and the idea here is that each one of these sensors, that can be placed onto any position of the car and each one of these triggers will, essentially there's a couple of different strategies manufacturers use for this but essentially each one of these triggers allows, based on the strength of the radio frequency it can pick up which corner or which one of the sensors is closest to each corner of the car. |
| 14:48 | So again this is one layout where you've got triggers and antennas, this is also a different version where you've got a single antenna and triggers on each corner and there's also an even more advanced sensor setup where you've actually got an antenna on each corner of the car like this. |
| 15:04 | This is a much more expensive system, there's a lot more, the components themselves are much more expensive, the wiring's obviously a lot more involved. |
| 15:10 | But the reason, one of the reasons that people do this is where you've got a setup in a car with a lot of composites, particularly carbon fibre and the downside with that is that carbon fibre tends to block radio frequencies so in that particular situation, having one antenna, one central antenna tends to be pretty weak and it can end up blocking the signal so much that you don't even read anything from the tyre pressure monitoring sensor. |
| 15:36 | So for this reason, particularly, this is something you'll see particularly on prototypes, certainly you'll see it a lot on really high end GT cars where they've got lots of carbon fibre used either in the body work or in the inner guards and stuff like this. |
| 15:49 | This is often a place where you'll see an individual antenna fitted to each corner of the car rather than having a central one or even one at the front and one at the rear. |
| 15:56 | Just to help boost the signal that it receives from the tyre pressure sensor. |
| 16:01 | So that's a little bit of the architecture about how those systems work. |
| 16:04 | There's all sorts of manufacturers putting these out now. |
| 16:08 | You'll also see, there is actually one other variation which rather than being an internal sensor, it's actually more like a cap so it's actually like an external, almost like a valve cap so you have your completely original valve stem, the idea is that you wind the sensor on from the outside and it replaces your valve cap. |
| 16:25 | Now that is a system that works, it's not my particular preference, from my perspective it's a little bit dangerous as far as having something bulky hanging outside the tyre, it probably introduces a lot more chance of damage or deflation or anything like that. |
| 16:40 | Now I'm sure there's a time and a place for it in professional motorsport that's not my opinion of where it should be used, I'm much more of a fan of using a proper integrated internal sensor. |
| 16:50 | And the benefits that they bring. |
| 16:53 | So some of the practicalities I also wanted to cover as well. |
| 16:56 | You do have to be careful when taking tyres on and off. |
| 16:58 | If we look at this, let's say this is the outer surface of the rim here, that's the outside of the rim, this is the inner rim surface. |
| 17:07 | So this is in quite a vulnerable position for using something like tyre irons or tyre bars when you're levering the tyres on and off the bead. |
| 17:13 | This is something that you have to be really careful of. |
| 17:15 | So if you're doing your own tyres, that's usually not so much of a problem. |
| 17:18 | If you're taking your tyres to a tyre shop or if you've got let's say at large race events, all the tyres are usually fitted by the tyre supplier. |
| 17:26 | So they've got a tyre fitting service so the teams don't typically fit their own tyres. |
| 17:30 | Typically they'll be fitted by the tyre supplier themselves and it's always worth mentioning to them, depending on how experienced they are with tyre pressure monitoring systems, my personal preference is to always just make sure that they know that there's sensors in those rims because it is really, can be really expensive if they go and lever off these things. |
| 17:50 | They're relatively fragile, they're usually made of plastic. |
| 17:54 | Doesn't take much to damage them and if you're up for $250, $300 a sensor each time they pop one of these things off, it can end up not only being a frustrating exercise as far as you missing that data, it's also a really expensive exercise and a becomes a bit of an argument over who's going to pay the bills in my experience so it's definitely something I encourage you to do is be careful with these things. |
| 18:14 | And as I mentioned before, one of the other really important practicalities is of the battery replacement. |
| 18:19 | So these batteries, they do have a finite life so if you are looking at buying a tyre pressure monitoring system it is worth considering whether the batteries are going to be replaceable or not, whether they're built into the, completely built into the sensor and not designed to be accessed by the user or whether they can be replaced by the user or not because that does have an impact when it comes to replacing those batteries, if you're up for replacing the sensor and particularly you've got a really high end sensor, that becomes a really expensive process if you're up for replacing the sensor every time the batteries go flat. |
| 18:51 | The other practicality that's important to talk about with the the batteries is that I touched on a little bit earlier is the temperature resistance. |
| 18:57 | So in my experience when these things start giving problems, it's usually because of temperature damage to the batteries. |
| 19:04 | So the typical style of really cheap NiCad battery that you typically have in these sensors, they aren't very resistant to high temperatures so in my experience, temperatures over 120, 130°C range, that's when you start to degrade the battery life quite considerably. |
| 19:21 | In previous race teams when we've had problems with tyre pressure monitoring systems and we've gone to try and diagnose what's going on, that was sort of the 120 to 130° mark is when we started to see pretty consistent drop offs in tyre pressure sensors and that would typically be happening at tracks where we had really high braking loads and relatively low brake cooling as well. |
| 19:41 | So things like street circuits where you don't have a lot of nice fresh air being fed to the brakes, it ends up, that temperature ends up being soaked in through the uprights into the hubs, into the rims and then into the sensors themselves so that's definitely a practicality you've also got to be careful of as well. |
| 20:00 | So guys, that's a bit of a basic wrap of what a tyre pressure monitoring system is and how it works. |
| 20:08 | I'm going to be going through the data next but I just wanted to say if you have got any questions about anything that's come up, either throughout today's webinar or car setup or data analysis questions in general, now would be a great time to put those in the chat and Luke will put those through to me when I've got through a little bit of the data analysis section as well, I'll be happy to jump on whatever questions you've got. |
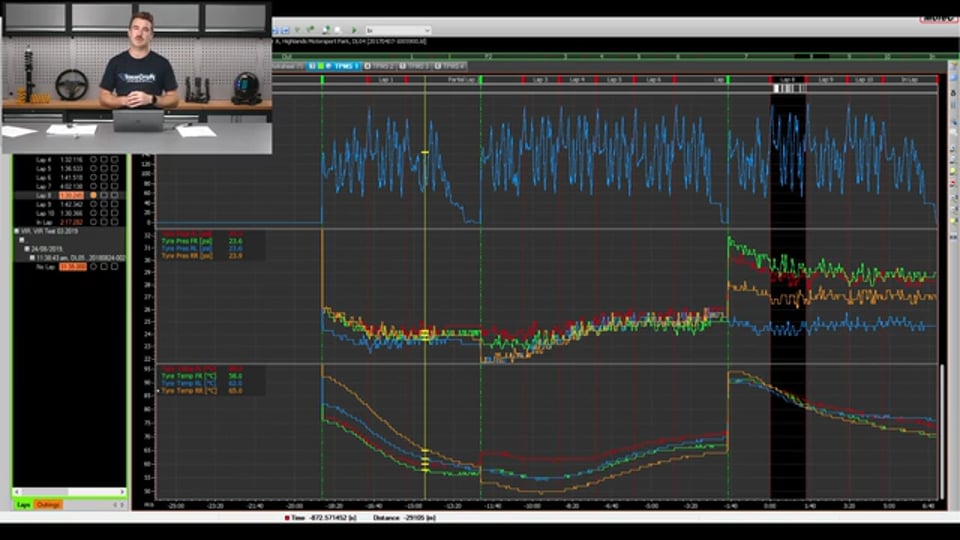
| 20:28 | So if we just jump across to my laptop screen again I've got MoTeC's i2 software here and I'm just going to go through a couple of different examples of different data from different sorts of tyre pressure monitoring systems. |
| 20:41 | So the first one I've got up here, I've got a couple of different channels showing. |
| 20:46 | I've just got my speed trace shown at the top here and I've got my tyre pressure and then also my tyre temperature shown here. |
| 20:55 | So in this particular setup for this particular car, this has got a relatively simple TPMS system. |
| 21:00 | Something actually really similar in style to this where it's just a simple pressure and then internal air temperature measurement. |
| 21:08 | So we've only got 2 streams of useful data coming off each one of these sensors. |
| 21:11 | So this is, you can see, I've got the speed trace here to give us a little bit of context. |
| 21:16 | So you can see this is a run and then they've come into the pit lane here and they've gone out for another run and they've come into the pit lane and they've gone out for another run here so there's 3 separate runs and straight away what's really clear is that you've got each one of these tyre pressures having a bit of a step change between the car going in and out on track. |
| 21:34 | So this particular car is something that runs with pre heated tyres. |
| 21:40 | So this is a car that uses tyre ovens. |
| 21:42 | So we have all of the tyres either in blankets or in the ovens depending on the type of tyre and we pre heat them before the car goes on track. |
| 21:50 | There's a couple of different reasons, one is that, well straight away the performance of the tyre is up to temperature straight away so it tends to come on and start working a lot quicker. |
| 21:58 | The other thing is a safety reason as well, so not only is the tyre ready to start working, it's also up to, it's much closer to being able to produce grip which means it's much less sketchy as far as getting the car to work when the car goes out on track. |
| 22:13 | It's also a safety thing in terms of having the pressures up. |
| 22:18 | So when you pre heat the tyres, so we pre heat them in the oven and it'll depend on the brand of tyre but that might be anywhere between 80 and 90°C that we'll be preheating them too which is sort of in the window what we expect them to typically be working at on track. |
| 22:31 | The idea here is because we've pre heated them in the oven, not only are they nice and soft and they're nice and hot, they're also at roughly or somewhat close to the pressure we expect them to be running on track as well. |
| 22:42 | So that means that you don't have these really low tyre pressures because the problem with low tyre pressures on track or one of them is that because you've got low pressure, you've got relatively low vertical stiffness in the tyre, that means you are quite susceptible to damaging the tyre as far as it hitting curbs and stuff, you've got to be really careful on the out laps. |
| 22:57 | If you're not pre heating your tyres, means you're not going to pinch the tyre or do any structural damage to over stress it. |
| 23:01 | So that's what you can see going on here, so at the bottom I've got the tyre temperature and you can see that they're coming out of the oven really hot. |
| 23:08 | So this is, you can see here the right rear is coming out at 92° and the coldest one is the front right coming out at 76. |
| 23:16 | That's another, the reason for that is because this particular team uses tyre ovens and you do tend to get quite a big temperature split across the tyre so you typically got the tyres, well you don't have to have this but this particular team stacks the tyres from top to bottom, so you've got the rears on the bottom and the fronts on top. |
| 23:32 | So you often end up with the rear tyres because they're just higher up in the tent, heat rises so they end up being quite a lot warmer. |
| 23:38 | There are a couple of different tricks and it depends on the oven but typically you'll see the rear tyres coming out of the oven a little bit hotter than the fronts. |
| 23:44 | So in this particular situation we've got let's say this is one of the earlier runs in the day so we've got the tyres coming out of the oven a lot hotter than what they actually get, you can actually see they're coming out really hot and once the car actually gets on the track they're actually dropping down quite a lot. |
| 23:58 | What you'll typically see and I think you'll see this in one of the other pieces of data, or actually you see it in the next run here, you can see the tyre temperatures initially drop and then as the driver builds confidence, as their speed starts to increase, as they start to load the car a bit more, you see the temperatures start creeping up again and you'll see what I was talking about before where the shape, the general shape of the pressure trace here is really following the general shape of the temperature trace, that's really showing that relationship between the temperature and the pressure of the tyres pretty clearly. |
| 24:28 | So I've got another example here of a, so let me switch data sets because this is for a different car. |
| 24:36 | This is a different style of tyre pressure sensor, I'll go into it a little bit later as well but this particular car also has the multiple infrared sensing element, so 16 channel internal infrared temperature but it's also obviously giving us the basic data that is, we expect which is the internal air temperature and the internal air pressure as well. |
| 24:59 | So this particular car doesn't, it's not using tyre heaters, they're coming straight cold off onto the car. |
| 25:05 | In this particular case, I suspect because we're in the sort of 35-40° region down here, for these tyres, it may well be that this car's already been running on track for the day or one side of the car's sitting in the sun, that's probably the reason that we've got this temperature split, looks like the right front and the right rear are the hotter tyres. |
| 25:22 | But again you see that general slope in the pressure here as the, it's really following the temperature growth. |
| 25:31 | And again this really clearly illustrates how important monitoring and taking all the temperatures are and setting all your pressures. |
| 25:37 | One of the other things I wanted to talk about was temperature distribution or energy distribution inside the tyre. |
| 25:43 | So I've got a little diagram here that I wanted to show you guys. |
| 25:48 | So this is a typical energy distribution that would be part of a race engineer's pre event work so what we're doing here is taking all of, basically we've got some algorithms for anticipating the amount of energy that's going to be distributed through the tyres, through their sliding energy throughout a lap. |
| 26:08 | What I mean by sliding energy is looking at the power that's absorbed both sliding longitudinally and sliding laterally. |
| 26:13 | That doesn't actually mean the tyre's physically skidding along the track, that sliding term is just a way we characterise the amount of energy that's absorbed while it's turning and while it's driving and braking and what we'll typically do in a pre event situation is go through and look at how the energy's distributed amongst the tyres for a given track so typically if you're working in a race team you have one car you'll be running for multiple different tracks throughout the season. |
| 26:34 | And the reason this is really important is because it just really gives you a bit of time to prepare, to understand which tyres are likely to be the most heavily utilised. |
| 26:44 | Particularly endurance racing where you're either using tyres for multiple stints. |
| 26:48 | So you might be using a tyre multiple times on track, that might be consecutive stints, you might be taking it off on one stint, putting it back in the oven, putting it back on the same or even different position on the car later in the race, this is just giving us sort of an energy perspective of how much energy each tyre is likely to absorb. |
| 27:06 | So we can see at this particular circuit, this particular analysis is done for, we've got roughly 34% of the energy is going to be absorbed by the left front, 28 by the right, 21 for the left rear and roughly 16% via the right rear. |
| 27:19 | So in this situation, and again you can break this down into longitudinal and interlateral components as well but this is from global perspective, we know that the left front is the tyre that's going to get the hardest time so that doesn't only mean that it's going to get the hardest time from a wear perspective, it's also the tyre that is going to be getting the most pressure growth from cold to hot as well. |
| 27:38 | So that has to be taken into account of our setting pressures and conversely the right rear is the most lightly loaded tyre in this particular circuit so that means that's going to have a much less pressure growth from cold to hot. |
| 27:49 | So again I just wanted to give you guys a bit of an energy perspective on that and a little bit of an insight into some of the pre event work from a tyre pressure perspective. |
| 27:56 | So the reason I wanted to bring that up is because it's actually quite a nice example in this particular data set here. |
| 28:03 | I always use the same colour convention for data for each corner of the car, so left front's always red, right front's always green, left rear's always blue and the right rear is always orange for me. |
| 28:13 | That just allows me to really quickly, once you're used to that convention I can quickly look at this data and I can see really quickly which position on the car each one of these lines relates to. |
| 28:21 | But if we look at the left rear which is shown in blue here, it's actually starting with the lowest cold pressure and these pressure values here are relatively non sensical, they're just scaled numbers. |
| 28:32 | Normally they would be reading a normal pressure output but in this particular case, while they're not real numbers, it's still giving me an idea of the relative pressure between them. |
| 28:40 | You can see that the left rear is actually the lowest pressure tyre that we've got on the car when we start the run. |
| 28:47 | If we look through to say just before the car comes into the pits at this point. |
| 28:51 | It's one of the highest, if not the highest pressure tyre. |
| 28:54 | So if in this particular case, just from looking at that tyre pressure plot I can see that it's the left rear tyre that is absorbing most of the energy over the lap. |
| 29:03 | That usually correlates pretty well to the amount of wear that's involved. |
| 29:06 | So usually the tyre that's got the most temperature, sorry the most pressure growth is also the one that's most heavily loaded so it tends to be the one that's absorbing the most energy which tends to correlate pretty well to the amount of tyre wear as well. |
| 29:20 | We can see that the right front in green has got one of the higher initial starting pressures but it actually ends up being by far the lowest pressure when it's actually on track, when it's running there. |
| 29:30 | So you can see that gives a really nice I think it gives a nice demonstration about the relative energy inputs that's going into each of the tyres and again just giving you an understanding from the data's perspective of the energy that's going into each tyre. |
| 29:46 | Obviously this data is also really useful for engineers back in the pits. |
| 29:49 | So we're watching this data coming in live from the cars, both to tweak maybe the next set, the pressures from the next set of tyres that are going to go onto the car and also making sure there's no reliability problems, we don't have a deflation or anything like that in the car. |
| 30:02 | Let's see what else I've got prepared here. |
| 30:04 | So this is looking at the type of sensor that has the 16 channel infrared internal temperature, so that's what each one of these temperatures is shown here. |
| 30:15 | I'm looking at the exact same data I was for this car but from a different perspective, now we're just looking at the speed trace and we're looking at the temperature split just for the left front tyre. |
| 30:27 | So all of these channels here are just the temperature split for the left front tyre. |
| 30:29 | So you can see as the run evolves you've got, it's pretty clear you've got a big split between the inside and the outside tyre temperatures here. |
| 30:37 | And you can see how long that split takes to evolve as well. |
| 30:42 | So you can see really clearly, there's all sorts of different ways you can map that, all sorts of different math you can use on that to try and characterise the inside and the inside of the tyre. |
| 30:50 | Also you want to be careful, and this is part of your calibration process, making sure that each one of those bands that this sensor is looking out over, it's actually looking at the inside part, or the correct part of the tyre you're expected to. |
| 31:02 | That's going to depend completely on how this thing's mounted, how the geometry of your rim and your tyre and your tyre width and all of that sort of stuff, that's something that is going to need to be pre calibrated to make sure that each one of these channels here is actually pointing at a useful part on the tyre for you. |
| 31:19 | So that's one way we can look at that temperature data as well. |
| 31:23 | The last thing I want to talk about with the data analysis for the tyre pressures is using some basic math functions to basically pull out some more usable statistics for us on the tyre data. |
| 31:36 | So if I look at, say the first plot here, you can see as we move through the lap we've got, in this particular last, obviously the tyres have come out of the oven much much hotter, they're actually coming out much more even, they're all in the 90° range here. |
| 31:50 | And we've got this big pressure split that will tend to converge as the run continues but you can see how much the tyre pressure is actually changing over a lap, it's actually changing a lot. |
| 32:00 | So there's usually a couple of statistics, I tend to use to sort of summarise that down into a more useful metric and the way I tend to look at that is by looking at a, using a loaded corner average. |
| 32:11 | What I mean by that is I only look at the parts on track for each tyre where that tyre is on the outside of the car and it's loaded within a corner. |
| 32:19 | So everywhere where we're not cornering, or that tyres not loaded, I ignore it and I take the average of every time the tyre is loaded and is on the outside of the corner. |
| 32:29 | So here there's a couple of different ways we're showing that. |
| 32:32 | In the bottom here, what I've got here is the output of the, sorry this section's very, bottom plot here. |
| 32:39 | This is just giving me a tyre pressure each time that those conditions are true. |
| 32:45 | So we'll have a look at what the math I'm using for that is. |
| 32:49 | Just to show you guys, so I've got the using when true statement here which in MoTeC's i2 is just saying, if this thing is true do this, if not do this. |
| 32:55 | So there's 3 different sections here, I've got this section, this first section which is just saying if the lateral G force is less than -0.3 G, so that's just telling me that the car is turning right because it's a negative, that means I want to look at both of the left side tyres. |
| 33:14 | Then give me the tyre pressure, otherwise give me invalid. |
| 33:16 | Now the invalid statement simply means show me nothing when it is not true. |
| 33:21 | I could put a zero in there but for this particular case, invalid is more useful. |
| 33:24 | I also find it cleaner, it tends to clutter the plot less with lines going up and down from the zero point. |
| 33:30 | So all I'm doing here is saying show me the tyre pressure when it's, when each tyre is loaded in a corner. |
| 33:35 | Then the next stage I'm doing on that is giving the average. |
| 33:39 | So I'm just saying, basically for these channels here I'm just saying when, take the average of each of those over each lap. |
| 33:46 | The idea there is it's giving me a gated average per lap. |
| 33:49 | So it's really just giving me one number per lap per tyre that I can use and the way I'm using that is to end up tweaking my pressures for the next set. |
| 33:56 | So what I'll do here is just jump into the math channel for one of these to show you guys how that looks. |
| 34:04 | So here I'm just taking the stat mean, it's just the syntax I use for average inside i2. |
| 34:10 | It's just saying give me the mean of the tyre pressure corner gated front left which is that channel we looked at before which is just looking at the loaded corner, sorry when that tyre's loaded. |
| 34:21 | So give me the average of it and reset it each lap. |
| 34:24 | So that's just saying give me the average for each lap individually and reset for the next lap. |
| 34:28 | So what I'll do, I'll just zoom in here and we'll just make it, that's the wrong one, I'll just make it a little bit clearer here. |
| 34:36 | That's the wrong one. |
| 34:38 | So what I've got here is the output of that channel. |
| 34:40 | So this is the corner gated average per lap. |
| 34:42 | So you can see here that this is the, I can use each one of these values as the average tyre pressure as we move out throughout the lap. |
| 34:51 | So let's say for argument's sake I'm looking at the data up here and I know that, let's say for argument's sake I'm looking for a 24,5 hot pressure target on the front left corner. |
| 35:04 | I can see here that on average I've got 25.4 so I want to put a 0.9 pound hot target offset. |
| 35:13 | So I want to reduce 0.9 pounds hot. |
| 35:16 | So that's going to be different, the amount I'm going to take out is going to be different depending if it's a hot tyre or it's a cold tyre, if it's a hot tyre in an oven or in a blanket, I can just take more or less 0.9 out of it straight away because it's going to be relative close to its operating temperature. |
| 35:27 | If it's a cold tyre I'll be doing a little bit less to account for the expansion that we're going to get for the cold gas inside that tyre. |
| 35:35 | But you can see, well from my perspective anyway, when I look at that original data down here, it's a lot messier, it's moving around a lot throughout the lap, I just find that this puts it down into one nice simple metric that I can use to do my tyre pressure offsets when I'm running the car on track. |
| 35:50 | So guys that's it for the lesson today, I hope you guys learned a little bit about tyre pressure monitoring systems and how we can make use of the data. |
| 35:57 | It's certainly a tool and a sensor I put a lot of emphasis on, it's something, probably one of the sensors from a race engineer's perspective I spend the most looking at. |
| 36:06 | It's definitely one of my most used sensors and I think it's probably pretty clear to you guys to see how most people would benefit from a sensor like this, particularly when you've got the ability to log it live on the car. |
| 36:17 | So guys that's it for now, I'm just going to jump across to the questions now and I'll see if you guys have got any questions for me that have come through from the webinar. |
| 36:26 | OK question from Marco Antonio Morales, Marco asks, I do, on a rear wheel drive car for circuit racing 350Z car using radial TW 200 tyres, how much difference I have on the psi front rear tires and rear tires less psi? I know are several factors but psi is a good starting point. |
| 36:48 | Yeah so Marco, I think what Marco's basically getting at there is how much of a tyre pressure split would you tend to run at one end of the car compared to the other. |
| 36:56 | In his particular case he's got a front engine rear wheel drive circuit car. |
| 37:00 | Now unfortunately it depends so much on the car, it depends on the type of tyre that you're using, the brand of tyre, the style of track that you're running on, definitely the driver preference as well. |
| 37:13 | What I would say as an absolute, just as a real generalisation but for a car like this which is a relatively heavy front engined car, so there tends to be a lot more bias, weight bias on the front axle, what you tend to have is a pressure split of slightly more hot pressure in the front axle relative to the rear. |
| 37:32 | And part of that is that you're trying to match the vertical stiffness of the tyre because the vertical stiffness of the tyre, as the car moves around track is essentially just part of your suspension, it's just an extension of your suspension, it absolutely operates in a very similar way to how your spring and your damper work. |
| 37:48 | They're actually part of your suspension, you can think of the tyre as a separate spring and damper that's mounted in series with the rest of your suspension. |
| 37:55 | So what I mean by that is that you want to start matching your vertical, you generally want to start matching your vertical spring rates of your tyres front and rear and because, not just your vertical spring rates but your frequency response of each end of the car and part of that is matching, getting the stiffness in the window so you get the right balance of frequency response at each end of the car. |
| 38:16 | Now that may be a little bit of a technical answer for you guys but essentially what it ends up meaning is that you end up having higher pressure in the front than you do in the rear, just to give you a little bit more stiffness in the front axle because you've got such a front weight bias. |
| 38:28 | Now as far as amounts of pressure split you need, you really need just to go check it on track. |
| 38:34 | For a starting point I'd be talking to your tyre manufacturer and asking what the safe hot pressure you should be aiming for on track. |
| 38:39 | Now once you've got that safe hot pressure, that's what I would be typically starting, aiming for on the rear and I'd probably be starting in the range of 2-3 pounds higher in the front axle. |
| 38:49 | So I've been involved with cars, front engine cars rear wheel drive cars where we run a totally square pressure, hot pressure target. |
| 38:56 | So that means if I was, let's say I was looking for 27 psi, I'd be looking for 27 psi hot in all 4 corners of the car. |
| 39:03 | I've also been involved with cars, front engined rear wheel drive cars that need a really big pressure split. |
| 39:10 | So I've worked on one particular car I can think of needed about a 5 or a 6 pound split. |
| 39:15 | So 5 or 6 pound higher hot in the front than the rear when we were running on track and that's just what worked best. |
| 39:21 | So we essentially we just have a matrix of tests and you run through sweeping. |
| 39:26 | So starting at a higher pressure and then sweeping down the front down in maybe 1, 2 psi steps and then come in, do the same thing to the rear, start high, move low and then try different combinations of high and low at each end of the car just to see what works best. |
| 39:39 | You can, there are lots of simulation methods, things like post rigs and stuff you can use but these are typically outside the budget and abilities of most enthusiasts so typically you are just going and testing it on track and seeing what works best for you. |
| 39:55 | But Marco to basically give you a short answer to your questions, I suspect you're probably going to want a pressure split somewhere in the 2-3 pound range, that's probably a sensible starting point if you want to go start testing that yourself. |
| 40:05 | I would say as well, that even though I said that for maybe home enthusiasts or amateurs, you have to go to the track and test this. |
| 40:14 | Even if you've got access to a whole lot of really expensive and sophisticated simulation, maybe a 7 post rig like you do typically in professional racing, this is absolutely something you still need to validate on track so it's not a case of just working it out theoretically and sending it on track, it's perfect, we know it's perfect, it's never the case. |
| 40:31 | The simulation gets you in the ballpark but operating the car on track is absolutely the way you still need to do it for finding the actual optimum. |
| 40:40 | It's very rare that the simulation in the post rig work actually gives you the optimum output from the start. |
| 40:46 | There's so many more factors that are missed by the simulation in the post rig work that you just can't simulate, compared to running it on track. |
| 40:54 | OK got another question here from Suhas Govindaraj, Suhas, really sorry if I butchered your last name there but hopefully I got it pretty close. |
| 41:03 | How do you decide what tyre pressure to run when we switch from 15 inch to 17 inch? What are the advantages and disadvantages of running low profile tyres? So Suhas, again there's so many variables here but let's say all else being equal, let's assume that you were going from a 15 inch to a 17 inch and the brand was the same, the construction is the same, the compound is the same and the, which probably isn't very realistic but let's say they were. |
| 41:30 | And the only difference is you're going from a relatively high profile 15 inch to a relatively low profile 17 inch. |
| 41:37 | There are a couple of different things, probably one of the main things that's changing when you're going to a larger low profile tyre is the vertical stiffness of the tyre is typically going to be stiffer than for that higher profile tyre. |
| 41:50 | So when I talk about profile, I'm just talking about the size of the side wall. |
| 41:53 | The downside with more vertical stiffness is that it's giving you, essentially giving, it's going to give slightly less compliance in the tyre, it means it's not going to follow rough surfaces of the road as well. |
| 42:05 | What I mean by that is that when it's, it's sort of analogous to running an overly stiff spring when, there's a place to run a stiff spring, so like nice smooth racetracks. |
| 42:15 | Stiff tyres, stiff springs, no problem, it's not something that's going to hurt you but if you're running on really rough surfaces, if you're running on street circuits or really bumpy tracks, then this is a time where that's not always, that extra vertical stiffness you get from the tyre, whether that's coming from, whether that vertical stiffness is coming from tyre pressure, or whether it's coming from the construction or the size difference, whatever it is, that's one disadvantage. |
| 42:37 | One of the advantages of running a lower profile tyre is something, what we call cornering stiffness. |
| 42:43 | Now probably the easiest way to, if we jump across to the overhead again, the easiest way to talk about what cornering stiffness is, is if we've got a plot here of so this is what we call slip angle, which is usually called Alpha. |
| 42:57 | And we've got lateral force which is often called FY. |
| 43:02 | So what I mean by slip angle, that's the amount the tyre is, the amount of essentially the angle that the tyre's pointing with respect to the direction that the tyre's actually travelling. |
| 43:13 | This is the way we characterise turning force, or sorry lateral force out of a tyre typically. |
| 43:16 | The way this plot usually looks is something like this. |
| 43:21 | So FY just means lateral force, so I'm just meaning from the tyre's perspective if we're looking over top of the tyre, this is the direction the tyre's travelling, lateral force is the amount of force the tyre is giving us to help corner the car. |
| 43:34 | So the definition of cornering stiffness is the stiffness or the slope of this area of the curve. |
| 43:41 | So what this is saying is as we increase the slip angle of the tyre, this is telling us how much lateral force is changing as we increase the tyre slip angle. |
| 43:48 | So as we increase, increase, increase we've got this linear section here then we've got this transitional section and then we've got a frictional section. |
| 43:55 | So what I mean by that is there's a point where essentially you get a linear increase in the cornering force for a given amount of steering input and then you've got this section where the increase is starting to drop off and you've got some peak. |
| 44:08 | This is the point where the tyre is producing its peak lateral force and then you've got as you keep steering the tyre further and further, you end up actually reducing the amount of lateral force. |
| 44:20 | So, coming back to your question about why a stiffer tyre or why a low profile tyre, one of the advantages to it is when I said cornering stiffness, so the definition of cornering stiffness is the slope of this linear part of the tyre force curve. |
| 44:36 | The reason that's, so that's just the rise over the run or how much that, for this linear section how much that gains for how much, how much slip angle you need to input versus how much lateral force you get out of it. |
| 44:48 | The reason that's important, the cornering stiffness is it's related to the response of the tyre. |
| 44:52 | So typically you'll see something with a stiffer construction, whether that's because of the materials in the construction or just because it's lower profile, typically you'll see something that's got more cornering stiffness or react faster to your steering inputs. |
| 45:05 | So that means for a given amount of steering input you'll get less lag and you'll get more steering force, more quickly. |
| 45:11 | So what I should say by that back over on the overhead again. |
| 45:14 | So this is our cornering stiffness for tyre A and then we've got, let's say this is tyre B. |
| 45:20 | So this has, tyre B has a lot more cornering stiffness in that its rate of lateral force increase for a slip angle input is rising a lot quicker. |
| 45:34 | So I've also drawn it arbitrarily with a different peak and a different slip angle range but essentially what I'd expect is that your, a lower profile tyre would tend to have a quicker response and in mathematical terms that normally means cornering stiffness so you'd end up sort of coming up that slip angle curve a lot more quickly. |
| 45:54 | OK another question from Suhas, Suhas asks, when building high performance street car and drag cars, what sensors do you consider a requirement and what data parameters are critical to be monitored when setting for street and for drag racing? In both cases budget is not a consideration, thanks in advance Yeah so really it depends to what level you're getting into your data analysis but when, certainly when you're starting out, if you're just fitting sensors for both circuit racing and certainly for drag racing as well, I would absolutely say that less is more. |
| 46:23 | It's really easy in data analysis to think that you need all of these really exotic expensive sensors which is something we're all guilty of, me included as far as wanting all of this really expensive gear but when it comes to, certainly monitoring driver performance and to a certain extent chassis performance, less is more. |
| 46:40 | What I mean by that is when you're starting out, it's really much better to fully exploit the simple sensors and understand what they're saying, before you move onto adding a whole lot of, the complexity and sophistication to your logging system. |
| 46:52 | Adding that complexity and sophistication not only is it really heavy on the budget, things do get really expensive really quickly, it's also a massive time investment and becomes a lot more overhead to maintain the system, that means both in terms of making sure the sensors are working properly, making sure everything's calibrated properly, making sure all the offsets are done, also becomes a lot more work as far as organising your data, the amount of data you've got to deal with increases, it ends up being more difficult to store it and to share it around, everything sort of expands out and becomes a lot more complex. |
| 47:23 | I would say for a starting point, when you're getting into building high performance street circuit, drag cars, I would say things like being able to monitor the lateral and longitudinal acceleration, so G sensor is absolutely a mandatory basic sensor. |
| 47:39 | Having GPS on the car, so that gives you a really simple way of getting the vehicle speed and logging it. |
| 47:47 | I would say, the next level up from those 2, I would say adding video to your car, so lots of loggers have video built into them so it synchronises the video with the data. |
| 47:56 | I'd also say getting things like throttle position, brake pressure, gear position, those are the sorts of next level of complexity up from there and after you get to that there's all sorts of things, whether it's damper potentiometers, laser ride height sensors, tyre pressure monitoring systems. |
| 48:11 | I would absolutely say, if you're just starting out, starting with accelerometers, GPS and then maybe moving onto getting your throttle inputs, your brake inputs, getting them into the logger, that's where I'd start. |
| 48:23 | I'd really concentrate on being able to maximise the output of those sensors first. |
| 48:26 | There's a lot you can do with really basic sensors and you're really doing yourself a disservice if you don't spend the time to get on top of getting the most out of those sensors before you move on to using something more expensive and more complex. |
| 48:38 | OK questions from Tlambie, Tlambie asks, do you optimize pressures for lateral grip? Do you find it is a compromise relative to spring rate? Absolutely it is so the question there is really talking about, well there's 2 parts to that question, are we optimising, is lateral grip our primary metric for what we're trying to optimise? And do we find it a compromise, do you have to run different pressures for different spring rates? So probably the most important part of that question, talking about the lateral grip, so generally you'll find in most road racing applications, you've got this constant compromise whether it's to do with suspension setup, whether it's to do with tyre pressures, whatever it is, you've always got to compromise between maximising your longitudinal, so your braking and your accelerating and your lateral performance. |
| 49:24 | And often these two things are at odds, whether it's camber, whether it's about setting your, getting your hot pressure target, these things typically aren't the same, the way to get the most lateral performance isn't the same as getting the most longitudinal performance. |
| 49:37 | Typically you find in road racing, biasing your performance towards lateral performance or towards increasing your cornering is generally always the bigger gain than taking a hit in braking or accelerating. |
| 49:47 | The reason is it's just because we spend quite a lot of the lap cornering. |
| 49:50 | You've got to not only the slower you're going through the corner, the more time you're spending in it so the more time you're losing, it also means you've got to slow down earlier, you've got to spend more time on the brakes to enter that corner, it also means you've got to do more accelerating on the other side of that corner as you exit out as well so typically you'll find when you go through, and this is what I found as well in terms of lap time simulation when you bias your setup towards lateral versus longitudinal generally you'll always have a larger focus or a larger bias towards your lateral cornering forces and that absolutely applies to setting the tyre pressures as well. |
| 50:22 | The other part of that question is do you find it a compromise relative to spring rate? To some extent yes, it will depend on how wildly you're varying your spring rate. |
| 50:29 | So if you're sort of changing your spring rates in the margin of, within 5% of the stiffness range, you're not typically going to hit a different hot pressure target. |
| 50:39 | If you start moving too much further away from that and as long as you, you have to be quite organised and careful with how you're analysing your data but absolutely you will tend to find that the tyre pressure will need to start moving away from one hot target if you're getting a long way out, if you're changing your spring rates a lot from one race weekend to another. |
| 50:58 | Part of that is what I touched on before with the tyre pressure essentially being part of the suspension and that it's another spring in series. |
| 51:05 | Maybe I should just sketch that because probably clearer to see exactly what I mean by that on the overhead here. |
| 51:11 | So if we've got our suspension system, so this is our main spring and damper. |
| 51:15 | And this is our upright with our hub and our wheel and tyre here. |
| 51:21 | So it's really obvious to everyone that we've got our spring and damper here. |
| 51:24 | We've essentially got another spring and damper in this section of the tyre here. |
| 51:27 | You can actually simplify this system down, if you're talking mathematically and you're simulating this thing, what's actually happening is you've got another spring and damper set up here that's in contact with the ground. |
| 51:39 | You've essentially got spring damper, spring damper and obviously these things working in series so they need to be tuned to work together so if you are moving a long way from your spring and also your damping settings you often do have to change your tyre pressures in order to match the vertical stiffness of the tyre to your new stiffness of your suspension. |
| 52:01 | So guys that's all the questions I've got for today. |
| 52:04 | I hope that you guys have learned something, both in terms of the main part of the webinar talking about the tyre pressure monitoring system and how we can use that data, but also I hope I've answered your guys questions sufficiently. |
| 52:16 | So that's it for today guys, I look forward to seeing you guys again in the next one, cheers. |


