282 | Interpreting Damper Potentiometer Data
Summary
It’s unlikely you’ll find any high-end race car without damper potentiometers. In this webinar we’ll look at why they’re so useful and some of the things you can use them for to tune your chassis and dampers.
| 00:00 | - Hey guys, welcome to today's RaceCraft gold member's webinar. |
| 00:03 | Today we're talking about how to make use of damper pot data. |
| 00:06 | Now I have talked about damper pots in the past in some of these webinars but I thought I'd just do a little bit of a refresher in case you're not familiar with that. |
| 00:13 | So the idea here is that we're using some sort of sensor, whether it's a linear sensor like this or a rotary sensor like this and the idea here is that we're using these sensors to measure the position of our suspension as we move around the track. |
| 00:25 | So this is something that we can be connecting directly to the damper itself which is why they're often called damper pots. |
| 00:32 | Or it can be connected to any other position on the suspension as well. |
| 00:35 | Really the end goal here that we're looking for is to be able to measure how much the suspension is moving as we move throughout the circuit or the track or whatever we're doing with the car, there's lots of interesting and useful stuff you can do with damper position data and today that's what we're going to be going through, how to make use of some of that data when you're logging it for yourself. |
| 00:54 | So I just wanted to go through maybe to start with, a little bit how these things are arranged just for anyone who's not familiar with how they work so just jump across to the overhead camera here. |
| 01:02 | So if we start by looking from the side view, we've got our tyre here and let's say we've got a really simple suspension, let's say we've got something like a macpherson strut. |
| 01:18 | With our spring on there like that and this is rigidly attached to the upright and our lower control arm here. |
| 01:25 | So obviously as the suspension moves up and down, our wheel's going to move through some arc which is going to be defined by the kinematics of our suspension. |
| 01:33 | One of the most commons ways you'll see these things used is if we're using this style of damper pot here, is having the damper pot mounted in series with the damper itself so it might be mounted like this where maybe the bottom of it is mounted to the rigid part of the damper and the top of it, sorry the moving part of the damper and the other part is mounted to something that's essentially connected to the top of the car. |
| 01:56 | So the idea here is the damper's extending and compressing, you've got the little sensor here moving with it. |
| 02:03 | Obviously we need to make sure that we've got sufficient stroke in our sensor, we've got a couple of different examples here, the same brand and everything of a sensor but we've got a couple of different free lengths. |
| 02:13 | So depending on how you want to package it and how much stroke you need is going to depend which choice of sensor you go for. |
| 02:19 | There's heaps of different manufacturers our there making sensors, it's not difficult to find it at all. |
| 02:25 | So the guys have just told me we've got no overhead so you guys actually couldn't see at all what I was drawing there so I'll just go old school on this. |
| 02:33 | So essentially this can be mounted in line with the damper which hopefully you guys got the idea of. |
| 02:39 | Let me just grab this prop from behind me just to make that a little clearer. |
| 02:42 | So this would be mounted somehow like this, so we're measuring the displacement of the damper shaft itself, we'd be mounting some way to the top and somehow to the bottom of the damper and as all of this compresses and extends, we've got the ability to move it like that. |
| 03:03 | Let me just get that sitting right. |
| 03:06 | The other option we can use is to use something like a rotary sensor. |
| 03:09 | So one of the advantages of rotary sensor like this is it gives you a little bit more flexibility in packaging it. |
| 03:15 | It can be a challenge to fit something like this in the wheel well, particularly when you've got to consider that everything, particularly the front, you've got to make clearance for the wheel to go up and down but also everything to rotate as you steer. |
| 03:28 | It can actually be quite challenging to find a place to put something like this where you want to keep in out of harm's way so the other option is to use a rotary sensor. |
| 03:35 | So we can attach this, whether it's mounted to the lower control arm or whether it's mounted to somewhere in the damper itself, it doesn't matter, we can go ahead and map this to whatever position we want but this is another option. |
| 03:47 | The other great thing about this particular Delphi sensor is it is a much much cheaper option to go for, this is something like might be in the region of say $200-$300 USD whereas something like this is actually down in the range of I think maybe $30 or $40 USD. |
| 04:02 | Now there are some differences in the specification but I have used this particular sensor in the past and if you guys are interested I can make sure, jump onto the forum and ask me and I can pass on the part number for you guys, it is a really cost effective option for measuring damper position. |
| 04:18 | The reason it's so cheap is it's actually based off an aftermarket sensor, I think a lot of GM and possibly other cars use this to measure suspension position. |
| 04:25 | They use it for all sorts of different things in the OEM world, whether it's about checking what the pitch of the car is where you're towing to make sure it'll drop the headlights and everything to make sure you're not blinding people, there's all sorts of different things I use those for. |
| 04:36 | But that is quite a nice cheap way to get around it and actually I bought a set of these to use on our RaceCraft car which is something I'm planning on retrofitting into that car. |
| 04:45 | So one of our GT86s we're going to have this normal linear style and the other car, the RaceCraft GT86 I'm planning to use a rotary sensor. |
| 04:54 | So it'll be interesting to be able to do a comparison between those as well. |
| 04:58 | So essentially we're measuring suspension and how much it's moving, now let's have a quick look at what that data looks like when we actually log it. |
| 05:06 | So here across on my laptop screen, I've got the absolute raw signal of damper position as we move around a given circuit so here at the top I've got the speed trace up the top here and this is both front damper potentiometers and this is both rear damper potentiometers here. |
| 05:23 | So you can see, this is a pretty messy signal, it's jump around all over the place as we move throughout a lap but essentially what's happening is as the, that's one good point I should bring up first, is that it depends which direction or how you calibrate your sensors as to which direction the data is going to, how that's going to be interpreted in your logging system so what we've got here in this particular here is when the sensors get shorter or when the suspension compresses, that's going to be giving us positive numbers and when the suspension extends and when this sensor gets longer, that's going to be giving us negative numbers or lower numbers than if it was more compressed anyway. |
| 06:02 | So when we see the signal going up like that, means the suspension's compressing and when we see it getting lower, that means the suspension is extending. |
| 06:10 | So if we just jump right into the first part of the lap here, have a little inspection of what's going on. |
| 06:15 | So essentially we've got quite a high speed approach here, the car's doing 250 km/h at the entrance to this corner, we can see that up the top here. |
| 06:21 | And then it's entering a right hand turn and we can see the damper potentiometers here have got a lot of oscillation going on. |
| 06:28 | Now there's different reasons for that, but in this particular case this is because it's a really really bumpy part of the circuit so in this particular case it's a really high speed corner, what are they doing through here, still 190 km/h but you can see the front end of the car's going crazy, we can see in this particular case the damper potentiometers were fitted in line with the damper so if we look from the maximum to the minimum here we've got something like 33 mm and down to 11 mm so it's a huge amount of suspension change that's happening in really quick proximity so let's say like see here so from 1 peak to the next peak, how long is that taking? So if I put the 2 cursors on there I can see that's happening within the space of 0.2 or 0.3 seconds so this thing's really humming as far as how quickly it's extending and compressing. |
| 07:13 | So that's one way we can use the damper position data, to straight away see how much it's oscillating, it's giving us a way to maybe put some metrics on how bumpy the track is if we're doing some circuit characterisation but let's move through the lap and have a look at a couple more features maybe in a place where it's a little bit less chaotic. |
| 07:32 | So here we've got the damper position changing as we move down the straight and we'll come back when I talk about aerodynamics later on. |
| 07:39 | We've got a hairpin turn down here which is quite slow in this section of track so let's just zoom into that. |
| 07:46 | So in this particular section we're coming from 180 down to about 60 km/h and what we can see is that we've got a higher value on the front left than we do on the front right and because we know the convention we use, we know higher numbers means more compression, that means we know we're turning right because the front left is more compressed than the front right so what's actually happening here is the front left is compressing and the front right is extending as it's the one on its inside tyre so it's extending as it goes to the ground. |
| 08:15 | So that's basically just a really basic look at what that damper position data, that raw data looks like as we move around the track. |
| 08:25 | So the other thing that we can use damper position data for, probably one of the most obvious things is to work out our ride height. |
| 08:32 | Now unfortunately we don't have an overhead camera here so I can't sketch that for you but essentially what we're able to do is when measuring the displacement at each wheel and using a little bit of really basic math, we can go ahead and translate the position of each wheel to a real ride height measurement somewhere on the chassis. |
| 08:49 | Now that's really useful because we can start to do things like whether it's roll and pitch calculations or maybe the distance of a splitter above the ground or how high a certain position of our rear diffuser is above the ground, whatever it is, we can go ahead and translate that position in space as the car moves around the track so obviously to do that we need to know something about the ride height to start with so you need to put some of your setup information into your analysis project but after that you can start to do, you can translate any position of interest on your sprung mass, just get some sort of approximation anyway of the ride height. |
| 09:26 | Obviously in reality we're measuring the displacement of the suspension, the tyres themselves obviously also compressing, the loaded radius is changing constantly and the loaded radius which just means how far is the tyre deflecting, is changing off all sorts of different things, whether it's speed, camber, slip angle, slip ratio, obviously pressure, all of these things, it's actually quite a complex thing to model the loaded radius of a tyre adequately but long story short, all I'm meaning is that the ride height is also a function of how much the tyre is changing, obviously all we're measuring is the actual deflection of the suspension itsef. |
| 10:03 | But nonetheless, it still is a very interesting piece of data to have to be able to understand the ride height of the car. |
| 10:10 | We'll go through a couple more examples as we move through the webinar. |
| 10:14 | The next probably most obvious thing to look at is how much the chassis is rolling. |
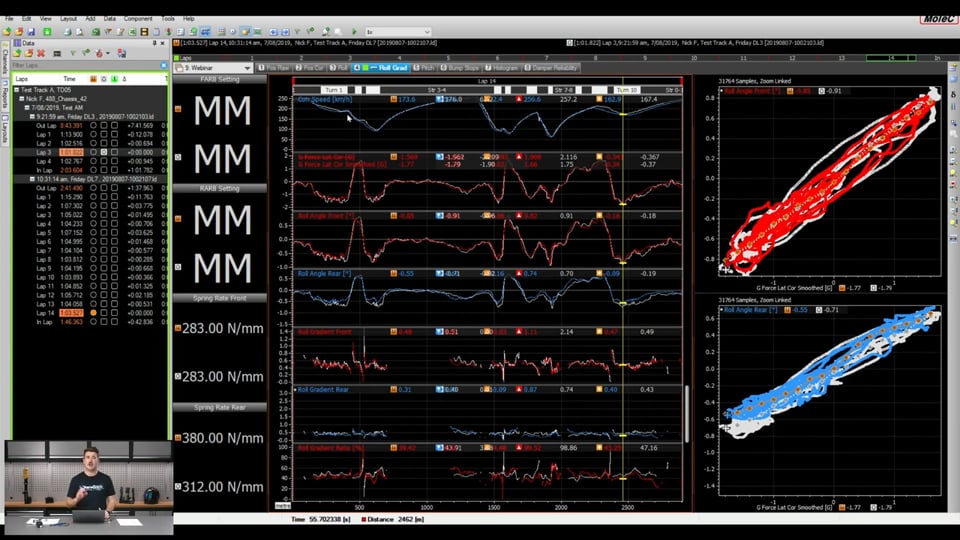
| 10:20 | So if I jump across to the next tab here, we've got some information, I'll go from top to bottom on what we're looking at here, we've got the speed channel a the top, we've got throttle and brake traces overlaid here, I've got the steering and then I've got a front and a rear roll angle. |
| 10:37 | Now I've gone through in a previous webinar that you guys should go back and check out which is talking about how we actually go through and calculate the roll angle. |
| 10:44 | We've got damper position data, I go through the math channels, how we make those math channels up to define it for yourself, it's really really simple but essentially all we're looking at is the difference in damper position from one side to the other, we're then translating that into a difference in wheel movement from one side to the other. |
| 10:59 | After that, all you need is the track width or the distance between both tyres at each end of the car and after that it's really trivial to calculate how much roll angle you've got. |
| 11:10 | Now one of the things you do need to do before that is essentially give yourself some sort of zero or reference point to understand what the damper positions are when the car is level, when the car is sitting there on the patch. |
| 11:20 | So there's a couple of different ways you can manage that, you can go ahead and zero the dampers when the cars on the setup patch, you could record the position of the dampers when the car's on the setup patch or another option which is what I've used in this case, is to virtually zero the dampers or make a corrected damper position channel when the car's sitting in the pit lane so what's what is shown here. |
| 11:40 | I'll just go back one tab. |
| 11:42 | So this is really similar to what we saw in the raw damper position data. |
| 11:45 | Essentially there's just an offset applied for the position the dampers are sitting in when the car's sitting in the pit lane. |
| 11:51 | So we use it as an approximation for the, the sort of zero position, or the zero, the ride height position is. |
| 11:59 | So the idea here is that when the car's sitting at ride height, each of the damper position channels will be offset to a zero value then after that it makes it really easy to compare differences because you can subtract one from the other or do comparisons between them. |
| 12:12 | And because you know zero is when the car's level, then you can go ahead and do, whether it's pitch or ride height calculations or roll calculations in this case.. |
| 12:20 | So that's just an offset which is what I've got, you can see I've got labelled there as position corrected, that's all that means, cor. |
| 12:29 | So going back to our roll here, so like I said all we're doing is comparing the damper position from one side to the other then converting that to a wheel position and then using that to calculate a roll channel. |
| 12:41 | So what we can see straight away here is how the car is rolling in and out of the corner. |
| 12:46 | I've got a little bit of other information here in this case, I won't go through it in too much depth in this webinar but essentially I've got an electronic version of my setup sheet which is linked to my data analysis project. |
| 12:57 | The idea here is that as I change the setup on the car, I can use real values from my setup sheet inside my calculations and the idea here is that as my setup evolves throughout a race weekend I can visualise and use those real numbers from my actual setup sheet inside of my data analysis project. |
| 13:15 | I think it's actually something, if you guys are interested in it, if I get a bit of interest, I think it's actually maybe something I'll give its own gold webinar because it is actually a really useful thing to be able to do when you're starting to do sophisticated things with your data. |
| 13:25 | What I'll do here just to make that really obvious, I've got one data highlighted here as my main, I'll go here and put an overlay for another lap from earlier in the race weekend and what you can see here is that I get this white data overlaid here and this is essentially just giving me an overlay from another lap so not only have I got it overlaid here on all of the channels, so my speed, my throttle, my brake, my steering and both roll channels, I've also got the values coming through from my electronic setup sheet. |
| 13:53 | So in this case the MM is the front and the rear anti roll bar settings. |
| 13:58 | In this particular car it's got blade adjustable sway bars and it's got blades at each end that you can rotate to change the stiffness of the anti roll bars. |
| 14:04 | So MM means medium on both sides so we've got all the settings, all 4 settings on the car set to medium in this particular run. |
| 14:12 | In these 2 particular runs we've got 1 line for each of the runs and then down here I've got my spring rates which are coming through from my setup sheet. |
| 14:18 | So between these 2 particular runs, even though, not only are they 2 different pieces of log data but we've also got, I can see I've got the same front springs, so we can see this is spring rate front written in this section here and we've got spring rate rear but the spring in the rear is softer in the overlay so we can see the main is indicated by this little M and the colour symbol and the white, it's got an O for overlay and that's all of the white data has got a softer rear spring. |
| 14:44 | So let's have a look at what that actually means in terms of the data so we're looking here at the front and the rear roll channel so this is the front here and this is the rear here. |
| 14:55 | And we can see really clearly as the car moves throughout the lap. |
| 14:58 | So we can see in this section when we're going down this straight section here, the roll angles are very close to zero, there's not much if any roll on the car and then we can see, in this particular part it's a really high speed corner, it's not a place where you have to lift, it's very gentle corner but nonetheless because you are going quite fast, it does have some significant roll angle in the car so we can see that the roll angle here is changing as we move throughout the lap. |
| 15:27 | Then the point I actually wanted to point out which is quite interesting, where you actually start seeing something useful or one of the places I should say it's most obvious to see something different is in this really fast turn down here towards the end of the lap. |
| 15:38 | So this section, you can see in the speed trace here we're still carrying a lot of speed through the corner, we're still doing 170 km/h through this part of the corner and we're taking the corner, you can see the driver's ramping up the throttle in both these pieces of data here. |
| 15:54 | We can see that the front roll channel is pretty similar. |
| 15:57 | There are some differences but part of that is down to the way the car's being driven a little bit differently. |
| 16:03 | The biggest difference we see in the rear roll channels, obviously an offset in the rear roll angle. |
| 16:08 | Now I told you guys already, I gave you a bit of a clue that this is probably something to do with having a softer rear spring in the car. |
| 16:14 | So we can see here we've got a 312 newton per millimetre spring in the rear on the white overlay run, we've got a 380 newton per millimetre spring in the primary run, the coloured run that we see here. |
| 16:27 | And as a result what we can see really clearly is that the rear axle is indeed rolling more in the overlay vs the primary run. |
| 16:34 | So that's what you'd expect by having all of the other settings on the car the same, we know we're fitting a softer rear spring, the spring is not only part of providing the vertical heave stiffness but obviously it's part of the roll stiffness equation as well and on this particular car the springs do tend to have a really big effect on the roll certainly much more, even more so than changing their anti roll bar settings, the anti roll bar settings in this particular car don't tend to be quite as important, sorry quite as dominant compared to making spring changes, even though this is a relatively big change in a spring. |
| 17:09 | So in this particular case what we were looking for is adding a little bit more dynamic pitch into the car, we found that was helping particularly in low speed, just having a little bit more rake in the car. |
| 17:20 | It was also helping give the car a little more support through the high speed corners as well. |
| 17:25 | So that's it for roll angle. |
| 17:27 | Now that's looking at the raw value of roll angle. |
| 17:30 | Now that is useful but there are a couple of other things we can us that roll information for and one of them is the roll gradient. |
| 17:36 | So the definition of roll gradient is to divide the roll angle, divide it by the lateral G force. |
| 17:43 | So what you end up with is roll angle divided by G force and we call that the roll gradient so that's got units of degrees per G. |
| 17:53 | The idea here is it givces us a metric to normalise the amount of roll that we've got to the amount of G force so obviously like we see here in this raw data, as the car rolls in and out of the corner we're going to have the roll, you're going to get more roll when you've got more G force. |
| 18:07 | So the idea here, sort of by normalising it to roll angle per G, that means that a little bit, it's a little bit less sensitive, obviously this assumes a linearity in your suspension and to some extent, in this particular car anyway, the suspension is linear enough to make this a valid comparison, essentially we're normalising the amount of roll to the amount of G force that we've got. |
| 18:30 | The idea here is it gives us a normalised way to be able to compare one suspension setup to another, even if there is being driven slightly differently or slightly slower in one lap to the other. |
| 18:40 | So let's jump cross and have a look at that now. |
| 18:43 | I've got a worksheet set up looking at the roll gradient. |
| 18:47 | So there's a little bit going on here to start with, I'll break it down just to make it really clear. |
| 18:52 | So at the top as always I've got my speed trace. |
| 18:54 | I always usually have a speed trace at the top of most time/distance plots that we're looking at. |
| 18:58 | I find it just helps give me a little bit more context about what's going on, I can see what part of the track the car is in, I can see what's going on with the car, whether accelerating, braking, cornering, stuff like that. |
| 19:06 | So I generally always have it at the top. |
| 19:08 | I've got my lateral G force, a smoothed version of my lateral G force plotted here. |
| 19:13 | I've got the same 2 channels that we had plotted in the previous workbook which is the front roll angle and the rear roll angle which we can see something similar happening here with our big offset and our rear roll angle in this big high speed corner. |
| 19:25 | But this, down the bottom here, is I've got 3 new channels that I didn't have showing before. |
| 19:30 | So I've got the front roll gradient, the rear roll gradient and then a ratio between the 2 roll gradients. |
| 19:38 | So again as I said, we're just calculating the roll gradient from how much roll angle we've got on each axle vs how much G force we've got, that we've sensing from the car and that's coming, in this particular case from the smoothed version of the lateral G force. |
| 19:53 | I find every car's a little bit different as far as the information coming from the G sensor, in this particular car I find the G sensor, it's quite a noisy signal and you get a lot of noise in the raw signal so I tend to smooth it It just helps give me a little bit more stability in the calculations I'm using and in this case, I'm not interested in looking at really high frequency information, I'm only interested in the general trend of what's happening, not necessarily what's happening to the actual G force as this thing bucks and moves around. |
| 20:19 | So we've got our front roll gradient here, we can see that largely the front roll gradient is really similar between the two runs, so again we've got our main one indicated by the colour channel here and our overlay by the white. |
| 20:32 | They're essentially lying on top of each other but we do see a difference here in the rear roll gradient where we see this offset. |
| 20:38 | Maybe it's a little bit small for you guys to see but essentially what I'm looking at is this section down here, we can see definitely a significant offset in the amount of degrees per G force that we're getting on the rear axle so that's straight away telling us by looking at it in terms of roll gradient that we know we've got less rear roll stiffness in that overlaid run because it's rolling more for a given amount of G force. |
| 21:00 | Now to take that concept a little bit further, I've got the ratio of the roll gradients here so that's essentially giving me a measure of, I wouldn't say it's a completely meaningless number but it's a little bit arbitrary in its calculation but what it's doing is giving us a relative number, a relative ratio between our front and rear roll stiffness so in this particular, I'm defining the roll stiffness there in terms of the roll gradient so it's a little bit of an arbitrary measurement but by comparing how your roll gradient ratio evolves throughout a race weekend, it's giving you some idea of your roll stiffness distribution. |
| 21:35 | What I mean by that is how much roll, how much of the roll stiffness is being reacted at the front axle vs how much is being reacted at the rear axle. |
| 21:42 | So the way I've got this computer, let's jump into the math for how I've actually got that computer, I'm pretty sure it's just the rear roll gradient divided by the total, sorry in this case I'm doing it the opposite way around, I've got a 1 minus so essentially what going on here, we've got the front roll gradient divided by the total roll gradient. |
| 21:59 | So these are in some ways slightly meaningless numbers but it does give us a relative measurement from one setup to the other so here, the front roll gradient and then I've got the front and the rear added together. |
| 22:10 | Now I've got 1 minus there, because I'm putting that in terms that something, maybe more familiar that we'd use in a racecar where we often describe roll stiffness as percentage front of how much of our roll stiffness is being reacted on the front axle relative to the rear. |
| 22:26 | Same as things like brake bias, you often talk in terms of how much of your brake bias percentage you've got on the front axle relative to the rear axle so that's all that's going on here, that's why I've got this 1 minus and you'll see as we dive into this, why I've done that It doesn't matter, you can have it the other way around, you can equally be dividing the rear roll gradient by the total, it will give you the same effect, it's just the way I've decided to compute it there. |
| 22:49 | Essentially the point I'm getting to here is that if we look in this area of the data where we've got a more, we've got a higher amount of roll in the rear axle. |
| 22:57 | We can see the same thing in our roll gradient ratio, we can see that in the white overlay data we have this roll gradient ratio has a higher number and that relates, that correlates with the idea that we've got a higher roll stiffness distribution or more of the total car roll stiffness being reacted on the front axle. |
| 23:18 | So that's the way I prefer to loo at it as percentage front. |
| 23:21 | So straight away I can come along here and I can see really clearly, in this corner anyway, I've got a higher percentage of the roll stiffness being reacted through the front axle, you do have to take some of this with a little bit of a grain of salt. |
| 23:32 | There's going to be some sections of track where this measurement is going to be a little bit less useful to you, you've often got to either account for or ignore areas where you've got a whole lot of squat or pitch on the car because obviously in some cases this is going to be affecting the measurements you're using, you've got to be careful of looking at high frequency noise, you've got to be just essentially looking at the portions of track that make the most sense where you're going to be closest to steady state cornering, the types of pieces of data that are going to be most useful for you when you're looking at things in terms of roll gradient. |
| 24:03 | Another way we can visualise this which is what I've got shown on the right hand side here is that we've got the front roll angle plotted vs the lateral G force and the same with the rear roll angle. |
| 24:12 | So because I've got those 2 values plotted together on an XY plot, the slope of the line that is essentially being plotted by all of those parameters is telling us something again about the roll gradient. |
| 24:24 | It's just another way to go ahead and calculate or give you an understanding of the relative roll stiffness so maybe it's a little bit difficult for you guys to see but for me essentially I've got a little bit of averaging happening in the background here of these plots which is what you can just sort of see in these orange points here which is essentially applying a moving average to give me a little bit less noise. |
| 24:44 | But essentially what I see here is that in the overlay data we have a straighter line and in the, sorry that's the main data and in the overlay I have a more aggressive line, I've accentuated that to make it a little bit more obviously but you can see there's a bit of an offset here in the 2 different slopes in the way that's working. |
| 25:03 | So that is another way of visualising the roll gradient, there's all sorts of different ways you can post process that, clean it up, not show the raw data, only show the time average data. |
| 25:11 | I prefer to show both there just so I can see a little bit of hysteresis as we move throughout the corner. |
| 25:15 | The other thing that will become a little bit clearer is if you tend to look at one particular section of the track, maybe it's a little bit clearer here just looking, obviously we've got those XY plots zoom linked to what we see in the time/distance plot so you can see here I think a little bit even clearer, the difference in stiffness because we can clearly see a different gradient on both of those sections of the XY plot. |
| 25:37 | Now it's not all about lateral, obviously we spend, as engineers we spend a lot of our time looking at lateral performance of the car it's one of the things that's certainly most dominant in terms of the lap time but let's not forget about things like pitch as well, so I've got that calculated here. |
| 25:51 | So this is also using the same data from our damper potentiometers but instead of looking at the lateral deflections, now we're looking at the longitudinal. |
| 25:58 | So pitch is something that's really important to consider, not only from mechanical aspects but obviously also from aerodynamic aspects as well. |
| 26:06 | If you've got a car that's got a lot of aero on it, particularly if you've got a lot of aero being coming from your floor if you've got a flat floor or a diffuser or a splitter and stuff like this. |
| 26:15 | They tend to be really sensitive to ride height and pitch. |
| 26:18 | So that's what I've got this showing up here for, obviously depending on the kinematics of your car, depending how much the car pitches, the rear comes up or the front comes own is going to depend how much your camber's changing, how much your toe's changing, if you've got a lot of bump steer it's really important for understanding the entry and exit balance of your car but in this particular car which is a GT car, it's really useful for understanding between 2 different setups how much the car is pitching because again if I've got a section of track where maybe the balance is really good, let's say in the low speed, I've got a pretty good balance, the car's pretty neutral and turning in really well but let's say in the high speed I've got a whole lot of push, depending on the setup changes I've made throughout the race weekend I may be able to come to something like looking at the dynamic rake that we've got on the car and that might give me a clue as to why I might have a whole lot of high speed push in that section of the track. |
| 27:08 | Maybe I can see that we've got a whole lot of less rake so the rear is a whole lot, we've got the rear that has got a whole lot less rake on it now. |
| 27:17 | Probably because we've got a softer spring. |
| 27:19 | And that, in a car with a lot of downforce will often end up giving you understeer because you're moving the aerodynamic centre of pressure towards the rear of he car which ends up giving you an aerodynamic understeer so having the ability to look at the pitch of the car, how that's evolving throughout the lap, it's absolutely a really, another useful metric that you guys should be using if you're making use of damper potentiometer data as well. |
| 27:43 | Another thing that we can make use of is looking at our bump stop gaps. |
| 27:47 | So here I've got another worksheet setup, I'm just going to get rid of one set of data to make it look at a little bit less chaotic. |
| 27:54 | But essentially a lot of you guys will be familiar with the idea of a m stop. |
| 27:57 | Essentially it's usually a polymer stop that sits on our damper. |
| 28:02 | So in the primary case it's just there to stop the suspension components crashing together when you use up all your suspension travel. |
| 28:08 | In racing we'd use them for other things as well. |
| 28:10 | Certainly they're useful for tuning the balance of the car as the car moves around the track but in this particular case, in this particular car it's got quite a lot of downforce so we end up making use of those to tune how far the car deflects when it's got a whole lot of downforce on it as well. |
| 28:27 | So one of the things I'm usually interested in in a car like this is I want to engage the bump stops at certain parts of the track and maybe not in others. |
| 28:35 | So if I've got a driver that's complaining about a car behaving badly in one particular part of the track, one of the things, if you've got an inconsistency like say a snap from one end to the other, one of the things I might be looking at is whether I've got bump stops engaging in a really aggressive way in one particular corner and also I'll be looking at them on the straights to look at how much the car's squatting and whether they'll want to get one part of the car to squat more or less, whether it's about trying to get a little bit more top speed out of it or whatever it is. |
| 29:03 | That's sort of the idea behind what we're doing with the bump stop data. |
| 29:05 | So from top to bottom here got our corrected speed, got our throttle and brake just as a little bit of a reference to help me understand what's going on with the car, got our steering and then we've got these 2 channels here for bump stop gap. |
| 29:15 | So essentially what's going on there, I'm just doing a little bit of math in the background and I'm taking the amount of damper stroke I've got, I'm subtracting the height of the bump stop, I'm also subtracting the height of any packers that I might have in there that I'm using to tune the engagement of the bump stop and that gives me an amount of travel I've got available before the bump stop's going to be engaged. |
| 29:32 | Long story short, that gives me a way to calculate the amount of how close I am to riding on the bump stops at every corner of the car, at every point on track. |
| 29:40 | So the way, look at this data here, just going to bring that up to make it a little clearer. |
| 29:45 | So the zero line here, you can see sort of the zero point on the axis which is here on the front and here on the rear axle. |
| 29:51 | The zero point is the point where the bump stops will become engaged so anything above zero is when the bump stop is not engaged, anything below zero is when we're starting to compress the bump stop and the more negative that number goes it means the more compressed that bump stop is becoming. |
| 30:06 | So we can see here, let's go back to that same section of the track we look at earlier on in the webinar where we've got that really bumpy corner. |
| 30:13 | I've got this situation here on the front left on the outside front corner where as we're heading through this really high speed corner, I've got the bump stops getting engaged really heavily at this point and then a little bit later in the corner as well before the car turns to the left and then it turns to the right again as you move through and you can sort of see how that channel is following essentially the same path as what the damper position channel will follow but we've got it offset by this calculation to understand our bump stop engagement. |
| 30:44 | So one of the ways to look at this would be to say look if you had like a snap or something in the car, at the front of the car or maybe a bit of an understeer moment here, this might be one thing to look at as far as understanding whether you're engaging your bump stop too aggressively at this point. |
| 30:59 | Other way we're looking at this is looking at in terms of the straight. |
| 31:02 | So this is the fastest sstraight on the track down here. |
| 31:05 | So this is showing me really clearly whether my bump stops are engaged on the front or the rear axle. |
| 31:10 | Now one of the ways you'll be using this in a heavily aerodynamic car is to modify the dynamic rake you've got in your car as you head down the straights. |
| 31:17 | One of the reasons that's really important is because the rake has a big impact on the amount of drag, on the straights you often want reduced drag, if it's going to be a big lap time advantage for you on that particular track. |
| 31:28 | So you may well want to control the rake of the car and what we've got here is the essentially the rear bump stops being engaged most of the way down the straight, certainly in this section down here where they're becoming engaged because of drive, as the driver comes on the throttle, the rear of the car's squatting, hitting the bump stops but then essentially it's remaining on the bump stops all the way down here and you can see down in this section of the track just down here in this blue section where they're becoming even more engaged as the car heads around the, there's a little bit of a kink in the track up there in the high speed section but essentially it means it's really starting to dig down into those bump stops and again I'm just using that to control the rake, the dynamic rake that we've got in the high speed section. |
| 32:07 | So down the bottom here, they've got a couple of different visualisations for exactly the same data over and over again so I've got our four channels from top to bottom, there's 1, 2, 3, 4 lines here. |
| 32:15 | There's our front left, front right, rear left and rear right and every time I've got a red bar here, this is indicating that that bump stop is engaged so again, it's just another way of visualising the same information, here I can see really clearly early in the lap I've got the front left engaging with a couple of touches on the front right. |
| 32:34 | We can see that the rear left is really heavily engaging quite a lot of the lap. |
| 32:36 | And again I can see as the car flip flops through this section of the track down here I can see I've got an engagement here, I've got another big engagement here on the rear left. |
| 32:43 | Again it's just a way, another really quick visual reference for seeing where it's engaged, it's not giving me any information about how engaged it is, it's just sort of a one or 0, an on or an off. |
| 32:55 | I've got another way of visualising the same data here. |
| 32:57 | So we've got this track map, one for each corner of the car so obviously front left, front right, rear left, rear right and essentially I've got a bit of a rainbow plot here showing me the magnitude of how engaged each bump stop is as I move around the track. |
| 33:09 | So I can see really clearly here the front left bump stop is becoming engaged as the driver hits the brakes in this section and then I can see it unsteadily coming on and off as we move throughout the corner there. |
| 33:19 | I can see again the front left is becoming particularly hard, quite hard engaged on the front left as we move into this braking zone here. |
| 33:26 | I can see that the front right is getting a bit of a hammering through this left hand corner which is a really fast corner coming uphill and I can see it's really clear that the rear bump stops are spending quite a lot of their time on throughout the lap. |
| 33:39 | Now obviously it's going to depend on the stiffness of your bump stop and your available suspension travel in the particular car you're running as how much bump stop engagement you can get away with. |
| 33:48 | This is certainly quite a lot of engagement but this is how this particular car needed to run to get the most out of it. |
| 33:55 | So one of the other things probably a lot of people will be familiar with with using damper position data is histograms. |
| 34:01 | So damper speed histograms which is something that's really important to be able to understand for tuning your dampers. |
| 34:08 | So what a damper speed histogram is is it's basically looking at the amount of time you're spending in each speed range of the damper. |
| 34:16 | So for dampers, they are primarily sensitive to velocity that's the velocity of how fast the damper's moving. |
| 34:23 | So one of the ways we can understand about how, if we look at how much time each damper is spending in which speed range we can start to understand which parts of the damping curve are most dominant or how much time we're spending in low speed vs high speed vs rebound vs compression. |
| 34:39 | We can start to look at the biases we've got in our damper tuning. |
| 34:42 | So I've got a couple of examples shown in this next page here. |
| 34:46 | So let me go through this, I've got the front left, front right, rear left, rear right, that's what I've got showing in this section over here. |
| 34:54 | And then I've got the front axle and the rear axle plotted overlaid over here. |
| 34:57 | This is essentially just a different way of looking at the same thing if I'm looking at the symmetry from one side to the other rather than necessarily each side by itself. |
| 35:06 | And again I've got some dynamic linking from my setup sheet here where I've got the compression and rebound settings for each corner of the car so I've got front left compression, front right compression, rear left compression, rear right compression and then the same for the rebound over here so I can see for this particular run what settings I had or the clicks I had on my dampers. |
| 35:23 | So this is one of the ways a lot of people will be most familiar with looking at, damper speed histograms, will be actually in terms of a bar graph rather than a line. |
| 35:32 | Myself I prefer the line, I find it easier particularly when you're looking at overlays which we'll show a little bit later but I'll show you what you guys might be a little more familiar with to look in terms of bar. |
| 35:44 | So this is probably the most common way people are used to looking at these things but essentially what we've got here is on the left hand side of this plot we've got rebound side and on the right hand side we've got bump or compression. |
| 35:58 | And we've got, as we move along this X axis we've got different speed ranges. |
| 36:01 | We can actually see down the bottom here of the rear dampers, we've got 0, so 0 that means no speed, the dampers aren't moving at all and as we move to the extreme left, that's in the rebound side, over 200 mm a second and as we move to the right that's the compression side over 200 mm a second so essentially each one of these bars, we can think of it as a bin and the height of that bin is showing us relative to the rest of the speeds in that damper range how much time is being spent in that particular bin, by that damper as we do a full lap of the track. |
| 36:33 | So in this particular case here we can see that the front left damper, I should say as well this grey overlay in the background here, this is something that I've got set in the settings to define the high and low speed boundary. |
| 36:45 | So typically in damping, depending on the motion ratio that you've got in your damper, between wheel and damper but a common boundary that we consider between low speed and high speed is 25 mm per second. |
| 36:57 | That's a little bit arbitrary but it is a guide for, 25 mm per second of damper speed, that's when we put an arbitrary line in the sand to say anything lower than that is low speed and anything higher than it is high speed so that's what's indicated to us by this slighty grey band that's shown in the middle. |
| 37:14 | That's also where you can see the histogram bars changing colour. |
| 37:17 | So what we can see here in this particular setting on this particular run that we've got some compression bias in the damping. |
| 37:24 | So what I mean by that is if I look at this section of the histogram, it's probably not great that I'm doing this in red over top of red but hopefully you can sort of see that. |
| 37:31 | So we've got these two parts of the bar are relatively symmetrical but in this section here which is still part of the low speed, what we would consider low speed damping. |
| 37:42 | We've definitely got some bias between compression relative to rebound so that means we've got the damper spending slightly more of its time in the compression rather than low speed rebound. |
| 37:53 | So what we're often looking for in a pure mechanical setup, certainly as a baseline is some amount of symmetry in the damper histogram. |
| 38:01 | Now that's not to say that the fastest solution or the fastest setting for you car on track is going to be symmetrical, in fact, I've almost never seen the final tuning or setting that you end up getting to that's fastest for your car on a particular track, I've almost never seen symmetric histograms work the best. |
| 38:18 | Sort of from a theoretical perspective, from an energy perspective there's some theory that makes it seem like having symmetry in your histograms is the way to go. |
| 38:26 | In reality that's not the case but it is somewhat of a sensible starting point if you're starting to play around with your damper settings as you tune your car for the track. |
| 38:35 | Now what I'm going to do here is, actually I'm going to come back to that later when I talk about the reliability before I get into it a little bit further. |
| 38:45 | I do want to mention now guys, if you have got any questions that have come up through this webinar, whether it's anything directly that we've talked about today with damper position data or histograms or anything or even just anything to do with car setup you're welcome chuck those through now and the guys will put those through to me and I'll get onto them in a second as soon as I'm finished getting through the content here. |
| 39:05 | One of the ways that using a damper histogram can be really really valuable is actually picking up problems in the damping settings. |
| 39:14 | So what I mean by that is I've definitely been caught out by this a few times in my career where you ask for a certain damper setting to go into the car and maybe the mechanics either don't do it at all because they forget or they actually do the opposite. |
| 39:27 | It is one of those things with damper clicks, the little knobs on the side of the dampers, it is something, particularly when you're in a rush or if you're unfamiliar with the car, it is one of those things that's quite easy to get wrong, go the wrong direction, you tell them for compression, you ask for low speed compression, maybe they do low speed rebound or maybe they go in the wrong direction, you ask for a bigger number or smaller number, that's why it's so important to have your communication down with your number one mechanic. |
| 39:51 | So you can communicate that stuff properly to make sure the settings are done as you expect but one of the things I wanted to bring up that a damper histogram is particularly useful for is for actually finding those mistakes. |
| 40:02 | So one of the ways we can do that is by let's say I know in this particular data set I did actually have a mistake, one of the mechanics had the wrong damper settings in all of the dampers in this particular car. |
| 40:14 | And it's something that actually took me a while to get on top of. |
| 40:16 | It took me a while to figure out that, longer than it should have, that the problems I was having with the tuning of the car were because of a damping setting. |
| 40:24 | Suddenly the test we'd done previously didn't make sense because the car was behaving quite differently. |
| 40:30 | I had to end up going back through the setup sheets that the mechanics had generated before I realised the damper settings had been made incorrectly. |
| 40:37 | So if I chuck this overlay on here, it will just take a second to come up. |
| 40:41 | You can see here this is where it gets quite busy when you're using line over, or I find it quite busy to look at using bar overlays, you can see the differences but I personally find it easier to look in terms of a line difference instead so I'm going to put that back to a line display. |
| 40:55 | So this should become quite clear. |
| 40:59 | So straight away we can see really big differences between all of these histograms between these two runs. |
| 41:04 | So this is the same car on the same track, same day, the only difference here is different clicks on the dampers. |
| 41:09 | So what we can see here, because we've got in the overlay colour, the white colour, we've got this big spike in the low speed section and we can see here that we've got the white lines are quite a lot lower in the mid high speed sections in here. |
| 41:22 | So what that's doing, because we're normalising this over an entire lap, this is telling us the dampers are spending more time in the low speeds. |
| 41:30 | So that means we've got a whole lot more low speed damping in general. |
| 41:34 | It's actually relatively symmetric about both the compression and the rebound side. |
| 41:38 | We've just got a whole lot more of it and as a result because the dampers are spending more time in the low speed regime, they have to necessarily spend less of their time in the high speed regime. |
| 41:48 | So that's why we see this difference down here where we see this big, let's look at the left rear for example, there's a big spike in the middle in the low speed regime and we see a big dip in the high speed regime. |
| 41:57 | In this case on the rebound side. |
| 42:00 | So if I'd been more onto it on that particular race weekend, if I had anticipated that maybe we might have a damping setting or maybe if I just looked at the right graph when I was going through the data, I would have picked this up straight away by doing an overlay from one run to another and just quickly checking those histograms it's a really quick check to make sure that your dampers are behaving as you'd expect, make sure that they overlay roughly, make sure that the change has gone in the direction you expect, all the stuff like that, that would have saved me certainly a little bit of time of scratching my head and trying to figure out what was going on before I caught the problem. |
| 42:31 | The other thing that's useful to think about is the natural variation we get in these histograms from one run to another so I'm just going to click through some laps from the same run. |
| 42:41 | So these are all laps where the same damping settings were run on the car. |
| 42:45 | Obviously because the car's on track we're not coming in and changing these in between, this is all from one run. |
| 42:50 | You can sort of see the natural amount of variability we get between them. |
| 42:52 | That error in calculation or the different ways the car's being driven so you will always get some sort of variation in the way the histograms look, that's to be expected but certainly if I go back to that extreme example, big differences like this, this is straight away telling me, in this particular case I've got a whole lot more low speed, both compression and rebound damping on that overlay white run compared to the main run. |
| 43:16 | The other way that you can go through and check that, I'm just going to unhighlight this for a second, is looking at the damper reliability, looking at some damper reliability metrics. |
| 43:25 | So here I've got a little damper reliability page set up, I've got my raw damper position data coming through here and then I've got a couple of reports so what I'm using here, I've got my, all four corners of my dampers set up here in this table and I've go the min, max and the average values shown for every lap, so that's a little bit hard to see because I've the way I've got it set up but essentially the way I'm actually using these is the values in this table, so each one of those columns is a new lap. |
| 43:51 | I've actually got it plotted in this little report table here. |
| 43:54 | So what I can see by really quickly scanning across it, in this particular case I actually had a problem with the right rear damper pot as well in this run. |
| 44:03 | What's really clear to see is if I just look at the minimum channel here, you can sort of see the scale finishes at zero in each one of these because 0-10, 0-10, 0-10 and suddenly we've got this one at -10-0 so if I look at the blue channel here which is the minimum channel which is the minimum damper position calculated for every lap of that run, I can see here I've got this spike down here and sort of hovering around the zero, now that's why I've got the raw channels plotted here, just gives me, the report's sort of pointing me to what to look towards in the data. |
| 44:33 | I could go back here and look at the particular lap, so this looks like about lap 3 in the run, lap 2 or 3 so let's go back to that, let's see what it's seeing here. |
| 44:41 | Yeah if we have a look at the data, looks like lap 2 that's happening on. |
| 44:43 | We can see these big spikes down into the negative here which don't make any sense for the way this particular damper position is calibrated on the car. |
| 44:52 | So not only that but if I just zoom into this particular part of the track, we can see it looks really different, the actual signal looks really different and this particular case what was going on is we had one of our damper pots actually starting to give problems electrically, it was starting to give us garbage signals coming out of it and that's what we see with this really high frequency noise coming out of the sensor. |
| 45:12 | You can see the sort of form, the frequency that each of the other dampers is responding to with respect to this right rear, it's sort of gone crazy and it's giving us not just a weird signal but also it's giving us crazy values, negative values which we shouldn't have in the raw signal. |
| 45:29 | So you could pick this up by looking at a time/distance plot but this is a situation where I like to make use of reports when looking at something like dampers just to make sure that the sensors actually are operating correctly. |
| 45:42 | If I hadn't looked at this, if I go and look at something like a roll channel or a pitch channel, that's when these things can start to offset our values and we start to get things that don't make maybe quite as much sense as they should. |
| 45:52 | By going through and checking your reliability channels in this way, that gives us a chance to be able to catch these things as early as possible so we can get them rectified on the car. |
| 46:03 | The other way we can make use, one last thing I want to talk about before we finish up today is to talk about downforce calculations so in this particular car as I said, does have a lot of downforce. |
| 46:15 | We can see here, it's really clear that particularly on the front axle, this damper position is changing as we move along the track now we do have, this part of the track we do have a corner which is meaning the front left corner is being a little bit, getting a little bit more load but in the section of track where you're travelling in a straight line, we can see it's pretty clear that we've got a bit of a trend coming up like this. |
| 46:35 | The reason for that is because we've got a whole lot of downforce coming onto the car which is compressing the suspension as we move along a track. |
| 46:42 | Now if you've got things like spring rates, the bump stop rates, if you're engaging them, things like, taking into account things like load transfer, you can actually do a pretty reasonable calculation of understanding how much actual downforce your car has by making use of damper pots. |
| 46:57 | So guys that's all I've got to talk about as far as all the technical aspects of ways you can use damper position data. |
| 47:03 | I think we managed to pack quite a lot of useful info in there, I hope you guys got something out of that and I'll get to your questions in a second. |
| 47:09 | On that, don't forget guys we've got new courses coming out on race driver fundamentals and our suspension fundamentals course which I'm currently writing at the moment, we'll be getting ready to film soon. |
| 47:20 | If this stuff that we went through today is of any interest to you, I'm sure both of those courses will also be right up your alley as well. |
| 47:27 | So guys remember if you're not watching this live, you can always ask a question based on what you've seen in the webinar in our forum and I'll be happy to get to it there and hopefully we can all learn more by getting more of your questions on there and getting a chance to jump on them. |
| 47:42 | So I'm just going to jump across to the questions here to see if we've got any questions, so there are a couple that have come through, alright let's have a look. |
| 47:53 | First question, are the rotary type sensor similar reliability to linear? Yeah so in my experience, one of the advantages of a rotary sensors is they do actually tend to be, if anything probably more reliable. |
| 48:06 | Obviously there's all sorts of rotary sensors you can use and they're not all created equal. |
| 48:10 | This particular Delphi sensor, I've had really good results with, I've used it on a couple of different, actually relatively high level race cars, you'd be surprised how often these things get used. |
| 48:22 | One of the advantages of them, because they're OEM, is they do tend to have a really good IP rating, it just means ingress protection, it means they're really good with dealing with things like water and dirt and horrible stuff that gets flung around inside the car when you're on track. |
| 48:37 | So I would actually say in some ways having a rotary sensor, well I can only really speak for this particular rotary sensor, my personal experience is they've actually been more reliable than the linear ones. |
| 48:50 | In the linear ones there's all sorts of different, not all sorts, there's a few different types of technologies they use for the actual sensing inside these things. |
| 48:56 | By definition they tend to be a little bit more susceptible to damage, they're actually got, in this particular one, they've got this little foam seal that you can, probably difficult to show you without the overhead but the idea here is that it's got a little foam wiper seal to try and stop dirt and water getting in there. |
| 49:16 | But by nature of having this nice smooth part of the sensor out in the open and flopping around inside the wheel well, it's just natural that you're going to end up damaging this thing, probably doing more damage to it than you would if it's nice and protected and shielded like all the sensor developments are in a rotary sensor. |
| 49:33 | So overall, are they more resilient, I would say probably are for that particular sensor. |
| 49:39 | It's not always appropriate to use something like that, it's really going to depend on your situation. |
| 49:44 | OK I've got a couple more questions jumping on here as well. |
| 49:47 | Is there any benefit to integrating to get speed acceleration on dampers to evaluate damper settings? Yeah absolutely, that's actually what's happening, that's what you're actually doing when you are looking at the damper position to get the damper speed. |
| 50:02 | So the damper speed histograms, I should take one step back, there's a couple of different ways you can use damper speed and damper acceleration. |
| 50:10 | So obviously I talked about damper position, we used that for lots of different things in the webinar today. |
| 50:14 | Damper speed is useful for looking at in terms of the histograms. |
| 50:17 | Damper acceleration I find most useful for looking at impacts on the car. |
| 50:21 | So obviously the force that we get in any particular part of the car is somewhat proportional to the acceleration that that corner of the car experiences. |
| 50:29 | So what I found in the past, is things like, I've had a tyre failure from things like a tyre being hit too hard on a curb particularly on an out lap when the tyres are cold and the pressures aren't up. |
| 50:41 | You can usually correlate that really strongly to high damper acceleration so if you plot acceleration in one of those time/distance plot or in a report, you'll often find a strong correlation between say a position of damage on track, whether it's damage to a suspension component, a bent wheel, a damaged tyre, looking at damper accelerations is one good way to do that. |
| 51:00 | Looking at damper acceleration and velocities is also a really good way of going through and characterising tracks as far as looking at it in terms of bumpiness. |
| 51:07 | So when you're part of a race series that goes to a whole lot of different tracks, you'll often come up with a whole lot of different metrics that help you characterise different tracks in different ways to understand how you can evolve your setup from one track to another. |
| 51:20 | Bumpiness or how unsteady the surface is, how rough the surface is, is one of those because it makes a difference to how we're going to roll out in terms of our damper settings, in terms of our spring settings to make sure we're going to be able to maximise our grip on those rough surfaces. |
| 51:31 | So absolutely looking at position, speed and acceleration of the damper signal, all relevant metrics. |
| 51:38 | Suppliers of various pots, high end and budget? So I'm not sure what all of that question means but I'm going to assume you're asking of the different types, is there a big difference between high end and low end? I've got to say I've probably only really been exposed to mostly high end damper pots, I'm not really sure if there's such a thing as a low end damper pot out there. |
| 52:04 | In saying that there's definitely such a thing as probably more low end, more generically applicable linear potentiometers. |
| 52:12 | Something like this, I would always be tending to use something that is designed for an automotive application. |
| 52:19 | So normally the different sensor supplier will recommend a particular product depending on the application so for this particular brand, Penny and Giles, they've got a huge range of different linear potentiometer options. |
| 52:32 | Some of them are much more designed for use for things like automation, things like factory work, maybe much cleaner environments. |
| 52:41 | That obviously means that they're maybe cheaper to build or packaged in a different way, it's a relatively harsh environment inside a car, whether it's because of temperature or water or dirt or anything like that. |
| 52:54 | That's why it's probably, the most important thing is to get one that is actually designed for an automotive application in the first place. |
| 53:01 | After that, you need to make sure that you have sufficient resolution on your damper potentiometer to be able to actually, essentially what I mean by resolution is what are the smaller step sizes it can use? Essentially all of these, certainly all these options I've got here on table are far accurate enough to be able to do that, have a resolution size much small enough to be able to do that. |
| 53:27 | Again the sensor manufacturer is going to be best to help give you the best advice as far as which one of their sensors is going to be most appropriate for your particular application. |
| 53:38 | Last question here is suggested same rates? Yeah so sample rates is a great question and it's probably something I should have touched on before as well. |
| 53:45 | That question is really about how fast should you be logging these things? So it depends what you're doing with the data. |
| 53:51 | If you're looking at simply position data, so for things like roll gradients, how much the car's pitching, how much downforce you've got, you don't actually need particularly high frequency data, you could be looking at as little as maybe 10 or maybe 20 Hz you can be logging these things at and you'll get some useful information. |
| 54:05 | That's because the things like with roll and pitch, these things are all relatively low frequency movements, things aren't changing really quickly. |
| 54:13 | If you're looking on the other hand at tuning your dampers, so you're doing things like damper speed histograms, this is where you really want to be cranking up those logging rates. |
| 54:22 | Because we're actually looking at, there's a couple of reasons, we're often looking in the frequency domain but also, rather than the time domain, but we're also actually differentiating that signal to go from position to velocity in order to do that calculation. |
| 54:37 | So if you have all of your position movement, position logging points to coarse to each other, essentially when you do that differentiation it gives you a poorer signal or a poorer approximation of the velocity from the position signal. |
| 54:48 | So if you're looking at things like doing damper speed histograms and looking at the actual damping performance, using damper pots, you really want to be looking at a minimum frequency of around 250 Hz. |
| 55:00 | I've seen anywhere from 250 to 1000 Hz used well, in the 250 to 500 Hz is typically what people are using when they're looking at damper pots. |
| 55:10 | Certainly for tuning the actual damping using the damper pots themselves. |
| 55:14 | OK guys that's all the questions we've got here today. |
| 55:16 | Again if you guys are watching this afterwards and you've got some questions about it, jump in the forum, put your questions there and I'll be happy to jump on them and we'll get some more learning out of this together. |
| 55:27 | Thanks very much guys, we'll see you in the next one. |


