285 | Auto Tune - ECU Master EMU Black
Summary
Autotune functionality is common place on many aftermarket ECUs now, providing the potential to speed up the tuning process. It’s important to understand how to use these functions though if you want to get reliable results. In this webinar we’ll look at the auto tune functionality on the ECU Master EMU Black ECU using our V11 Subaru STi.
| 00:00 | - Hey team, Andre from High Peformance Academy here, welcome along to today's lesson. |
| 00:05 | Today we are going to be addressing the closed loop fuel control and the auto tune functionality on the Ecumaster EMU Black ECU. |
| 00:15 | And this is something that we have the ability to take advantage of, particularly if we've got a wideband air/fuel ratio sensor fitted to the ECU. |
| 00:23 | The closed loop control is going to be very beneficial in helping pick up the pieces if we've got variations day to day on our ambient conditions that will affect the accuracy of our fuelling, so that'll help keep our air/fuel ratio right on our target and we can also log that as well and then with the logging we can also use the auto tune functionality which can be a quick way of helping to basically optimise our volumetric efficiency table so we're going to go over some of that. |
| 00:53 | As usual we will have questions and answers at the end of the lesson so if there's anything that I talk about that you'd like me to go into more detail on or anything related to the topic at all, please ask those in the chat, we'll get into those at the end. |
| 01:07 | So first of all and I've already touched on this but why do we need closed loop fuel control? Surely if we just do our job properly, tune our VE table properly, we're going to get absolutely rock solid stable control of our fuelling under all conditions. |
| 01:21 | Well unfortuantely that would be a nice theory but it's not quite reality and particularly with an aftermarket ECU like the EMU Black that runs on the speed density operating principle, we aren't directly measuring the airflow into the engine, we're not using a mass airflow sensor. |
| 01:40 | Instead we're operating on the speed density principle where we are calculating mass airflow using the speed density operating system via the ideal gas law So the problem with this calculation is it does leave us open a little bit to potential errors and this is why we require a range of correction tables that are active essentially in any aftermarket ECU. |
| 02:05 | Corrections for air temperature, often this is dealt with directly within the volumetric efficiency fuel equation but even that, depending on the location of the sensor, heat soak etc can over compensate or under compensate. |
| 02:18 | We've also got the requirement for aspects such as cold start enrichment to get our fuelling under control when the engine is cold. |
| 02:27 | Even then when we get the car off the dyno as we see our atmospheric pressure and temperatures change slightly, we will still find that our air/fuel ratio will vary slightly compared to what we saw on the dyno or what we theoretically should have under perfect conditions so that's why closed loop control is so powerful, it allows us to basically let the ECU do minor corrections to get our fuelling back where it needs to be. |
| 02:52 | Now it's important to understand though that closed loop fuel control is not a bandaid for us doing our job properly in the first place. |
| 03:02 | We still need to actually tune the VE table and any corrections and get these dialled in as close as we can. |
| 03:10 | This is the same with any closed loop control system, whether we're talking about fuelling, idle speed control or boost control. |
| 03:17 | We're going to want to get the system controlling really nicely under open loop operating conditions where the ECU isn't trying to make any corrections. |
| 03:25 | The closer we can get our VE table so that our corrections under closed loop control are minor, ideally I'd like to be within maybe plus or minus 2-3%, the better the results and the less work the closed loop system has left to do. |
| 03:40 | So this is the point I really want to drive home here, a lot of tuners think that they can do a half ass job of tuning the VE table, don't worry too much about it, enable closed loop control, happy days, that'll do all of the hard work for us and that is just simply not correct. |
| 03:55 | The other aspect that I see a lot of people kind of fall into a trap with here is if they're relying heavily on closed loop control and their VE table's a bit of a mess, if we're accelerating through the RPM range and we've got one cell at let's say 5500 RPM that's way too rich, what we're going to find is as we transition through this, the air/fuel ratio understandably is going to move rich as a result of having too much VE in that cell. |
| 04:20 | So the closed loop control is then going to start pulling fuel back out to get us back to our target air/fuel ratio. |
| 04:27 | If we then find that the next cell at let's say 6000 RPM is too lean what we're going to get into the situation where we've already got a negative trim from our closed loop fuel control, we now move into a cell that's already too lean so we get this sort of effect where we go massively over lean momentarily before the closed loop system can kind of correct. |
| 04:47 | So remembering the closed loop control, it is reactive, not predictive. |
| 04:52 | So get our VE table as close as we can, dialled in nicely and everything's going to work much nicer. |
| 04:59 | Let's jump into our software though, enough talking there and we'll have a quick look through some of the aspects that we need to deal with. |
| 05:05 | So at the moment I've just got the engine up and idling, I don't really need to run the thing on the dyno here for the purposes of our demonstration. |
| 05:12 | We'll sort of have a look at what we've got going on and we've got our main VE table out here. |
| 05:18 | So this is essentially the first place to do our tuning, we want to get our volumetric efficiency table dialled in as I've mentioned so our air/fuel ratio is on our target. |
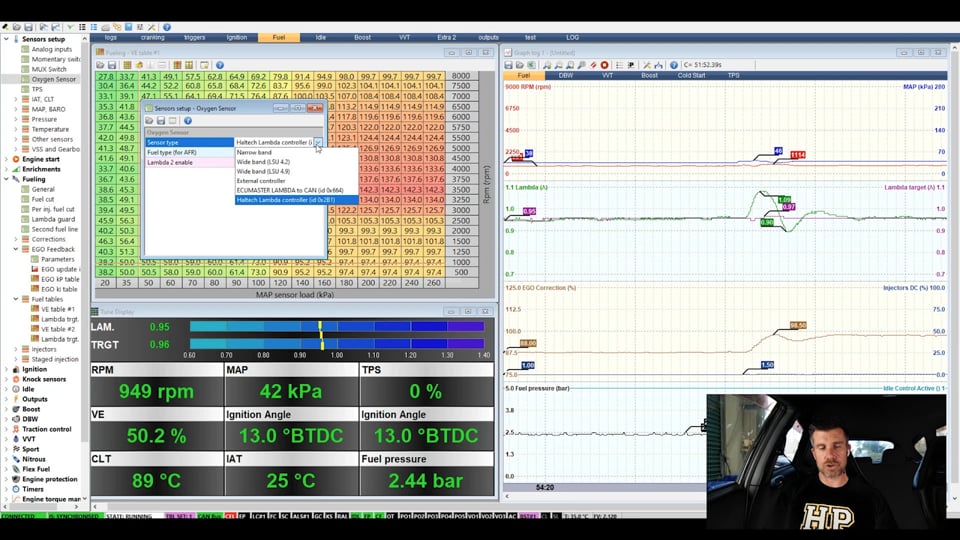
| 05:26 | Really nice feature with the Ecumaster EMU Black, we've got this little lambda vs target bar graph so it's really nice to quickly glance and see where abouts your fuelling is compared to your target while you are tuning. |
| 05:40 | We can see while I'm talking here, our fuelling's moving around a little bit, basically it's my fan switching in and out but as aside from that, as aside from the transient with the fan switching in and out, sitting pretty nicely on my target of 0.95 lambda. |
| 05:55 | Now I'll just close down our sensor setup here, the other aspect that comes as part of this is our fuel tables. |
| 06:01 | So we'll come down here, so we've got our VE table 1, that's what we're looking at right now. |
| 06:06 | This also works with our lambda target 1 tables so I'll just open this up and we'll have a quick look at this. |
| 06:13 | Basically as part of our tuning what we want to do is start by making sure that our lambda target table is actually realistic and we're targeting the sort of lambda or air/fuel ratio targets that we actually want. |
| 06:25 | So what we can see here is down in the idle areas where we are right now, I'm a little bit richer than stoich at 0.95. |
| 06:32 | All of our cruise areas up to about 100 kPa and about 5500 RPM are targeting lambda 1 for good economy, minimal tailpipe emissions. |
| 06:41 | As we move to the right out here and our boost increases, particularly out at 220 kPa and above, you can see we're targeting 0.80 probably, actually a little bit leaner than I'd probably usually go with but this is there or there abouts what we'd expect. |
| 06:54 | So really important to make sure that that table is dialled in for several reasons. |
| 06:58 | First of all it's going to be your guide when you are tuning your VE table but when you do enable closed loop control, this is going to be the target table that the closed loop system is going to try and track towards. |
| 07:09 | So of course if it's wrong, the system is going to track that incorrect target and this is something I know a lot of people who are new to a volumetric efficiency based ECU do struggle with because older millisecond based fuel tables, we really didn't need to worry about the VE target table unless we used closed loop control so that's what that is, that's what needs to be done there and we're also going to assume that we've got our VE table dialled in. |
| 07:37 | Now in order to get air/fuel ratio data into the ECU, we've got a range of different options there. |
| 07:43 | The EMU Black does have a onboard wideband controller to work with the LSU 4.9 lambda sensor. |
| 07:51 | Interestingly with our demo unit, we actually couldn't get that working. |
| 07:55 | Doesn't seem to be a problem that is widespread, we went back and forth with Ecumaster in Poland over this. |
| 08:02 | Did a bunch of tests and basically couldn't get to the bottom of it. |
| 08:07 | The wiring to the ECU was correct but to get us through Ecumaster actually added in support for a Haltech WB2 CAN based wideband controller we already had on the car. |
| 08:19 | If we come up to our sensor setup here in the top left and we come down to our oxygen sensor, I'll double click on that, bring this up here. |
| 08:29 | This is where we can define the sensor so if we come down to sensor type here and click on the drop down menu, we've got narrowband, which is a little useless to us really for performance tuning We can have a 4.2 ir 4.9 wideband so this would be the internal wideband controller. |
| 08:45 | I said 4.9, it will actually support 4.2 as well. |
| 08:49 | We can use an external controller, we can use the Ecumaster lambda to CAN external wideband controller or in this case as I've mentioned, they were nice enough to add support for the Haltech lambda controller which communicates via CAN. |
| 09:03 | So that's our options there, we can also set our fuel type there and obviously we are on gasoline so that gets that data in and obviously that's why we've got our lambda value coming in here. |
| 09:15 | So that's the first point, obviously if we don't have accurate air/fuel ratio data coming into he ECU we can't use the closed loop control functionality. |
| 09:25 | Now let's talk about how that fuel, that closed loop fuelling works. |
| 09:29 | And you've got a couple of options here as to how you want to use this. |
| 09:33 | You can either choose to make your tuning changes to dial the VE table in in open loop, so before you actually go and set up your exhaust gas oxygen correction or closed loop control or alternatively you can set the exhaust gas oxygen correction up right from the get go. |
| 09:50 | Just do need to keep in mind that that will affect the numbers that we need to put in the VE table so what I mean by this is if we are for example 5% too rich and we're not running andy closed loop control, let's say we're targeting lambda 1, the measured lambda would be 0.95, we can correct that by removing 5% from the relevant VE cell in our table, that'll correct it. |
| 10:15 | The trap that a lot of people fall into is they set up closed loop control, kind of forget that they've done it. |
| 10:21 | Now for exactly that same cell, the VE number is too great, so remembering that would have resulted normally in open loop of a lambda of 0.95, instead this time what's happening in the closed loop control is pulling 5% out to make that correction for us so if we don't remember that and we're just purely looking at our nice little graph here, our bar graph of lambda vs target it's going to be right on our target and we think great, job done, the VE table's dialled in but it isn't so that's just a little trap to keep in mind and there's no fixed way of doing this, it's really personal preference whether you tune with EGO on or off. |
| 10:57 | One of the nice features with the EGO on is particularly if you're dialling in a VE table from scratch and there may be some large errors initially while they're dialling it in, you just let the EGO with a large range of control sort of get us quickly get us back into the ballpark and then apply those changes. |
| 11:12 | Off the right hand side here in our graph we can see, if I just pause this for a second. |
| 11:19 | We've got our EGO correction here in brown and we can see what that's doing. |
| 11:24 | So if I click here, this particular point, we can see the number to the left of my cursor, can't really circle that but it's saying 97 so just need to understand what that means. |
| 11:37 | In the Ecumaster range of ECUs, this is a value where 100% means that no trim is being applied. |
| 11:46 | Numbers less so 97% in this case, we are removing 3% of fuel to get us back onto our target. |
| 11:52 | If we actually come over here with our fan running we can see that we're down at 88% so that means that there is too much fuel when the fan is active or vice versa, I actually can't remember which way around this is and the ECU is removing in this case, 12% fuel to get us back onto our target. |
| 12:08 | And we can see exactly what's happening up here as well, the green trace here is our lambda trace. |
| 12:13 | We can see that that's what's happened here, our lambda goes down to 0.87 before the closed loop trim comes in and pulls it back up onto our target. |
| 12:20 | So just understanding what those numbers are, of course numbers that are greater than 100, exactly what you'd expect there, adding fuel. |
| 12:29 | Alright we'll just make that go back to live there. |
| 12:33 | And we need to understand how the close loop control functions. |
| 12:38 | So to do that we're going to come into our fuelling menu here and if we come down to our EGO feedback, well start by bringing up our parameters. |
| 12:48 | So this is the broad parameters we can use for setting this us and by default well find this little tick box for EGO feedback will be disabled so we won't have any control. |
| 13:00 | The start here, all of this is pretty self explanatory but we've got a rich and a lean limit so basically this just allows us to limit the maximum amount of correction that will be applied. |
| 13:10 | It's important to just be a little sensible with this. |
| 13:14 | We obviously need to provide enough control for the system to be able to do its job but we don't really want the system being able to make too dramatic of a change, particularly under high load. |
| 13:26 | A lot of ECUs will give us the ability to control the trim relative to our load. |
| 13:32 | So maybe we could give 10 or 15% control range down at idle where we will likely have changes resulting from heat soak but at wide open throttle, maybe 1 bar of boost and 7000 RPM we might pull that down to plus or minus 5%. |
| 13:48 | We don't have that function in the Ecumaster range so you just need to be a little bit mindful about that. |
| 13:56 | So 15% plus or minus, it's probably not bad, it's a little bit over what I'd like to do at wide open throttle but we'll talk about how we can control that in a second. |
| 14:05 | So we've got the same for our lean limit. |
| 14:07 | We've got some narrowband control functions which I'll ignore because again really for our purposes, narrowband sensors not much use. |
| 14:17 | I've got the warmup time so how long the system will wait before the control actually comes in. |
| 14:23 | Then we've got some limits here so this is where we can go some way to controlling where abouts in the VE table the closed loop system will function. |
| 14:32 | So we can limit the throttle position, in this case I'm allowing control essentially everywhere but if we wanted to make sure that we were only operating closed loop control under cruise conditions it'd be easy enough to set this to maybe 40 or 50%. |
| 14:44 | We've also got a minimum coolant temperature. |
| 14:47 | I don't really mind allowing the closed loop control to function from stone cold as long as the sensor is actually up and operating, it actually can be a really nice way of making small changes as required to the fuelling during warmup enrichment so yeah I don't really see a problem with bringing this in at maybe 10 or 15° just again as long as the control is actually online and operating. |
| 15:09 | We've got our minimum RPM so whether or not you want to choose a minimum RPM to make sure the system is inactive maybe at idle, I don't really see too many instances where that would be required but you know if you want to, you could do that. |
| 15:23 | We've also got max RPM so again, the combination of max RPM, max throttle position and the next one that we'll look at is our minimum and maximum manifold pressure. |
| 15:32 | Again we can just control where abouts that system is active and again I'm basically allowing control everywhere, 700 - 8000 RPM, 20 -300 kPa so yeah all the time we're in closed loop control. |
| 15:45 | Also some nice features here, the ability to delay the closed loop control after a fuel cut or a gear cut or a transient. |
| 15:53 | So this is important because, it's actually a problem we face in one of our other cars where on a gear shift with a sequential gearbox and a strain gauge, what we're going to end up with is a fuel cut or ignition cut to allow the gearbox to change gear. |
| 16:08 | That will result in an instantaneous lean spike so we really don't want the closed loop system to be chasing that lean spike, it's going to sort itself out naturally as soon as fuelling or ignition is reengaged and the next gear is active so it's only a momentary thing so we have the ability to delay that. |
| 16:25 | So in this case, 100 milliseconds, probably not a bad place to get started, little bit of testing with some datalogging's going to be required just to make sure that everything stays relatively smooth across those sorts of limits. |
| 16:37 | We've also got the ability to control our exhaust gas oxygen integral limit so our maximum and minimum integral limits and this is a bit of a fine line. |
| 16:47 | I talk a little bit in some of our courses about problems with integral windup any time we are running a PID control algorithm. |
| 16:55 | This doesn't actually give us a derivative but it does give a proportional integral gain or integral element here is in response to an error over time. |
| 17:05 | So what it'll do is if we've got an error there, it's going to drive the exhaust gas oxygen correction in order to get us back to our target which it does really well. |
| 17:15 | But we can get into a situation where if it's left unchecked that integral element can become so great that it actually causes some control issues a little bit further down the track. |
| 17:27 | So plus or minus 5-10% should be more than sufficient again if we've got everything dialled in we shouldn't be having to lean too heavily on our closed loop control so that's really the key there. |
| 17:38 | But just bear in mind, giving the integral gain too much power here can be problematic. |
| 17:44 | So that's our basics there, that sets up the exhaust gas oxygen correction. |
| 17:49 | We'll close that down here and there are a couple of other parameters that go hand in hand with that. |
| 17:53 | I'll try and get this over, it's not going to let me, that's alright. |
| 17:57 | The next one down is our exhaust gas oxygen update interval so we'll open that up. |
| 18:02 | So again just bring this up so we can see it. |
| 18:05 | So we've got a 2D table here. |
| 18:07 | This is again a function that a lot of ECUs don't incorporate and I think it's probably something that is pretty much essential for closed loop control. |
| 18:15 | Now the problem is when we're sitting here at idle, depending on where exactly the oxygen sensor is relative to the exhaust ports and there is a latency in an update to our fuelling actually being detected by the sensor. |
| 18:31 | What I mean is there's basically a transport delay from the exhaust gas exiting the cylinder, going down the exhaust manifold, that's quite long in a Subaru as well, and then going through the turbocharger and finally being detected by the wideband sensor. |
| 18:45 | So we need to take that into account because otherwise basically what will happen is the ECU will look at the air/fuel ratio go hey, we're too lean I'm going to add fuel. |
| 18:55 | It adds fuel, instantly looks at the result which of course hasn't upated because the new combustion event hasn't reached the sensor, it looks at the sensor, goes hey we're still too lean, I'm going to add more fuel and this kind of goes over and over and by the time the air/fuel ratio actually updates the exhaust gas actually gets to the sensor, we're already way too rich and now we just sort of go through this oscillation of going backwards and forwards between too rich and too lean so what we want to do here is be mindful of making sure that we choose a sensible update interval and this is relative to RPM cause of course conversely if we're at 7000 RPM and wide open throttle, there's a lot of exhaust gas going through the engine and it's going to reach the sensor very quickly so looking at this table here, we can see down at low RPM I've got values of 50, interestingly, there's a little hint for this here, this is milliseconds multiplied by 5. |
| 19:50 | So not quite sure why exactly they haven't just entered a millisecond delay but that's not actually 50 milliseconds, it's 50 multiplied by 5 so just to keep that in mind there. |
| 20:02 | On the other hand at 5000, 6000, 7000 RPM, we're down to an interval of 20. |
| 20:09 | So just keep that in mind there so that you're going to actually have some numbers that are sensible. |
| 20:16 | Generally in terms of what numbers would go in there, at idle depending on the particular setup we might find that we need a delay of maybe 1000 to 2000 milliseconds, it's quite long so 1-2 full seconds so the ECU will update then wait 1-2 seconds before taking another sample from the O2 sensor. |
| 20:35 | On the other hand, 50 to maybe 100 milliseconds at high RPM, that's absolutely fine. |
| 20:43 | So 100 milliseconds, basically it's updating 10 times every second based on what it's detecting. |
| 20:49 | So a key way of knowing that you've got this wrong and it's difficult because this also has some interaction with the proportional integral gains, is that if your interval is too short you're going to see this hunting or oscillating. |
| 21:04 | Which at the moment we can see what's going on over here, maybe I'll just try changing this and see if we can actually cause this issue. |
| 21:12 | We'll set that back down to 20. |
| 21:13 | So looking at what our exhaust gas oxygen correction's doing at the moment, it's sitting pretty stationary there at 88% but what I'll try doing here, if we just change this down to numbers of 40% VE, what that's going to do is lean everything out and we might, should have probably tested this so I know it's going to work, we should probably see that it's going to lose a little bit of control and we can see that it's actually not too bad, it's gone up to 107% and it's actually pretty stable so a bad example but trust me that that is something that you do need to be mindful of there if your update rate is too fast so just making a liar out of me right now but yeah it is something that does genuinely cause you some issues if you've got that update rate set too fast or too slow for that matter. |
| 22:05 | Right we'll set that back to how I had it, we'll close that down. |
| 22:08 | Also another point just to make here which should be relatively commonly understood for most tuners of the Ecumaster EMU, any time we make changes to anything we do actually need to make those changes live, we can do this with our little icon up here in the top left corner and then all of those changes will be basically flashed into the ECU. |
| 22:32 | Alright so the update table which was a really really terrible demonstration of how that works but hopefully you can at least understand the principle. |
| 22:42 | We've also got the ability to change our proportional and our integral elements. |
| 22:47 | So hopefully here I can show a better example. |
| 22:50 | So they give us a 3D table here which is kind of nice because it allows us to control things relative to RPM and load and again this sort of feeds a little bit back into the update rate that I just talked about. |
| 23:06 | Because what we end up with at low RPM at idle where there's low exhaust gas flow will be very different to what we end up with at wide open throttle. |
| 23:15 | So at the moment we can see these numbers in here, I've got numbers between 2 and 5, not really anything particularly dramatic set up there but again I'm just going to try and upset the car here a little bit and see if we can get into a situation where we'd start getting some hunting. |
| 23:29 | So we'll enter a value there of 10 and this is probably going to, oh maybe we will get a little bit of error here. |
| 23:35 | OK it's going to yeah we can see, OK it is working, that's great, I love it when a plan comes together. |
| 23:42 | What we can see here, and it's only doing it briefly but it does show the sort of example. |
| 23:48 | We can see that our lambda here, our green line has sort of got this oscillation going, it's started to go lean. |
| 23:53 | Then our closed loop control kicked in, we can see if I look down at that brown line it's gone up to 112%, 112.5% so it's 12.5% more fuel but it's overshot there so then our air/fuel ratio goes a little bit too rich, it's gone down to 0.95 so the closed loop control sort of oscillates and we see that oscillation before it catches up so this is indicative, it wasn't too bad there with that little example but that is indicative that we've got a little bit too much proportional gain and we can see even now while I'm talking, the air/fuel ratio is still tracking around a little bit so I mean that's gone from a number of 2 which I know was working pretty well under idle conditions, to a number of 10. |
| 24:32 | It's a pretty big change. |
| 24:34 | My go to for testing proportional or any gains for a PID control algorithm, if we don't know any better, start by just making bold changes, so I normally will double my values, so we'll start at 2, I'll go to 4, test the system there, see what the control is like. |
| 24:51 | If we've still got relatively sluggish control, go from 4-8, 8-16 etc, you'll get to a point where you will lose control and the system will start oscillating and what that does is it instantly gives you an idea of the range of numbers which are workable for that particular system that you're trying to control. |
| 25:09 | So in this case we went up to 10, we know that that was too much, it was oscillatiing so probably going to be somewhere in the range of maybe 1 through to about 8 or thereabouts, it gives me that range to work with. |
| 25:22 | Alright so that's our proportional gain and then we've got our integral gain as well. |
| 25:28 | Look at our integral gain, I should mention there, the downside of having our proportional gain too high is that we end up with that oscillation, the downside of having our proportional gain too low is that it won't actually make a correction to our air/fuel ratio so we get sluggish response. |
| 25:46 | So basically that's the 2 extremes of the situation, what we're looking for is sharp response, picking up that error quickly and eliminating it without undue oscillation or overshooting. |
| 25:57 | The proportional gain though on its own cannot get rid of all of the error. |
| 26:02 | The reason for this is that the proportional gain is a response proportional, as its name suggests, to the amount of error that exists. |
| 26:12 | So the problem with this is it'll make a big change to our closed loop correction when there is a big error but as our error gets closer to zero the effect of that proportional gain is obviously reduced so this is where we need something else to pick up the final little pieces of the error which is our integral gain. |
| 26:30 | And that's our integral gain table here, basically exactly the same, sort of control, we've got exactly the same sort of response as well. |
| 26:39 | If our integral gain element is too small, we won't get rid of our error so we'll always have an error that remains so that's the thing to look for there. |
| 26:48 | On the other hand, just like our proportional gain, if our integral gain is too high and I'll try, hopefully this is going to play the game for me, we'll set this from 0.3, let's got to a number of 5 and that should be enough to make this unstable. |
| 27:03 | And you can see that's exactly what's happening, just as I'm talking here we're starting to see our air/fuel ratio in green and our closed loop control in brown are both oscillating wildly so clear indication that we've gone too far. |
| 27:16 | So somewhere in between is the happy range. |
| 27:18 | So again I use exactly the same process for tuning the integral gain. |
| 27:21 | Basically start with a low number, double it until we find the sort of area where we start getting that oscillation, we're losing control and that'll give you the range to work with. |
| 27:31 | So lot of people get scared of tuning PID gains, it's really not that bad. |
| 27:36 | As long as we understand the process we're going through, start with low numbers, begin by doubling them until you find that range of control that you can use and then within that range of control we're looking for fast control eliminating the error without oscillating or overshooting, if we can get that, we can get pretty good results. |
| 27:55 | So that's our closed loop control there, we're going to have some questions shortly so this is a good time to, I suggest if you've got any questions please ask them and we'll get into those in a moment. |
| 28:05 | The other aspect that goes with our closed loop control though is our auto tune functionality. |
| 28:10 | And in the Ecumaster EMU worked example in our practical standalone, I actually went about this a different way and this is personal preference really, I used a separate data logging package there, MegaLogViewer HD to actually do some correction on the VE table. |
| 28:31 | Still a completely relevant way of doing this but there is autotune functionality built into the Ecumaster EMU Black which I want to go through so at the moment I've got a pretty boring log going because all we've done is just had the engine at idle, haven't actually got the thing bolted up to the dyno at the moment so that kind of eliminates some of the potential of what I can do with running the car at a wide range but just while I'm talking here we'll just bring the RPM up so we can get a few more samples at a few more places here. |
| 29:00 | One of the things we're always going to need to do is once we have optimised the tune on the dyno, there's going to be some areas on they dyno that we can't get to. |
| 29:08 | So particularly at very light load the overrun areas, it's difficult for us to really accurately get into those areas on the dyno. |
| 29:17 | The dyno generally will slow down so we're going to need to focus on those out on the road and we also, as I've always mentioned, is we generally do see some small discrepancies between the air/fuel ratio on the dyno and the air/fuel ratio that we see out in the real world. |
| 29:32 | Of course it's what we get in the real world that actually counts so correcting this can be quite a time consuming job. |
| 29:38 | Obviously in the perfect world we don't really want to be trying to stare at a laptop screen while we're driving around and make individual cell corrections so this is where using the logging functionality here and gathering a large amount of data in a datalog can help us then to correct the VE table in just a few iterations so what we'll do is we'll stop our datalog there. |
| 29:58 | And what we're going to do is we're going to go to our tools menu and we're going to come down to auto tune. |
| 30:05 | So first of all we can define some of the parameters around where the auto tune will work so minimum and maximum RPM, minimum and maximum throttle position, minimum and maximum map so pretty straightforward there, we can also set up transient delays, in this case 500 milliseconds and what table we're going to apply the auto tune functionality to so don't really need to change anything here and what we're going to do is bring up this second table here which kind of show us where we've gathered data. |
| 30:35 | Now obviously I only revved the engine up so we've got a relatively narrow range of data that we have selected, these solid cells are ones that have been selected. |
| 30:44 | And green here means that we were too rich. |
| 30:48 | If these cells were pinky or red then that means that they're going to be leaner than target and with added fuel. |
| 30:57 | What we've got is the ability to sort of see what's going on here. |
| 31:00 | We've got our VE numbers up the top here, is what I was trying to suggest, we've got our VE, we also can look at the actual lambda, we can then look at the number of samples that we go in each cell which is quite important because we want really good quality data which means that we want a lot of hits in each individual cell. |
| 31:19 | So we can see for example the ones where we've been down in the idle area the whole time I've been talking, obviously a huge number of samples. |
| 31:26 | On the other hand, these areas here where we've obviously just flashed through, we obviously don't have such good quality data, we've only got 32 to 36 samples same with up here. |
| 31:39 | So this is just important because it's going to allow us to decide how much weight we're going to put on the required changes that need to be made based on that data. |
| 31:49 | If we've only got a handful of samples, particularly if those samples are suggesting that we need to make a massive change to our VE, I'd be a little bit hesitant to do so. |
| 31:58 | We've also got the ability to show the difference between our target lambda and our measured lambda and we can also show the VE table difference. |
| 32:08 | So this is the calculated difference that needs to be applied to the volumetric efficiency table in order to supposedly correct that error. |
| 32:15 | So what we can do then, once we've got all of that data from our log, so ideally we'd take the car out for a decent drive, gather a lot of data, basically clicking off as many combinations of manifold pressure and RPM as we can and hopefully that would sort of encompass most of this table. |
| 32:34 | We can then highlight the data that we want to actually apply so let's say we're happy with all of this data here and we can highlight that and we can right click and then we've got the ability to make 2 adjustments here. |
| 32:47 | We can either apply the entire calculated correction, in this case the one that I'm currently hovering over, we can do this by clicking the S key as well. |
| 32:55 | Apply selection 100%. |
| 32:57 | Now that's probably not a bad place to get started, particularly if you've got some pretty large changes that are required. |
| 33:04 | But if you're close to the mark, what you can find is that this will, even though it's got some built in sort of guards around transient enrichment for example, it can still bring in some errors depending on how you drove the car and the quality of the data that you gathered. |
| 33:20 | So particularly if you're already pretty close to the mark I'd be more inclined to use the alt S which is apply selection 50% so basically if it calculates that it needs a 10% correction to the volumetric efficiency in one cell, then apply 50% will only apply a 5% correction so it just makes a smaller change and this allows you to creep up on the correct result. |
| 33:43 | So it's a really quick and easy way of making wholesale changes. |
| 33:45 | The advantage as well based on what you actually select you can be quite specific in what adjustments you actually make to the VE table. |
| 33:55 | So if you know you've got some questionable data you can choose just to completely ignore that sample set there and only focus on the good quality data that you do want to apply. |
| 34:06 | Also important to mention that the auto tune functionality will work with or without the exhaust gas oxygen correction so basically the Ecumaster EMU Black will take into account if we already have the wideband control functioning and that's let's say adding 5% already plus it sees that we're already 2% off the target, it'll add those together and say that that particular cell needs a correction of 7% so again just a really nice quick and easy way of making wholesale changes to get our volumetric efficiency table dialled in out on the road or the racetrack based on logged data from a datalog. |
| 34:46 | Right we'll get into our question and answers now so if you do have any more questions, please keep them coming. |
| 34:58 | Right we'll just get this window down so I don't overheat while we're doing this. |
| 35:02 | First question comes from Reeshab who's asked, my air/fuel ratio at idle on neutral goes to 11-12, is this normal? 11-12:1, no it's probably not normal. |
| 35:16 | Not a lot of information around that question but yeah no you should be getting pretty stable control of your air/fuel ratio. |
| 35:25 | Now while I was going through that demonstration, clearly we were seeing some swings in our air/fuel ratio based on the fan switching in and out, probably something I should have focused on but we do have the ability to add additional fuelling based on loads that are placed on the engine so that's where we'd correct something like that. |
| 35:44 | But within reason, I wouldn't expect the air/fuel ratio to be swinging more than about plus or minus 0.5 of an air/fuel ratio unit so if we're targeting 14.7, we might be going between maybe at the most 14.0 and maybe 15.2. |
| 36:00 | Need to be careful because as you go leaner than stoich as well, that's where you'll really find the engine might start to start idling quite poorly. |
| 36:09 | Engine will run pretty happily at maybe 13, 13.5:1 through to 14.7:1 but the lean side of 14.7:1 is where we do get problems which is one of the reasons why closed loop control is beneficial because under heat soak conditions we can find that we'd naturally be quite lean where the engine doesn't really run particularly happily. |
| 36:29 | Bjorn's asked, why not put load under Y axis in general options? Could it be that the particular wideband O2 sensor used had, like AEM gave a calibration resistor on them. |
| 36:42 | I don't know if I would just create an issue where the O2 sensor may not read. |
| 36:45 | OK not quite sure what the angle of that question there Bjorn. |
| 36:50 | This sensor is a wideband from Haltech so that does use the calibration resistor in the 4.9 lambda sensor. |
| 37:01 | I'm not sure if you're looking at a way of disabling that if it was faulty, some of the wideband controllers do send diagnostic information which is helpful, particularly if you are running the onboard lambda which as I mentioned unfortunately we couldn't get up and running in our particular vehicle. |
| 37:19 | That would basically disable the closed loop control if the sensor was faulty, we don't have that option unfortunately. |
| 37:28 | Bjorn has asked, I once had an issue where I forgot my closed loop enabled with EGO feedback and the EGO KP table the numbers in there were a little high which cause it to malfunction and made the car actually dump fuel rich at say 0.7 lambda. |
| 37:41 | I couldn't figure out what it was till I realized the numbers in the table were off and was the cause of the issue. |
| 37:46 | Keeping that in mind that it may vary from car to car, would there be a desired setting for that EGO KP table and how would you go about setting up the ideal figures in there? So hopefully I did answer that, there aren't numbers that you can apply to every situation. |
| 38:00 | I actually found that the numbers from the base table from Ecumaster actually didn't give very good control. |
| 38:07 | So there's a lot of aspects that do come into this. |
| 38:10 | One of them, particularly with that delay factor, will depend on where the exhaust gas oxygen sensor is relative to the exhaust ports, how far away it is. |
| 38:19 | But the process there is start with small numbers, start with low numbers and start by increasing those numbers and then doubling them so you find the range that is workable, obviously finding where you get into that oscillation where you lose control, you want to stay away from that which it sounds like that might have been what was happening with your situation there. |
| 38:40 | Zac has asked, is an intake air temp sensor really that important for a climate that is relatively hot all the time? Yeah absolutely it is. |
| 38:48 | The air temperature affects the air density, that's a really big factor in defining how much fuel we need to supply. |
| 38:55 | Even if your atmospheric conditions are relatively consistent, I'd say that you're probably still seeing more of a fluctuation than you may be initially expecting, you will find the air temperature will also be influenced by other factors such as heat soak so if you've run the car, got it hot, stopped it and it's heat soaked in the engine bay, the air temperature there will be much hotter than the ambient for a period of time so yes, intake air temperature sensor, it's a non negotiable in my opinion. |
| 39:26 | Paul has asked, interesting there is no derivative gain? So it's just a PI controller, not PID? Yeah it is Paul, it's not uncommon, P and I is a combination that does work. |
| 39:37 | It really depends how much proportional gain that you need. |
| 39:41 | The derivative gain is nice because it provides a damping effect so you can use an aggressive proportional gain to get a fast response to an error and then use the derivative gain to stop that overshoot but yeah I'm not sure why Ecumaster chose to only use proportional and integral. |
| 39:57 | Yeah just the way they've decided to do it but absolutely is workable. |
| 40:01 | I think back to the old MoTeC M48 ECU that I used in my drag car back in the day, and that had the option for only P and I control for boost and actually still worked relatively well. |
| 40:14 | I'd probably still incorporate derivative if I had the chance though. |
| 40:18 | Charles has asked, what program am I tuning with? It is the Ecumaster EMU Black software. |
| 40:23 | Paul has asked, was wondering if PID tuning can correct for wastegate flutter on Subarus. |
| 40:28 | OK just to be really clear Paul, with these webinars I focus solely on the topic at hand so I won't answer that question sorry, if you've got questions that are off topic, feel free to ask them in the member's forum and I'll be happy to answer them there. |
| 40:44 | Bjorn has asked, isn't it best to use the autotune feature with the acceleration enrichment off amongst other enrichments and or closed loop EGO off? OK so this comes down to how we drive the car more than anything. |
| 40:57 | So what you're getting at there is Bjorn basically are the acceleration enrichment corrections going to give us garbage data? It really doesn't matter whether it's on or off because either way if there is a true transient enrichment event we're going to end up with some bad data. |
| 41:15 | The reason for this is that transient enrichment is necessary. |
| 41:18 | If we want to get consistent air/fuel ratio across a transient or throttle input event, then we do need transient enrichment so if we turn it off we're 100% going to get a lean hole if we tip into the throttle quickly. |
| 41:30 | So whether or not we use it, the problem, the advantage here comes from the ability, we can set a delay around transient enrichment. |
| 41:38 | So that's helpful but it really does still come down to a bit of a garbage in garbage out kind of factor so what we want to do basically is be quite mindful in the way we drive the car. |
| 41:51 | I like wherever possible to do this without having to come to a stop. |
| 41:55 | Where possible it's nice to also do it in a single gear and that allows me to be very very, have very good control over what I'm doing on the throttle, where I am in the RPM and the manifold pressure range and by making small and gentle throttle inputs it stays away from that transient enrichment. |
| 42:14 | Conversely, this is why in the worked example I actually used the MegaLogViewer HD software because it does allow a lot more filtering around aspects such as transience, aspects such as complete overrun where we're completely off the throttle which in my opinion gives us just a little bit more control when we are driving and we're changing gears which most people are going to have to do so hopefully that helps explain that. |
| 42:40 | In terms of closed loop on or off, generally I would do this with the closed loop off but as per the help file, it will work with closed loop control functioning as well. |
| 42:51 | R Tuned Media has asked, will the auto tune function continuously work or is it an adjustment that must be initiated manually every time? No we basically store that setting into the ECU once it's enabled and then it will work every time we start the car. |
| 43:06 | Zac's asked, would a spark related misfire cause my air fuel ratio to jump around? Yes 100%, if you've got a misfire of any type, what you're going to end up with is unburned fuel and air making its way into the exhaust. |
| 43:18 | That will actually read lean because it's the unburned oxygen that will actually affect the EGO reading. |
| 43:27 | Name that I cannot even start to pronounce, I was wondering how useful the autotune feature is? Is it safe to use autotune on a fresh build to get the car driving on the street? Or is it just used to make corrections to an existing tune? I would not rely on that auto tune functionality to generate a VE table. |
| 43:45 | That's not what it's there for, it's not really designed to work from scratch. |
| 43:49 | It's really focusing on making small iteration changes to an existing tune so no if you're starting from scratch, get your tune dialled in properly and then rely on the EGO correction. |
| 44:03 | R Tuned has also asked, how much data should be logged in order to get the best use of an auto tune function? The more the better, within reason, I mean you don't have to go out, drive around for 5 or 6 hours to get data. |
| 44:16 | Basically as long as we're getting maybe in the region of 500 to 1000 samples per cell, that's going to be a good solid data, anything more than that's a cherry on top but yeah don't think that you need to spend 5 minutes in each of the cells. |
| 44:32 | But we want to avoid those cells where we're just getting a flash in the pan, maybe 100 samples or less and that's why it's really good to review the number of samples that you've seen in the auto tune function before you actually decide to trust that data. |
| 44:48 | OK Bjorn has just clarified, the real question was why not run load axis on the Y on the MAP, oh OK sorry I understand, so a little bit outside of the realms of our actual topic so this is just a setup preference. |
| 45:02 | Bjorn said he's found it easier to understand MAP when I was learning to have load on the Y axis for 3D tables. |
| 45:07 | Yeah Bjorn, I mean I tune literally dozens of different types of ECUs. |
| 45:13 | I tend to agree, I personally, it makes more sense to me to have load on the Y axis. |
| 45:20 | I haven't done this just simply because this is how most Ecumaster EMU tuners will look at a base map and that's how it's set up so personal preference really. |
| 45:31 | But yeah I mean I definitely find that MAP on the Y axis does make a lot more sense so sorry I misunderstood your question there before. |
| 45:40 | Alright we'll finish up there, got no more questions so for anyone who is reviewing this webinar in the archive, if you've got further questions, please feel free to ask them in the forum and I'll be happy to answer them there. |
| 45:49 | Thanks for joining us and we'll see you all next time. |
Timestamps
0:00 - Intro
1:05 - Why we need closed loop fuel control
2:50 - Not a bandaid for doing a poor tuning job
5:00 - Software tour
5:15 - Main VE + lambda target tables
7:35 - Getting AFR data into the ECU
9:25 - Making tuning changes before or after closed loop control is dialled in
12:30 - Setting up closed loop control
17:55 - Exhaust gas oxygen update interval
22:40 - Changing proportional elements
26:20 - Changing integral elements
28:05 - Auto tune functionality
35:00 - Questions


