289 | Optimizing Brake Temperatures
Summary
The optimum operating temperature of a set of brakes is critical and there’s a lot more than initially meets the eye when it comes to understanding and tuning brake temperatures. In this webinar we’ll talk about brake cooling and why temperature is so important.
| 00:00 | - Hey team, Tim from High Performance Academy here Today we are talking all about brake temperature tuning. |
| 00:06 | So why is brake temperature important? Now really there are a couple of different things we need to talk about before we get into today's webinar. |
| 00:12 | The first is obviously safety, pretty obvious when it comes to the brakes. |
| 00:15 | The other is from a performance aspect. |
| 00:17 | So from a safety aspect, what do I mean by keeping the brake temperature in the right range? Every one of those components, whether it's things like the pads, the calipers, the brake lines, the brake fluid, the brake discs themselves all of these components have a safe temperature window which they can operate in. |
| 00:34 | It doesn't matter which one of those you're talking about, there's always a limit to how hot we can get them. |
| 00:39 | A lot of the times when we're talking about brake temperature, and we'll get into this in much more detail as we go, we're usually talking about temperature, things like the callipers and the discs are usually the simplest things to measure the temperature of. |
| 00:48 | Obviously if we exceed any of those temperatures we risk the case of failure and obviously brake failure is something that's pretty obvious, we don't want it to happen, that's going to be pretty catastrophic if you've got a brake failure at the end of a long straight or something like that, you can't slow the car down. |
| 01:05 | There's a really good chance you're going to be destroying your car or even worse hurting yourself as well. |
| 01:09 | So that's the first thing, really obvious, we've got certain temperature limits we need to keep within. |
| 01:14 | I should say as well, your brake manufacturer, particularly if you're using things like aftermarket pads, calipers, discs, stuff like this, when you're using that stuff, that's information that's really specific to that particular material, that particular manufacturer, your supplier of that brake equipment is the best person to give you the safe temperature limits to work within. |
| 01:33 | The other part and the thing we're usually more interested in, well I'd say usually more focused on, what you should be more focused on usually is the performance aspect of it as well. |
| 01:40 | So the safety kind of goes without saying, we should be keeping our eye on the safety aspects but usually the thing I'm most focused on when I'm tuning a car on the track, looking at brakes anyway is looking all about the performance aspects. |
| 01:53 | So the temperature behaviour of a set of brakes has a massive impact in terms of performance and usually the performance metric we're most interested in is the coefficient of friction between the disc and the pad. |
| 02:05 | So what do I mean by that? Essentially the way a set of brakes works is you've got a caliper which is essentially a little clamp where it, depending on the design the piston can come from one side or both sides, essentially it's squeezing on the disc, it's spinning around and you're clamping against that disc to slow it down. |
| 02:20 | It's that coefficient of friction between the pads and the disc that we're most interested in. |
| 02:24 | If we just jump across to my laptop screen here I found a plot here before that I thought I'd share with you which I think illustrates things quite well. |
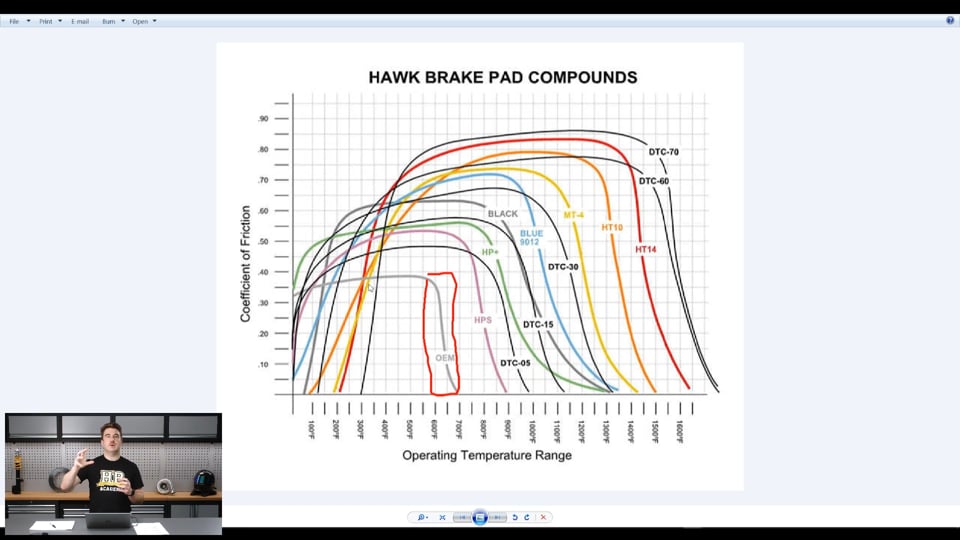
| 02:31 | Now this is not a plot of anything to do with what I worked on, this is just something that I found when I Googled brake temperature, brake coefficient and this is a particular Hawk brake pad compound coefficient vs temperature plot. |
| 02:45 | So Hawk is just an aftermarket manufacturer of motorsport style pads and essentially what we're looking at here is a plot of coefficient of friction on the vertical axis versus operating temperature on the horizontal axis. |
| 02:59 | Now there's all sorts of different ways they can specify temperature, sometimes they can be specifying the temperature of the pad which is usually a little bit more challenging to measure accurately. |
| 03:08 | Most often they are referring to the temperature of the disc, the surface temperature of the brake disc. |
| 03:13 | So what we can see here, each one of these lines is a separate brake pad compound and all that means is the different chemistry and the different materials that's going into making that pad. |
| 03:25 | So let's start off really basic, we've got this light grey one here called OEM which is obviously just original equipment manufacturer which is just essentially just a road car pad, what your manufacturer will ship with your car when you go and buy a bog standard road car. |
| 03:40 | So that's the thing I want to point out first. |
| 03:42 | The really important point I want to start with here is see where, it's maybe a little bit hard to see but see where that little light grey line crosses the coefficient of friction axis there, so let's say we're somewhere around maybe 0.32, something like that. |
| 03:54 | The important point there is that we are at essentially ambient temperature here. |
| 03:59 | So if I go down here we can see, let's say 0°F, you can see what this scale goes from, it goes from 0 to 1600°. |
| 04:09 | Just to put that in terms of celsius, I'm pretty sure somewhere around here is going to be around 400° and maybe somewhere up around here is going to be maybe getting up towards 800°C but I'll stick with Fahrenheit because that's what we've got in this plot. |
| 04:23 | So the point I wanted to make there is that room temperature or really low temperatures, we've actually still got some coefficient of friction there which is what you want in a road car pad. |
| 04:32 | Typically what you'll find in a standard road car pad is that they will have great, adequate at least stopping capability from cold. |
| 04:41 | So that means, that's the great thing we want about road cars, we just want to be able to get in it and use it, we don't want to have to warm the brakes up, we're going to go down to the shops or to do our commute or whatever it is, we know we want to stand on the brake pedal and straight away we want the car to stop. |
| 04:53 | So that's the first thing to notice about this thing is that they work from cold which is a really important point about road car pads. |
| 05:01 | What we do see as we get up into the temperature range here is we get up towards let's say 700°F which I think again is around 400°C, don't quote me on that, I'm not an expert on imperial units. |
| 05:12 | We see that the coefficient of friction has absolutely nose dived, it's fallen off a cliff down here and we're down towards somewhere towards 0 coefficient of friction. |
| 05:20 | So at this point here it's a really narrow window where it's dropping off. |
| 05:24 | Let's see, if we just scroll down here, so somewhere between, let's say 580 and 700°F we've gone from roughly our nominal coefficient of somewhere around 0.35 ish, we've nose dived down to 0. |
| 05:39 | So what that's telling us straight away, if we get these things too hot, we're going to have no braking friction and the brakes simply aren't going to work. |
| 05:45 | So in a motorsport application, well any application but certainly in a motorsport application which is generally what we're focused on, not only do we want to make sure we've got sufficient coefficient of friction, having a consistent coefficient of friction across the temperature window that we're likely to run across is really the most important thing. |
| 06:01 | It's one thing to be able to operate at really high or really low temperature but because we're usually operating across a range of temperatures on track, it's really important that we have as consistent as practical coefficient of friction. |
| 06:15 | One of the reasons that's really important is because you've obviously got a braking system at the front axle, you've got one at the rear. |
| 06:22 | One of the things that's really important when it comes to car balance in the brake zone is the brake bias, so the brake bias is normally spoken about in terms of the hydraulic bias. |
| 06:30 | All I mean by that is the amount of hydraulic pressure that's actuated on the front axle to squeeze the front callipers versus the amount of hydraulic pressure you've got in the rear axle. |
| 06:38 | But the other aspect of that is thinking about other things in terms of mechanical brake bias. |
| 06:43 | So obviously if we've got, let's say for argument's sake we've got equal brake pressure in the front and rear axle for argument's sake and we now have a different coefficient of friction at one end of the car than the other. |
| 06:55 | Typically you'll always have higher or at least more energy being absorbed on the front axle. |
| 06:59 | So let's say for argument's sake you've got a higher temperature on the front axle relative to the rear and the brakes. |
| 07:04 | If you've got a really widely varying coefficient of friction, that's going to give you really different mechanical brake bias. |
| 07:10 | So the torque that's applied to each axle when you're braking is really important, it has a big impact on how the car handles in the braking zone. |
| 07:20 | If you've got too much front brake bias, that means you're going to lock your front wheels and the car will, you'll suffer from understeer and you'll be overheating your front brakes and all that sort of stuff. |
| 07:30 | If it's the opposite, if you've got the rear locking too quickly then obviously the rear wheels are locked which is a big instability problem. |
| 07:37 | When you're heading into a corner the last thing you want is the rear wheel locking up on you, certainly in road racing anyway 'cause that's going to make the rear of the car start to fish tail. |
| 07:45 | It's obviously going to lead to instability and oversteer on corner entry. |
| 07:47 | So in short, we want that coefficient of friction to be as stable as possible and really the point of bringing this plot up here is that we can see by choosing different brake materials we can put ourselves in the right window for the right operating temperature that we're going to be operating at. |
| 08:04 | So typically it depends a lot on different brake materials and stuff like that but somewhere around this 800° mark is typically, in my experience where the maximum temperature of most proper race pad compounds like to operate. |
| 08:18 | They don't tend to operate a lot higher than that, it tends to be the limit you're trying to stay within, both from a performance and also from a coefficient of friction capability. |
| 08:29 | So for example, let's take this HT14, this red line here which I don't know what that compound is off the top of my head but let's assume that it is a proper race pad. |
| 08:38 | We can see that as we get above 1400°F here we're really having a pretty big drop off in the coefficient of friction. |
| 08:45 | Obviously we want to avoid that so this tells us for this particular pad, HT14, we really want to be staying within the sort of temperature bounds to have it as stable a coefficient of friction as possible. |
| 08:56 | So really a plot like this, if you're working with a certain manufacturer or you're going ahead and selecting brake pads for your car, this is the sort of plot you want to be looking at to understand what brake compound is going to be suitable for your application. |
| 09:07 | Obviously something like a rally car, is going to be really different from what you're running in let's say an endurance racing circuit car, where the brakes are remaining really hot for a really long period of time, whereas a rally car, where they tend to be used, or certainly on some stages anyway, a lot lighter, they're not getting the big heavy braking zones that you tend to be getting in an endurance racing car or something like that. |
| 09:27 | Obviously the application's going to have a big impact. |
| 09:29 | The other thing about something like a rally car is because you're going to have periods where you're not creating the, you're not going around the same lap, lap after lap, you've got different varying conditions as you move through the stage, it's really important that the pads actually do operate from a really low temperature. |
| 09:42 | You don't always have the opportunity to warm the brakes up or tune the brakes to keep thm running at a consistent temperature so that's going to again feed into your decision matrix, how you're going to tune the temperatures and also how you're going to go through with your selection process for your pads as well. |
| 09:58 | So guys, that's just a really important point I wanted to make about brake compounds and their temperature windows to start with and hopefully that's really clear why it's so important to understand where we are as far as temperature when we're starting to talk about tuning our brake temperatures. |
| 10:12 | So next thing I want to talk about is how we actually go ahead and measure the different temperatures. |
| 10:17 | I sort of alluded to this a little bit earlier before, you can be measuring things most commonly at the calliper, at the disc, or even in the pad itself in some situations. |
| 10:26 | In my experience it's not particularly common to measure things in the pad, it sort of requires some sort of sensor build into the pad itself which isn't usually that practical in most motor racing situations. |
| 10:37 | By far the most common thing that I've worked with in the past and the data that we'll look at a little bit later today, is looking at the brake disc temperature. |
| 10:44 | And there are a couple of different ways we can do that. |
| 10:48 | So from a brake disc temperature perspective, the most common is to use an infrared temperature sensor which I've actually got an example of here. |
| 10:57 | So you can see this little sensor here, this is an Izze Racing sensor, it doesn't really matter, most of them have a very similar working principle. |
| 11:06 | You can see down the base here, this has got this little shiny element, this is the element, the part of the sensor that we point at the brake disc. |
| 11:13 | So each of these have a particular working angle that they work over so what I mean by that, and I'll just sketch down on top here. |
| 11:22 | This is the position of the brake disc that we'd be looking at here. |
| 11:28 | This is in plan view so let's say this is the thickness, the main part of the brake disc here and this is the centre of it in here so this is the part that we're interested in. |
| 11:36 | Usually these have an angle over which they are able to look at. |
| 11:40 | So I think this particular one here, I think I've got it written on it. |
| 11:43 | You probably won't be able to read that but I can read that as 60 there, so I think I take that as 60°, I'm pretty sure this one works over. |
| 11:50 | So what that means is there is a 60° working angle across what it can see. |
| 11:56 | So the reason that's really important is because as we get, that essentially defines if you want to read across the whole span of the brake disc, that essentially defines the distance at which you'll place the sensor from the brake disc. |
| 12:08 | So this particular sensor, I can't remember how many channels it has, it has multiple channels, maybe it's 8 or 16, I can't remember but essentially it breaks that surface down into multiple parts and we can actually get a reading of the different temperatures at multiple points across the disc. |
| 12:24 | Most of the time, and the data we're going to look at today, it's a little bit simpler than that, usually you're aggregating that data, averaging it across the disc face or across at least the main working part of the disc face to understand what temperature you actually have. |
| 12:36 | It's getting pretty advanced and of limited use when you're looking at breaking things up into many many parts, certainly when you go up towards 16 channels. |
| 12:44 | I'm sure that's something a brake manufacturer would be using but maybe more in a racing sense you're usually looking at the aggregate or the average of that whole temperature distribution. |
| 12:54 | In fact I'm just going to grab, I've got this brake just behind me, that's probably a better demo as well. |
| 13:00 | You can see what I was talking about there, this is how we'd usually have it mounted on the suspension pointing at the brake disc like that. |
| 13:06 | Obviously this is the section of the brake disc that we're usually most interested in working with as well. |
| 13:12 | Just chuck that back. |
| 13:18 | Hopefully that's not going to roll away on me. |
| 13:21 | So the other brake temperature things I want to talk about, the net one is using temperature stickers on the callipers so I've actually got an example of that I saved from before. |
| 13:31 | So here is, in this case an Alcon brake calliper, it doesn't matter really what it is, you can see these outlines, these circular sections, these are where the brake pistons sit. |
| 13:41 | You can see the outline of one of the brake pistons on the other side there as well. |
| 13:43 | This is a 4 piston calliper so we've got two pressing from each side but the point I want to talk about here is this little sticker here. |
| 13:52 | So the idea behind this is it's giving us a readout of what the calliper temperature is getting to. |
| 13:57 | So this isn't normally so much used in terms of looking at the performance of the brakes, certainly not when we're talking about things like coefficient of friction of the pads and stuff. |
| 14:08 | This is usually one of those reliability things that we want to keep an eye on. |
| 14:11 | It relates to, there's probably two things it really strongly relates to, one is the life of the calliper and what I really mean by that is things like the seals in the calliper which are the things that tend to be the most susceptible to heat damage. |
| 14:24 | So the calliper manufacturer will give you a safe working range that the maximum temperature that they say you can run this thing to safely while they still guarantee you the performance of the calliper. |
| 14:33 | And the other thing, obviously because this thing's full of brake fluid as well, it's giving you an idea of how much heat the brake fluid is being exposed to as well and there will be a temperature rating for the specific brake fluid of your choice as well. |
| 14:44 | So this isn't something that obviously you can look at live on the data or anything like that, it's more of just a case of looking at that sticker after the session and just seeing what the maximum temperature, it's not giving you any, I should say this as well, it's more of a 1 use sticker, it's one use in terms of once you've got to the maximum temperature of it and what I mean by that, yeah it goes from bottom to top here. |
| 15:04 | So we've got a little scale that increments over as the temperature goes up here but essentially each one of these little divisions here goes black, I know I'm drawing it in red here but essentially it gets filled in as you get higher and higher temperature so let's say this is as high as it had gone, that sticker would have gone black up to that point and I can read off here in Celcius, that means I know that I got up to roughly 188° was the maximum temperature. |
| 15:31 | Now these style of stickers are not reusable. |
| 15:33 | What I mean by that is once it's got to 188 or whatever part of that little bar graph it's filled up, that stays filled up and the only way it can change is if you get it hotter again than that. |
| 15:43 | So you don't have to be replacing these stickers all the time. |
| 15:45 | It's just a case of making sure you're staying below the maximum. |
| 15:48 | If you get above your maximum, obviously you want to peel that sticker off, put a new one on it and probably change something about your braking system to reduce the running temperature but it's just a last safety check to make sure that you're not overheating anything like your callipers as well. |
| 16:01 | The last brake temperature thing I wanted to talk about as well is actually using what we call brake temperature paint. |
| 16:07 | Now this sounds really old school but it's something that's actually used still really extensively, it is old school but it's still used really extensively as well. |
| 16:13 | Certainly it's something I make use of still in a lot of the racing projects I'm involved in. |
| 16:17 | So essentially what's going on here is you've got a series of different paints. |
| 16:22 | So in this image that I've got up here on my screen, this is a particular kit from AP which is just a really common aftermarket brake manufacturer. |
| 16:31 | So we've got 3 different types of paint here, it's these 3 little bottles here, we've got a green and orange and a red. |
| 16:38 | And you can probably guess what's going on here, the idea is that when we apply this to a surface, when it gets to a certain temperature, that paint changes colour and each one of those different colours of paint changes colour at a different temperature range so I can't remember exactly, I'd have to go look it up but I think the green is somewhere around 400, the orange is somewhere around 600°C and the red is somewhere around 800°C. |
| 16:58 | So again it depends on your target operating temperature for the pads and everything that you're running in your car but let's say an average race pad I would usually be trying to wear off somewhere around the orange mark, I certainly want all the green to be gone. |
| 17:12 | When it changes colour, it goes white. |
| 17:15 | I've got an example, I'll show you that in a second and I'd usually be wanting to run the discs so that all the green is gone and I'm just starting to get some of the orange to change colour but certainly not the red, I want the red to stay there because if I start wearing off the red, that means I've exceeded that 800° range which is for the particular case I'm talking about anyway with these particular pads I'm using most of the time, that's something I want to stay below. |
| 17:35 | So you can actually see an example here of the paint that's been applied here. |
| 17:39 | This is actually an example of a different disc, this is an Endless brand of disc and they actually come with this brake temperature paint on them already on the edge but it's the same idea. |
| 17:48 | In this case they only come with two different colours, a green and a red. |
| 17:53 | So this is a shot of brake temperature fitted to a disc. |
| 17:56 | So the way you use this, as I said, it does go grey, it wears off as it gets heated. |
| 18:02 | Usually the way I deal with it myself is I get the mechanics to reapply it after most sessions if I'm interested in looking at the brake temperatures so I usually make sure that for each session I know the car's going out, I know that the brake discs are painted so if I wanted to, I could go back and check the brake temperatures. |
| 18:17 | The reason I use this in this particular car that's shown here is we don't actually have infrared temperature sensors fitted to this car. |
| 18:23 | It doesn't have those fitted to the only way I know about what's happening with the brake temperatures is by using that brake temperature paint. |
| 18:31 | So it's not always an option, if you've got the sensors, great, if you don't and a lot of people don't, you can still do a lot with relatively cheap stuff like these little paint kits. |
| 18:40 | So you can see we've got all 3 colours painted there, we've got that green, we've got the orange and we've got the red which looks a bit pink there but that is the 3 colours painted to it and that's what it looks like when it comes straight out of the bottle before it's been run on track. |
| 18:55 | This last photo here is of the same disc but this is a situation where you can see how those colours have started to change. |
| 19:01 | Now one of the things I want to make clear here is that it's really the edges of the disc, these sections here that we're usually most interested in keeping track of. |
| 19:12 | The reason we're not so interested in the vanes, this section in the middle and some of you guys probably know what I'm going to say already is that that's the section where the disc is cooled, so that's where we've got cold air running through the inside of the disc or at least it starts cold when it gets there, it's pretty hot by the time it exits. |
| 19:25 | But the idea behind that is that obviously that section of the brake disc, those little vanes are going to be cooled by air all the time so you're not going to be getting a true reading of the temperatures of the disc so that's why these sections on the outside here have changed colour and the centre section has remained green. |
| 19:41 | So this here is a pretty good read for the particular pad compound that we were using that day. |
| 19:46 | This is, you can see the green is completely changed to white so that means we've well blown through that 400° limit. |
| 19:51 | The orange has just started to white off and maybe it could be a little bit hotter, you can see it's started to white off a little bit at this edge. |
| 19:58 | It's maybe running a touch cold but we're certainly pretty close to the window there because that orange has started changing colour, that means we're getting it touching up towards that 600° mark. |
| 20:09 | And the red or the pink in this case as it came out, maybe it's a little bit hard to see maybe this photo is a little bit washed out and it makes it a little bit lighter than it is but that hasn't started changing colour yet. |
| 20:19 | So that's an example of how we can use something like brake temperature paint to check that our brakes are operating in the right temperature window as well. |
| 20:28 | So obviously the source of all of this heat is coming from friction. |
| 20:31 | Simply because we've got our brake callipers squeezing brake pads onto these brake discs. |
| 20:38 | The whole thing that's going on, the energy transfer that's going on, we've got kinetic energy in the car, we're squeezing these pads against the discs, that's converting kinetic energy that the car's got, essentially largely into thermal energy, we're tuning all of that kinetic energy that the car's got largely into heat that we're then rejecting, throwing out into the atmosphere and so that's really the source of all of this temperature that we're trying to understand and control both for good and for bad. |
| 21:03 | So how do we actually go through and control the brake temperature on the car? The most common solution is to use, certainly in a proper motorsport application anyway is to use blanking. |
| 21:13 | So what I mean by that is you've usually got a series of ducts or maybe flexible tubes, or depending how your brake setup is setup on your car. |
| 21:22 | You're taking air from maybe the likes of the front of the car or the side of the car or some scoop on the car somewhere and you're venting it towards the disc. |
| 21:29 | So let me grab my prop again. |
| 21:32 | I'll just show you guys exactly what I'm talking about. |
| 21:34 | So just imagine that we've got a hub fitted to the centre of this car. |
| 21:37 | The way we want that to work, we'd be going this direction on the car, we want those vanes pointing towards the back of the car when it's at the top. |
| 21:44 | We want to be feeding air into the inside of these vanes here. |
| 21:48 | So what I mean by that is, or the reason it's like that is because this is designed to work like an air pump. |
| 21:54 | You see when you look directly down those discs, hopefully it's clear to you there, those discs are sort of leaning back. |
| 21:59 | So what I mean there, in a similar way to what these grooves are doing, it's nothing to do with the grooves, this is nothing to do with the cooling necessarily but they're sort of going in a similar direction, thoes vanes are leaning back towards that and the reason they're like that is to allow the disc to work like an air pump. |
| 22:13 | The idea is we want to vent air into the centre of the disc and eject it out the top and the design of this disc means that it actively promotes that, actively draws air from inside to outside. |
| 22:24 | So when we're, getting back to what I was talking about with blanking, what we're doing, we're taking this big hose, however that's ducted from the front of the car, we're feeding it to the inside here, usually want some sort of plate, either sealing to the face of a disc or sealing to the inside of the disc. |
| 22:37 | So all of that air that's coming into that tube is being forced to go through the inside of the brake disc as well. |
| 22:43 | Now when it comes to tuning brake temperatures, and I am going to get onto looking at some data pretty soon. |
| 22:48 | The way you're usually dealing with it is by changing the brake blanking on the front of the car. |
| 22:54 | So what I mean by brake blanking, usually you've got, however big that hole on the front of your car or that scoop or however you're getting that air, usually you've got that sized for the worst case scenerio. |
| 23:02 | So that's the biggest it ever needs to be, maybe let's say you're running on a really hot day, you're running on a street circuit that's really demanding on brakes, you're not getting a lot of cooling, you're going to need to allow, size your whole brake cooling package, your ducting, all of your inlet scoops, all that stuff, all of that's going to need to be sized for the worst case scenario. |
| 23:18 | 'Cause you need to be able to have, on the days where you've got the most demand on the brakes, you need to be able to cool them adequately to keep them within that temperature window. |
| 23:26 | So the reality is, most of the time you're not operating at a place you want to use all of the brake cooling. |
| 23:32 | Obviously if you over cool the brakes, we're going to be lower than our target temperature, maybe the brakes are going to be in a bad coefficient of friction, maybe the disc's going to be too cool which can be a reliability issue, certainly when it comes to thermal shock, having them too cold when you apply the brakes and stuff like that, that can end up making quite a lot of thermal stress inside the brake discs. |
| 23:50 | Point of all that being, regardless of what the reason you're trying to control the temperature for is that you've usually got that temperature window you're trying to shoot for. |
| 23:58 | So if you've got these big holes that you're feeding cool air into the brakes with, if they're too big they're going to over cool your brakes so what you usually end up doing is closing them down which is what we call blanking. |
| 24:09 | So let's say if you've got this big hole at the front of the car that you're feeding one of the corners, so let's say your right front corner, you're feeding cold air to it, what you might have is, you'll often see this in motorsport is people will even just put duct tape, just tape across the front of that duct to block up, to restrict how much air's getting through there, there's lots of different ways you can do that. |
| 24:27 | It can be as simple as putting tape on there, race tape or duct tape to just restrict the amount of air that can get into the front of the car. |
| 24:34 | Or maybe if you're getting a little bit more sophisticated, maybe you've got little, the right shape little blockers that can go in there, so maybe they've got a smaller inlet hole and they sort of fill out the rest of that duct. |
| 24:45 | For example lots of people either bolt them in or they have little magnets that hold them in so they can change them quickly. |
| 24:51 | Doesn't really matter, the point is you're varying the amount of flow through that duct and that's what we call blanking. |
| 24:56 | Take a look at it nexts time you're watching a high level race event. |
| 24:59 | You'll often notice, particularly on things like prototypes, GTs, it's really noticeable where they're taking all of their air for the brakes from the front bumper, you'll see tape on the brake ducts, you'll also see the same thing on the radiator inlets where people will often be blanking that front up to restrict the amount of air coming in. |
| 25:16 | Whether that's from tape or whether it's from some physical part that gets plugged in there, just take a note of it, you'll definitely notice it if you haven't already. |
| 25:23 | The other thing to understand about blanking is that the reason we want to blank these things up, particularly at the front of the car is usually there's a big aerodynamic advantage to blanking the front of the car. |
| 25:33 | So what I mean by that is by blanking the front of the car or closing off some of those ducts, you end up with a more, you end up forcing more air usually underneath the floor of the car which usually increases your downforce, makes things more efficient, we want to be creating as much downforce as we can through the floor of the car usually rather than things like wings and canards and stuff over top. |
| 25:51 | So usually there's a downforce advantage by adding blanking to the front of the car. |
| 25:56 | That's to say if you've got a car that's making downforce in the first place, if that becomes relevant to you. |
| 26:02 | So guys, let's get into have a look at some of this actual data, what it actually looks like when it's being logged on the car. |
| 26:08 | So what I'm looking at here is some logged data from a touring car and in this particular case, I've only got some really simple data showing at the top. |
| 26:18 | I've got my corrected speed, which is, let's say a reference speed channel as we move throughout one lap and at the bottom here I've just got, just keeping it really simple with two brake temperatures so I've got the front left in red and I've got the rear right in orange. |
| 26:31 | So to start off with, let's just understand exactly what the shape of this data even means. |
| 26:36 | So obviously if we look at the speed channel, any time that we're speeding up like this, it means that the car's accelerating, any time we're braking, we're going to nose over here and these minimums at the, if we have a look at these minimums that we see on this saw tooth pattern down here, any time we're got one of these, that's indicating to us that we are at the mid corner. |
| 26:56 | So that's that apex of the corner or the slowest point of the corner that you're going to negotiate, that's where you'll see those dips and the saw tooth pattern is pretty typical of what you'll see in pretty much every speed trace you ever look at, certainly from a circuit racing point of view anyway. |
| 27:12 | So we've already identified that this is a section here that we are braking, based on the speed trace. |
| 27:19 | If we bring the cursor over here and line that up, we can see pretty clearly that our brake temperatures are spiking pretty heavily as we get into that braking zone. |
| 27:26 | So if we just have a look at the, keep an eye on the legend down here, this legend is showing us the current brake temperature, the position that the cursor is being shown at. |
| 27:37 | So let's say, this is the first corner on this lap and when we approach the braking zone here we've got roughly 450° on the front axle and roughly 470° on the rear axle. |
| 27:47 | Then as we get right into the braking zone, you can see it really quickly, the brake temperature really quickly spikes up there and again just to be clear, this brake temperature is from an infrared type sensor looking at the brake disc, that's the temperature we're looking at. |
| 27:59 | And if I come to the peak here we've got let's say 750 and 560 on the rear axle. |
| 28:06 | So definitely a really big split in temperature between the front axle and the rear axle and that is really typical, obviously because the car is transferring most of its load forward when it's under brakes, the front axle is going to be the axle that has to absorb most of that braking energy so it's really typical to see the front axle absorbing a lot more energy and therefore getting to a higher temperature than the rear axle. |
| 28:28 | So this is where using that coefficient of friction plot that I showed you guys before is going to be really important to understand because we've got our rear axle operating at let's say 550 and our front axle operating at 750 so that means if we're going to be trying to tune our coefficient of friction windows we need to be keeping an eye on the temperature balance between the front and the rear axle. |
| 28:47 | Now let's move on from this, so obviously we've got out of the braking zone, the car's got to the mid corner at this point and we're starting to accelerate out, so the driver's completely off the brake pedal and you can see at this point that both brake temperatures slowly trending down at this point. |
| 29:02 | And that's what's happening as the cooling is getting to those brakes, it's feeding nice cold air inside the disc, it's cooling all the brake components down, so the discs, the callipers, the pads, all of them are getting a bit of a rest at this point. |
| 29:15 | Then we arrive at the next braking zone and what's interesting about this one here is you can see there's actually a couple of points to this. |
| 29:19 | Even without the brake pressure, we can see there's a couple of things going on here. |
| 29:22 | There's sort of this rise in the temperature here followed by a little bit of a step change. |
| 29:27 | That's telling us something about the way the brake system's being used at that point. |
| 29:31 | So we've got a funny step as it goes up there. |
| 29:33 | So it looks like the driver's probably getting on initially and then waiting a bit before they apply a bit more pressure and that's what's giving it that funny shape in the temperature there. |
| 29:42 | Followed by another drop. |
| 29:45 | So you can see also as we move throughout this section fo the track here, this is a section of continuous back and forward 90° turns in this particular circuit. |
| 29:52 | The brake temperature's actually changing a lot as we move throughout the section so obviously as we come into this first turn here, we've got a really big braking zone, so there's a huge amount of energy going into the brakes, they spike right up as we're getting up towards, what have we got here, again around 750° again on the front axle and almost 600 on the rear axle but then as we move through each successive braking zone, we've got quite a different brake temperature coming up between, both on the front and the rear axle. |
| 30:16 | See at this point by the time we get to this 3rd corner here, our front temperature's only 530 and our rear temperature's 550 so our rear temperature's actually higher than our front at this point. |
| 30:24 | Again that should make it really clear why it's so important to choose those temperature windows for your brake pad compounds that you're actually using on your car. |
| 30:32 | Then we we move onto this nice long straight here, so this is a really slow corner at this point and then we accelerate up across this really long straight down here. |
| 30:40 | And we can see at this point, this is where the brake cooling's really getting a lot of time to do its job. |
| 30:46 | This is where you can see that brake temperature slowly dropping off there, there's a little stab on the brakes at this point for a little bit of a braking event, not too much because you can see the brake temperature's aren't rising too much and they keep cooling so any time that that brake temperature's dropping off like that, that's telling us that the brake cooling doing its job as well. |
| 31:03 | So obviously one of the things like I talked about blanking, we want to make sure we are staying in the right temperature window and there's two, there's definitely more than two but let's say, let's break it down into two really important things that we want to keep track of when we're keeping track of our brake temperatures. |
| 31:18 | One is the maximum and the other obviously is the minimum. |
| 31:21 | So there's a couple of different ways we can do this, one of the things I like to do lots of different pieces of software package will allow you to do this, I'm just going to come in here and put some guidelines in here, so I'm just going to come into my brake temperature plot, I'm going to put a couple of, some max and min lines here. |
| 31:36 | So essentially these are going to give me some just visual reference guidelines for where I want to be when I'm running this car on track. |
| 31:41 | So my min line, I know for this particular brake compound, I want to stay above 400° and my max line that's safe to run this particular compound at is 800°. |
| 31:51 | So what that's going to do when I add these in here, what it should do, and hopefully you can see those. |
| 31:56 | Basically there's a red line here and a blue line here. |
| 31:59 | Essentially that's just giving me a bound within that I want to make sure I'm tuning my brake temperatures for. |
| 32:04 | So one of the things I'm usually looking at as an engineer when the car's running on track is to make sure if I do have this really great live data that's coming over telemetry, telling me my brake temperatures, is that I want to make sure I'm staying within those bounds. |
| 32:16 | Now one of the advantages of that is particularly if I can watch it live when I'm watching it on telemetry that's coming into the pits is that I can tell the mechanics straight away that I'm going to need to make a blanking change at the next stop because I can see either we're over cooling or we're under cooling. |
| 32:29 | So let's take a situation here, going down this long straight here and we can see this long decline in our brake temperatures and we're actually starting to dip below, we actually are dipping below that 400° at that point there. |
| 32:41 | Looks like we are getting 390 ish, something like that so it's only just but that's probably something I'd be too worried about but let's say if that was dipping down to 350 or something like that, that would be a situation where I probably would need to start adding blanking to the front of the car because I'm actually over cooling the car at that point. |
| 33:01 | Obviously there's other things you can do as far as changing things like the mass of your brake discs, the size of them which is going to change the thermal mass which is going to change how long it takes for them to, how much temperature you change for a given amount of energy input and how quickly it's going to lose it but in this particular situation, assuming, during a race weekend I'm not going to be making physical changes to my braking system, the only tool I'm really going to be making use of is changing my blanking, changing the amount of cooling I'm getting. |
| 33:25 | If it was starting to cool too much, that's where I'd be adding blanking to the front of the car. |
| 33:28 | The other thing that is really important to understand when it comes to using these brake temperatures, in my experience anyway is for brake bedding. |
| 33:42 | So brake bedding, the purpose of that is when you've got a brand new set of brakes, this can either be brand new pads and brand new discs or just brand pads or just a brand new disc even, depending on the situation, there's lots of different reasons you might only have a new dics and not a new pad or vice versa. |
| 33:58 | The end story is we need to be able to match those two things together. |
| 34:02 | So there's two things going on there when we want to match the pads to the disc face. |
| 34:06 | It's really important for those to be matched properly, otherwise the performance of the brakes never really gets there in terms of a high coefficient of friction. |
| 34:13 | So when we bed them, it's essentially a process we go through to match those two faces together and a little bit of that is to match the intricacies, little grooves or little, maybe the surfaces aren't completely flat, it's matching those two faces together so a little bit of the pad will get worn off in the higher spot so it really keys in and sits on the disc properly, that's one part of it but probably the more important thing that's going on with brake blanking is that it's actually a chemical reaction that's happening as far as the pad transferring some of its material and becoming embedded into the actual surface of the brake disc. |
| 34:47 | So that transfer of pad material from the pad to the disc is really critical as far as making sure the pads and the disc are mated together, they're bedded together and they're going to work properly. |
| 34:58 | If you don't bed things properly, typically, depending on the materials you're using, it can lead to things like extremely high wear rate or alternatively it can just lead to really poor coefficient of friction. |
| 35:08 | Just not getting enough bite on the brake pads so they're not bedded together properly. |
| 35:11 | All of that is to say that when you're going through that bedding process, and every brake manufacturer will be a little bit different in their recommended procedure, often, and this probably applies more to the higher quality brake manufacturers, is they'll give you temperature windows that they want to get your brakes to at each different stage of that brake bedding process. |
| 35:30 | So a brake bedding process, to break it down into really simply terms, it might mean maybe doing an out lap really slowly just to slowly bring those temperatures up, you don't want to shock load any temperature into the brake system. |
| 35:41 | So you might be maybe doing a lap at maybe 20, 30%. |
| 35:44 | Then you might maybe do another couple of laps, building up to 80% where you're really starting to load the brakes a little bit more with a little bit more aggression and then maybe another lap driving at 90 or 100% or even part of a lap in some particular cases and then you're going to do at least one full cool down lap to let all of the brake components cool down evenly and as slowly as possible, again you don't want any shock loading in the temperature. |
| 36:07 | Now that's a really broad overview of how you bed brakes, it's much more specific for each brake manufacturer but the thing that's really useful that'll come to you with a lot of brake systems is they'll actually give you a temperature profile or temperature limit, or temperature windows you need to stay within while you're bedding your brakes. |
| 36:22 | So all of that's just to say, if you've got this information available live, then you can actually be speaking to your driver on the radio if you're engineering the car or alternatively you can be showing that information live on your dashboard when you're going through and doing your brake bedding procedure and you can actually see in real time what your brake temperatures are which is really useful if your brake manufacturer calls out those different temperature points that you've got to hit throughout your bedding process because this just gives you much more confidence that you're going to be bedding those things repetitively and consistently to make sure you're making the most out of those brake sets and you're not destroying them by not bedding them properly. |
| 36:56 | So guys, that's it for the main part of the lesson, almost there sorry. |
| 37:00 | I did want to say just before I jump into the last few bits I want to bring up here, if you've got any questions that have come up throughout this webinar, whether it's about the braking systems in general, whether it's about the brake temperature data we went through today, or anything about car setup or race engineering in general, happy to answer your questions, chuck them through to me and I'll get onto those as soon as I finish this little last part of the lesson here. |
| 37:22 | A couple of other things I want to dig into here just before we finish up is a lot of you guys will have noticed that these two brake temperature readings look quite different from each other. |
| 37:31 | This yellow or orange one here looks quite different from, which is the rear axle, looks quite different from the front, if we zoom in on that, we can see that it's got a huge amount of noise in that signal. |
| 37:41 | Now it'll depend a little bit on the exact setup you've got, the sensors that you're using, the emissivity and the type of brake discs that you're using and everything on your car but in this particular situation, this is a sign, it can be a sign of two things, one is that the brake temperature sensors are starting to get dirty or in this case, with this particular car what this means is that the sensor was actually starting to fail. |
| 38:05 | So again just another nice thing to be able to go through and check when you see this sort of noise and it doesn't necessarily mean this is the case for all sensors or all situations but in this particular case when we investigated it, it meant that the sensor was actually on its way out and starting to fail and giving us a whole lot of noise in that signal. |
| 38:20 | That may or may not be a problem, it depends on the situation, certainly if you're starting to do a whole lot of, you can start to do some really interesting things with some statistics and some heat transfer metrics and stuff like that and if you are doing some more advanced math on some of your brake temperature channels then having all of that noise in there can really start to mess with it and really start to give you bad results so in some situations, it's going to be more important than others. |
| 38:45 | The last thing I wanted to show you here, all of this data here and I should say, let me just zoom out a little bit over here, this is over a full race so I was just looking at one lap before, this is looking at the whole race. |
| 38:56 | If we start from the start of the race, come back here, so in this section here, this is the car leaving the pit lane and going to the grid. |
| 39:04 | This section here is after the car's stopped on the grid and it's going on its warmup lap and this point here is where the car's actually starting to race from. |
| 39:12 | So what we can see straight away is that the brakes are starting essentially from dead cold down here, they're reading 80° but that's not going to be real, the reality is the brake temperature sensors aren't going to be as accurate at low temperatures because it's more important that they work at high temperatures but essentially in this case we've got 60 and 80° showing which we can essentially treat as room temperature even though it's not telling us exactly that. |
| 39:34 | And then we can see the brake temperature starting to rise as they're working the brakes as they make their way to the grid. |
| 39:39 | Then it gets even much more aggressive on the warmup lap in this section here which is really where they're trying to get the brakes up to the right temperature so they know that when they start the race and they go and hit turn one, that the brakes are going to be at the right temperature window or certainly as close as possible to that right temperature window so they know they're going to get a nice consistent hit on that brake pedal and both ends of the car are going to retard at the expected amount. |
| 40:03 | What you can see, all of these, let me zoom in a little bit here, you can see quite aggressive changes in the brake temperature here. |
| 40:09 | We see exactly the same thing reflected in the speed trace and really what's going on here is this is all about the drivers working the brake pedal hard, on and off, on and off, on and off the brakes as you guessed it, just to get temperature into the brakes. |
| 40:22 | And we can see by the time they start the race, let's see where he gets to, at this point here where they're starting the race, takes off towards turn one and gets on the brakes and we've got temperatures of, what have we got, 380 on the front and 311 on the rear so a little bit lower than our target starting points, certainly not unsafe for this particular situation but probably not as hot as we'd want. |
| 40:42 | In that particular situation that's where I might be talking to my driver and saying look, to get the most out of the brakes at turn one to make them more consistent, to get more bite out of them, we need to be aiming for over 400° on the minimum brake temperature and that means we can have a look at what he did on the out lap or the warmup lap previous to that, we can see the sort of brake temperatures that you're seeing on here. |
| 41:04 | And I can either be radioing through to him overlaying this old data and making sure he's using even more brake pressure and getting even more temperature into the brakes, or he can be looking at that on the dash himself if he's got some sort of reference to go on as well. |
| 41:17 | So the last thing I wanted to show here was actually overlaying some of this stuff with respect to a qualifying run, so what that actually looks like. |
| 41:24 | I'm just going to bring up that same data I was looking at before from the middle of the race there and I'm going to overlay a qualifying run here. |
| 41:31 | So we can see we've obviously got, the white data here is the qualifying run and you can see at this point in qualifying this is when we've got new tyres in the car, this is when the car's going to be lightest, it's got low fuel, new tyres, whereas during the race the tyres are going to be much older, the car's going to be heavier, it's carrying more fuel, it's never going to be quite as fast, that's where these speed differences are coming from but the thing I really want to point to is the brake temperature. |
| 41:53 | So let's take this point down here at turn 2, the second braking zone, let's have a look at the different brake temperatures that we've got here. |
| 42:01 | So if we look at just the front axle which is the top line here, on the main data which is the same data we were looking at before, we had 650° and on the overlaid data we've got 830°. |
| 42:11 | Now obviously that 830° is above what I want to run in the race. |
| 42:15 | I wanted to set my maximum at 800. |
| 42:18 | Now there's a little bit of a compromise going on here and it comes back to what I was talking about with the blanking to increase the front downforce. |
| 42:23 | Obviously in a qualifying situation, we're only doing one one lap or maybe one or two laps maximum before we start to wear the tyres out and we want to save these things for the race so we really want to go out and do a really short run. |
| 42:35 | That means that the brakes are going, it's going to take them a while to get up to temperature and the beauty of that is it means that we can actually run more blanking, so run less cooling. |
| 42:43 | That allows us to run more, gives us more downforce advantage or run more downforce onto the front of the car in exchange for running the brakes a little bit hotter than we'd ideally want to run them. |
| 42:52 | So if we're just doing it over 1 or 2 laps it's really not a big deal, certainly for the particular brake package that was fitted to this car. |
| 42:57 | It's not a problem but that is just a really clear example, you can sort of see if we look at the white data there versus the red data how much hotter we're running those bakes at that point during a lap and that really does come down to just taking a hit on the blanking. |
| 43:12 | The rear temperatures are quite a lot lower, so we see these are the rear temperatures down here on the qualifying run and these are the rear temperatures on the main race run. |
| 43:20 | A lot of that is just down to, it takes a certain amount of time, we can't actually build enough rear temperature into the rear brakes to get them as hot as we'd like over a qualifying run. |
| 43:29 | You can do stuff with changing brake bias and really dragging the brake and stuff like that. |
| 43:33 | All of this also ties into your warmup procedure with getting your tyre phasing right and all this stuff, it's all a big compromise as I'm sure you guys can pick up but that's what's going on, the rear brakes aren't getting hot enough. |
| 43:44 | They would certainly start to come up during the race but in a qualifying run we just don't have enough time to put enough energy into them whereas the front, we're running over temperature because we're trying to increase the front downforce. |
| 43:55 | So guys I'm just going to jump into the questions now and see what we've got, see what sort of things you guys are asking. |
| 44:02 | Let me just scroll on down through my notes here. |
| 44:06 | OK looks like I have a lot of questions to get through today guys, strap in for a long one. |
| 44:12 | Suhas Govinderaj, Suhas asks, what's the role of brake fluid in brake temperatures? What do you suggest when changing a set of pads when the rotors are hot to avoid the pads sticking? Does greater carbon content in rotors mean higher brake temperature it can take? OK so there's a whole lot of different parts to that question, let me try and break it down. |
| 44:32 | The role of the brake fluid in the brake temperature, so brake fluid is really a whole subject of itself, essentially each fluid has a different temperature rating depending on its internal chemistry, whatever it's made out of. |
| 44:43 | There's conventional brake fluids which is something like maybe a dot 4 or something like that which is what you'd run typically in a road car. |
| 44:50 | I think it jumps up to a dot 5 when you start running synthetic brake fluids which is what typically we're using in racing. |
| 44:57 | One of the advantages there, that just gives us a higher temperature rating and that's really the role of the fluid, you just want to be buying the fluid that's matched to your particular situation. |
| 45:06 | There's not really any point in everyone running around with dot 5 or synthetic brake fluid in their road cars, simply because it's a lot more expensive. |
| 45:12 | There's no need for it because you're just not getting your road car brakes hot enough. |
| 45:16 | Next part, what do you suggest when changing a set of pads when the rotors are hot to avoid the pads sticking? So I'm not quite sure what you mean by the pads sticking. |
| 45:26 | Normally when you do a brake change throughout a race, if you're doing them hot, they wouldn't usually stick to the brake discs, they would usually just be sitting there, they're usually quite happy to come off. |
| 45:35 | It depends on the style of calliper and everything that you're using, whether it's a quick release calliper or whether it's a conventional calliper, how you need to push the pistons back, it's usually not a big deal and usually when you're changing brake pads during a race, that whole brake package is really designed, the pads are usually specific with little ears on them and stuff to make them quicker to get out during a race as well. |
| 45:52 | Does greater carbon content in the rotors mean higher brake temperature it can take? Yes and no, not necessarily, it really, there's a lot more to it, that it comes down to than that. |
| 46:00 | Your best situation, every brake, let me go back little bit, every manufacturer of different discs will have a different specific blend of steel and iron that they're using as far as making their brake discs. |
| 46:15 | Certainly when we're talking about conventional brake discs anyway. |
| 46:18 | Obviously there's all sorts of different types of brakes out there, there's carbon ceramic, carbon carbon, in the vast majority of racing that most of us are exposed to, certainly even in the high end GT racing and stuff like that, all of the brakes are mandated as being steel in order to save costs. |
| 46:32 | The carbon content alone doesn't necessarily influence the maximum temperature it can take. |
| 46:36 | That stuff really needs to come from your specific manufacturer. |
| 46:39 | OK next question, Manuel M.61, Manuel asks, big brake upgrades that aren't that crucial for a car primarily used on the street but rarely driven on the track? OK so the way I'm interpreting your question there is, can we justify fitting a big brake to a car that's really driven on a track? It depends how important driving on the track is to you, what you'll find in the vast majority of road cars, certainly there's not many road car brakes that can survive being driven on the track for maybe more than 1 or 2 laps. |
| 47:09 | A lot of road cars, even high performance road cars, their brakes will start to fade a lot, even within the first lap of being driven really hard, properly on track. |
| 47:18 | What I mean by fade is essentially if you get above that temperature limit that we talked about when we looked at that coefficient of friction plot for the temperature of the brake pads or the brake disc, it means that the friction coefficient is dropping off and that's what people often call fade. |
| 47:33 | So this is usually a combination of the wrong compounds, of the discs being too small, so they're getting too hot, not having enough brake cooling getting to them. |
| 47:41 | So in this particular situation when you're talking about, if you've got a road car that you occasionally take on the track, if it's really important to you to be able to hammer your car around the track and not have brake fade, then yeah it probably is justified to have a big brake kit. |
| 47:51 | Part of that big brake kit is usually about having more heat capacity in your disc, well there's more to it than that, if you're going up in diameters it's giving you more torque because you are now grabbing the brake disc at a larger moment. |
| 48:05 | So what I mean by that, if you've got your brake disc and you're going to, make sure I don't crush my laptop there, if you're going to go up in the diameter which is a pretty normal thing to do in a big brake kit, every time that calliper gets further and further out, you've essentially got a bigger lever arm that you're slowing the brake disc down so that's one part of it. |
| 48:21 | Having a thicker disc as well, the amount of material in your disc, your thermal mass will make a big difference to the average running temperature of the disc as well. |
| 48:27 | As well as the brake pad selection and obviously the brake cooling as well. |
| 48:31 | So ultimately my advice is if you are running on track, it probably is going to be a thing to have to upgrade your brakes. |
| 48:40 | OK I've got a little bit of an off topic question come in here but I'll deal with it anyway. |
| 48:45 | Suhas Govinderaj, Suhas asks, apart from today's topic, cornering is a balance between load transfer and tire capacity. |
| 48:52 | Which of the following do you suggest in order to get the fastest exit from a corner? When the max force from the tyres are towards the track and is about to slip or when they are gripping with medium force towards the track surface? So the way I'm going to, I'm not totally over what you're asking there Suhas but I'll try and sketch out what's actually going on with tyre forces when you're moving around the track. |
| 49:15 | So if we're talking purely about lateral tyre forces here. |
| 49:18 | There's all sorts of things that go into controlling the amount of tyre force we get out of a tyre. |
| 49:27 | One of the biggest ones is vertical load. |
| 49:30 | So this plot here, this is going to be a plot of, sorry vertical load and also slip angle, this is the plot of the lateral force we get out of a tyre versus the slip angle which you can think of as the angle that it's steered at with respect to the road surface. |
| 49:42 | So a really typical way a tyre slip angle plot might look like is something like this. |
| 49:46 | So what's going on here, this is slip angle. |
| 49:50 | This is lateral force. |
| 49:56 | And the idea here is that we are trying to maximise the lateral tyre force so it's pretty obviously for this particular situation, I should say this line here, this one particular camber it's one pressure, it's one vertical load, it's one particular snapshot in time of the way that tyre is loaded and all we're changing is the slip angle. |
| 50:15 | So if this is the direction that the car's travelling, the angle that the tyre's slipping at with respect to the road. |
| 50:21 | So it's really obvious that we want to, if we're going to maximise the force of one corner of the car we want to be operating up here. |
| 50:26 | We come down here, look up our slip angle. |
| 50:28 | That information is quite difficult to come by in terms of, it's quite specialised information, it's something you do tend to have access to in professional racing but not so much in amateur racing, to go ahead and gather this data is quite complicated. |
| 50:42 | What you're asking is more specifically about vertical load so if I was to draw one vertical load there and maybe a second vertical load here, and another vertical load here, so these are all looking at different vertical loads, the question that you're asking is the amount of lateral force that a tyre can give is a function of the vertical load and the way we influence vertical load by changing the lateral load transfer distribution. |
| 51:06 | The way we change the lateral load transfer distribution is by changing things like suspension geometry, things like our roll centre or our spring and anti roll bar stiffnesses as well. |
| 51:15 | With that, we can basically tune which corner of the car reacts the most load and therefore tune the vertical load that's applied to each corner of the car. |
| 51:22 | The reason for that is modern race tyres are all really sensitive, well all tyres in general actually really are sensitive to vertical load as far as their load sensitivity. |
| 51:31 | We can break that down in terms of simplifying it down in terms of being a coefficient of friction. |
| 51:37 | Essentially all that means is the higher the vertical load you place on the tyre, the lower the coefficient of friction. |
| 51:44 | So if I just do another plot down here which is, let's say coefficient of friction and vertical load which I'm going to write FZ here, all that means is vertical load. |
| 51:53 | The general form of a coefficient of friction of a tyre kind of looks like that in that the higher the vertical load, the lower the coefficient of friction. |
| 52:01 | So got to remember the coefficient of friction is the ratio of the lateral force divided by the vertical load. |
| 52:07 | So it doesn't mean that we get less force, it means that the tyre's less efficient at producing force. |
| 52:12 | Long story short, more lateral load transfer at one end of the car, let's say you put a stiffer spring on one end of the car, then you are reducing the cornering capacity at that end of the car. |
| 52:22 | Massive discussion, it's something that's dug into in a lot more detail inside our suspension course that's coming out soon but happy to answer a follow up question if you've got another one there for me. |
| 52:32 | Ok Villaeli asks, brake cooling wise what are the most common methods to cool the brakes? So by far the most common method is just to simply take cold air from the front of the car in the same way that you'd take air from the front of the car to cool your radiator or intake for your engine, you'd be supplying that cooling air to the inside of the brake disc which hopefully you got that explanation I talked about before, we were talking about the brake disc. |
| 52:58 | If not, essentially all we're doing is feeding air into the inside of the brake disc and because of the way the vanes are shaped, certainly on a proper motorsport style disc anyway, even on lots of modern road cars, it's shaped like this, it's designed to work like an air pump. |
| 53:12 | The air goes from inside to outside and we're just using air to cool them. |
| 53:15 | There are other situations, extreme situations, let's say back in the day, in the old WRC cars, they used to use water cooled brakes. |
| 53:24 | There's a couple of different types of water cooled brakes. |
| 53:26 | In that particular situation, the rally cars, what they actually used to do was run a separate cooling circuit through the brake callipers. |
| 53:31 | So they had a water pump system pumping water through the brake callipers and back through a heat exchanger just to basically circulate water around and cool the brakes, that's one way. |
| 53:42 | There are other more brute force methods that I haven't myself been involved in but I do know of teams and categories where they've sprayed water on the actual brake disc as well so that means actually carrying around a whole water tank in the car and actually just spraying water all over the brakes to reduce the brake temperature. |
| 53:57 | I wouldn't say that's my suggested approach but that is an approach some people have taken in the past. |
| 54:02 | You'll find the vast majority of all brake cooling out there is all happening through taking cold air from the front of the car and cooling the discs and the brake callipers with it. |
| 54:11 | OK question from Antho, what equipment do I need to gather this information from my own car? Can it be done relatively cheaply? Yeah so there's a few different temperature measurement types I've talked about there. |
| 54:22 | One was the temperature, those little temperature strips, those little temperature stickers. |
| 54:26 | That's more as I said talking about the health of the calliper and the health of the brake fluid, what sort of temperatures you're getting your brake fluid to. |
| 54:35 | That's one thing, those temperature strips are relatively cheap, there's nothing expensive about those, there's all sorts of different places you can get them from. |
| 54:41 | You can buy them from motorsport braking suppliers, you can even get them from a local industrial supplier, people that make machines and they're used in all sorts of industrial applications, you don't need to get motorsport specific ones or anything like that. |
| 54:54 | That's one thing. |
| 54:55 | If you don't want to get into the range of using things like infrared temperature sensors like the ones I showed here, which are useful but do get pricey certainly. |
| 55:02 | You should be making use of something like brake temperature paint which is one I went through before as well, that stuff's not expensive, I don't remember off the top of my head, you're probably talking, I don't know, between $30-$40 USD for that whole kit and it's probably going to last you at least a whole season depending on how much racing you're doing so that's certainly I think something that doesn't need to be, you don't need to be spending a lot of money on it to be getting value out of tuning your brakes. |
| 55:24 | Obviously there's downsides with using something like brake temperature paint. |
| 55:27 | It's only giving you the maximum that your brakes are operating on track but that's a hell of a lot better than nothing. |
| 55:34 | Other than that you've got a whole lot of guess work. |
| 55:36 | There's really not a whole lot to go on so if you can't stretch your budget to using something like an infrared temperature sensor then certainly looking at things like temperature paint as well. |
| 55:46 | Oh one other thing on that, I forgot to mention as well, I've definitely seen people using contact sensors, so I haven't used them myself but that's essentially where you can use essentially a little thermocouple that actually runs against the brake disc surface, this actually runs in contact with a little spring loaded piece. |
| 55:59 | I've seen people use those as well. |
| 56:01 | I haven't used them myself but I know there are some people out there using those as well which maybe that's a valid way to do it, I know for a fact that they are a lot cheaper than using an infrared temperature sensor. |
| 56:11 | OK Plohl asks, have you seen any data for both sides of the rotor? I.e. for cooling being feed to the inside face of the rotor rather than the centre? Yes I have, there's a couple of different places you'll see that. |
| 56:24 | One is on brake dyno data, so often when, some of the information I showed you before with the coefficient of friction vs temperature, that all comes from what we call a brake dyno, all that means is you're running a, you've got an electric motor running a brake disc and they're measuring the temperatures, the forces, the pressures involved, all that sort of stuff. |
| 56:42 | Long story, all it essentially allows you to measure the brake performance in a controlled environment. |
| 56:48 | In that situation, it's quite normal to have all sorts of different instrumentation around the brake disc but as far as running on a car, not usually, I have seen it before but it's very rare and part of that is just because of the challenge of packaging that stuff into looking at the brake discs. |
| 57:03 | I know that there are certainly some cars, what I mean by that is essentially if you imagine, if this is your brake disc, if this is your tyre and your wheel out here and this is the inside of your car, it's much easier to package something mounted to the hub or upright or somewhere in the suspension so you can point at the inside part of your brake disc. |
| 57:20 | Mounting it so it has to be on the outside, it's possible but it's just a lot more challenging, you have to find room for it, there has to be room inside the wheel for it, you have to find a way of reliably routing the wiring to it and keeping it in place. |
| 57:30 | It's certainly possible certainly when you're working in higher end cars where you've got a whole entire brake drum which is part of their brake cooling package to control the flow of the air around the disc and also helps with some of the aerodynamics. |
| 57:41 | But in that situation, you can certainly start to understand it but in my experience, the vast majority of cars are just one infrared temperature sensor per corner and yeah that's not telling you the whole picture but once you understand your brake package, it's more than enough to go on as far as tuning your brake cooling. |
| 58:00 | OK another question from Villaeli, what methods are to be used first to increase brake performance? E.g. brake ducting first or pad upgrade or big brake upgrade? So it really depends what things you're struggling with in the first place. |
| 58:14 | So it depends what brake problems you've got, that's what I mean by that. |
| 58:18 | So if you have, it's probably a good step to go if you're starting to try and understand what's going on with your brakes to at least get some brake temperature paint to understand the maximum temperatures they're getting to on track. |
| 58:30 | That's certainly a really cheap and easy way to start. |
| 58:32 | So let's say for argument's sake, you're heading out on track, you go and run your car around, you're getting a whole lot of brake fade which means that you're pressing the pedal really hard but you're just not getting much retardation. |
| 58:42 | That's a pretty good chance, what's going on there is that you're over the temperature limit for your brake pads. |
| 58:49 | You come back and check your brake disc temperatures, your brake disc temperatures are within the recommended limit, let's say you were just starting to chew into that orange there, for a motorsport style disc that'll generally be totally safe around that 600° temperature range. |
| 59:03 | But you're still getting that brake fade, that's a pretty good indication you need to go to a different compound of brake pad. |
| 59:08 | That's one way, you could have a situation where you're on track and you go to press the pedal and the brake pedal gets really soft. |
| 59:13 | That's not brake fade, that's when, generally when the brake fluid's starting to boil. |
| 59:16 | So in this situation here you're actually going above the vapour pressure of the, sorry you're heating the brake fluid up so much that you're actually getting little air bubbles inside of the brake fluid. |
| 59:29 | The problem with having these little bubbles inside your brake fluid is that normally a solid fluid with no bubbles in it is essentially incompressible. |
| 59:37 | If you press on one end, you're going to get the same force output on the other end. |
| 59:41 | Or the same displacement at least. |
| 59:44 | The problem with having air bubbles inside your brake fluid is if you press and you've got air bubbles, these air bubbles are compressible so what will happen, rather than transmitting that fluid pressure from one end of the, whatever it is, master cylinder, brake line, whatever to the other. |
| 59:59 | It'll actually start compressing those bubbles and all of those bubbles need to be fully compressed before you'll actually start building any meaningful pressure inside the system. |
| 01:00:09 | So if you start to boil your brake fluid, couple of different approaches there, one if you're only just starting to boil it, you could probably get away with upgrading your brake fluid if that's the only problem you've got, maybe going to a dot 5 or a synthetic type brake fluid. |
| 01:00:22 | It may also be an indication of having to run more cooling. |
| 01:00:25 | Let's go to another situation where maybe your brake discs are getting too hot, you're right into that red section of the brake paint or you're seeing in your infrared temperature sensors, you're well over the brake temperature, you've got two options there. |
| 01:00:36 | One is that you can run a bigger disc that has a bigger thermal mass. |
| 01:00:39 | So that means it's going to take more energy to raise the temperature a certain amount. |
| 01:00:44 | There's downsides with that, it's going to increase your unsprung weight, it's going to slow you down when you're accelerating the car, stuff like that. |
| 01:00:49 | The other approach would be to improve the cooling. |
| 01:00:52 | So hopefully there's a few things for you to go on there depending on what problems you're actualy suffering from. |
| 01:00:58 | OK question from Josef Krakel, Josef asks, are coatings like powder coat and electroplate etc and colours, light versus dark any use for cooling callipers/fluid, i.e. rejecting or convecting heat? That's not something I've actually had the experience with, what I mean by that is I haven't back to backed different coatings. |
| 01:01:17 | I'm sure that there are some different coatings out there or at least people claiming that their coatings can help with heat rejection and stuff. |
| 01:01:24 | I think most of the time if you're talking about trying to reject heat from a component like a brake calliper, it's probably going to be more efficient to have no coating on there at all I would have thought. |
| 01:01:35 | I'm sure there must be some cases where it helps with the heat rejection in some instances but really the much more dominant thing that's going to control much more of your temperatures are things like how much you're cooling them, the calliper design, whether they've got fins on them, stuff like this, I would have thought that different coatings and stuff, I'm sure there's some marginal differences in there but I'd be very surprised if you can make a huge shift in your brake operating temperatures by changing things like coatings and platings and surface coatings and stuff like that. |
| 01:02:03 | OK another question from Suhas Govindaraj, Suhas asks, one silly question, he wrote one silly question, I didn't, I was just reading what he said. |
| 01:02:11 | One silly question, what's the need to replace the brake lines and fuel lines to braided lines? At what point do we consider going for a brake master cylinder upgrade? OK that's not a silly question at all. |
| 01:02:22 | What Suhas is asking is a couple of things there, when do you decide to go from the factory rubber style lines to a braided brake line. |
| 01:02:28 | So what he's talking about there is the brake hoses, these are the bits that run from one part of the brake system to other that need to have some flexibility. |
| 01:02:35 | Usually things like going from the chassis to the suspension where obviously the brake callipers and discs are moving around because they're mounted to the suspension so you need some sort of flexible connection between them. |
| 01:02:44 | So most road cars will run a rubber style brake line. |
| 01:02:50 | They're a lot more sophisticated than that but that's essentially what they look like from the outside. |
| 01:02:55 | The great thing about those is they're really cheap to make, the downside of them is because when you go and build hydraulic pressure which is what we're doing in our brake system when we're pressing the brake pedal, that pushes on the master cylinder, the master cylinder compresses the brake fluid and that gives us our hydraulic pressure. |
| 01:03:07 | You're dealing with really high pressures, you can be talking 1000 psi odd in the average motorsport braking system. |
| 01:03:13 | So there is, the downside of running a rubber line is that you actually get some compliance in them, they actually start stretching as you apply brake pressure to them and obviously the higher the brake pressure, the more compliance or more stretching you'll get in there as a result. |
| 01:03:28 | Now the problem with that is it means you need more pedal travel to build a certain amount of pressure, it means you can get more inconsistency in the way you're building pressure inside your system. |
| 01:03:38 | So it's usually a bad thing. |
| 01:03:39 | Almost exclusively in motorsport wide, say totally exclusively in motorsport, everyone's using braided lines, no one's using those rubber style lines just for that simple reason, it's a braided line, usually got a stainless braid or some sort of braid on the outside of it. |
| 01:03:52 | They're much more rigid so it takes much much more pressure for them to expand and change shape at all. |
| 01:03:57 | So that same thing, it just means it reduces the amount of pedal travel you need to use, it reduces the compliance in the braking system. |
| 01:04:05 | And the second part of that question was at what point do you consider going for a brake master cylinder upgrade? Oh I should actually jump back into the previous part of that question, your question was actually when do you upgrade them? Basically if you can see, if you're running, I can tell you if you're running a car in a motorsport application and you're not using braided lines, forget about it, just start running braided lines, you're going to need them. |
| 01:04:27 | But a really instructive way to actually check if you're getting a lot of compliance, you can actually get someone, take the wheel off your car, get someone to go and press the brake pedal really hard and just sit in there in the wheel arch, you'll actually see, you can just see with your eye, any rubber brake hose, certainly a non high performance brake hose will actually start, you can actually even see it swelling at that point when you put a lot of brake pressure on it. |
| 01:04:48 | Certainly if you can start seeing that, it's time to upgrade them. |
| 01:04:50 | Those are the sorts of pressures and forces you'll be using when you're actually running on track. |
| 01:04:54 | Second part of your question, how do we consider going for a brake master cylinder upgrade or when do we consider doing that? This really only becomes a problem when you're changing the size of your brake callipers relative front to the rear, stuff like that. |
| 01:05:05 | It's when you need to make a hydraulic bias change, that's when you need to and if you haven't got the ability to do bias changes on a bias bar, you need to make changes to your master cylinder size. |
| 01:05:15 | That's as far as I'll go with that, we have got a future course coming out all about braking systems which is going to run you guys through all of the different calculations and steps involved with choosing new master cylinders and when you need to do it and how you make the calculations and stuff like that. |
| 01:05:29 | It's a pretty long winded topic that I'm not going to get into but we do have a course coming out on that soon. |
| 01:05:35 | But essentially it's all about when you need to make a hydraulic bias change and if you're at the end of your bias bar window it means you're going to need to step up and make a change in the master cylinder bore size which obviously changes your pressure force relationship. |
| 01:05:48 | OK last couple of questions here guys. |
| 01:05:50 | Eric N asks, please touch on cross-drilled versus grooved brake discs for track use. |
| 01:05:56 | Yeah so what Eric's asking here is cross drilled versus slotted, there's all sorts of schools of though in this but let's say if this is our brake disc, I'll show you on the one next to me in a second. |
| 01:06:10 | Cross drilled, you guys are probably familiar with these already and it used to be very common, it's less so now, they're not as popular anymore. |
| 01:06:17 | The idea here is you've got these holes drilled in the disc which sounds a little bit counter intuitive but there's a couple of purposes for those. |
| 01:06:25 | One it helps with heat management, it helps reject a little bit of heat. |
| 01:06:28 | The second is it allows the gas built up in the interface between the pad and the disc face to escape. |
| 01:06:35 | So what's actually happening when you've got your pad squeezing against the disc face like that, as well as all of that friction building up and that heat building up and all that stuff that's going into the disc and the pads, a tiny tiny level, at that tiny interface between the disc and the pad what's actually happening is you've got a gassing off of the pad which means as part of that chemical reaction that's taking place when we squeeze that brake pad together with the brake disc, you've actually got gas being released. |
| 01:07:01 | Now in some situations, if that gets bad enough, that gas pressure can be high enough, it actually can stop the brake pad coming into contact hard enough with the brake disc and that's part of the reason that people used to use cross drilled rotors, it gives a path for that gas to escape through the disc rather than hold the brake pad off the surface. |
| 01:07:16 | Of course part of it is cooling as well. |
| 01:07:18 | The downside of using a cross drilled disc like this, it makes it much more susceptible to cracking. |
| 01:07:23 | Any time you've got a hole drilled in a part like this, it's an opportunity whether it's from a bad machining mark or maybe a little slightly microscopic rough edge, anywhere you've got a point like that, it's called a stress concentration and that's a great place where cracks love to start in brake discs and brake discs are incredibly highly stressed components, both mechanically, we're spinning these things up huge RPMs, then we're just trying to crush them together and squeeze them while also taking them through these massively different temperature windows, whether it's expanding and contracting, it's a really, it's a horrible mechanical situation to deal with. |
| 01:07:57 | One of the worst things you can do in my opinion anyway is go and then put holes in that component to even more highly stress is because what ends up happening with these little holes is you end up with these stress cracks starting to form around the holes. |
| 01:08:10 | The worst things that can happen is when these cracks get big enough and actually start to join up with each other, at that point, once you've got cracks starting to join up with each other, it's a recipe for disaster, that brake disc has not got long to live and they actually will just fail. |
| 01:08:23 | And when a brake disc fails you do not want to be around for that, it is a seriously bad time. |
| 01:08:28 | The other part of your question there, is with, you asked about slots which is what we've got going on here. |
| 01:08:34 | I'll just jump on the overhead here. |
| 01:08:36 | So this is the modern alternative to a drilled rotor. |
| 01:08:39 | You really don't see drilled rotors anywhere these days, certainly in any high end braking situations, everything is slotted like this. |
| 01:08:46 | It's the exact same idea, it's essentially just giving a place for that gas to escape as it wipes along that pad surface. |
| 01:08:52 | It means that any gas that's build up between the pad face and the disc can escape along that slot, to keep the brake working properly. |
| 01:08:59 | And it just so happens that using a slotted disc like this is a lot less stressful mechanically, it's a lot less likely to build up cracks and anything in the brake disc. |
| 01:09:07 | Alright guys, we got there, last question, Villaeli asks, I'm surprised you did not mention brake bias adjusters, why is that? Thank you for your time. |
| 01:09:15 | Yeah this particular webinar was really all just about brake temperature. |
| 01:09:18 | Really digging into why brake temperature's important, what the data looks like, how we can cool the brakes. |
| 01:09:23 | Brake bias is something we'll be digging into in a future webinar. |
| 01:09:27 | Again like I said, we've got that whole brake design and brake system course coming up. |
| 01:09:33 | That's something we'll be going into in a lot of detail in that course but I can promise you we will have future webinars where we'll dig into talking about brake bias, both the hydraulic parts, the mechanical part, what those mechanisms look like, why you change them and stuff like that. |
| 01:09:46 | I promise we'll be digging into that stuff in future. |
| 01:09:48 | OK guys, that's the end of the webinar for today. |
| 01:09:51 | Make sure you keep an eye out for our future courses, as I said, the suspension course is really close to coming out. |
| 01:09:55 | We've got that brake course which is in development at the moment as well as all our regular HPA content, like the tuning stuff that you're used to, wiring and CAN stuff, all that stuff, there's always more coming down the pipeline. |
| 01:10:07 | Guys remember if you're not watching this live, you can always jump into the forum and ask a question there, I'm there every day checking those forums and jumping onto your questions and making sure we get everything answered so feel free, if there's anything that came up out of this webinar to jump into the forum and let me know what your questions are. |
| 01:10:23 | Thanks very much guys, we'll see you in the next one. |
Timestamps
0:00 - Why is brake temperature important?
10:10 - How is it measured?
10:50 - Infrared
13:20 - Stickers
16:00 - Temperature paint
20:30 - Cause of temperature
21:00- How can we control it?
25:20 - Aerodynamic advantages
26:00 - Data inspection
37:20 - Failing sensors
38:45 - Whole race data overview
41:15 - Qualifying run overlay
44:10 - Questions


