291 | DIY String Wheel Alignment
Summary
String-based wheel alignments are commonplace in high-end motorsport, however the systems the professional’s use can be pricey. In this webinar we’ll look at the principle behind string-based wheel alignment setups and show you how simple it is to make one on a budget.
| 00:00 | - Hey team, welcome to today's motorsport, sorry today's wheel alignment webinar where we're talking all about the basics of DIY wheel alignment, how you can do this for yourself both at home or at the track as well. |
| 00:13 | So before we get into actually going through the different equipment and maybe the different ways we can lay it out and use it, I just thought I'd go through some of the basics of motorsport wheel alignment before we go any further. |
| 00:22 | It's not going to be a really big in depth discussion, it's just going to give you guys a little bit of orientation as we move through today's lesson. |
| 00:29 | So I thought, just come across to my laptop screen here, I'll just go through a couple of definitions for a start really briefly. |
| 00:35 | So here to start with I'm just going to define the definition of camber. |
| 00:40 | So camber is something that a lot of people are talking about camber, you'll hear it brought up a lot when people are talking about different wheel alignment settings. |
| 00:47 | What's going on here is it's really clear that these tyres are leaning in towards the top so just drawing a vertical line there and just drawing another line through the centreline of the wheel and tyre, it's really clear that that tyre's leaning in towards the top. |
| 00:58 | So that's what we always call negative camber. |
| 01:00 | Negative camber, having the biggest impact on our cornering forces and it tends to degrade our braking and acceleration forces. |
| 01:06 | So what I mean by that is as we add negative camber, to a point you end up picking up lateral grip or cornering power on that axle, whatever axle you add the negative camber into. |
| 01:14 | But you tend to also degrade either the braking or the acceleration forces to a point. |
| 01:19 | Usually when you're in that 1, 2, 3° range, you're not usually, well race tyres anyway don't tend to be that camber sensitive, you don't tend to get a lot of change in your braking, accelerating forces, it's really as you get much higher than that 2-3° range where you start to get a break off in your braking and cornering forces. |
| 01:38 | The next one is just talking about the definition of toe. |
| 01:41 | So here again just drawing another line to show us the centre, parallel to the centreline of the car, another line through the centre of the wheel and tyre there, that's toe out. |
| 01:49 | Sorry when the front of the tyres are pointing out towards the front of the car, that's what we call toe out, obviously toe in is the opposite when the front of the tyres are pointing in towards the car there. |
| 01:59 | As you'll see as we go throughout today's lesson, the way we're actually going to measure that, I'm just going to quickly draw a line in here, that horizontal line, we're actually going to measure from some reference that's parallel to the centreline of the chassis. |
| 02:10 | We'll be doing measurements like this from each position of that reference to the tyre and that's going to be, the difference between those two measurements is how we're actually going to be referencing our toe. |
| 02:19 | Toe is used for lots of different things but at the front axle, it often gives you a little bit more initial turn in power, just in the initial turn in phase, it doesn't actually affect the handling of the car too much usually at the mid corner, it's definitely in that transient corner entry phase. |
| 02:33 | Whereas at the rear of the car, it's a big stability tool so particularly controlling the amount of turn in stability we've got when we first start cracking the steering wheel as well as the braking zone as well. |
| 02:42 | Toe probably, toe in I would say is one of the most underrated tuning tools out there as far as chassis tuning so we'll talk a little bit more about that as we get on throughout today's webinar. |
| 02:54 | The last one is caster, so here we're looking at the side view of a macpherson strut. |
| 02:57 | Again if I just quickly draw a reference line, a roughly vertical reference line and I draw another one through the top pivot and the pivot on the bottom control arm of this, particularly a macpherson strut that's the definition of caster. |
| 03:09 | The caster as well as, has a big effect on how much steering weight and also the steering feel that the driver gets back through the steering wheel. |
| 03:16 | The amount of caster we run which is just any amount of inclination of that steering axis which is what we've got here, you can see really clearly that it's leaning back towards, at the top it's leaning back towards the rear of the car. |
| 03:27 | The more caster we have, the more dynamic camber change we have and all I mean by that is for a given amount of steering input, the more caster we have, the more dynamic outside camber we have on the front outside tyre. |
| 03:37 | So it's absolutely a really, probably going to be slightly misunderstood in some respects tuning tool, but is a really powerful tuning tool. |
| 03:44 | It does tend to be something we don't tend to play around with a lot just because it is quite an involved thing to change, it has a lot of flow on effects with changing other things with your wheel alignment as well. |
| 03:53 | So it doesn't need to be one of those things that tends to be played around with as much as something like toe or camber but nonetheless absolutely a really important tool to be aware of and know how to exploit on the car as well. |
| 04:04 | So as far as how to actually go through and measure all of this stuff on your car, I just want to take you guys through a couple of the different tools, I've got a few of them here on the bench with me. |
| 04:13 | So it's really important to understand for a start that doing your own wheel alignments, either at track or at home is absolutely within the realm of almost anyone. |
| 04:22 | It really doesn't require a huge investment in the tools required, certainly when you stack up all the cost associated with running a car, this stuff is really at the bottom end of the spectrum. |
| 04:32 | Now you can go ahead and spend a huge amount of money on really really flash expensive gear and I'll show you guys a few different options depending on what sort of budget level you're looking at but you really can get in at the ground floor with really really affordable equipment. |
| 04:46 | And as we'll see, all this stuff's really easily transportable to the track which is a really important part of doing your wheel alignment because it's one thing to take your car to a local wheel alignment shop to get it done for you. |
| 04:54 | Let's say best case scenario they actually understand how to do motorsport wheel alignments which is a very very different thing from what most wheel alignment shop experts are doing, let's say you have got a great setup from your local wheel alignment shop, if you don't have the ability to be able to go ahead and do that at the track with you, then that's going to be a big disadvantage because it is a really common thing to want to be able to make wheel alignment changes on the track to improve the handling of your car. |
| 05:16 | So let's start off from the top with measuring camber. |
| 05:19 | So there's a couple of different tools I've got here. |
| 05:22 | One of them is this frame, this is the first one I'll start talking about. |
| 05:25 | Essentially it's a really simple aluminium frame, there's a couple of pins here. |
| 05:28 | The idea here is these pins are adjustable height, I can just crack off that little lock nut there and I can move that up and down. |
| 05:33 | The idea here as you can probably guess is that each one of these pins, we sit this against our rim surface, so I'd be coming, if this was the face of the tyre here, I'd be coming up against the side of it here and just measuring directly on the rim surface and obviously that's adjustable so we can make it fit our specific rim so we get that reading right. |
| 05:51 | So you can see down here, it's just got a, I'll just chuck it under the overhead so you guys can see that a bit more clearly. |
| 05:56 | It's just got this digital level here. |
| 05:58 | Really really simple tool, it's essentially like a builder's style level and obviously you need to calibrate hat to being flat but the idea here is that you can just go ahead, put that against the tyre and read off that camber value directly which makes it a pretty affordable and simple tool as well. |
| 06:15 | Obviously, and it goes for all of this stuff that we're going to talk about today, it is a little bit sensitive and you do need to be careful as far as protecting it, making sure you're not getting these things dented or bent or anything like that. |
| 06:26 | You don't really want to be chucking this in a full box of the rest of your spares and setup equipment, they do ideally need to be looked after because obviously it doesn't take a lot as far as bending something, whether it's breaking something or bending it to change your wheel alignment settings so you do need to be careful. |
| 06:42 | The next tool that I wanted to talk about was this one here which is a slightly different style of tool and I'm just going to chuck it under the overhead here just to help you guys get a better view of it. |
| 06:51 | So there are a few different vials involved in this thing but maybe before I get into those, I'll just explain exactly how that works. |
| 06:57 | So what's on the front of this thing is actually a magnetic face. |
| 07:01 | And the idea behind this magnetic face is you hold it against the centre of your wheel, so whether you, ideally you have some sort of magnetic or steel surface that you can put in the centre of your wheel, either that or if you've got some nice flat surface, you can actually just hold it against the centre of your wheel if you need to. |
| 07:18 | It doesn't even need to stay on magnetically but it's just convenient if you do. |
| 07:22 | There's lots of different adaptors you can get, essentially that plugs into that centre slot if you pull out your wheel centre cap, you can just plug in a little adaptor that locates in the centre of the wheel and this thing can just plug straight on the front of it. |
| 07:33 | But the idea here is that essentially this goes onto the centreline of the wheel and let's say we've got negative camber, so it would be sitting up like, let's get it into a reasonable value. |
| 07:44 | You can see we've got 3 different vials here, and the only one we really care about a lot of the time is this one here, negative camber, so we've got negative camber, caster which I'll get to in a second and we've got positive camber. |
| 07:53 | So you can see if I just hold this thing roughly flat, I can see, it's really these two, this top and bottom vial I'm interested in here, I'm holding that roughly at zero camber and let's say this is our wheel I'm going to put some negative camber on this thing. |
| 08:07 | You can see as I increase that up, we can just go ahead here and just read directly the real camber value off the gauge here. |
| 08:15 | Obviously positive camber isn't something you're going to be using a lot of. |
| 08:19 | That's really much more about what people will be using on circle track racing, sorry I should say if you're doing road racing, you're not going to be using a lot of positive camber, it's really only circle track and stuff where people will be using positive camber on the inside tyres but for road racing certainly, we're almost always using some amount of negative camber. |
| 08:38 | So this is the vial you'll be making predominant use of. |
| 08:40 | So when we're going ahead and measuring camber, this is all about, normally what we're talking about, and it really goes for everything that we're going to talk about today in terms of the wheel alignment, we're talking about measuring the angles and the positions of all of the different components when the car's sitting there static on the setup patch. |
| 08:55 | So obviously when the car's moving around track, all this stuff's changing. |
| 08:58 | The toe, the camber, the caster, all that stuff's changing depending on your suspension geometry, the type of racing you're doing. |
| 09:03 | How softly sprung your car is, all that sort of stuff. |
| 09:05 | But really the setup is all about just giving a reference for when the car is just sitting there statically on the setup patch. |
| 09:12 | So the other thing I wanted to talk about was caster, that's where you're going to use this same tool to define that as well. |
| 09:19 | So there's a whole lot of different ways you can measure caster but one of the really simple ways is with using a tool like this and that's making use of this centre vial here which is labelled as caster. |
| 09:29 | So the process, the way this whole system works for measuring the caster is it's making use of the idea of the amount, the camber changes as we turn the steering wheel. |
| 09:40 | So there's a relationship there between the caster and the camber, let's say our steering axis is straight up and down. |
| 09:46 | So maybe if we come back to my laptop screen here, this is probably the clearest way to say it, so we can see here in this, again if I just come back and draw those lines in again, a vertical line and one running through the steering axis which is just running through the pivot points, in this case of the top of the strut and the bottom of the lower control arm of that outer point. |
| 10:04 | If that strut was sitting straight up and down, that will, at least that point between the top pivot and the lower pivot point, if that was straight up and down, as we turned the wheels, we would have, well straight up and down for a start means no caster, we've got zero caster, that means if we turn the wheels, if we turn the steering wheel, that camber is going to stay static. |
| 10:24 | Whatever it's set at when the wheel is pointing straight ahead, the steering wheel is pointing straight ahead, you're going to have the same camber as you rotate that around, that outside front tyre's going to rotate, the camber angle is not going to change because it's pivoting around a central axis. |
| 10:37 | The more and more you slope that back, which is what we see in this situation here where that strut is leaning back towards the rear of the car at the top there, the more positive caster we have, the more camber change we're going to get for a given amount of steering input. |
| 10:52 | That's really important because the amount of camber change we get on the outside front tyre has a big effect on the balance because obviously as we're turning into a corner, we're using steering input, that means that balance of camber between the outside front and the outside rear tyre which are the two dominant tyres, when we're in the cornering phase, the balance of camber between those is going to have quite a big effect on the balance of the car so caster absolutely is a really effective and important tuning tool to understand. |
| 11:18 | So getting back to how this thing actually works, I just thought I needed to go through that little explanation before I went any further, obviously as we change our caster, our camber's going to change when we turn the steering wheel. |
| 11:31 | So the way this works, is this whole system is set up to work for, to tell us the, it measures the camber difference between two different steering positions and from that, it's calibrated to automatically calculate the caster for us so it's actually a really simple process. |
| 11:45 | The idea here is that we've got this thing fitted to the centre of the car, we just need to zero, see this vial down the bottom down here, down on my left, essentially we just need to zero that, just to tell us that this whole thing's flat, obviously if I rotate it this way, you can see that little bubble turning one way or the other. |
| 12:02 | That's an important point to note as well but the idea here is that we're starting with the wheel straight ahead and let's say we're looking vertically down on top of one of the tyres, let's say the front right wheel. |
| 12:12 | What we want to do is we want to rotate the steering a certain amount. |
| 12:16 | So the way this particular unit is calibrated is to turn the steering wheel or sorry turn the steered wheels 20° in each direction. |
| 12:23 | Let me actually just draw that out so it's actually a bit clearer to what I mean there. |
| 12:27 | So let's say we're looking from above, this is our tyre and you've usually got a slip plate underneath here which is just to allow the wheel to slip a certain amount, sorry to easily rotate a certain amount. |
| 12:39 | And the way this works is that we want to, if this is our centreline of our wheel to start with, we want to turn the wheel 20° and the way we usually do this is our slip plates have usually got two pieces on them. |
| 12:50 | And it's got some marks on this thing already so when this thing rotates around to let's say 20°, there'll be some new marks that line up on the top and bottom of that slip plate so we know exactly how far we've turned it. |
| 13:05 | So coming back to our example here, let me just get rid of that. |
| 13:10 | We've got our little tool here mounted on the wheel, we're going to come 20° one direction. |
| 13:16 | At that point, what you need to do is get it flat along this little vial down here and all we need to do is use the thumb wheel, let me just use the other hand so it's a bit clearer, try and hold it in an accurate position. |
| 13:29 | We're just going to rotate this thumb wheel and all that's doing is just moving the position of this vial, essentially just changing the angle of this vial and what we want to do is rotate that, I'm faking it a bit here obviously here 'cause I'm just holding it but we're just going to rotate that pin until we've got that bubble zeroed over here on this point of the vial. |
| 13:47 | So the idea here is that that that's our reference point, we've gone 20° one way. |
| 13:50 | All we need to do now is go 20° the other way, so that means going back to 0 and 20° further and then all you need to do at that point is read off the caster difference at this point down here. |
| 14:01 | So now let's say, obviously I'm faking all of this as we go but this is roughly 5° of caster so the process there again, just zero the gauge to start with then all you need to do is move 20° one direction, find the reference point on the vial, put it back to zero, 20° the other way so that's past zero, 20° the opposite direction and you can read the caster directly off that and as I said, it's taking advantage of that camber change difference we get for a certain amount of steering input. |
| 14:27 | So this tool by itself, obviously the beauty of something like this, there are lots of different tools out there you can use, whether it's using something like this with a mechanical vial on it or you can use digital levels, there's all sorts of different manufacturers whether it's BG Racing or Long Acre for this one in particular. |
| 14:44 | it doesn't really matter, they all do something really similar but the beauty of using a combined tool, something like this is that you've got your camber and your caster measurements all in one. |
| 14:53 | So obviously there's a little bit less expense, it's one less thing to carry around with you if you can do two measurements with one thing. |
| 14:57 | I can't remember the exact price, I'll get Scott who is dealing with your questions today to chuck the link for this particular tool if you're interested in looking into it as well. |
| 15:08 | They're not particularly expensive, I think it's maybe around the $150 or $200 USD mark. |
| 15:13 | Hopefully I'm not too far away there but obviously a lot of functionality built into that thing as well. |
| 15:18 | So the last thing I want to talk about which is really probably the guts of today's webinar is all about measuring toe. |
| 15:27 | So toe is one of those things that, it maybe is one of the more slightly involved things to measure on the car and that just comes from the amount of setup that we need to do to be able to measure, actually measuring it itself is really really simple but I'll, for a start I just want to draw out exactly what I mean by doing a toe measurement. |
| 15:45 | So if we're looking overhead from the car, so let's say this is our, looking overhead of the car here. |
| 15:54 | And we've got our, let's say I'm going to draw some exaggerated angles here on our tyres on our front tyres. |
| 16:01 | Let's say our rears are relatively straight ahead. |
| 16:07 | So we want a way of measuring the amount of toe out in this case, if this is the front of the car. |
| 16:14 | The amount of toe out we've got on the front of this car. |
| 16:16 | So the standard reference for doing all this stuff is to reference all of our toe measurements to some datum on the chassis and the way we're usually doing that is by measuring relative to the centreline of the chassis. |
| 16:28 | Obviously when it comes to measuring the centreline of the chassis, there's a whole lot of different ways you can set that up, you could measure from some physical position on the chassis, usually on road cars that's actually surprisingly challenging finding the centreline of a chassis. |
| 16:40 | You could use things like the centre of the two sills at each end of the car, you could use the centreline between two of the subframe bolts, so the symmetric subframe bolts either side of the car to define some sort of centreline but you still need some way of transferring that out to the outside of the car so we can reference it for the toe measurement. |
| 16:59 | So the method that we're going to go through today, and the reason that this whole webinar is called string based wheel alignment, is what we're going to do is basically just going to run some strings down either side of the car and the whole point about these strings is that we want them to be parallel to the centreline of the car. |
| 17:16 | Now the method here that we're actually using is we've got these bars at each end of the car, got one in front of the front axle and we've gone one on the rear axle and this is obviously a really simple system but the real trick about this is that these two bars have got slots cut in them at a point exactly, sorry these two slots are the exact same distance apart, so if we were to lay these two bars on top of each other, let me just bring that down a little bit. |
| 17:45 | If we laid those two bars on top of each other, these little slots that we've got cut into the bar here, are the exact same distance apart and I've just actually got one of these bars here, just an example to show you guys, this is one of the, just to show you on the main camera, it's just one half of those bars but here you can see there's a couple of different slots cut into this thing and I'll get into more detail about this in a second but I just wanted to show you what I mean by those slots. |
| 18:07 | The real guts of this situation is that as long as those slots are cut at the same, or those little notches are at the same position on both front and rear bars, when we set these up at each end of the car, we know it has to be a fact, as long as the strings are tight, sorry as long as they're not too loose, these two strings, they 100% have to be parallel to each other which is the first part of the reference that we're building up here. |
| 18:33 | So we've got these bars at each end of the car, these are going to be our toe measurements and it's great that they're parallel to each other but the next thing is to figure out how we get them parallel to the centreline of the car. |
| 18:42 | Now again as I said there's a few different methods and I'll show you guys a few different examples a little bit later but the method we're going to go through today is essentially we're using the measurement from the centre of each hub to the string each side, sorry both on the front and the rear axle. |
| 18:58 | Now obviously the toe angles I've put here are pretty extreme so this is going to look a bit silly but I just wanted to make it really clear what we're doing here. |
| 19:06 | So essentially the method here is we're going to shuffle these bars sideways left and right as required until we get these strings parallel to the centreline of the car and as I said, you can use all sorts of different references in the chassis but the most convenient is usually just to measure the suspension itself. |
| 19:22 | If you're doing this on a car that's got adjustable suspension arms, usually it means you have to jig your suspension arms equal to each other, each side of the car because they are going to become part of the reference process so what I mean by that, all I mean is taking a simple steel rule and measuring this distance here, from some convenient point on the wheel face to the string. |
| 19:40 | When I say wheel face, I'm actually meaning the face of the hub. |
| 19:44 | So whether that's, if you've got the ability to pull the centre cap out of your wheel and just measure straight through to the hub position, essentially what we're doing is centreing the string relative to the outboard suspension components. |
| 19:56 | So the idea here is that, I'll come across, set these things up roughly to start with, I'll measure this point from the centre of the hub to my string and then I'll come over to the other side and obviously I'll have a different measurement and the idea is that I want to iterate back and forward between left and right until I get those two measurements roughly the same. |
| 20:13 | So all I mean by that is taking that bar and just shuffling it across a little bit in its little holder and then I keep doing that, I might have to go two or three times back and forward across the front axle until I get them sitting centred to the suspension. |
| 20:25 | Then I'm going to head to the back and do the exact same thing. |
| 20:28 | As you can imagine, making a change on the front is going to make a small change on the back and vice versa, making a change on the back is going to make a small change in the front. |
| 20:34 | But pretty quickly, it's a little bit iterative going back and forward on each end, going back, forward, back, forward, you'll actually end up having the strings centred to the centreline of the car pretty quickly. |
| 20:45 | So at this point, now we've got our strings centred to everything, now we've got our reference box, means we know that we've got 90° in here in all of these corners. |
| 20:56 | And we can go ahead and measure our toe angle. |
| 20:58 | So as I said before, I touched on but the way we're, the way we're measuring our toe angles is by doing a relative measurement from our reference strings like here to the surface of the rim in here. |
| 21:09 | Obviously if we look at the rear axle here, let's pretend there's zero toe there, if I measure on the rear here, I'm going to get the same measurement front and back, telling me I've got zero toe angle. |
| 21:19 | So depending on your work, you're used to working in imperial or metric units, it doesn't matter, it's the same concept, I'm used to working in millimetres for toe, it's a convenient measurement to work in. |
| 21:29 | But you have 0 mm on the rear here and on the front, let's say this is pretty extreme, whatever it is, maybe you've got 15 mm of toe out on the front. |
| 21:37 | So normally, and this is something you do have to be careful about when you're talking toe with people is whether you're talking a toe setting per axle or per corner of the car. |
| 21:45 | So quite often, most often in my experience anyway, people will usually be talking about per corner or how much toe angle you have per corner of the car, or strictly how much toe length you're having per corner of the car, but you do have to be careful if you're discussing setup options with people. |
| 22:00 | Usually it'll be symmetric from side to side but you do have to make sure, whether you're talking total axle or corner. |
| 22:06 | Obviously let's say I've got 1 mm toe out per corner, that gives me 2 mm total for the entire axle so it obviously doubles the magnitude which is a pretty important change. |
| 22:15 | So I do want to touch on here, a lot of commercial wheel alignment systems will almost always use angle. |
| 22:21 | Certainly that's the way OEMs define their toe and it's true that to be more correct or more strict about this, defining your toe in terms of an angle is actually more correct. |
| 22:32 | The problem is when it comes to a motorsport context, we're usually using some sort of reference bounding box like I've described here. |
| 22:39 | What you're actually measuring is a length rather than an angle, it's just simply a lot more convenient to do it. |
| 22:46 | Now in my opinion, it really doesn't matter whether you're using a length or an angle, it just means you've got to stick to that same thing and use it over and over. |
| 22:53 | So it gives you, all you're doing with the setup obviously is building some sort of reference for which you can base future setups on. |
| 22:59 | It's not so much important what it is, sorry it's not important so much exactly what it is, it's just that you've got a way of repeatedly measuring the same thing over again so you can replicate it in the future setups. |
| 23:11 | So that is probably a criticism I hear quite a lot about the stuff is that why aren't you measuring in terms of angle rather than a length and it just comes down to practicality and it doesn't really matter in my opinion, it's just really what's most practical for you to measure for yourself. |
| 23:26 | OK so that's it for how we actually go and measure the toe or the concept of how we measure that toe, it's all about giving ourselves a reference bounding box around the car which we can simply go ahead and measure all of those references. |
| 23:39 | The other thing I wanted to get onto before I mentioned before I went any further with describing how all of this stuff works is, and it's pretty important when you're going ahead and doing your setup to be sitting on a relatively flat surface. |
| 23:49 | So the problem with doing this sort of setup on your garage floor or doing it in the pits at the average, whether it's a garage or just an open pit lane, whatever it is, those surfaces are almost never flat. |
| 24:01 | They're usually designed to have some amount of angle built into them to allow the water to run off them and not pool in a certain area. |
| 24:08 | So the problem with that is if you've got a whole lot of angle in your car, let's say it's sitting lower one side with respect to the other, if we're going to come in here and measure our camber angle and the car's sitting on an angle, obviously that's going to give us an offset in our measurement. |
| 24:21 | We don't want that, it's not giving us a real angle that we can measure so we want, it's really important that we're measuring everything with the car flat. |
| 24:27 | So that's something that I'm going to save a little bit for a future webinar, the different methods we can use to get the car sitting flat and make a virtual setup patch for ourselves. |
| 24:36 | Again there's different ranges of that spectrum, anything from really really cheap, making use of readily available tools, all the way up to some more expensive and sophisticated equipment but I think I'll save that specific discussion for a future webinar. |
| 24:51 | But as far as how do we go and actually make measurements of these, all of this toe stuff, I now want to show you guys a couple of different variations starting from really simple and something that's really cheap to build for yourself, all the way through to what people are using at the professional end of the spectrum. |
| 25:07 | Before I do go any further, I mentioned this before as well, this is the string, or an example of the type of string you can use to do this method that we're talking about here, you'll see it coming up in a couple of the pictures I've got for you guys but essentially this particular one is a BG Racing product. |
| 25:24 | This part really doesn't matter what it's made out of, the only advantage in using something like this is it's a bit more convenient for storage, it's got this little winder handle on the back, it just stops it getting tangled, it's got a nice little spring loaded part on the front but really these are all just details, you can use something as simple as fishing line or a really nice thin nylon string or something like that which is essentially all this is, you don't need to go ahead and spend a huge amount of money on setting this stuff up, this is what we use here, it's just because it's nice and convenient and stops things getting all tangled up but the other advantage of it, obviously it's a nice bright orange which makes it a little bit easier for people to see, both when you're working on the car but also on camera as well which is obviously important for us when we're showing people how to do stuff. |
| 26:04 | So over here on my laptop screen, let's bring up a couple of images, let's see which ones I wanted to show you, just these ones down here. |
| 26:11 | So let's start at the most basic end of the spectrum. |
| 26:13 | So what we've got shown here is one of our GT86s and you'll see I've got an axle stand set up at each end of the car, so let me convert back to a little pointer tool that actually is the one I want which is this one here. |
| 26:29 | At each end of the car we've got these axle stands set up. |
| 26:33 | So we've got one on each corner and you can just see the rear one just poking out at the rear of the car and there's obviously one in the rear left back here somewhere as well that we can't see but the idea behind these is they're just there to support these toe bars which is what we see right here. |
| 26:47 | Which is very similar to what I've got on the counter here in front of me which again, if you come back to the overhead and just have a look here, you can see from the end here, it's got a few different little grooves and the idea here, if I just grab the string. |
| 27:02 | See if I can do this without dropping everything. |
| 27:06 | The idea here, this is that string just to locate in one of those little grooves, you can see it's nice and well located in there and it's just keeping it in the same position throughout. |
| 27:15 | Now one detail to be aware of here is obviously there are multiple slots cut in this bar, these are just cut at even increments and the idea here is this is just to allow for cars of different widths. |
| 27:26 | So obviously some cars are wider than others, some cars have got more track width than others, it's just, you've got to make sure that you're using the same slot at each end of the car, whether you're using the narrow ones or the wider ones, it doesn't matter, as long as those two slots are equal length to each other. |
| 27:40 | Now in this particular photo here, this is just a really piece of bar from a local hardware shop and we've just cut some little grooves into it. |
| 27:48 | So I think, if I just come across to our next photo here, I'll come back to that one. |
| 27:51 | You can see it there, might be a little bit hard to see, if I just zoom in, you can actually see very faintly there just the little hacksaw lines where we've just hacksawed a little groove in there. |
| 28:01 | And as I said, you do have to be careful when doing it but as long as you get those two little hacksaw grooves space equally apart between the front and the rear bars then that's as simple as it needs to be. |
| 28:11 | Doesn't need to be any more sophisticated than that. |
| 28:14 | Here again we can just see, this is actually looking at the rear of the car, so you can see we've got the same setup of the axles here and we've got that string, you can see it's just hanging over that groove at the rear of the car. |
| 28:25 | Now obviously the beauty of a system like this is it really doesn't take a lot of money to set this stuff up, if you go to a local hardware store and just buy some aluminium bar or whatever material you like really, and just cut those slots in it, that's really probably less than $20 to set that up for yourself and all you need then is 4 axle stands to go ahead and set that up and set up your own reference system to do your own toe measurements there. |
| 28:48 | Now one of the downsides with a system like this is quite often when you're doing ahead and doing your wheel alignment, this is great if you're actually just wanting to check your wheel alignment but if you're going to go ahead and make adjustments which the vast majority of the time you are going to want to make adjustments, the problem with this, usually when you're making your adjusments, you're going to jack the car up, you're going to take the wheels off, you're going to have to make your adjustments, then put the car back down and take your measurements again. |
| 29:10 | The problem with a system like this is because the bars and everything are sitting on these jack stands which are obviously sitting on the ground, when we go ahead and drop the springs off to make the adjustments, and we jack the car up and lower it down, it's almost guaranteed the strings aren't going to be in the right place anymore, when you jack the car up, it's never going to come back down into its same position with respect to the strings so that is a downside of using a system like this is while it's perfectly valid and you can definitely get really accurate measurements with it, it really doesn't affect your accuracy at all, it really comes much more down to a convenience thing. |
| 29:44 | So as the next solution that I'm going to show you guys here is very very similar to this, it just takes it up a little bit in level as far as sophistication to help speed up your process a little bit. |
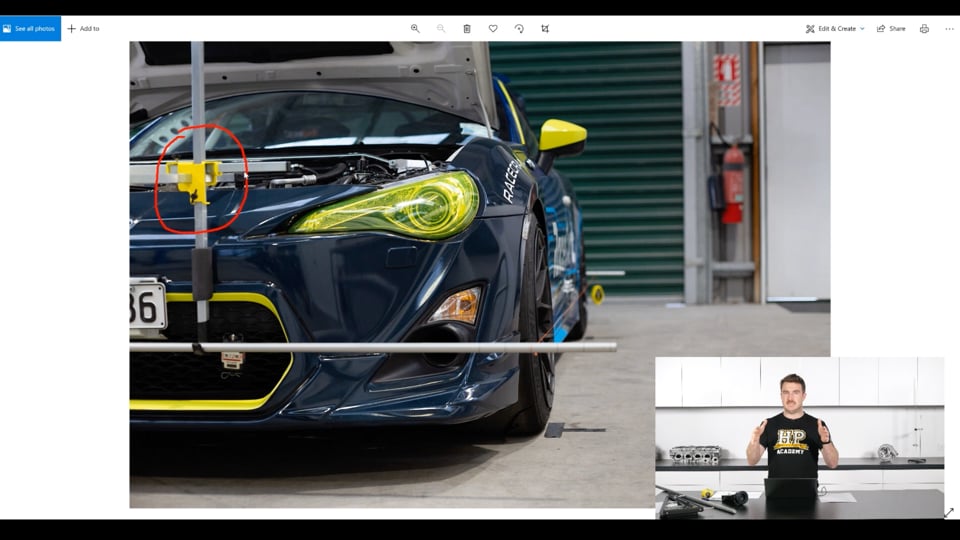
| 29:54 | So let's jump across, I've got the next one shown here which is a really similar concept, same car, even the same strings and everything like that, the difference you'll see here is that we've now got these frames mounted to the car. |
| 30:08 | All these frames are doing, got one at the front and one at the rear, all these frames are doing, they're doing the exact same thing as what we had with our axle stands before, the difference here is that these frames are attached to the car itself rather than the ground. |
| 30:21 | Now I'm sure some of you guys can already anticipate the benefit of this, this means that as we go ahead and make adjustments to the car, we might want to drop the strings off the side of the car temporarily to give us access to the suspension or the wheels, the tyres, stuff like that but as long as we don't bump those little bars that are running across the front of the car, because they're attached to the chassis it means we can just put the car back down on the ground, put the strings back in place and we can go ahead and keep making our measurements without having to recheck our bar centreing at each end of the car. |
| 30:48 | So it's really just a speeding up process. |
| 30:50 | I've got a couple more pictures of this system here as well that gives another view of the system so we can see we've got our adjustable bars up there so you can adjust the width of these things, the depth, whatever it is, they're totally universal to fit all sorts of different cars, you can see that the bar is just supported by a little hanger down there and you can see very faintly there you can see the little slots that are running across the front of the bar and you can see we're using the third slot out there to put our string line on for our particular car. |
| 31:19 | But it's really the exactly same system, sorry the exact same principle as what we were using with the axle stands, this does end up costing you a little bit more because you have to invest in these frames. |
| 31:29 | Obviously you could make these for yourself no problem but assuming you just want to buy them off the shelf, this is bumping the cost up a bit. |
| 31:34 | There's all sorts of different systems out there, you're probably talking between $300 and $500 USD depending on the level of sophistication, if you just want to buy one off the shelf. |
| 31:42 | Here's a couple of shots of me putting this on the car itself. |
| 31:46 | So there's a couple of points I want to point out here, obviously these little hooks go each end, sorry they hook into something convenient on the front of the car. |
| 31:53 | Usually there's something along the front end of the car, the GT86 like we're using here, it's actually a little bit tricky just because it's got a whole lot of intakes and plastics and everything on there but nonetheless there's still a place to hook those into. |
| 32:03 | The idea here is that you can see these little turning knobs down here, the idea is you crack those off and this little bar here can slide in and out of this section of the tube, same thing going on here, there's a little knob here which you can slide, this section of the frame up and down as well. |
| 32:22 | So this thing's super universal as far as being able to fit to all sorts of different cars. |
| 32:27 | Down here as well, you can see the little hanger which is where one of those bars is sitting and on this side there's something a little bit different, it's essentially a tube with a little lockable pin there, the idea here is it just makes it, gives you a little bit more security to make sure that you've got that bar, once you've got it sitting in the place you want, you can just nip up that little turn dial there and it'll just locate the bar and stop it slipping on the frame. |
| 32:49 | I think I've got one more picture here, yep this is just of me doing those adjustments on the front of the car and again you can see those mounts where that bar's just sitting on the front there and I'm just using a little knob on the front to adjust those to get it to fit the car exactly right. |
| 33:03 | So again as I said, the big advantage there is it's just holding the strings relative to the chassis itself so you can go ahead and make changes to the chassis and it just speeds up the process a bit as far as making, doing those toe measurements for yourself. |
| 33:17 | Let's have a look as far as the last version I want to talk about and this is really getting into the much more high end stuff. |
| 33:26 | So this particular car here is an LMP2 car, it's a relatively high end prototype car, these run in things like European Le Mans series, Asian Le Mans series, World Endurance Championship, IMSA in the US, stuff like that. |
| 33:38 | It's basically a spec prototype but the point is here, this is a team running at an extremely high level of professionalism and they are still making use of humble string based wheel alignment where they're measuring all of their toe positions based off string. |
| 33:53 | Now that's not to say there aren't some teams out there using some different equipment. |
| 33:57 | There's still teams out there using some optical tools and stuff like that to do this stuff but the reality is a lot of teams, in my experience the vast majority of teams are still using string based wheel alignment systems, simply because as long as you're careful and you pay attention to what's going on, they're largely infallible as long as you've still got that same system with the slots cut equal spacing apart from each other at your reference bars at each end of the car, as long as they're equal spaced apart and you find a way to centre them to the centreline of the car, the strings are a really reliable and repeatable method of doing all of your toe measurements so let's dig into exactly what's going on here. |
| 34:29 | So you can see here's one of the rear bars, we'll go into more detail in a couple of other shots here in a second and it is quite hard to see but you can just see the string line coming across here. |
| 34:40 | And you can see it just extending along the bodywork there and all the way to the front where you've got a similar toe bar attached to the car there. |
| 34:49 | So it's really the exact same system. |
| 34:51 | Instead of wheels, and I'll come back to this in a little bit more detail in a second, rather than having wheels in the car, they use these setup plates and they're just basically measuring the distance from that string to that plate there which is just in place of a dummy wheel essentially. |
| 35:04 | Now the biggest thing to understand here about the way these guys are doing it is that they build all of their fixtures themselves and rather than having a bar that hangs on the car somewhere, they've got these bars that actually screw into these fixtures on the back of the car so this whole aluminium piece on the back here, this isn't actually part of the car itself, this is only here, or I'm pretty sure this is only a fixture that's used for the setup anyway so it's attaching, this is what they use to measure ride height, it's got some ballast weights on here to simulate having the weight of the bodywork and all that stuff on the car while they're doing their setup but the point is here this whole fixture just allows that bar to attach to the rear of the car. |
| 35:42 | So obviously this becomes an even quicker thing to set up again, all you need to do is take your fixture, bolt it onto the rear of the car, screw in your toe bars and then this thing's set, that whole fixture is designed to be square to the car, square to the centreline of the car and the chassis, all of that stuff, there's no setting of the strings side to side, shuffling them around to try and get them centred to the car. |
| 36:03 | And again this doesn't necessarily make things any more accurate, it's just about making things faster to work with. |
| 36:09 | Obviously when you're at the racetrack, you're always short on time so just taking minutes or seconds even out of your setup procedure is always a valuable thing, certainly when you're trying to pack in a lot of changes or maybe even repairing crash damage between sessions, whatever it is. |
| 36:23 | Anything that speeds up your process as far as checking and setting your wheel alignment is always a plus So let's go through a couple more photos that I've got here, so this is a zoomed in version of that right front corner, you can see it's labelled there right front. |
| 36:35 | And you can see that little slot with the string they've got sitting in there. |
| 36:38 | It doesn't look like anything flash, I'm not sure exactly what they're using but even this looks like fishing line to me. |
| 36:42 | I'm sure it's something very similar to that, and you can see it's just sitting down in this little V slot down here. |
| 36:48 | Now the other thing you can see here is they do have the ability to adjust these. |
| 36:51 | So I would say what's going on here is this is probably built in to allow them to allow for any changes for damage or new parts that have to go on during a season if they damage one of these fixtures. |
| 37:02 | So this just allows them to really dial in to make sure each of those slots is sitting at the same length apart. |
| 37:08 | But really all that's going on there is the exact same thing that was going on before, with all of these different slots in the bars this is just a very specific tool made to fit one very specific car. |
| 37:19 | This is a little bit of detail on that fixture at the rear of the car that I was telling you guys about. |
| 37:23 | So this whole fixture here just bolts onto the rear of the car and that, when the guys obviously put this into a big setup box that travels around the world with them but this bar, this ride height bar here screws into that fixture and again it's just about having fixed references to the centreline of the car. |
| 37:40 | There's nothing more going on that that, it's just a very, albeit expensive but it is a quick way of setting all this stuff up. |
| 37:48 | And these are the measurements, so this one here in particular is the one I wanted to show you where this is how we're actually doing the toe measurement. |
| 37:55 | So you can see we're just using a really simple steel rule and it's just measuring from that reference which in a lot of cases for us working at a more amateur level, we'll be measuring from some surface on the wheel, some outer surface of the wheel to that point on the string which you can see down here, let's zoom in here and see exactly what that measures. |
| 38:13 | We've got 55 there so let's say roughly maybe 56, 57 mm of toe is what he's reading at the end of the car. |
| 38:22 | Obviously he's going to take the difference between what's happening at the rear and what's happening at the front and that gives him his toe position or toe setting on that corner of the car. |
| 38:31 | So guys that's it for explaining how you go ahead and sort of the basics of how you go ahead and measure all of your own wheel alignment settings, either at home or at the track and hopefully you guys can see while it is possible to spend a lot of money on this equipment, you really can get into having all of the equipment you need to be completely self sufficient to do all of your own wheel alignments yourself for a relatively modest investment. |
| 38:52 | It certainly doesn't have to be a huge investment. |
| 38:54 | Certainly compared to even buying something like a new tyre for your car, it's in that sort of realm of expense when it comes to buying all the basic equipment you need to run your car. |
| 39:03 | So guys if you guys have got any questions that have come up throughout this webinar, whether it's about any of the equipment that I've gone through, how it works, whether it's about data analysis, race engineering, anything you've got for me, happy to answer those questions now if you put those through to me, Scott will chuck those questions through to me and I'll get onto them in a second. |
| 39:21 | The last thing I wanted to talk about here, just going back one photo, was the purpose of these dummy wheels that are set up here. |
| 39:29 | So this is what we're seeing here in this section. |
| 39:33 | Essentially the entire, this entire frame, the purpose of it, and you can see this is the wheel nut, the normal wheel nut and the hub assembly in the middle here. |
| 39:41 | The purpose of that entire thing is that it allows you to simulate the way the car would work as if it had a wheel and tyre on it but get rid of that wheel and tyre to give you much more access to all of the adjustments that you've got on the car. |
| 39:53 | So having a wheel and tyre in the place is fine but, and lots of people will be doing the wheel alignments like that. |
| 39:59 | The problem is it makes it really difficult to get in there, to access all the different suspension arms and do adjustments as you go so what's really common in really high end motorsport is to use these setup plates and it's something I am seeing creep in more and more when it comes to amateur motorsport as far as lots of different companies making this sort of equipment available to people off the shelf and without needing to necessarily, I mean it's still expensive but without necessarily having to make it yourself. |
| 40:23 | So this team, this particular LMP2 team which is Jota Sport, they make all of their own fixtures themselves so all of these fixtures, whether it's the ride height bars or the frames or the ballast weights or these dummy wheels, all of this stuff is machined in house and it is an incredibly expensive process to go through and machine all of this stuff properly but essentially all this thing is, is allows you to get the wheel and tyre out of the way to give you better access and make your measurements a little bit quicker, sorry your adjustments a little bit quicker as well. |
| 40:52 | What you usually find, in really high end stuff anyway, all of these corners of the car, all of these pole systems are usually actually ballasted up to make the same weight as one of the wheels and tyres. |
| 41:05 | You don't have to do it like that, you can either add it on later by making a calculation but what you'll find a lot of times is teams will actually have ballast added to each one of these little setup plates in the corner or these dummy wheels to make it exactly equal to what they expect one of the wheels and tyres to measure to just help make their corner weighting and their total weight procedure process a little bit easier. |
| 41:28 | Obviously it's really important that this whole setup system here, the height of this whole system gives you the exact same loaded height of the wheel and tyre that you'll be using at your target tyre pressure as well so that's a really important part. |
| 41:41 | You can also see how it's integrated at the bottom there, it's sitting on some scales. |
| 41:45 | You'll see some of these systems, I don't think this particular one is like that but often there's load cells built into the bottom of these setup plates just to allow them to clean up some of their setup gear, have one less thing to carry around with them as far as not having to cart a set of scales around with them to different racetracks around the world as well. |
| 42:02 | So these things can get really really clever and expensive depending on how sophisticated you want to go with them but really again it just comes to making things quicker and easier and more accurate for the mechanics so you can do things more quickly between sessions. |
| 42:14 | So guys that's it for the lesson today. |
| 42:17 | I'm going to jump across and see if you guys have got any questions for me. |
| 42:21 | Alright first one from Benny B, what are the advantages/disadvantages of using the string thing for toe versus toe plates? Yeah so there's a couple of different, when people say toe plates, there's usually a couple of different things. |
| 42:34 | Usually what people are talking about doing is, actually let me draw it out, probably better than trying to show you with my hands. |
| 42:40 | So if we're looking from the top of the tyre here, usually when people are talking about toe plates, they're talking about some sort of plate, if this is the, let's say this is the front of the car and this is the outside of the car. |
| 42:54 | Some sort of plate that runs up against the outside of the tyre and then a place for you to go ahead and lay a string from one side of the car, the left to the right hand side for example, measure the difference between the front and rear positions, which is a similar idea to what we're using when we're talking about strings. |
| 43:11 | The reality is, it's just nowhere near as accurate. |
| 43:14 | There's a few different sources of error in there but probably the biggest one is just because you're usually sitting these things up against the tyres. |
| 43:20 | Now I'm sure there's systems out there that sit up against the rim as well, obviously it needs to be a little bit more flexible to be able to deal with different shapes and sizes of rim and stuff like that, that would make it a little bit more accurate. |
| 43:29 | And that will give you the overall toe value on that axle but it doesn't actually tell you anything about how that toe is set relative to the centreline of your car. |
| 43:39 | So obviously, I spoke at length about how we're using the system to make sure the toe is set relative to the centreline of the chassis, using toe plates won't tell you anything about the way the toe is set relative to the chassis. |
| 43:51 | Obviously it's a little bit less important at the front axle because you'll naturally just find the centre point depending on where you put the steering wheel but at the rear axle it becomes a lot more important. |
| 43:59 | So I would say it's not as accurate because usually you're running the toe plates up against the tyres. |
| 44:03 | Straight away that's a bit no no. |
| 44:06 | Well from my perspective anyway, in terms of having different bulges in the tyres or even different lettering on the tyres, it makes it a lot less accurate but again you're just not referencing to the centreline of the car. |
| 44:15 | OK few more questions here. |
| 44:17 | Question from Pat Kinnane, Pat asks, would this string method be able to measure camber or do you need to buy a gauge to attach to the wheel? No it can't really measure camber, you would need to be setting this, well theoretically you could if you set the strings up hanging vertically, maybe you could do something like a fixture that hung, a string and a plumb bob so you had some sort of vertical reference, that would definitely be possible. |
| 44:40 | I've never personally measured using anything like that, I think that would start to get quick bulky and overwhelming with different frames at each corner of the car and stuff like that. |
| 44:48 | The way I've always done it and the different ways I've done it has always been using a system like this, whether it's a frame that goes up against the wheel or whether it's a system like this that locates to the centre of that hub and just allows you to measure the camber directly off that. |
| 45:02 | Theoretically absolutely you could, it's not something I've ever done or seen done, doesn't mean it's not possible or not doable. |
| 45:08 | Another question from Pat, how would you go about adjusting caster? So there's a couple of different parts here, do you mean like how I would do it or why I would do it? So the why, I covered a little bit before, the biggest ones are steering feedback with the amount of steering force, the torque you get back through the steering wheel. |
| 45:27 | Obviously you get a self centreing effect, the more caster you run, the more self centreing effect you get so for a given steering input, the more caster you run, the more the car will want to bring the steering wheel back to the centreline position to keep the car tracking straight, that's one thing. |
| 45:42 | The other part is all about that dynamic camber which I spoke about quite a bit so far but essentially it's just about having, the more caster you have, the more dynamic camber you have for a given amount of steering input so again, zero caster means zero camber change as you turn the front wheels, the more caster we have, the more dynamic camber we have as we turn the front wheels and a big part of the camber is obviously the balance of the car, that camber balance between the front and the rear axle. |
| 46:05 | So the more camber we have in the front, typically the more we'll reduce the understeer. |
| 46:09 | Vice versa the more camber we have on the rear with respect to the front, the more we'll increase the rear grip. |
| 46:17 | So that's really about why you would adjust caster, as far as how you adjust caster, every suspension's a little bit different. |
| 46:22 | Something like on a double A arm suspension, usually it'll be, so if this is your two A arms, so we're looking from the front of the car here, these are your two inner pivot points on the top, two inner pivot points on the front. |
| 46:32 | Usually one or both of your arms will be able to, whether it's by shim or threaded adjustment, whatever it is, you'll usually be able to rotate those arms like this vice versa to allow you to skew your steering axis like that. |
| 46:43 | It can also be on eccentric bolts on the top or bottom arms. |
| 46:47 | For something like a macpherson strut, usually you have to lengthen or shorten that little trailing arm you've got running to the front of the car. |
| 46:53 | There's all sorts of different ways and it depends really on the type of suspension but it's really about taking your steering axis, whether that's defined by a macpherson strut, whether it's defined by A arms, whether it's defined by multi link doesn't really matter, the idea is we're just skewing that steering axis so anything that moves the steering, so anything that moves the suspension that skews the steering axis in that fore and aft direction is changing your caster. |
| 47:14 | Question from Suhas Govinderaj, Suhas asks, is it possible to measure toe angle from digital angle gauge tool by taking measurements by rotating the tool by 90° from where we measure the camber angle? In my mind I don't think there is, I mean I'm sure theoretically you could do something trick with IMUs or something like that to be able to measure the toe angle by but remember the plane that we're measuring this in, we're not measuring with respect to gravity, we're measuring with respect to something that's running parallel to gravity so it's going to be a pretty difficult thing to measure by that way. |
| 47:49 | I would say keep it simple, use what the pros are using, use what everyone else is using, don't try and over think it. |
| 47:55 | Just because you can do it, doesn't mean you should do it. |
| 47:59 | OK question from Eric P, Eric P 1203, Eric asks, do you have to measure each side of the steering rack to make sure the front wheels are pointing perfectly straight before measuring toe? Yeah so there's a couple of different ways you can do that and Eric's point there is that you need to make sure that the steering wheel is straight ahead which is something I didn't mention. |
| 48:17 | The idea here is that when you're driving straight down the road, you want your steering wheel, you don't want it to be like this, you want it to be pointing straight ahead. |
| 48:24 | There's a couple of different ways you can do that, usually something that starts as a road car, usually you want to have some sort of steering lock so that's something that can be wedged underneath the steering wheel between the seat, so you set it straight ahead, you wedge this thing in, then you can go ahead and make your toe measurements. |
| 48:39 | In more dedicated race cars, usually you've got a lock you can put into the steering rack which is obviously really important to make sure you remember to pull that thing out before you go on track but the idea here is that the steering column can only index into one place on the steering rack and there's usually a hole in the steering rack that goes through the body and the rack itself. |
| 48:58 | Mechanically drop a pin in there that automatically centres the rack and you can go ahead, not only it centres it but also keeps it centred so you can go ahead and make and check your toe adjustments. |
| 49:08 | Alternatively you could do what you're talking about if you've got the steering rack pulled or whatever, you could come in here and take a measurement of the amount of steering rack that's extending each side of the steering rack but of course you want to make sure your steering wheel's sitting straight ahead in that position as well, there's all sorts of different ways of doing it and it'll really depend on your specific car. |
| 49:24 | Question from Joseph Ashton, your thoughts on using micrometer versus a millimetre ruler? Yeah I think using a millimetre ruler is perfectly accurate enough. |
| 49:33 | In my experience anyway, your toe measurements are usually in the range of between say -4 to 4 mm. |
| 49:41 | That's even on a pretty extreme toe angle or toe measurement to use in the first place. |
| 49:46 | Most of the time you're +/- 1, 2 mm, somewhere like that and I think that the amount of accuracy you can get, as long as you use a nice thin fishing line, as long as you use a nice clean ruler, I don't think you need to go any finer than that. |
| 50:00 | After that, I think if you start going down into the parts of millimetres, quarter or a tenth of a millimetre, you're really getting down into the region where you're getting diminishing returns on how well you're setting up your wheel alignment. |
| 50:13 | Obviously you've got some errors stacking up in the suspension, even things like clearance in the bearings and the bushings and stuff like that, it's all very well, theoretically you might be able to measure down to a 10th of a millimetre. |
| 50:23 | The problem is if you add up all of the different tolerances and clearances in all your bearings, even if you're using spherical bearings, there always has to be some sort of tolerance associated with some sort of clearance to allow them to move, same with your wheel bearings and stuff like that, they can't be perfectly rigid, I think, my opinion anyway is you're getting down into a position where it's probably not going to be very useful, you're probably going to be shrinking, you're going to be measuring at a finer point than you've got more clearance that's going to swamp that measurement anyway. |
| 50:51 | That's my take on it anyway. |
| 50:52 | Oh I see you've just added in there sorry, there's a question, or vernier callipers. |
| 50:56 | Similar thing, there's nothing wrong with using vernier callipers, it's just really a practicality thing. |
| 51:03 | I think using a ruler, it's just a bit simpler when you're usually measuring from some face on the wheel to that string, it's just usually a bit more convenient to run that ruler up and read the string mesurement directly on it. |
| 51:14 | You could use vernier callipers but I think it's going to be a bit more fiddly as far as trying to get it so you'll be shaking there and trying to get this thing to really just slightly touch up against the string but no more because you don't want to deflect the string so I think that's really why the ruler is such a ubiquitously used tool rather than trying to get too clever with vernier callipers or a micrometer or anything like that. |
| 51:34 | Question from Kelly Hatcher, Kelly asks, how do we diagnose the negative car behaviour, e.g. of camber and toe? What are we noticing in the car, curious on how to know more or less. |
| 51:45 | Yeah so there's probably two main parts to that, one is the driver feedback. |
| 51:48 | So you've just got to go out there and try some different settings and see what works best for you depending on what particular car handling parameters you're looking at changing. |
| 51:57 | And this is, we've got a whole course on this in our motorsport wheel alignment course which goes through everything from, in much much more detail than what we've gone through today but also specifically to your question, how each one of these measurements actually affects the car, how to understand what's happening in terms of the driver feedback and then what changes you need to make to affect what type of car handling. |
| 52:13 | So that's sort of buttons up one side of it which is all about how the car feels on track. |
| 52:18 | The other part is using a tyre pyrometer which again is covered in the course but the idea here is that we use a tyre pyro to go ahead and measure the surface temperature distribution across the tyres. |
| 52:29 | Once the car comes back into the pit lane, the tyres, they can tell us a lot about the way the car's being driven, the way it's handling, also our wheel alignment settings as well. |
| 52:36 | Just to give you one example of something like that, if you're using a tyre pyrometer and you've got a really big temperature split across your tyres, let's say you've got 20 or 30°C where you're 20° hotter on the inside edge compared to the outside edge, that's straight away telling you you've got one or two things going on. |
| 52:50 | You've either got too much negative camber, whether that's too much aggressive camber gain in your geometry or just too much static negative camber. |
| 52:57 | Or you've got too much toe out on the front axle. |
| 52:59 | Similar thing you can use to understand tyre pressure changes as well, there's all sorts of different ways you can use that but I would sort of break it down into those methods where we're looking at temperature of the tyres which ties back a little bit actually to the tyre temperature spread I was talking about earlier in the webinar. |
| 53:14 | Where you're looking at that tyre temperature spread from the inside of the carcass of the tyre but also you can check this more conventionally using a tyre pyrometer on the outside. |
| 53:25 | And then you've got that driver feedback which is just really, with all the simulation and stuff you do at really high end motorsport, ultimately you've still got to go out there and test it on the car and get the driver feedback and see what it really feels like on track so those are big parts of it. |
| 53:37 | OK it looks I've got my last question here from Joseph Ashton, thoughts on a bounce and roll after measurements? Yeah so what Joseph's taking about there is essentially settling the car. |
| 53:45 | So something I didn't go into when we were talking about it today is obviously each time we want to go, we make our measurements on the ground and then I say OK now I want to make an adjustment so generally that'll mean jacking the car up, maybe taking the wheels off, getting in there, making our adjustments and dropping it back down on the ground again. |
| 53:59 | Now the important thing to understand there is that the tyres don't move, let's say this is the chassis looking straight ahead here and these are our tyres that it can heave up and down. |
| 54:06 | The tyres don't move through perfectly vertical lines, they're always going through some sort of arcs, well almost never anyway, maybe if you've got a live axle it's a different story but for the majority of cases where you've got independent suspension they're always moving through arcs like this. |
| 54:19 | Now the problem with that is when the car gets jacked up and the wheels droop, let's say they drop down like this, I'm obviously making things pretty extreme here, and we put the car back on the ground, because the tyres have got some grip with respect to the ground and they actually need to move out as well as up to go through that arc, that ends up holding the car up in an artificial position. |
| 54:35 | So there's two things that need to be taken into account there, the first thing is that we need to allow a way for the wheels and tyres to slip against the road surface or the surface that we're doing our wheel alignment on so that usually means some sort of slip plate. |
| 54:49 | So the idea here is that we put a little plate down, you can get really sophisticated with teflon lined plates like a little steel plate with a teflon surface in between to allow them to slide with respect to each other, so there's a tiny little pancake we put underneath each corner of the car and as the wheel comes down, the tyre comes down on that plate, while it's giving it a nice solid surface to sit on, it allows it to slide quite easily. |
| 55:13 | That's one part of it, you can also do it with stainless steel plates with grease in between the surfaces, there's all sorts of different ways you can do it, you can also do it with, which is something actually I've used in my previous race team, which is just two sides of a clear file. |
| 55:28 | Two plastic sheets sitting with respect to each other, I've seen people use rubbish bags, there's all sorts of things it can be, doesn't need to be really expensive. |
| 55:35 | Most important thing is when you push those two surfaces together, that you haven't got much friction between them. |
| 55:40 | That's the first part, the next thing is to give it a good bounce when you get it back on the ground. |
| 55:45 | So let's say we've jacked the car up, we've done our changes, we've dropped it back down and you've got it on these nice set of relatively friction free surfaces, they're not totally friction free which is the reason people are usually giving them a bounce, which means the most important thing here is you're consistent with the way you do it. |
| 55:58 | So you do it once at the front axle, once at the rear, maybe two or three bounces, two or three bounces and then you consider the car settled. |
| 56:05 | As long as everything is, your slip plates that you've got underneath there are nice and free and those bounces will be enough to settle the car and it's just really important you do the same procedure each time. |
| 56:15 | Definitely a good point Joseph, I see that the last thing you've also brought up there is about rolling. |
| 56:20 | That's a different version of it, it'll give you a similar effect. |
| 56:23 | It depends a little bit on the equipment you've got but the idea, the point Joseph's making there is that rather than bouncing the car to get the suspension to settle on these slipping pads, is that you take the car, you roll it backwards and you roll it forwards, maybe by let's say 2 or 3 metres in each direction. |
| 56:38 | The idea here is that as you're allowing the wheels to rotate, they're sort of naturally going to find their home, they're going to be allowed to track back out to their natural static position as well. |
| 56:47 | That's kind of more of I'd say an American style of way of doing things, this is the way you see a lot of NASCAR teams, a lot of Indy Car teams and stuff doing stuff like this where they do tend to be, roll the car rather than bounce them but every team's got their own procedures and you'll find teams up and down all sorts of different pit lanes using different procedures, whether it's rolling or whether it's bouncing. |
| 57:04 | The most important thing in my opinion anyway is to be consistent with however you're settling the car to get the tyres to sit back in here. |
| 57:10 | OK another question has just slipped in from Plohl who asks, have you ever found that you'll need to change the roll stiffness balance through springs or bars after dialling in the wheel alignment and tyre temps? Yeah I mean that's a massive question. |
| 57:25 | I would say in general when you're dealing with small changes in wheel alignment, if you're talking about doing things like maybe a couple, 1 or 2 mm or toe or something like that at one end of the car, I would say they're relatively decoupled from things like roll stiffness changes. |
| 57:41 | It doesn't mean to say that there's never a situation where maybe if you run more toe out in the front, you may need to run slightly higher roll stiffness distribution at one end of the car or the other but in my experience, certainly when you're dealing with small, this does just apply to once your car's in the setup window. |
| 57:57 | These things tend to be relatively decoupled to each other, that's my take on it anyway is not usually, usually you're dealing with these things independently, I've certainly never been to the point where I've been able to understand that I need to do half a click of bar change at one end of the car if I do 1 mm of toe out for example on one end of the car as well. |
| 58:18 | Not in terms of compensation anyway. |
| 58:21 | OK guys, that's it for the webinar today, there were some really great questions in there so thanks very much for putting all those through to me. |
| 58:28 | I can tell you guys are obviously pretty engaged and interested in this as a topic. |
| 58:32 | If you do want to take this further and you don't already have our motorsport wheel alignment course, I definitely encourage you to go check it out, at least go have a look at the website, have a look at the syllabus there, there is a huge amount more detail than what we've been through today but it is absolutely a really fundamental part of being able to run your own car for yourself. |
| 58:49 | If you're not watching this live, remember you can go into the forum and ask some questions on there, I'll be there answering questions daily so if you do have questions that come up from this webinar, please feel free to jump on the forum and put those through to me, I'll be happy to answer those for you guys there. |
| 59:05 | And remember guys, future courses coming up, our suspension fundamentals course and also our motorsport braking system fundamentals course which are courses that are both coming out really soon as well. |
| 59:16 | OK thanks very much guys, I will see you in the next one, cheers. |
Timestamps
0:00 - Intro
0:35 - Camber definition
1:35 - Toe definition
2:50 - Caster definition
4:05 - Cost effective to get set up
5:15 - How to measure camber
9:10 - How to measure caster
15:20 - How to measure toe
23:40 - Flat patch
25:05 - String
26:05 - Basic setup
29:55 - Frame kit
33:15 - Jig
39:20 - Dummy wheels
42:20 - Questions


