293 | Concentric Twisting Explained
Summary
Concentric twisting is a technique that’s commonly seen in professional motorsport harness construction, yet there’s very little information around the process. In this webinar we’ll cover the process and why it’s used, as well as showing a demonstration of how to lay up a concentric twisted harness.
| 00:00 | - Hey team, Andre from High Performance Academy here, welcome to another one of our webinars. |
| 00:04 | And this time we're going to be talking about the process of concentric twisting, we'll find out what the term concentric twisting even means. |
| 00:12 | It is a bit of a buzz word out there in the motorsport wiring industry, a lot of people for it, a lot of people against it. |
| 00:18 | One of the common questions we have crop up every time we hold one of our free live webinars on wiring topics is, how do we actually produce a concetrically twisted harness? So today I'm going to have an attempt to do this live here. |
| 00:35 | Which could go one of two ways, but we'll give it a crack and if nothing else I'll be able to at least talk you through the process as we go through it. |
| 00:43 | As usual, we will be having a Q&A session at the end so if there's anything I cover, maybe you don't quite understand or anything related to the topic in general, please feel free to ask those questions in the chat and we'll get into those at the end. |
| 00:56 | Now I guess the first place to start is what is concentric twisting and why do we use it? So if we just start with a little test piece of harness here that Zac made up for us quite a long time ago, this is a really good way of visualising what concentric twisting is. |
| 01:15 | So we'll just get this under the overhead for a moment. |
| 01:19 | And this consists of 3 layers. |
| 01:21 | So we've got here the central core which in this case is a two core shielded cable, or actually two two core shielded cables twisted together. |
| 01:32 | You can see that that's twisted in a specific direction, in this case what we call this is a left hand lay because we're looking at it, we're looking down the wire, the lay is in a anti clockwise direction or to the left. |
| 01:45 | Our next layer here, this consists of a number of 22 gauge wires and you can see that these are twisted in the opposite direction. |
| 01:54 | So this of course is a right hand lay. |
| 01:55 | Got a couple of elements in here as well, this gold tape which we can see probably a bit more prominently here on our 3rd layer, this is kapton tape. |
| 02:03 | We're using this to help secure the layer and in particular here it's also being used to secure this kevlar lacing cord which we can also see on both layers. |
| 02:13 | The kevlar lacing cord is simply there to help hold everything together while we are constructing our layers and also hold everything together while we're putting our DR25 sheathing over it. |
| 02:25 | Let's move to our last layer, so again our last layer is a left hand lay. |
| 02:29 | We've got this time 22 gauge conductors and finally we've got our raychem DR25 which is essentially pretty much the normal practice for any motorsport harness. |
| 02:44 | So that's what it is, we've got essentially our harness broken up into individual layers, each layer consists of a number of conductors, each of those subsequent layers will twist in the opposite direction to the direction before it so if we just jump over to my laptop screen for a moment here. |
| 03:03 | If we took a cross section through the harness, this is essentially what we're going to have. |
| 03:08 | Normally, well depends how we're building it, in this case we've got one conductor that is basically forming the core for our twisted harness. |
| 03:17 | That's probably not too usual, when I'm building just about any wiring harness for at least an engine management system, almost always we're going to end up with those shielded cables as our core and there's a good reason for this. |
| 03:33 | First of all we're going to have shielded cables on any engine installation because we use these for mission critical sensors such as our engine speed and position, knock sensors would be another good one, wheel speed sensors would be another one that I would usually use shielded cable for. |
| 03:49 | And those are bulky so having them in one of the outer layers of our concentric twist is awkward at best but it is doable. |
| 03:58 | But they also form a nice solid base for us to actually build up our subsequent layers on. |
| 04:03 | While it is definitely possible to twist around a single 20 or 18 gauge wire and use that as our core, it does make it much more difficult, particularly when you're getting started so one of the keys is any time we can we want to use something like that shielded pair, shielded cable as our central core. |
| 04:23 | Alright so that's what we've got, that's what it looks like, why do we do it? So there are several reasons here. |
| 04:30 | One of the key ones is it gives a lot of flexibility to the harness. |
| 04:33 | So I've got a completed sample harness here, this is actually something that we built for our FD RX7 so each of these sections of harness is concentrically twisted. |
| 04:45 | So we get this section here, we can see that we can really bend it right back on itself through 180° and when we do this, we don't see any bunching in the finished harness. |
| 04:55 | Let's just actually get that out of the way and I'll do this under our overhead with our little test piece here. |
| 05:03 | You can see how easily it can bend and if we do this with the actual harness itself without the DR25, exactly the same deal. |
| 05:12 | So the reason for this is because each of those subsequent layers can move relative to each other so they're actually moving over the top of each other and that's what gives us that flexibility. |
| 05:24 | Now there are some other advantages that really come as part and parcel of that increased flexibility. |
| 05:31 | The first is that we end up with very simplified routing for our harness through our engine bay. |
| 05:37 | Quite often we will be in a situation where we are very limited for room in the engine bay and the routing for the harness can be quite tight. |
| 05:45 | Having that flexibility means we're not going to end up with our wires bunching up as we twist it or bend it around corners. |
| 05:51 | An important part of this though is that by using that concentric twisting technique, when we do bend the harness around a corner like that, no individual wire in that harness is placed under any more stress or strain than any other so if you could compare that in your mind for example to if this was just a parallel run of wires, if we bend the harness like that, we're going to end up with the wires of the outside of that harness with a lot more stress placed on them compared to those on the inside. |
| 06:20 | That doesn't happen with a concentric twist process. |
| 06:24 | And what this means is reducing the strain or stress on those wires can improve the long term reliability of the harness. |
| 06:32 | The other aspect is that by constructing our harness in this way, we end up with a minimal size to our finished bundle, our finished harness. |
| 06:41 | That might not sound too important but particularly when we're looking at perhaps a main branch point for our harness, where we have, or main trunk I should say for our harness where we might have 50+ conductors, that wouldn't be too difficult to achieve with a modern engine. |
| 06:56 | That's starting to get quite a large number of conductors so the smaller we can make that, the simpler it's going to be to route that harness through our engine bay and again that sort of comes back to what I was saying earlier with routing our harness through a complex tight engine bay, the smaller our harness is, the better. |
| 07:12 | This sort of also comes into conjunction with the DR25 sheathing that as I've mentioned is kind of the mainstream product we use in the motorsport industry. |
| 07:21 | DR25 is chosen for a few reasons, it is a heat recoverable sheathing and when it is recovered down it provides abrasion resistance to the finished harness and it also provides resistance or protects the harness I should say from moisture, chemicals, dirt, dust ingress so again, all in terms of improving the reliability of our harness, all good things that we obviously want to achieve. |
| 07:48 | Now in terms of that concentric twisting process, while it has been used for a long time in the motorsport industry, people haven't stumbled upon this necessarily by themselves. |
| 08:00 | There is official code of practice documentation from TE Connectivity that you can have a look at. |
| 08:08 | I'lll just jump across to my laptop screen and show you through this. |
| 08:12 | This is that code of practice document. |
| 08:14 | And if you just take note here 'cause I can't really link you to this but if you just search for that particular term there, ELE-3COP-256, you will be able to have a look at this document in your own time but basically it gives you some procedures here for the process of concentric twisting and it also tells you essentially what we're trying to achieve, how we go about it and gives you a bit of an indication on some of the things you should be doing and some of the things you shouldn't be doing. |
| 08:47 | Now that code of practice is useful to a point but it's basically some guidelines and then people have developed their own techniques over and above this. |
| 08:56 | So there's some great information in there, it's a great foundational document to definitely sink your teeth into and get to be really familiar with but at the same time you're still not going to come out of reading that document with a full understanding of what's actually required for you to physically design and then construct your harness so hopefully we're going to give you a little bit more information in that today. |
| 09:20 | So first of all I want to just talk about a few of the terms that you're going to hear that come from this document but you will hear them used when it comes to concentric twisted harnesses anyway. |
| 09:31 | We've talked about lay direction already. |
| 09:34 | So basically if we're looking at the harness, from our viewing direction, the lay direction is the direction that the wires twist away from us so if we're looking at this one here, we'll just get this under our overhead. |
| 09:46 | If I'm standing here looking down this harness, obviously the lay direction is a left hand lay. |
| 09:52 | In an interesting aspect as well, it's recommended as best practice that our outer layer should be a left hand lay. |
| 09:59 | That's not always going to be possible but I'll just mention that that is the recommendation as well. |
| 10:07 | The term concentric lay really just refers to our concentric twisted harness where each layer, each subsequent layer is laid up in the opposite direction so we go from a left hand lay to a right hand and then finally a left hand lay again. |
| 10:20 | Couple of other terms as well. |
| 10:22 | So there's standard lay and there's hybrid lay. |
| 10:25 | So standard lay simply, and this would be the dream in a lot of situations, doesn't normally work out this way, where all of the conductors in our harness are the same size and type of conductor. |
| 10:36 | This simplifies in a lot of ways our lay up because we don't have to consider the number of wires that will be in each subsequent layer, that becomes really self explanatory which I'll talk about in a moment, we don't have to deal with different size or different gauge conductors as well which can make our layout process a little bit more complex. |
| 10:57 | Hybrid lay of course we've got various different conductor styles and we've got various different conductor sizes as well so this is going to be more typical. |
| 11:05 | Which is essentially exactly what we just looked at, we start with our shielded cables, we've got 20 gauge, we've got 22 gauge, sometimes we'll have in there maybe a couple of CAN buses as well which might be 22 gauge twisted pairs which need to then be run in conjunction with our concentric harness as well so that's going to be more typical, particularly for our automotive engine wiring applications. |
| 11:31 | The other one that's important to understand is the term lay length. |
| 11:36 | So that's essentially the length down the harness if we measure it in terms of one full rotation. |
| 11:42 | So again jumping to our overhead. |
| 11:44 | If we look here at our green wire we can see that it starts here and then we've got it come back around here. |
| 11:52 | Recommendation is that the lay length should be between about 8-12 times the diameter of our wiring layer. |
| 12:01 | There is a little bit of flexibility built into that but this isn't a case of where we can just take any number of wires for a particular layer and work with that. |
| 12:11 | There are pretty defined bounds that we need to work with and that's probably one of the key areas that a lot of people don't understand when it comes to concentric twisting, we do need to stick within pretty tightly defined bounds of how many conductors will make up a layer and this becomes problematic a little bit later as we will see. |
| 12:31 | Alright so I want to talk about the process we go through here and it's no big secret here, obviously the design process and the planning is really critical. |
| 12:44 | And more so here with a concentrically twisted harness because there are a few big considerations that come in. |
| 12:52 | First of all, where possible as I've mentioned we want to use something like our shielded cable as our core. |
| 12:59 | So this becomes central to our planning, we know what's going to be in the core of our concentrically twisted harness so we're going to plan accordingly. |
| 13:07 | At the same time we also need to where possible, we want to I should say, where possible, use the same conductor sizes in each layer. |
| 13:17 | Now that's the dream, that's what we're trying to achieve, sometimes it's simply not possible but where we can, that's what we'd like to achieve, it's going to give us a nicer finish or result, it's going to end up making our job a lot easier as we go along as well. |
| 13:30 | But as I say, sometimes that's not possible, we always plan for the best and then we can adapt our work as required once we actually find out what we need. |
| 13:40 | When we are working with multiple gauge wires or multiple different types of wire, what we want to do is start with the core being our largest. |
| 13:48 | And I've already mentioned, typically that's going to be our shielded cables. |
| 13:53 | And then we're going to work down in terms of our wire gauge. |
| 13:56 | So as you saw with our little test piece of harness there, we had our twisted shielded cables, we then had our 20 gauge and then we stepped down to our 22 gauge which was the outer layer. |
| 14:07 | What that's going to end up looking like is, if I can find this here, if we just jump across to my laptop screen for a moment, this is the design for the FD RX7 harness that you just saw that I showed you. |
| 14:24 | This is something Zac did as part of our professional motorsport wiring harness course. |
| 14:29 | But we'll just go back to these basics. |
| 14:32 | So this is essentially the high level of our harness design where we're looking at the particular connector that's going to be used. |
| 14:43 | In this case the connector is, the part number for the connector is listed here, along with the boot that's going to be put over this. |
| 14:51 | Then each of the pins, so that's the actual connector layout, each of the pin locations is then labelled here with the location then the conductor that's going to be used, in this case most of this harness was constructed in single colour 22 gauge white and then the function for that particular conductor and then of course where abouts it's going to in the harness. |
| 15:15 | So that's kind of our high level view and where we would get started with our harness design and really this would be the process irrespective of whether I'm building a concentrically twisted harness or a conventional harness, it really doesn't matter. |
| 15:28 | We've also got some information around our sub harness interfaces as well that are part of this harness. |
| 15:36 | And then if we come through here, we've got our splices as well, where abouts those are going to be located and then for our purposes the final part of this puzzle, once we've really got this designed is coming up with our concentric layup, so how this is going to work. |
| 15:52 | So what this basically starts with is our core, so this is our first layer here and we've got what's going to be part of this core. |
| 16:01 | In this case, this is actually a twisted pair for CAN high and CAN low which we can see that function is listed here. |
| 16:08 | Again everything is 22 gauge. |
| 16:12 | So the important part here, this is where things start to get a little bit tricky and I'm going to cover this very briefly but there's another process that most people actually follow so what we've got here is the outside diameter of the cable is being listed. |
| 16:27 | Now the reason for this is that if we know the diameter of the cable that we've got, that we're going to be working around and we know the gauge of the or the diameter of the conductor that we're going to be using for our subsequent layer. |
| 16:40 | We can actually calculate straight off the bat what number of conductors we are going to need for the next layer. |
| 16:48 | Take things back one step though, now this is for a hybrid layup where we're using different gauge wires, different styles of wire, if we came back to the really simple layup where everything was exactly the same, so a standard lay where all of the conductors were the same size and the same style, so let's say we're just working with simple 20 gauge wire. |
| 17:10 | What we're going to do, we know that the concentric twist starts with a single core, one conductor. |
| 17:16 | Each step up in layer there, our first layer from that, or our second layer, first layer after our core, that will then have 6 conductors so 6 of those same 20 gauge conductors. |
| 17:26 | We step to our next layer, we're going to add another 6 conductors each time we step up a layer so we go one, then we go 6, we go 12, if we're going to another layer we'd add another 6, we'd go to 18. |
| 17:38 | The reason for this, and this gets back to that we're working within relatively fine bounds here in terms of what our lay length is going to end up being and that is determined of course by the number of conductors so that's our golden rule there, each time we step up in layer, we're going to add another 6 conductors. |
| 17:58 | That's all well and good when we are using a standard lay where all of the conductors are the same type but of course as I've mentioned, hybrid layers probably going to be the more realistic situation that we're going to be dealing with. |
| 18:10 | So by knowing the conductor sizes and the diameter of our initial layer, what we can do is, we've actually included this in our professional motorsport wiring harness course. |
| 18:25 | There is a concentric lookup table, so concentric twisting lookup table which is what I've got on my laptop screen here. |
| 18:32 | Looks a little bit complex, Zac talks you through how this works but essentially what we can do is calculate based on the wire gauge, the diameter of the wire and then basically it'll look up and tell you, let's say for 5.0, we're going to end up with 15 conductors, sorry 18 conductors, let's see if I can read properly, 18 conductors are going to be in that next layer. |
| 18:57 | So that gives us a guide and that allows us, if we come back to this design here, that is why Zac knew before he ever actually laid anything up how many layers were going to be in our second layer, how many conductors I should say, which in this case is 5 shielded cables. |
| 19:15 | So that includes our ref, our sync, our knock sensor and 2 EGTs. |
| 19:19 | Moving up to layer 2, same process there, looking at the diameter of the layer and this time 23, 22 gauge wires to get our lay length correct. |
| 19:31 | So just having an understanding of this is really helpful because it allows us to really quickly understand what that harness is going to look like, we don't need to ever basically touch a conductor at this point, this is all our planning stage and in this case you can see, 3 layers in total and that last layer's got 29 wires. |
| 19:54 | You'll remember, that works quite nicely as well, I said that every time we step up if we're using the same gauge wire, we're going to add 6 wires. |
| 20:02 | Our second layer was all 22 gauge wires as we can see listed there. |
| 20:06 | So we've got 23 of them. |
| 20:07 | So as you can see, the process works, our 3rd and final layer, we added 6, we've got 29, 22 gauge wires and as you can also see, following the best practice, that final layer is a left hand lay. |
| 20:22 | So this is the process, and it might sound a little bit complex at this point. |
| 20:25 | How do you calculate all of that? What if you don't have that lookup sheet that I've just referenced because you haven't purchased that course? It's fine because the reality is that most people who are getting started with this don't have any of that information. |
| 20:39 | Instead, what you can do is build a few test pieces of harness and you're going to quickly get a feel for how many conductors need to go into a particular layer. |
| 20:48 | When you're building up your harness as well, you are going to get to a situation where, when you get to that final layer, it's going to be pretty obvious if you maybe don't have enough conductors in that layer and the lay isn't quite right, it's not going to give you the right lay length so that's at the point where if you hadn't done those calculations, you can start to manipuate things. |
| 21:11 | There are of course some advantages with going through the process of designing everytghing before you start building your harness. |
| 21:18 | One of those aspects is you're going to find when building concentric twisted harnesses that you can't just have any number of conductors, it just doesn't work for all of the reasons I've just talked about. |
| 21:30 | We need a specific number of conductors for each layer. |
| 21:33 | So more often than not, what you're going to do is get to a situation where your final layer, let's say that final layer we just looked it, it has 29, 22 gauge conductors that are required to get the right lay length. |
| 21:46 | What happens if we only have 20? So we're 9 short. |
| 21:51 | Well we can't do that, we can't finish it like that, we're going to not end up with the right lay length or alternatively we're simply going to have a big gap in our harness. |
| 21:59 | So this is one of the downsides in my opinion with concentrically twisted harnesses. |
| 22:05 | And it is a consideration we need to keep in mind is that we will more often than not need to add ballast or filler wire. |
| 22:13 | And that's kind of just along for the ride and this is where we do end up usually getting a bit of push back when we talk about concentrically twisted harnesses. |
| 22:21 | Obviously in a motorsport application, weight is a key consideration and obviously if we're adding wire in there for the sake of getting the count of conductors right then that's adding weight for no purpose. |
| 22:34 | And fair enough, unfortunately this is the process, this is the requirement so if we want to get the number of conductors right, sometimes we have no option. |
| 22:42 | But there are a few ways of dealing with this which really comes back to that planning. |
| 22:47 | So first of all, if we are going through the process, which, or the recommended process which I've just talked about where each subsequent layer only has the same gauge of conductor. |
| 22:58 | Let's say our layer below had, just pulling numbers out of the sky now, let's say that that required 20 conductors and we came up a bit short, we only had 16 so that layer has 4 filler wires in it already. |
| 23:15 | Well if we're already planning this out, what we could choose to do is take 4 of our smaller gauge wires from the next layer, drop them to a large gauge and put them in our previous layer so there's ways to manipulate this. |
| 23:29 | The other thing I always like to do if I'm in a situation where I know that I'm going to be facing the requirement for some filler or ballast wire, is look at adding some redundancy into the harness. |
| 23:40 | Do we have some spare functionality on our ECU that we might potentially want to use in the future? What we can do there is maybe incorporate maybe a spare 5 volt, a spare sensor 0 volt, and maybe a couple of analog or digital inputs and run those as ballast through and then break them out in a connector somewhere in the harness. |
| 24:00 | So they may never be used but it's a good way of bringing into use those otherwise unused ballast wires and getting something useful out of them. |
| 24:10 | Alright I want to just dive into some of the actual practical elements here with the harness construction as well. |
| 24:18 | So first of all, I've talked about the fact that we're normally going to be using a twisted pair, shielded cable, often more than one shielded cable as our core. |
| 24:28 | And that brings in itself a few considerations because we can twist our central core, obviously left hand or right hand lay. |
| 24:38 | So let's have a look at this one here and this has actually been purposefully twisted the wrong way. |
| 24:44 | What we can see here is that this is really really tightly twisted which looks really nice but by twisting this in a left hand lay we've actually twisted the two tables together in the same way that the individual conductors within each of those shielded cables is twisted. |
| 25:00 | And this is something we want to stay away from, this forms what is called a quad. |
| 25:06 | And in this situation what it does, basically the individual pair twist around each other is essentially eliminated and each, that individual twist is lost and this can be problematic for noise rejection in the future so we don't want to do that so when we're paying attention to this, we always want to twist our shielded cables in the opposite direction. |
| 25:29 | So let's just have a quick look here. |
| 25:32 | We've got a couple of pieces of shielded cable, I'll get these under our overhead and I'll try awkwardly to do this under here. |
| 25:39 | So if we look at a individual piece, again this is probably a little bit tricky for you to see on our overhead camera but the lay direction on this is a left hand lay and this isn't too pronounced being that it is quite a small gauge shielded cable but you will see this to some extent on our shielded cable. |
| 25:57 | So what this means is if I twisted these two together in a left hand lay, I would be creating that quad. |
| 26:04 | So going on this direction, that's not what we want to do so we want to in fact twist in the opposite direction with a right hand lay. |
| 26:13 | And we can quite easily, I say easily while I'm trying to make this look easy but it's pretty awkward. |
| 26:21 | We can quite easily twist these together by hand so this isn't a situation where we're going to be using a drill. |
| 26:25 | I should have probably cleared that up right at the start, concentric twisting is a hand twisted procedure, we're doing it by hand, we're not going to be using any battery drills or anything like that to help us with this process but that's a key point there, just keeping in mind the lay direction for our shielded cables, very easy to go wrong with that. |
| 26:45 | I've seen this done and it hasn't created any problems but it is technically a no no so if we've got the opportunity we're going to do things right. |
| 26:53 | So that's where we may get into a situation where the best practice of having our outer layer in a left hand lay may not be feasible. |
| 27:03 | if we're starting with shielded cables, we want a right hand lay in our case there so obviously if we've got 3 layers, our core and two others, the outer layer would also be a right hand lay so sort of breaking with our best practice but in this case there's a good reason for this. |
| 27:19 | Alright so another thing I'll just mention before we get into our demonstration here is with our conductors, when we are cutting them to length for a concentric twisted harness, unsurprisingly, we need a little bit of extra wire. |
| 27:36 | Now I say unsurprisingly, I'd expect that this should be pretty straightforward and self explanatory but if you cut your conductors that are going to be in these concentric twisted layers to the length that you've calculated that your harness needs to be to get from point A to point B, you're going to be sadly disappointed because when you get to the end you're going to find you come up a little bit short. |
| 27:58 | I don't put too much effort into the calculation here, generally when I'm doing these outer layers of the concentrically twisted harness, I'm going to add perhaps 25 to 30% more wire than what I've actually measured I need. |
| 28:12 | That's going to generally end up with my harness generously longer than it needs to be but it's always better to come up with a harness that's a little bit longer rather than finding that you're a bit short and trying to find work arounds. |
| 28:24 | These harnesses, and again probably something I should have mentioned, the downside is that they are not very easy to service, they're not going to give you the flexibility to make changes easily so always best to get it right the first time and unfortunately this may result in a waste of a little bit of wire but always better than having to rebuild the harness from the start. |
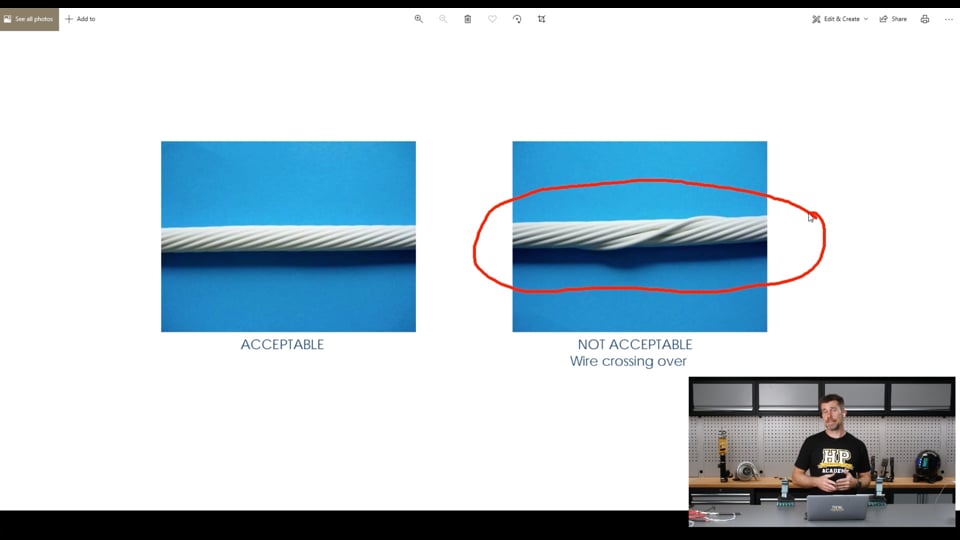
| 28:44 | OK so what we'll look at quickly before we get into our demonstration here is some of the key pointers that you've maybe not quite got it right. |
| 28:58 | And again these are not something I've come up with, this comes straight from the TE Connectivity code of practice. |
| 29:05 | So let's jump over to my laptop here. |
| 29:07 | So we're visualising that finished layer, or each of our concentric layers, this is what we really want, where everything is nice and even, sitting right beside each other and this is what you're almost inevitably going to get at some point, particularly when you're just getting started where we've got a wire overlapping or crossing over. |
| 29:27 | And it's always something that we want to pay attention to and keep an eye on while we are progressing our harness and it's really easy to fix while we're constructing a layer. |
| 29:37 | When you've got to the end, that becomes a lot more problematic. |
| 29:41 | There's a couple of tricks I use when I'm doing this. |
| 29:44 | And again, really important to understand here, there's no set in stone black and white this is how we must construct a concentrically twisted harness. |
| 29:54 | What I've done is essentially developed my own techniques as I've done more and more of these harnesses, I still don't do a lot of them so I certainly wouldn't say I'm the fastest or the most proficient. |
| 30:07 | Every time I get back into one, because I might only do a harness maybe every 4-6 months, there's that sort of learning curve of getting up to speed, getting familiar with the process again and feeling your way through it and then by the end, you're back up to speed and then of course put the tools down and don't do another one for a while ad loose some of that muscle memory I guess you'd like to call it that comes with it. |
| 30:31 | But one of the techniques that I've developed and you'll sort of see a bit of this, is I use a lot of cable ties while I'm building my concentric twisted harness. |
| 30:39 | You'll see as I go through the process here, I always start my layer by cable tieing the wires that I'm adding, the conductors that I'm adding to the layer around the core. |
| 30:51 | Now this is important, it stops them moving and it keeps them in the right location. |
| 30:55 | Once I've got a couple of full twists around the core going, I'll leave that starting cable tie there and then I'll grab another one and I'll tie that one around the concentric twist, just a little bit looser and what I do as I move down, I basically move that second cable tie down as well. |
| 31:13 | Because the cable tie is tight enough, it won't actually go over the lump that would be created right there with that wire crossing over, it just simply won't. |
| 31:24 | So straight away, if you haven't noticed it, it alerts you to a problem and actually helps you find the right home for that particular conductor and then work it down the rest of your lay up. |
| 31:35 | The other aspect I'll do while I'm building my concentric twist, I'll either use multiple cable ties and just leave them there temporarily, those will get cut off as we progress. |
| 31:44 | But then of course the final process there is to use kevlar lacing cord and the kapton tape. |
| 31:51 | So I've got the kevlar lacing cord here, I'll just get that under our overhead. |
| 31:56 | There's nothing particularly special about it. |
| 32:00 | It is very hard to work with, it's quite hard to cut. |
| 32:03 | I tend to use my flush cut pliers and that works quite well. |
| 32:07 | And what we do, once we've got our concentric twist, our layer finished, as we can see here, this is a pretty good example. |
| 32:16 | What we can do is basically tie the lacing cord around our layer and I'll do this while the cable tie is still intact so that there's no chance of anything moving and then I'll use the kapton tape over the top of this. |
| 32:34 | Now kapton tape is really nice because it is incredibly thin. |
| 32:37 | It's also available in a range of different widths. |
| 32:40 | We're not really using this for any other purpose than just securing that kevlar lacing cord while we're going and it's not going and it's not going to affect too much the finished look of our DR25. |
| 32:52 | I've talked through this webinar so far at various points about the aesthetics and you might be thinking well, what's it really matter if the harness works and does the job then isn't that good enough? And to a point I'd agree but we also take pride in our work and I think all of us involved in this industry are striving to better our results each time we build a harness so anything we can do that's going to provide a nicer finished look and particularly when we get to that final layer when we're putting our sheathing over it. |
| 33:23 | That DR25 will not really hide any error so if you've got a wire crossing over which we've just looked at, it's going to show up. |
| 33:32 | Even the kevlar lacing cord and the kapton tape to a degree does show up. |
| 33:39 | We'll just see if we can see that under our overhead. |
| 33:42 | Yeah it's very slightly visible here, we've got a few little lines that are barely visible and that's from that process there. |
| 33:51 | So using the kevlar lacing cord, the key point is tie it off, secure it with the kapton tape and then, as you can see here, what we want to do with our lacing cord is actually lay it up in the opposite direction and that way it will actually hold our concentric layer together. |
| 34:08 | If we tried to lay it in the same direction as our layer of wire, of course it's just going to disappear into the cracks between the layer and achieve absolutely nothing so that'll become pretty self explanatory as you go through and actually do that. |
| 34:20 | Let's jump back to the laptop and the other aspect here, just really comes down to our lay length, I've already done this to death as well, basically mentioning that we can't just have any number of conductors. |
| 34:34 | But this is what happens when we're trying to basically have too many conductors in here, in our layer or our layer is over twisted. |
| 34:43 | We can see everything's getting bunched together, it's not sitting nicely, it becomes pretty obvious pretty quickly. |
| 34:49 | Conversely if our lay length is too long we end up with a lack of twist in our harness here. |
| 34:57 | So using these from that code of practice guide and just comparing your work, you'll quickly get an understanding of where you sit in the scheme of things, whether you're getting it right, whether you're getting it wrong. |
| 35:08 | But more importantly, obviously this is critical when you're first getting started and you've got no point of reference for your own work, more importantly though, as you gather a bit of experience and you've done this a few times, you're actually going to get just a natural feel for what looks right, and how many conductors you need etc, how much twist you need in your harness. |
| 35:28 | Alright let's jump in, oh no one last topic I want to talk about before we dive into our little demonstration here and that is branching. |
| 35:38 | So I've mentioned it briefly already, brancing when it comes to a concentrically twisted harness does require a little bit more thought and this is a pretty good example here of a branch point, hasn't been booted yet just to make it a little bit more obvious. |
| 35:51 | So we've got our main branch, let's get it under our overhead, probably make it a little bit easier to see. |
| 35:58 | We've got our main branch coming in here which has all of our conductors, then we've got our concentric twist continuing in two different directions and then we've got a few 3 conductor strands coming out of here as well. |
| 36:11 | So thinking about what's going to go into our branches where they are and what conductors need to be brought out, can be beneficial. |
| 36:21 | And this is another one of those situations where there's no black and white here. |
| 36:25 | In the perfect world, what we would want is that at the first branch point, so obviously again just looking at our overhead, this is our main harness with all of the conductors in it, what would be nice ideally is if when we get to this branch point, every conductor that's coming out in this direction and everything that's coming out in these ones here, was all on the outside layers of our concentrically twisted harness. |
| 36:49 | The reason for this is it means that we don't have to completely deconstruct our concentric twist right down to the core and then repurpose absolutely everything. |
| 36:58 | If we only need to take the conductors from the outside of that harness, this makes our life a lot easier. |
| 37:03 | That's not always going to be possible though, let's say a good scenario for this would be at a branch point when we need to take one of our shielded cables that form the core of our main harness. |
| 37:16 | One needs to go straight down one trunk and one needs to branch off at 90° to each other. |
| 37:20 | In this situation, it is what it is, we really can't have any easy way to work around this and we're going to have to deconstruct our twist right down to the core at that point. |
| 37:30 | But if we understand this as well, we're obviously not going to end up going and building a concentric twisted harness that's maybe a metre long and then find that we have to disassemble 2/3 of that to get back to our branch point. |
| 37:44 | We'd only be building a harness out to broadly where we're going to be branching it and then we'll do the branch and then continue so this is just again a case of planning ahead, just understanding what's going to be going on, basically trying to work one to two steps ahead of where you are. |
| 38:01 | It's going to save you a lot of time, it's going to save you a lot of heartache and it's also going to end up giving you a nicer finished product but it is really important to also understand that you can't beat yourself up too hard here, there are no black and white aspects with this and it's a case of just manipulating as best you can to suit the particular application you are building for. |
| 38:21 | Alright we'll jump into this little demonstration, I'm hoping it's going to go nicely but you never know, you never really know. |
| 38:29 | And after this we will also have questions and answers as well so if you've got anything I talked about so far then please feel free to ask those in the chat now. |
| 38:41 | To help me with this, and I still like to do this more often than not, I am using these two little bench vices. |
| 38:48 | It's not essential, those who are good at it will freeform their concentric twist just sitting on the workbench and that's absolutely fine. |
| 38:56 | Personally I find that having everything secure and in a couple of little portable bench vices just can make our life a little bit easier. |
| 39:04 | Particularly if you're not twisting around a larger core like this. |
| 39:08 | Having them in the bench vice, having your single conductor in the bench vice and applying a little bit of tension just helps not get that wire caught up in the twist itself. |
| 39:20 | So it's a nice way to get started and I'd certainly recommend that it's a good technique but it's not the only one so don't think that that's essential. |
| 39:28 | So we've got our two core shielded cables here and same deal here, these are left hand lay so we know we're going to need to twist these to the right. |
| 39:36 | What I'm going to do, and I'm going to cheat a little bit here, I'm actually going to crush these in the end of this vice to keep them nice and secure and obviously that's not what we're going to want to do if we want these wires to actually live a long healthy life but for our purpose of our demonstration, it's going to work fine. |
| 39:53 | So we can just work these by hand here and it's not particularly difficult. |
| 39:56 | Normally one of the nice aspects with the shielded cable is that the outer jacket has a bit of resilience, takes a bit of a set into wherever we actually put it. |
| 40:06 | So it doesn't tend to spring back too much so it makes our life, particularly when it comes to concentric twisting, just a little bit easier. |
| 40:15 | So you can see again just exactly how easy it is to do this. |
| 40:19 | I'll just get to the end here and secure this other end in our other vice and try and keep things nice and tight here. |
| 40:27 | Right so again I'm going to crush this here and that's going to potentially damage our conductor strands so it's not the way we would want to build a harness that we actually needed to use but it's going to work for our purposes. |
| 40:39 | So job done there, now if you are building a harness, you want to use these little vices and you don't want to crush the wires like I've just talked about, there's various ways of doing this. |
| 40:48 | First of all, obviously we don't need to apply too much tension. |
| 40:51 | Another nice way of doing this which Zac actually demonstrates inside of our course as well is to actually wrap the conductor strands there in something like a bit of rag so that they're a little bit more protected but you don't need a huge amount of pressure on these vices to hold everything in place. |
| 41:09 | Right for simplicity here and just to add a little bit of colour what I'm going to do is I'm going to take our pink 18 gauge wire, just something I had on hand and I've cut a few sections of that wire. |
| 41:25 | I had a bit of a test go with this to start with so they are already a little bit twisted. |
| 41:30 | Now we've done a right hand lay so we know that our next layer, our subsequent layer is going to be a left hand lay. |
| 41:39 | Based on the diameter and our conductors we could go through that lookup sheet as well and work out exactly how many conductors we're going to need. |
| 41:46 | I'm not going to go through the process too deeply here because once you've seen how I go about this, it really, it does become a bit of a rinse and repeat. |
| 41:55 | But the mistake that I think a lot of people make is by working out, let's say we need 18 wires for our layer, alright well obviously we're going to lay up 18 wires. |
| 42:06 | You're going to struggle, if not find it impossible to add 18 wires in one go. |
| 42:12 | Generally anything more than about 4 to 6 wires in one go can become quite tricky because what's going to happen as we're twisting these wires, the ends of them become tangled up and you're going to see that as we go here, and they're going to need constant combing out. |
| 42:28 | The more wires we get, the more complex and difficult that becomes. |
| 42:31 | So at the moment what I'm doing, I'm starting here with 6 wires and that's going to be enough for me to get a bit of a feel for how this works and what we need to do. |
| 42:40 | So I'm going to take my cable tie here, let me get my conductors set up about where I want them to go and let's start by just getting my cable tie nice and tight around those wires. |
| 42:52 | And we've got them laid up in the direction they're going to go and it's going to be a constant process here, I've made my life difficult again by already having a bit of a test with these wires. |
| 43:03 | Making sure that they don't overlap. |
| 43:06 | Now this is all it's going to be from here. |
| 43:10 | There's no rocket science involved, it's not particularly tricky. |
| 43:13 | It's just a case of being patient and we're going to constantly just twist the wires around and as we're doing this I'm also going to be basically combing out the ends of them so they don't become twisted. |
| 43:25 | So we've got our first full twist there and we're just going to continue this. |
| 43:31 | So yeah as we twist them around, they are twisting around each other and that's why the ends of them become tangled so it's just that constant job of teasing out the ends, combing them straight and that's going to help ensure that we don't get that situation where we've got a wire overlapping. |
| 43:46 | As I do this, each time I go I'm just going to constantly just be looking at my finished twist and make sure that I haven't got any mistakes creeping in, I haven't got anything that has basically twisted over the top of itself. |
| 44:00 | In this case actually everything's going quite nicely so far, famous last words, probably should have kept my mouth shut. |
| 44:05 | And we'll just keep going. |
| 44:07 | So you see at the moment I've got this gap and that's absolutely fine. |
| 44:11 | This is the process of working with less wires in a particular layer than we are going to ultimately need but there's no problem there. |
| 44:20 | I'm just getting this first section which is probably going to be about half, the wires are probably going to need about another maybe 6-10 wires to complete this layer. |
| 44:29 | And then I can go and add some more in and just basically work slowly building up my layers until, my conductor number until I've got that full layer complete. |
| 44:40 | And that's another way, you can sort of start to play around a little bit with the number of conductors you've actually got in the layer and figure out do I need maybe 12 in this particular layer or is 13 giving me a better lay length and looking a little bit more complete? So this is where I also said, I can just basically twist this around for the moment and just leave it sitting there. |
| 45:02 | As we're building our harness and we're not quite sure on length, maybe we're coming up to a branch point, if we just build a little bit past the branch point and basically twist the wires around like I've done there, you can see that with a tefzel wire, it basically takes a bit of a set and it has a bit of a memory. |
| 45:16 | So this part of the twist that I've done here, that's not going anywhere, that's nice and stable. |
| 45:22 | But again if we've got a particular point that we maybe want to stop our work or maybe branch out or something like that, again just that second cable tie, and obviously I haven't got all of my conductors in this right now but what I was saying, so we've got a left hand lay up for that layer that I'm working on at the moment. |
| 45:40 | So if we move our cable tie down and we twist the cable tie in the same direction as our lay up, what that's going to do is help avoid that problem with an overlap of wire as well so that's how I use that cable tie once I'm going to just move down that layer. |
| 45:59 | And I'll just have that cable tie sitting maybe 1-3 twists behind where I'm actually working and that will just give me the confidence that nothing's going to get loose, it's all going to stay nice and tight as I intended and we're not going to get a situation with an overlap. |
| 46:15 | And I've just actually had that happen right there which is a good time to talk about what do we do. |
| 46:21 | Unfortunately probably a little bit difficult for me to show you the overlap. |
| 46:28 | Maybe I can actually, let's just have a look with our iPhone camera here. |
| 46:33 | So we'll get a better sense of what's going on here so we've got our little cable tie and we can see that up to this point, we've got no overlaps, everything is nice and parallel. |
| 46:43 | We get to this situation here and we can see that we have got a wire sticking out there. |
| 46:51 | So what do we do with that? I'm going to have to put this iPhone camera down so I can talk about how to deal with that. |
| 46:56 | But when we notice it, and it's really important to notice it straight away, basically what we want to do is work back to the last section where we had no overlap and the overlap has happened as I've gone through this particular twist here so we can just basically smooth that out with our hands, it doesn't require a lot of effort and then we can move our cable tie down and that's again the advantage of having that cable tie. |
| 47:16 | Once we've got that smoothed out, that's going to hold it in location there and then the problem actually moves further downstream and it's just again a case of continuing to tease out or comb out the twisted ends and our job is done. |
| 47:30 | OK so obviously I've only added essentially about half of the wires there that we need for that particular layer but it's just a rinse and repeat of that. |
| 47:38 | This also was the hard part. |
| 47:40 | We're now just going to add whatever number of conductors we need to fill out that particular layer and our concentric layer is done and hopefully you can see by some miracle that actually went relatively smoothly. |
| 47:52 | It really isn't that tricky if you understand the process. |
| 47:56 | And it's just a case of playing around and getting a feel for how it works, doing a little bit of a test harness and just having a play around with that and you'll start to get a sense of what technique is required, what technique works for you and again, just to reiterate there is no set in stone rules for how you need to go about doing this. |
| 48:17 | Whatever works for your application and adapt those techniques to suit. |
| 48:22 | So once we've finished, what I would do, generally about every maybe 100, 150 mm, I will put a small section of kapton tape, just one loop around to hold everything together and then we can also apply our kevlar lacing cord once we've completed our entire length out to the end of our harness or our branch point and then of course it's going to be time to start on our subsequent layer. |
| 48:47 | So that is the process of concentric twisting and hopefully that might have answered some of your questions on it which is a nice segway into our question and answer session so I'll jump in and see what we've got in there. |
| 49:00 | If you've got any more questions, feel free to keep them coming. |
| 49:10 | 99NB's asked, is reducing signal intereference another reason for twisting each layer in the opposite directioin? OK so this is a question that we do get quite often in terms of the concentric twisting in general, doesn't it cause problems with electromagnetic interference or interference in general? So what you need to understand is for a particular layer, so to specifically answer your question, no we're not doing that for noise reduction or signal interference reduction. |
| 49:40 | Each particular layer, of course when we lay that out, each of the wires are actually parallel to each other so in that regard it's really no different to a parallel lay harness. |
| 49:52 | The important point is that all of our mission critical sensors or our mission critical inputs are always run in a shielded cable anyway so that's what we've got there for reducing interference or preventing interference. |
| 50:07 | A shielded cable is what we use. |
| 50:09 | I've talked about the precautions we take to make sure we don't create a quad which we don't want to do but other than that, the other signals are generally going to be relatively slow moving analog signals or digital signals so there's no real concern there for interference. |
| 50:28 | The Harness Shop's asked, for standalone ECU, for 12 volt or 5 volt via usually will be 18 gauge, is it OK to splice it to 20 gauge and it goes to the sensors, in aviation we use the same gauge after the splice. |
| 50:39 | OK so I would say that 18 gauge would be actually pretty uncommon. |
| 50:44 | This really comes down, this is obviously not a concentric twisting question in general, this really comes down to understanding what the current demands for a particular circuit are going to be which is simply ohm's law, if we understand the voltage in an automotive circuit, generally going to be 14 volts with the engine up and running, we understand the impedance or load on that particular circuit we can calculate the current and then we know what gauge we're going to need. |
| 51:08 | So 18 gauge would be pretty rare in an ECU harness, not unheard of but for general hobbyist level ECUs I normally see 20 gauge wire being used which is probably overkill for most things other than perhaps our injectors and our ignition drive. |
| 51:25 | If we look at for example sensors, which you've mentioned there, there's very very minimal current draw on those sensor circuits and it's very easy to get away with 22 or 24 gauge, you could even go smaller than that. |
| 51:39 | In terms of your actual question, is it OK to splice to a smaller gauge wire? Yeah absolutely. |
| 51:45 | So what we would generally do, something I quite often do if we're running a power feed for example to 4 injectors. |
| 51:53 | Rather than running 4 12 volt feeds to each injector, one to each injector, what we might end up doing is running a single wire up to a branch point at a connector and then splicing out to the 4 individual feeds. |
| 52:06 | So what that means is that the 4 feeds going to the injectors can be a smaller gauge wire than the main feed 'cause that main feed needs to support all of the current so yes we splice to smaller wires, really easy to do. |
| 52:20 | Jeffis has asked, is concentric twisting still viable if it's a small run, e.g. 2 or 3 + CAN? I mean it is viable, you get into that situation of needing to simply add filler wire. |
| 52:33 | Whether it's the right solution for your particular application is really up to the individual. |
| 52:38 | I have done this for relatively small runs of wire, small conductor count harnesses. |
| 52:48 | But it obviously does just involve a lot more filler wire depending on how many layers you end up getting to so yeah you need to weigh that up. |
| 52:56 | Next question, obviously most engine harnesses don't move too much but could this wiring method be used in a harness that moves or would you have to add a slip layer more than the kevlar string. |
| 53:07 | OK so let's talk about this movement, and I have, you're quite right, I've talked about the flexibility of the harness. |
| 53:14 | And that is great but we still don't want relative movement in our harness or at least we want to minimise relative movement. |
| 53:23 | So to a degree, some of this is going to be unavoidable. |
| 53:26 | Obviously if we're running from let's say the firewall of the vehicle up to the engine. |
| 53:31 | The engine is not normally solid mounted in the chassis so there is going to be some amount of movement and of course the harness has to basically be able to handle that. |
| 53:40 | Concentric twisting is great for that. |
| 53:42 | I mean a parallel run harness will also obviously work pretty well too. |
| 53:46 | But we want to minimise that movement as much as possible so that's just important to mention. |
| 53:52 | Any time we've got movement in a harness, no matter how it's constructed, we do introduce the risk of long term reliability problems so just minimising that, even though the concentric twisted harness will support it better and be more reliable is always going to be beneficial. |
| 54:10 | 99NB's asked, when running a twisted pair, are there limitations on the bend like with ethernet? It's a good question, it actually caught me out there. |
| 54:18 | There almost certainly are requirements or limitations there on the bend radius. |
| 54:23 | I could not give you a specification on that off the top of my head but I mean any conductor, if we bend it too tightly, is going to potentially be problematic so yes but I just can't tell you off the top of my head what that number is. |
| 54:40 | Last question for today comes from Fred who's asked, do these wiring techniques hold up in off road racing environments? Ah yes absolutely you'll find a lot of the high end off road race vehicles will use concentrically twisted harnesses. |
| 54:56 | If you're on Instagram, a great one to follow is @jameslinmotorsports, he is a US based harness constructor. |
| 55:03 | While he builds harnesses for just about any form of motorsport, from the last time I checked his Instagram he was doing a lot of harnesses for offroad applications so yeah essentially everything you've seen here basically the ability to reduce stress and strain in the wires, flexibility, these are good in any application. |
| 55:22 | Off road is obviously a very harsh environment so definitely lends itself well to that environment. |
| 55:28 | Alright that's all the questions we've got there so remember if you are watching this in our archive at a later point, you can ask any further questions in our forum and I'll be happy to answer them there. |
| 55:39 | Thanks for joining us and hopefully we can see you next time. |
Timestamps
0:00 - Intro
0:55 - What is it?
4:25 - Why do we use it?
7:45 - TE Connectivity code of practice
9:20 - Common terminology
12:30 - Design process
21:10 - Why do you need to plan?
22:00 - Filler wires
24:10 - Incorrect lay example
27:20 - Conductor length
28:45 - Signs you've got it wrong
35:30 - Branching
38:20 - Demonstration
49:10 - Q&A


