297 | Balance Shaft Removal - 4G63
Summary
Removing the balance shafts from a 4G63 has long been a common way of freeing up a little power as well as eliminating as potential failure point. Done properly it can achieve both these aims, however if this is not dealt with correctly it can actually cause premature oil pump failure. We’ll look at the two common options and cover the pros and cons of each.
| 00:00 | - Hey team, Andre from High Performance Academy here, welcome to another one of our lessons. |
| 00:06 | This time we're going to be talking about balance shaft removal in the Mitsubishi 4G63 engine and this is obviously by it's very nature, a fairly specific topic. |
| 00:16 | It's also a relatively simple topic so this lesson is probably going to be a little bit shorter than our typical webinars which means as well if you do have any questions, and I'll be happy to take them, you probably want to get those in sooner rather than later so we don't miss out. |
| 00:32 | So let's start by talking about what balance shafts are and why we've got them. |
| 00:37 | So these aren't unique to the 4G63, there are a range of engines that run balance shafts and the idea behind the balance shafts is that they're there to dampen out or cancel out unbalanced dynamic forces. |
| 00:52 | And they are spun at twice engine speed and they rotate in opposite directions. |
| 00:58 | So I've got the pair of balance shafts here from the 4G63 and one is driven off the back of the oil pump and one is driven separately off a belt from the crankshaft pulley. |
| 01:11 | So if we just get one of these under our overhead for a second. |
| 01:15 | You can sort of get a bit of a sense of what they are. |
| 01:18 | So we've got two journals, this is the secondary shaft that is run independently via its own little belt. |
| 01:25 | So these two journals here run in the block and then as you can see if I rotate it, what we've got is basically an offset weight that is really how the balance shaft, key to the balance shaft. |
| 01:39 | So both of the balance shafts have their own offset weights and they rotate in opposite directions as I've said, at twice engine speed. |
| 01:46 | They do a pretty good job by all accounts. |
| 01:49 | The 4G63 in stock form is a relatively smooth engine so its noise vibration and harshness is definitely lower than a comparable engine that doesn't have balance shafts. |
| 02:01 | So good job to Mitsubishi, they are there for a reason which obviously begs the question, if they're there for a reason, why would we get rid of them? Well there's a couple of reasons, the first one which is often quoted is that getting rid of the balance shafts will free up a little bit of power. |
| 02:18 | And I 100% back this, it will free up a little bit of power but a little bit is probably the operative term here. |
| 02:26 | I've heard people quote anywhere from 15 to I think north of 20, 25 horsepower and I'd be very surprised if you're seeing the higher levels, the higher end of that range. |
| 02:38 | As usual, because we build engines or used to build engines for customers, I never got the opportunity to solely do a back to back test where the only change was the balance shafts. |
| 02:53 | Normally we'd do this as part of a performance engine build and obviously we're changing pistons, connecting rods, turbos, you name it, as part of the build so it's very difficult for me to really state with 100% accuracy, yes they will cost you this much power. |
| 03:09 | But yes there's going to be some power loss involved with driving the balance shafts. |
| 03:14 | For me, that's probably not the prime motivator in removing the balance shafts though. |
| 03:20 | Particularly in a race application, probably the more critical aspects or the bigger consideration is around the reliability of the engine. |
| 03:28 | So what this gives us is, we've essentially got 3 more bearing surfaces where we can have a failure. |
| 03:36 | Admittedly there's not very high loads on these components so that shouldn't be an issue but we've got these two for our independent balance shaft and then for the one that runs off the back of the oil pump assembly, we've got a third bearing surface. |
| 03:51 | So we've got 3 more bearings in the engine block and 3 more potential areas where we may have problems. |
| 03:57 | The other issue, and this is probably where we see more reliability problems with them is failure of the belt that drives the independent balance shaft and then you're going to end up with some really ugly vibrations at minimum because now you don't have the counter rotating shafts, instead you've only got one spinning off the back of the oil pump so you're going to know about that pretty quickly if you have that problem. |
| 04:23 | The other issue of course with that belt is it runs in close proximity to the cam belt. |
| 04:28 | So these normally happen in higher mileage engines that haven't been well maintained but if that balance shaft belt breaks, it can make its way through the cam belt which then ends up with the cam belt skipping teeth and that normally ends up with a pretty uglier result. |
| 04:46 | So we don't want that where possible. |
| 04:48 | So what are our options if we want to get rid of the balance shafts? Well essentially there's 3 main ways we can go about this. |
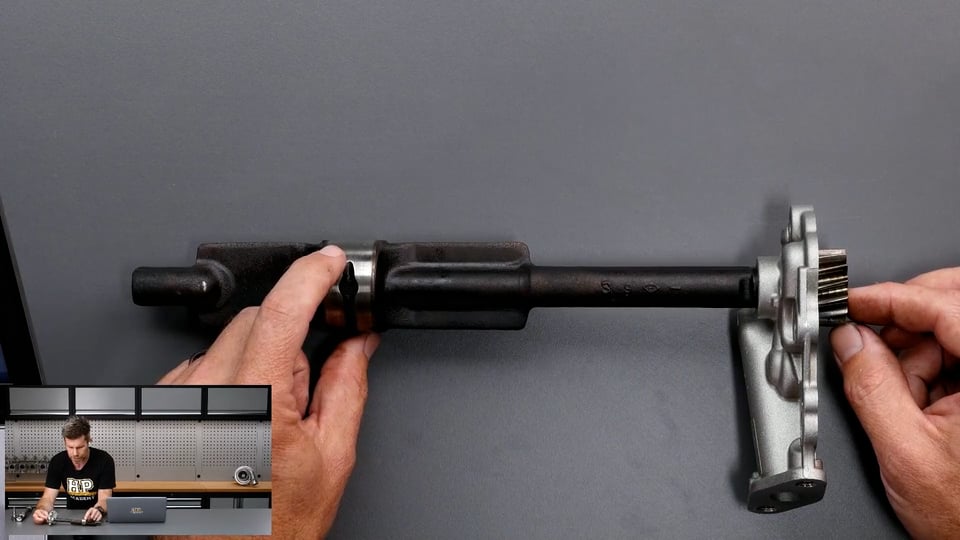
| 04:57 | The first and most common was simply to take the balance shaft that runs off the back of the oil pump and cut the end of the balance shaft off here. |
| 05:09 | So we'll have a look at just exactly how this locates. |
| 05:11 | So let's just get the components under our overhead and this part here, this is the back of our oil pump and that slots through there. |
| 05:21 | So there's essentially a journal surface in here that supports the front of the balance shaft. |
| 05:27 | Then we have our little oil pump gear that's going to locate over there and then there's a bolt that goes in there. |
| 05:34 | So that's what happens there. |
| 05:36 | Now this actually provides oil flow down through the shaft though, this is actually hollow so oil is pumped through from the oil pump itself, down through the shaft and then that provides lubrication for this rear journal so if we cut this off, what we're going to end up with is a hole in the balance shaft and obviously that's going to be a massive oil leak so that's not going to work too well. |
| 06:00 | So the common technique for a very long period of time was to cut the balance shaft off then we would drill the hole out to 9mm, drill and tap it for an 8th BSP pressure plug, fit that pressure plug with a PTFV teflon based thread paste and that would stop the oil leak. |
| 06:19 | That works but we'll talk about some of the potential downsides to that in a moment. |
| 06:24 | So that's our first option. |
| 06:26 | Cheap, relatively quick and easy to do, you can do it yourself with an angle grinder, a drill and a 8th BSP tap so that's probably why it became quite a popular option. |
| 06:39 | The other option is to take, actually we'll go through the other option for aftermarket parts first. |
| 06:47 | So if we jump across to my laptop screen, this is one from GSC Power Division. |
| 06:52 | But there's a range of manufacturers producing similar products. |
| 06:54 | And this, STM Tuned is another one that I'm aware of. |
| 06:59 | So this is a aftermarket billet replacement for the balance shaft here. |
| 07:03 | So we can see that's essentially the replacement for that part that we've just looked at. |
| 07:07 | There are a couple of other components here, this one here replaces the much larger diameter bulky drive gear for the other balance shaft, so simplifying that and reducing a little bit of weight. |
| 07:20 | We've got a couple of replacement bearing shells which we'll talk about shortly, why we need those. |
| 07:24 | And then we've got a blanking plug for the oil pump housing which again we'll talk about in a moment. |
| 07:30 | So that's actually a really good option and probably if you've got time on your hands and the budget suits then this is probably one of the more, the better ways of going about it and I can't actually remember off the top of my head what this is worth, $225 USD, probably plus a little bit of freight no doubt. |
| 07:50 | So it's not going to break the bank and definitely significantly cheaper than having a failure. |
| 07:55 | The other option which we've just gone through with our own Evo 9 4G63 build is to take this factory shaft here, and we'll get again under our overhead. |
| 08:06 | And basically if you take this to any machinist, we did this in house because we do have a machinist and a suitable lathe. |
| 08:13 | But what they can do is basically cut off this end section here which does nothing, all this is is just more counter weight. |
| 08:20 | And then basically they can machine off the eccentric weight from the rest of the shaft. |
| 08:27 | Basically turning it into the same as what you saw there from GSC Power Division. |
| 08:33 | I've done this a number of times with a lot of our builds before the likes of the GSC Power Division option was readily available and it's cost effective, it probably should take no more than about an hour's work from any competent machinist. |
| 08:47 | So probably going to be paying somewhere around about $60 to maybe $100 for that work depending on how friendly and expensive your local machinist is. |
| 08:58 | So that's a really good option to get rid of that balance shaft. |
| 09:01 | So why would we go to the expense of buying an aftermarket balance shaft, removal kit of having a machinist machine that off when we can just cut the end off the shaft and put a pressure plug in it? Well in most instances I actually found that the pressure plug option with the cut shaft worked quite well. |
| 09:23 | However I saw in about 1 in 20 engines, a failure of the oil pump and unfortunately 1 in 20 is just way way to frequent for me to be happy with that sort of an option. |
| 09:36 | So we need to understand a little but more about how the whole oil pump assembly works in order to get a feel for this. |
| 09:42 | So I'll just talk you through the components. |
| 09:44 | So first of all we have our oil pump housing or our front cover assembly. |
| 09:48 | And what this does is it starts with the other part of the oil pump gear, slots through there and this normally has a pulley on it which is driven by the cam belt. |
| 09:58 | So that's our driven gear. |
| 10:00 | Now we'll just get this in front of our overhead camera again and I'll try and assemble this up while we're going. |
| 10:06 | So we've already seen that we have the other part of our balance shaft goes through, we've got our little gear goes on top of here and then everything slots together, hopefully I can do this, kind of like so. |
| 10:23 | So that's our finished assembly and of course when the cam belt spins the oil pump driven gear, that then rotates the balance shaft. |
| 10:34 | So the problem that comes from this is that in stock form, this provides a really good rigid support for that little driven gear. |
| 10:46 | OK so it's got two journals that are supporting it, first of all there's the alloy journal in the back housing for that oil pump and then at the back in the block itself we've got this bearing surface that supports the shaft. |
| 10:58 | So what that means is that when load is applied to that little gear, there's a lot of support for that gear, it can't move around and it's basically in my experience provides a really long service life for it. |
| 11:12 | In some situations when, or not some situations, when we do cut off this balance shaft and lop it off right here, basically we lose the support of that rear section of the balance shaft to support the oil pump gear. |
| 11:28 | So what this does is now we're only relying on the support of the gear in this aluminium housing and again while in many instances I saw this work quite well, in too many instances, what I saw was this would wear quite quickly into the housing and basically what it would then do is allow the oil pump gear to move sideways, then it would start chewing into the aluminium material in the oil pump itself and that gave us two downsides. |
| 11:59 | First of all, what we'd end up seeing is the oil pressure would drop so obviously not a great situation from the get go. |
| 12:07 | The other aspect as part of this though is as it was chewing into the oil pump housing, it would also pump aluminium debris through the oil system which obviously is the last thing you want. |
| 12:19 | Yes there is of course an oil filter in the system but still, any time you're actually pumping aluminium debris through the system, that's going to end pretty badly. |
| 12:29 | So how do you tell if this situation is occurring? Can be a little bit tricky, normally it's going to be repercussions downstream depending how long this has been going on for but one of the keys is if you are doing a cam belt, I always end up giving the oil pump gear a spin by hand and that should spin really smoothly with absolutely no restriction. |
| 12:56 | When that oil pump is failing, what we'll find is that the oil pump gear is quite hard to turn and if you ever notice that, that is a big red flag to start looking a little bit deeper. |
| 13:07 | So not to say that you cannot get away with cutting that balance shaft and blanking the hole but as I've said, in my own experience I just saw too many failures for me to take any chances with that, particularly if you're building an engine and you're spending maybe $5000 to $10000 on upgrades and parts and machining, pistons, rods etc, it really doesn't make any sense to try scrimping and saving the $100 odd dollars it would cost to have your machinist machine down the shaft. |
| 13:39 | The only real downside is that you will end up still with a little bit more rotating mass in the engine with that whole shaft machined down compared to cutting the back off the shaft but again, the upsides in my opinion significantly outweigh the small downsides. |
| 13:59 | OK there are also a few other considerations here over and above just the balance shaft itself. |
| 14:08 | So if we just jump back across to the GSC Power Division photo, so we've got these two bearings and this is important to understand. |
| 14:18 | So you've got a bearing for the oil pump, the shaft driven off the oil pump. |
| 14:24 | Now that bearing, as I already mentioned is lubricated by the shaft itself so not too big a deal there. |
| 14:30 | These are pretty difficult to replace for the home enthusiast. |
| 14:35 | It actually really does require some specialist equipment to do so I always recommend having your machinist replace the balance shaft bearings at the time the machine work is being done, it's very simple for them to do, it's not going to add a huge amount of cost to the job and then you know it's done right rather than trying to do it yourself. |
| 14:56 | The reason for this is that the bearing is hidden quite deep into the block so this part of the block, we don't have access directly where the bearing is, you're going to have to work through from the front of the block and that can be quite tricky if you don't have the correct equipment to do it so you're very liable to actually end up damaging the new bearing shell. |
| 15:15 | That goes for the other side as well and as I mentioned with the one that's driven off the crankshaft via the belt, this one is lubricated, the rear bearing here is lubricated via an oil gallery in the block itself. |
| 15:36 | So this is a bit of a trap, obviously if we're removing the balance shafts, both of them are going so we need to remove this one and too many times I've seen an engine come in that's just been built and the balance shafts have been removed, we've started running it on the dyno and basically as soon as we start the engine up, we notice that the oil pressure is low. |
| 15:55 | Sometimes it will just scrape by when the oil is stone cold and you might get away with it, the oil pressure looks like it might be OK but generally as soon as there's any real heat into the oil, the oil pressure will be too low. |
| 16:08 | And the reason for this is that if you just remove this balance shaft and do nothing else, you've got a big gaping hole, probably a 6 or 7 mm hole for that oil gallery that's just going to be pouring oil directly back into the crank case. |
| 16:21 | So the way of dealing with that is simply to have the machinist press out the existing bearing in the block and then we want to just rotate it so that the hole in the bearing shell, and again if we just jump back to my laptop you can see there is the matching hole there for that bearing shell. |
| 16:41 | Basically want to just rotate that so that the hole no longer aligns with that gallery in the block and the bearing shell instead will blank it. |
| 16:49 | Now personally, no real need to buy a brand new bearing shell for this purpose. |
| 16:55 | Obviously if we're removing the balance shafts, we aren't running anything in that location anymore so all we're really trying to achieve there is just to blank off that oil flow and that's a fairly cost effective way of doing it. |
| 17:08 | Again, something that you're going to get your machinist to do. |
| 17:12 | Now the other consideration here and I'll just get the balance shaft back out of here. |
| 17:20 | If we get our front cover under the overhead, so this is our front main seal where our crankshaft snout comes out. |
| 17:29 | We've got this little seal up here at the top left and this is the seal for the independently driven balance shaft. |
| 17:39 | So when we remove that balance shaft we've not got this big hole through the front cover and there's a couple of ways of dealing with that. |
| 17:46 | So if you are dealing with something like the GSC Power Division kit, jump back across to my laptop screen, comes with this nice little machined alloy plug and you can simply remove the seal out of the location here, it's just going to leave a recess and then that plug just gets pressed in there with a little bit of sealant on it and job done. |
| 18:07 | There is no pressure behind this, it's just basically access into the crank case. |
| 18:12 | So you will still have oil splash so you need some sealant there but it's not actually under pressure, it's not going into an oil gallery. |
| 18:19 | The other way that's a little bit cheaper but probably not quite as nice looking is that the diameter of that particular recess there, matches a existing frost plug or freeze plug size so you can just go to your local automotive supply store and purchase the matching frost plug. |
| 18:38 | Again a little bit of sealant and tap that in and you are good to go. |
| 18:41 | If you're going to be machining up your own blanking plug there, the only tip I would give you is just be a little bit mindful of the amount of interference, you don't need very much, again there's no pressure here, because the wall thickness in this location is very very thin so if you try and get a little bit too ambitious with the amount of interference, what you're actually going to do is just crack through the side wall of that and probably end up with a long term oil leak, right down into the cam belt area which is obviously not where you want your oil leak to be. |
| 19:11 | Right so what we'll do is we'll have, jump into our questions really shortly so again if you've got questions, now is the time to ask them, I did mention that this is a relatively short and sweet topic. |
| 19:24 | But I just wanted to give you a couple of tips for removing the oil pump housing itself. |
| 19:29 | Because this is something where on face value it looks pretty simple. |
| 19:35 | If we turn this over, if you're just assembling the oil pump housing, what you're going to have is 4 bolts in this location with the 12 mm head so relatively straightforward. |
| 19:48 | The one that traps people and causes a little bit of heartache is this location here. |
| 19:54 | There is a counter sunk phillips head screw. |
| 19:58 | And that is really really tight so if you have a crack at undoing that using a screwdriver, it's just not going to end well. |
| 20:06 | So the tool that you need in order to undo that is a impact driver like this. |
| 20:13 | These are actually super handy to have for a variety of tasks, you can interchange the bits in the end of them, I'll get it under the overhead just so you can see. |
| 20:22 | So basically interchangeable bits at the end so doesn't have to just be a screwdriver style phillips or flat blade screwdriver attachment and then it's got a solid little location at the end where you're just going to give that a solid whack with a decent sized hammer and you can also set this to undo or to do up because obviously you're going to have to do both operations there. |
| 20:46 | So supporting the oil pump housing, what I do is use a piece of 4x2 timber or something similar and support that underneath where you're going to be hitting on the back of that screw and it's going to take a couple of decent whacks but that's how you get that out of location and conversely it's also how you get it back into location. |
| 21:08 | So there are torque settings in the factory workshop manual for the other 4 bolts as well, they're only grade 4 bolts into alloy so they actually don't need to be overly tight. |
| 21:18 | Another tip with that that I've seen a few people go wrong with is there is no need to apply any sealant between the oil pump, the front cover and the backing plate for that oil pump housing, definitely don't want to be getting any silicon sealant or anything like that into the oil pump, that's going to also end pretty badly. |
| 21:37 | Alright let's jump into our questions and we'll see what we've got. |
| 21:46 | First question comes from Max who's asked, would you keep the balance shafts for a street driven car? What about for a 2.4 double overhead cam conversion? No I literally did not keep the balance shafts in any of the 4G63s we built just as a matter of course, it was one of the modifications we made. |
| 22:04 | As I've said, I've downplayed it a little bit but yes there is some power to be gained and normally that's enough for most customers. |
| 22:11 | The other thing is that while you're not going to get quite such a smooth engine with the balance shafts removed, generally when we're building a performance engine, the components such as the crankshaft, conrods and pistons were also balanced to a finer tolerance than the factory components which does help. |
| 22:31 | Admittedly yes it doesn't get rid of all of the harmonics that naturally occur in an engine during operation but I've never had a built 4G63 that we've produced where there was a harshness or a vibration that was abnormal and you do also need to consider that there's multitudes of 4 cylinder inline engines that don't run balance shafts so they're certainly not an essential. |
| 22:57 | Manitou Black's asked, with a dry sump, would there be no reason to keep the dummy shaft for support as the OEM pump is removed? Yeah absolutely if you are running a dry sump system then yeah you're going to be gutting that oil pump housing. |
| 23:13 | There's no gears in there so yeah absolutely there's nothing to support. |
| 23:18 | Sorry I actually tell a lie, you're going to be still running the driven gear from the cam belt because that actually becomes essentially at that point an idler for the cam belt itself so you still need to keep that in location but yeah there's no need to actually keep the balance shaft in at that point. |
| 23:45 | Right that looks like that's all the questions we've got and again it is a relatively simple topic so not particularly surprising but hopefully the information in here will help some of you avoid a few potential pitfalls if you are looking to build your own 4G63 engine and remove the balance shafts. |
| 24:01 | As usual, if you are watching this at a later point in our archive and you've got any questions on this lesson, please ask those in the forum and I'll be happy to answer them there. |
| 24:12 | Thanks for watching and we'll look forward to seeing you all next time. |
Timestamps
0:00 - Intro
0:32 - What are balance shafts?
2:04 - Why would we remove them?
4:49 - Removal options
9:02 - Downsides of cheapest method | Cutting and blanking
13:59 - Other considerations | Bearings
15:15 - Other considerations | Oil feed
17:12 - Other considerations | Front cover blanking
19:24 - Tips for removing oil pump housing
21:45 - Questions


