299 | Setting Up Your Flat Patch
Summary
Having a flat and level surface to work on when completing your setups is critical if you want to be accurate. In this webinar we’ll look at what options are available for achieving a flat patch you can use at home and the track.
| 00:00 | - Hey team, Andre from High Performance Academy, welcome to another one of our webinars. |
| 00:04 | And in this webinar, we're going to be delving into the options available to set up a flat patch when you are doing your corner weighting, wheel alignment or your corner weighting and wheel alignment. |
| 00:16 | Now as usual with all of our webinars, at the end of this we will be jumping to questions so if you've got any questions on anything I talk about, please feel free to ask them in the chat and the team will get those through to me. |
| 00:28 | I will just mention that this is probably a slightly shorter webinar than our usual as it is a relatively straightforward process so if you do have questions, please jump on those quickly so we don't miss them. |
| 00:40 | Alright so let's start with what is a flat patch? And it is an interesting name that those maybe new to the world of race cars and wheel alignment might not necessarily understand. |
| 00:52 | It's a terminology that's come out of professional motor racing. |
| 00:55 | All it really means is a flat and level surface where you can perform your wheel alignments and corner weighting. |
| 01:03 | Why is this important though? The reason it's important is because when we are doing our wheel alignments or our corner weighting, we are relying on the car being perfectly flat and perfectly level. |
| 01:15 | So you could probably understand, if we're trying to do our corner weighting or our wheel alignment on really uneven ground, that's going to affect the compression or extension of individual wheels and obviously therefore it's understandable that this could affect the accuracy of our alignment. |
| 01:34 | When we're looking at a flat section of concrete pad, either in our own workshop or maybe at the race track, it's very tempting to look at a flat section of concrete and just assume that therefore that section is in fact flat and is in fact level. |
| 01:51 | When you get down to measuring it, you'd be very surprised to find that that is in fact the situation and even something that visually looks quite level, will normally be at least some out of level, if not some undulations in it and those will be enough to affect the accuracy. |
| 02:07 | So it's really important to then account for those inaccuracies, get the setup area or our flat patch back to being perfectly level. |
| 02:15 | Then when we're doing our setup, we're going to end up with consistent results regardless where we do our setup, whether it be at the home workshop or at a different racetrack every other weekend. |
| 02:26 | We're going to be able to compare our results directly and that's going to give us more consistency because when we head out on the track, we truly will have the same set up conditions, the same alignment and our corner weighting will be accurate. |
| 02:39 | So just to talk about why an out of level surface is going to affect our results. |
| 02:45 | And if we take an extreme situation here and we consider that our set up patch is on a massive angle, maybe a 15 or a 20° angle and we've got our car parked on that. |
| 02:57 | Shouldn't be too hard to understand that what that's going to do is offset the weight balance in the car, we're going to have more of the weight on the lower side of the wheels, what that's going to end up doing is compressing the suspension on that side. |
| 03:11 | So from an alignment perspective, we've got the low side of the car more compressed than it would be on flat ground, we've got the high side of the car more extended than it would be on flat ground and hence our suspension won't be in its true neutral point that we would be wanting to make our alignment settings from. |
| 03:30 | Now if you are corner weighting as well as just doing an alignment well obviously that weight transfer that I've just talked about or load transfer, that's going to play out by the numbers that we see on our corner weight scales and you could understand this because the process of adjusting our corner weight is simply adjusting up and down our individual corner ride heights and that jacks weight around the car so we're artificially achieving the same aim by doing our corner weighting on a surface that isn't level. |
| 03:57 | Obviously there is levels to this and depending on exactly how far out from level your surface is, that's going to impact on your absolute results but regardless what you're doing, it's only a situation that takes a small amount of time to actually get set up properly, it's not that difficult so it is worth adding this into the steps of your alignment process which is why we covered this in our wheel alignment course, if you want to check that out, you'll find it at hpacademy.com/courses. |
| 04:32 | Goes into all this as well as the actual process of aligning your car. |
| 04:37 | Now if we just jump across to my laptop screen for a moment, this is just a screenshot from our wheel alignment course where Tim was doing an alignment on our street FD RX7. |
| 04:47 | Which kind of shows you the extent we've gone to here. |
| 04:51 | This one is reasonably extensive and I'll be the first to admit, this process will cost you a fair bit of money to get the hardware required. |
| 05:00 | What we've got here is the car is on these Intercomp levelling stands on each corner and then we're doing corner weighting and our wheel alignment at the same time. |
| 05:11 | We'll go through the process and have a look at what these levelling stands actually are and what they do but there's much cheaper options which we'll start by going through, just using something as simple as a vinyl tile to pack the low corners of the setup patch to get it where we want it to be. |
| 05:28 | One of the key things is that most often you will be doing an alignment at your workshop. |
| 05:35 | Even if you're going to a race track for the weekend and you may want to make some adjustments at the track. |
| 05:42 | Usually you're going to do a setup in your workshop before you load up for the weekend and what this means is that generally you will be doing your setup in the same position repeatedly so it's a good idea here for consistency and also to save you time to mark out an area in your workshop where you are always going to do your setups. |
| 06:01 | Now in this photo, if we can jump across again, you can see we've got some flooring tiles that we use in the studio here and we remove sections on the 4 corners of the car when we want to do alignments. |
| 06:14 | We're always in the same place so we know how level this surface is here on the studio floor so basically what it means is when we come back, we always know what our setup's going to be. |
| 06:26 | Likewise, at our other workshop, we had an area where we were doing our alignments and basically what I ended up doing was just marking on the floor using race tape where each corner of the car was going to be. |
| 06:38 | That way it was as simple as rolling the car into location, we already had some notes for what packers we needed to use in order to get the flat patch set up so it was a very very quick process so I would encourage you to do the same when you are setting up your own flat patch area. |
| 06:56 | I'll just quickly go through the various options that are available and how some of the teams that we've visited deal with this. |
| 07:05 | So looking at my laptop screen here, this is a shot from Radical in the UK and this is their factory where they build their Radical race cars, street cars and race cars and they've got this dedicated flat patch area which is built into their concrete floor. |
| 07:22 | They've gone to the trouble of actually sinking the corner weight scales into the floor. |
| 07:26 | You can see there is a larger cut out with this checker plate here. |
| 07:31 | What that allows them to do is actually level those 4 corner weight scales, one under each corner of the car and then they can replace that checker plate. |
| 07:40 | That allows the car to roll very easily on and off. |
| 07:42 | Obviously something like a Radical doesn't have a lot of ground clearance so the actual height of a corner weight scale, be something in the region of about 50 mm, 2 inches give or take so getting the car physically up onto the corner weight scales in and of itself is a bit of a challenge so given that Radical at this point in their factory, this is all they're doing in this zone, they're just aligning cars day in and day out and sending them out the door, obviously they've gone to a little bit more trouble than we would usually go to in order to make that process streamlined and simple. |
| 08:15 | The other aspect with this is because those covers are removable, it gives them the ability to also adjust and re zero the flat patch, making sure it's truly flat as time goes on, maybe something moves around etc, so they can recheck that and gain consistency over time. |
| 08:34 | Unrelated really to our topic today but I'll just mention it here, you can see there's some sandbags over here and there's a sandbag in the car, so one of the aspects of corner weighting is we want to actually corner weight the car in real race conditions. |
| 08:48 | So there's no point corner weighting your car with an empty tank of fuel, no oil in it and no driver in it, that's just unrealistic and all it's going to do is guarantee that when you actually end up heading out on track, you're going to be running under unrealistic conditions and your corner weighting will not be what it was when we set it up in the shop. |
| 09:06 | So using sandbags is a really easy way to replicate the weight of the driver. |
| 09:11 | Generally, there's different theories on this depending on what you're trying to do. |
| 09:15 | I usually try and corner weight with about half a tank of fuel. |
| 09:18 | Going to mean that it's not going to be quite right when the tank's full, not going to be quite right when the tank's empty but obviously we're going to burn off fuel so there's some compromises to be made here. |
| 09:27 | So this is sort of a professional level setup. |
| 09:31 | Although still cost effective, not partiuclarly complex to achieve. |
| 09:35 | When we go to the next level, and this is a high level professional race team, this is Jota Sport in the UK. |
| 09:43 | This is the level that these teams will go to so this team run, among other things, the LMP2 cars for Jackie Chan Racing as well as a GT3 race program for WEC as well. |
| 09:56 | So they're running with some really expensive, very very advanced machinery and particularly when you look at the likes of these LMP2 cars, the drivability of the car, the balance of the car is really going to depend on corner weighting and wheel alignment setups and the corner weighting in particular, we were talking to them about the braking performance and the car will lock one wheel at the front if the corner weight between the left and right front wheel varies by more than about 2kg. |
| 10:26 | So it is very very critical to have this absolutely right. |
| 10:30 | So what they've got to achieve this is this sectional steel floor. |
| 10:35 | And I can only imagine that this was a very expensive installation to go through. |
| 10:41 | It is sectional and you can see that these little holes right through this floor and the reason for those is that the whole floor in each of the sections is adjustable. |
| 10:51 | So I think from memory, once every 12 months they have a specialist company come out and they will laser sight this flat patch and adjust it as required to ensure that every year it is absolutely 100% true, 100% flat. |
| 11:08 | So once they've got the car on the flat patch there, basically they're using setup hubs which replace the wheels and tyres, again just another aspect that improves the consistency of that flat patch and their results. |
| 11:21 | And the process that James here at Jota Sport is using is exactly what we teach in our wheel alignment course, even with a Le Mans prototype car like this, costing probably somewhere in the region of a million dollars, they are still using string wheel alignment. |
| 11:37 | Albeit, understandably they go to some extent with the equipment they're using, they've got some CNC machined setup equipment designed to hold the strings etc and that also makes their job a lot quicker when it comes to actually setting all of this equipment up. |
| 11:55 | But that's the high end of it, and obviously that's going to be well and truly above what anyone at the enthusiast level is going to be wanting to do and that's absolutely fine. |
| 12:06 | Alright, let's talk about the various ways that we can set up our flat patch and what we'll do is we'll start with the cheapest and easiest option which doesn't require any specialist equipment, well maybe one piece of specialist equipment so you can do this very cheaply. |
| 12:22 | What you are going to need in order to do this, you will need a builder's level. |
| 12:28 | Now you don't need a builder's level that's massive like this. |
| 12:33 | You can use one that's 500, 600 mm long, 1 metre long, it doesn't really matter. |
| 12:38 | You can also use digital levels as well, all we really want is the little bubble in the middle and it needs to be a good quality level that is in fact straight. |
| 12:49 | So that's our first piece of equipment. |
| 12:53 | You can probably purchase an entry level level, entry level level, yep that's what it is, for probably somewhere around about $40 to $60 USD and when you're done setting up your flat patch you can use it for building an extension to your workshop so it's multi purpose. |
| 13:09 | The other thing you're going to need to go along with this, and these are getting long so I do need to be a little bit careful so I don't destroy my studio, is a section of aluminium extrusion, rectangular hollow section aluminium extrusion. |
| 13:23 | This one here, I'd say is probably about 2.5m long or thereabouts. |
| 13:28 | What it needs to be is long enough to extend the full length of your wheel base. |
| 13:33 | So from the front centre of the wheel to the rear centre of the wheel. |
| 13:37 | That's how long we have to be. |
| 13:39 | Now depending where you are in the world, there are a variety of aluminium suppliers that will be able to cut you a length of this. |
| 13:46 | I think from memory, we purchased this in a 6 metre length. |
| 13:50 | Aluminium is a little bit pricey but probably getting what you want, should be able to purchase this for somewhere around about $100. |
| 13:56 | I do suggest that if you are going to be using this for setting up your flat patch, be careful with it, once you're done, put it in a safe place because it's very easy for this to get bent or damaged. |
| 14:10 | It's easy for it to be used by someone else in the workshop to do something that's going to likely bend it or deform it and once that's done, it's basically going to be absolutely no use to you so look after it. |
| 14:23 | Yeah probably going to cost you under $100 to get you a section that you can use for that. |
| 14:29 | We do need one other thing, well actually a couple of other things. |
| 14:34 | Which, I'll just grab out now. |
| 14:38 | We're going to need a couple of sockets. |
| 14:41 | And we're going to need to make sure that these sockets are exactly the same length. |
| 14:47 | The ones that I've grabbed here actually aren't quite, oh no they're pretty good. |
| 14:50 | But always check with a digital vernier caliper just to make sure that the length is exactly the same for these two sockets because if they're not, this is going to build in an error into your flat patch calibration. |
| 15:06 | So what I'll do, we'll just set this up and show you how it ends up looking. |
| 15:11 | What we're going to do is basically put one of these sockets at each edge of our contact patch. |
| 15:17 | So let's do our front axle for a start. |
| 15:19 | So we'll put one at the contact patch of the front left and one at the contact patch of the front right wheel. |
| 15:25 | We're then going to take our aluminium extrusion, we'll try not to knock everything else off the workbench which is always easy to do and were going to set that up on our little sockets. |
| 15:36 | Now why are we using the sockets? Well these are just a stand off so that if there's any undulation in between our two contact patches, the aluminium extrusion is going to be off above that so it's not going to end up wobbling on it. |
| 15:52 | So that gives us a really good accurate result of the height at the actual contact patch. |
| 15:57 | And then of course, all we're going to do is put our level on and probably pretty difficult for you to see here, we're actually a little bit out of level but this isn't our flat patch, this is simply my workbench. |
| 16:10 | So what we're going to do is basically check this in 3 planes. |
| 16:14 | We'll do across the front axle line, we'll go front to back and we can go across the back axle line. |
| 16:19 | What we're trying to do is find the highest corner of our 4 corners. |
| 16:25 | Once we've done that, we know that that's the highest point. |
| 16:29 | All of the other 3 corners or probably more likely 1 or 2 of the corners are going to be lower than that and what we need to do, understandably is pack those up so that everything is nice and flat. |
| 16:42 | Obvious question, how do we go about packing that up? Well there's a variety of options available and the simplest and by far the cheapest method that I've come across is to simply use vinyl flooring tiles. |
| 16:56 | So that's what I've got here. |
| 16:59 | We'll just chuck it under our overhead camera, I mean it's pretty basic really. |
| 17:02 | These ones, they're actually self adhesive so that's in itself a bit of a pain. |
| 17:07 | These are around about probably 0.8 to 1 mm in thickness. |
| 17:12 | So basically by using a variety of these as required, we can pack up the low side to get it where we want it to be so let's just have a crack at that now and hopefully I don't knock everything over. |
| 17:27 | And we're still a little bit low. |
| 17:29 | Nice thing with the vinyl flooring tiles is that they are pretty rigid, they don't compress so last thing you want is to use something soft, maybe like a cork tile which when you've only got the weight of the aluminium extrusion and your level on top of it, is going to look like everything's nice and flat and as soon as you get the car on it, the cork tile will compress and basically affect our result so the vinyl flooring tiles, really really cheap option, these are less than $1 a piece and probably if you got a pack of about 10 of them around the workshop, that'll be enough. |
| 18:01 | Now again, once you've gone through and you've levelled this, it's a bit of an iterative process, you find that highest point and you pack the lowest points, it's going to take a couple of iterations of measuring around to make sure that you are in fact level in all planes but once you've done that, again if you're marking your location for your setup on the workshop floor, have a notebook that you can use for your alignment anyway, you should always be keeping a historic record of your alignment settings as you develop a setup on your car and you can mark where abouts on the floor your setup is and how many vinyl tiles or whatever you're using to pack is required at that particular point and then next time, no need for this equipment, you can simply go and put your vinyl tiles straight on the floor and you'll be good to go. |
| 18:46 | So again, not a very complicated process and one that is certainly not going to break the bank in terms of the equipment you will need. |
| 18:55 | Let me just get this away and we'll look at our other options. |
| 19:01 | Alright so if you do want to get a little bit more involved with the process and particularly if you are doing corner weighting, you can still do the corner weighting on the vinyl tiles, there's nothing wrong with that but if you are going to be looking at spending the money on corner weight scales, then it is worth also considering whether you want to purchase a set of levelling stands. |
| 19:22 | So that's what we've got here, I'll just get the equipment out and we'll talk about each individual component. |
| 19:31 | So we'll look at this from our overhead camera so we've got our corner weight scale here. |
| 19:36 | So I'll lift this out for the time being. |
| 19:39 | And we can see our setup stand, our levelling stand, basically it's got adjustable feet in each corner. |
| 19:48 | So that that allows us to do is two things. |
| 19:51 | First of all, it allows us to level the individual corner. |
| 19:54 | So if we're not on a completely flat surface, we can actually level this platform and make sure that that platform that the wheel is going to be sitting on is truly level. |
| 20:04 | The other aspect though is of course we can screw the platforms up and down together, or each corner up and down together, that's going to raise or lower the entire platform and that will allow us to get a level platform relative to the other corners of the car. |
| 20:20 | So what I'll do is I'll just get my corner weight scale back in here. |
| 20:23 | And obviously just to keep things nice and simple here, I've only got one of these setup stands in the shop. |
| 20:33 | So how do we go about levelling it? So again, we can simply use the same process with our aluminium extrusion and our level. |
| 20:44 | We can first of all level the individual corner using our level. |
| 20:48 | Obviously, this gets a little bit awkward when we've got such a long level on such a small surface but basically we can get the level onto our corner weight scale. |
| 21:00 | Here we want to check in two planes, so I'm going to side to side here. |
| 21:03 | We want to make sure that we're levelled side to side but of course we would also need to check in the opposite plane, perpendicular to this to make sure that it's levelled front to back. |
| 21:12 | So that gets us one corner levelled. |
| 21:15 | From there what we can do is exactly what we just looked at, I still tend to use the sockets, centre of the corner weight scale and then go across to our left hand side of the car, do exactly the same, using our aluminium extriusion, our sockets and our level and then we can lift or drop the opposite corner, basically go through an iterative process and get all 4 corners of our car set up using a level and our aluminium extrusion but if you want to improve the accuracy and simplify your setup, a laser level is another option. |
| 21:51 | So we'll go through the laser level options and after that we will go into a question and answer session which is a good time to remind you, if you do have any questions on the topic, please ask those now and we'll jump into those when we're done. |
| 22:06 | I'll just get to the right spot here. |
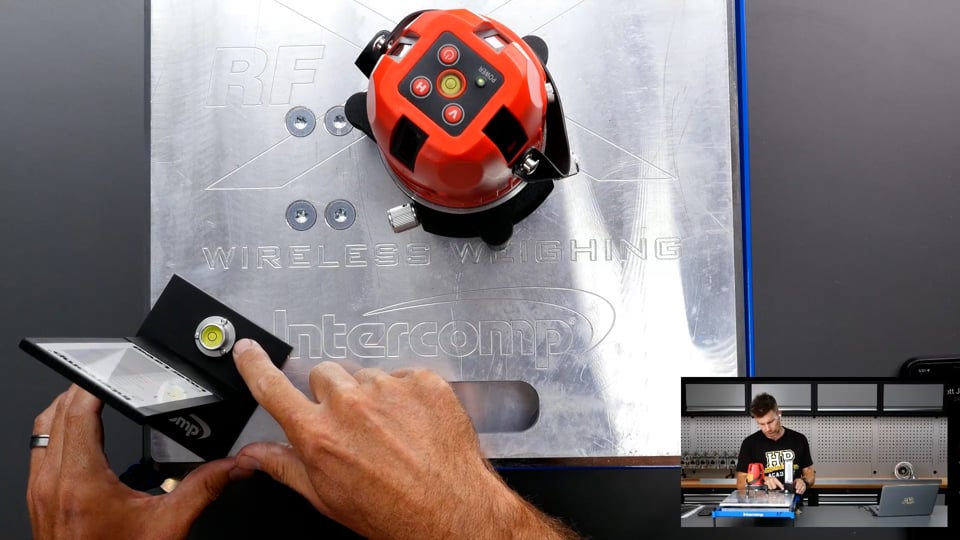
| 22:09 | Alright so laser level, how does that work? This is a particular setup that is sold via Intercomp but it is essentially a builder's level. |
| 22:19 | So there's two parts to it, well four parts to it really, we've got the laser level itself. |
| 22:25 | An if we go to our overhead camera here, what we can see is we can get this onto our corner weight scale, this has a little bubble level in the top of it which might be a little bit tricky to see but if I just bump this purposefully well out of level, we can see that the little bubble goes off to the side. |
| 22:45 | So basically we can use that bubble in the centre there to actually level the pad in our two planes, just like we looked at with the other system using our aluminium extrusion and the spirit level. |
| 23:03 | Now this also comes with three of these little uprights. |
| 23:08 | So these are, these have two parts to them. |
| 23:11 | First of all they have this little measurement scale on it. |
| 23:14 | So obviously what we want to do is put these on our other three stands so we can basically level the remaining three together. |
| 23:22 | We'll get a laser light, which will shine. |
| 23:27 | There we go. |
| 23:30 | On our little level. |
| 23:31 | So we can see from the laser light whether we need to raise or lower that in order to get it accurate and we've also got a little bubble level which you can see in our overhead shot here, it's not very easy to see that this currently isn't level but we've got that little level there so we can level the individual corners using the bubble gauge and then we can use the laser light to adjust the entire levelling pad up and down. |
| 24:00 | So undoubtedly the laser level system is a very quick, very effective way of levelling your flat patch but it also does involve a little bit more cost. |
| 24:12 | I can't quite remember off the top of head what that Intercomp system was worth, there's probably a little bit of Intercomp tax being thrown in there but you do now find some really quite cost effective laser level systems at general hardware stores so it is definitely an option that you could look at doing. |
| 24:34 | Alrighty, we'll have a look and see if we've got any questions. |
| 24:39 | And we haven't so obviously that means I've explained everything perfectly. |
| 24:43 | Ultimately it is a relatively straightforward process, there's not a lot of rocket science in here and as you've seen, you don't need to be spending a huge amount of money. |
| 24:52 | But it is still worth going over and explaining, first of all the need for it and then the process because as I mentioned, as we've gone through today's webinar, getting this wrong can really open yourself up to some big inaccuracies that basically defeat the whole purpose of doing your alignment and corner weighting in the first place. |
| 25:11 | Now if you are watching this in our archive and you've got further questions in the future, please feel free to ask those questions in the forum and I'll be happy to answer them there. |
| 25:19 | Thanks for watching and we'll look forward to seeing you next time. |
| 25:24 | Now for those watching on our YouTube channel today or Facebook, this is just some insight into what we put on every couple of weeks for our HPA gold members. |
| 25:32 | Our gold members get to review these webinars in our archive, we've got somewhere in the vicinity of about 300 hours of existing webinar content there, we cover a huge range of topics, not just car setup and race driver development, we also cover engine building, engine tuning and wiring and it's one of the fastest ways to expand your knowledge on a huge range of engine building, tuning, car setup and wiring topics. |
| 25:56 | Gold members also get access to our private member's only forum which is the best place to get reliable answers to your automotive questions. |
| 26:04 | You can purchase gold membership on its own for $19 USD a month but with the purchase of any of our courses, you'll get 3 months of free gold membership. |
| 26:13 | That's complimentary, you can find all of our courses at hpacademy.com/courses. |
| 26:19 | Thanks for watching and hopefully we can see you online again next time, cheers. |
Timestamps
0:00 - Introduction
0:40 - What is a flat patch and why is it important?
2:40 - How will an unlevel surface affect our results?
4:35 - Intercomp levelling stands
5:30 - Mark out frequently used surfaces
6:55 - Radical Sportscars' setup
9:35 - Jota Sport's setup
12:05 - Basic flat patch
19:00 - Levelling stands
22:05 - Laser level


