301 | Introduction to Haltech NSP
Summary
With the introduction of the Nexus ECU from Haltech we have the introduction of the NSP software for configuration and tuning - This software is also available for use on the existing Elite range of ECUs. In this webinar we’ll take a walk through of the NSP software and show you what you need to know.
| 00:00 | - Hey team, it's Andre from High Performance Academy here, welcome along to another one of our lessons and today we're going to be diving into the world of the Haltech NSP software which is a relatively recent addition, goes hand in hand with the Haltech Nexus ECU. |
| 00:16 | However more recently they have made the NSP software backward compatible with the existing Elite range of ECUs. |
| 00:24 | And this gives some significant advantages. |
| 00:28 | One of my pet peeves with the Elite software, the ESP software is that it is incredibly frustratingly slow in order to connect. |
| 00:40 | I'm talking in the vicinity of about 45 seconds to a minute, possibly longer depending on the specifics of your laptop and you might be thinking to yourself well so what, does it really actually matter in the big scheme of things? Yes it absolutely does, particularly if you're a professional tuner tuning for a living, every time you connect to a car running the ESP software, it is an absolute eternity and particularly if you're at the track and you're trying to do something under a bit of time pressure, 45 seconds to a minute, you may not have that time available. |
| 01:11 | If you want to just make some subtle change like maybe bumping a launch limiter or maybe changing your boost settings before the car heads out of pit lane out onto the track. |
| 01:22 | So the NSP software has fixed that along with bringing some significant advantages over and above the ESP software. |
| 01:29 | For a really quick introductory look, let's just jump across to my laptop screen now, this is the NSP software loaded up, we are obviously in our Subaru STi and it is equipped with an Elite 2500 ECU. |
| 01:44 | So for those who are coming from the ESP software, it's got a somewhat familiar look and feel, we've still got the same existing map displayed in exactly the same way, same existing 3D look at that map over here on the right hand side. |
| 02:01 | We can manipulate that in all of the same ways and all of your existing tuning hot keys etc will still work. |
| 02:09 | But there are some significant changes that you do need to understand as well. |
| 02:14 | Now just to show you the speed of the connection, at the moment, this little button up here is our connect/disconnect. |
| 02:22 | It's orange at the moment and that means if we go over that that it is currently waiting for the USB to reconnect, so I'm cheating a little bit here because we have already been online. |
| 02:32 | What I'll do is I'll just show you how quickly we get back online, so I'll just power the car up, oh which I've turned it off instead, let's try that again, there we go, and instant, literally instant. |
| 02:43 | But like I say, that's cheating a little bit because we were already online. |
| 02:47 | So what we'll do is we will reconnect now. |
| 02:50 | So basically when I press this button here, which is selecting the ECU we will be connecting to, one, two, three, maybe four, four seconds and we're back online. |
| 03:03 | So that's probably about as fast as any ECU that I deal with in the mainstream so it's fixed what was a really big bug there for a lot of Haltech tuners and I do applaud Haltech on getting a fix for that. |
| 03:19 | OK so that's our first and probably key change that I'm really excited about but there is a lot more to go through. |
| 03:27 | But before we can sort of go through that, I just want to briefly cover the upgrade process and this is not very difficult but it actually did create a few headaches for me. |
| 03:39 | I'm not going to go into too much detail because Haltech have got a great video on their website that you can watch that's going to let you watch Scott Halzinger go through the exact process, it's not difficult so I'm not going to reiterate too much here but I do have the ESP software here open as well and again I can't go online now but basically what you're going to need to do is for a start, update to make sure that you are running the latest version of ESP which will be the last version of ESP. |
| 04:09 | So that's the first thing you need to do before you can actually upgrade the firmware. |
| 04:13 | Once you've done that, in the tools menu, and I'm not online here, there will be an option down the bottom here that says convert or upgrade to NSP software and that's what you want to do. |
| 04:27 | Now why I mention this is that that actually didn't work for me and it basically fell over at the last step and when it installed and opened the NSP software, ended up in a bit of a loop going nowhere where it would not actually connect to the ECU. |
| 04:42 | A quick call to Haltech's tech department though sorted that out really quickly, what I needed to do was roll back to the lastest, the older version, the pre NSP version of the firmware and then update again. |
| 04:55 | But doing the update, and that's why I just want to mention this, rather than from the tools menu was from the ESP online here by clicking on that so I just want to mention that in case anyone else gets hung up by that so basically rather than being a seamless operation which is what Scott made it look like, I ended up having to go forwards and backwards a couple of times but as I say maybe a few of you will be caught out by that so I just wanted to mention that, will maybe save you a call to Haltech's support network. |
| 05:25 | Right so let's get into our NSP software anyway. |
| 05:29 | And I'll go back online here, I won't start the engine for the moment but let's have a look at some of the more fundamental options that are available. |
| 05:39 | There is a lot to go over here and I'm not going to probably be able to cover absolutely everything but we will start here with the preferences drop down menu and I'm just going to go through this in order. |
| 05:50 | So we'll start with our theme options here. |
| 05:52 | And straight away you'll see that by default we've got this sort of black theme or darker theme, very very different to the normal ESP software and the way that looks, black versus white. |
| 06:05 | So you can choose your options there, so you've got visual theme here and we've got 3 options, you can choose midnight I'll click on that, an error, great that's excellent, that's always perfect. |
| 06:20 | Which is just darker. |
| 06:22 | We've got the modern which we were just looking at and then if you really just want it to look like it always used to in ESP, you can choose classic. |
| 06:29 | I'm just going to go back to modern and we will leave it there. |
| 06:34 | Oh yeah and Scott's actually just messaging me right now, always awkward in the middle of a webinar, saying to do a firmware update which is this little green icon here, thanks heaps for butting in Scott but I do appreciate it, we'll leave that until afterwards but it's probably a good point to just mention that that is how easy it is to do a firmware update with the NSP software. |
| 06:55 | Now I'm going to be just a touch more nervous because I know I've got the master of Haltech watching this webinar live so I'll try really hard not to make a complete hash of it. |
| 07:07 | Let's head back to our preferences menu here and the next one down here is out unit options. |
| 07:12 | So this is just a nice easy way of defining how you want to view the different units in your software. |
| 07:20 | So this is a bit of a personal preference depending on whether you're a metric or an imperial person and even when it comes to that, we might like to maybe view our pressure in kPa for example but when it comes to our air/fuel ratio units, maybe you prefer using units of air/fuel ratio instead of lambda. |
| 07:37 | So you can set this up absolutely to your personal liking. |
| 07:43 | Nothing particularly new there though. |
| 07:45 | Back up to our preferences menu again and this is where we've got a little bit more flexibility now in the way we set the look and feel of the software up. |
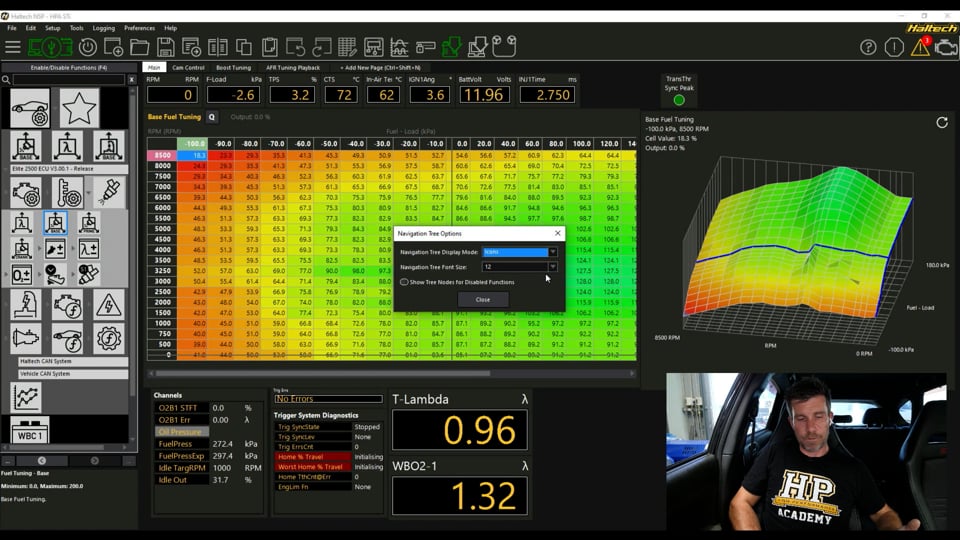
| 07:55 | So we've got our navigation tree options, we're just going to go out of order here and I'm going to come down to our table text view options and I'm going to click on that. |
| 08:03 | So that gives us the ability to control essentially how our table looks. |
| 08:09 | So in particular, maybe your eyesight's not quite as good as it used to be, maybe you want to view a larger font, so we go down to our table text font size and maybe we want to bump that all the way up to 16, happens instantly so you can get a bit of a preview of what that's going to look like. |
| 08:25 | I can still see OK so I'm going to go back down to 10. |
| 08:28 | Another one that gives you a bit of flexibility here is the cell pointer mode. |
| 08:32 | So we can see we can have none, we can have a box, crosshairs, circle, or whatever you prefer. |
| 08:37 | I prefer the box but some people will prefer the crosshairs so let's just change that and obviously at the moment we are not running so we can see that the crosshair's just sitting down here, 0 RPM and basically atmospheric pressure, as we would expect. |
| 08:55 | So just how we want to view that and this can help with a bit of accuracy around centering yourself in a zone. |
| 09:02 | Coming back up to our preferences now, we've got the same options for our navigation tree options, which navigation tree over here on the right hand side, menu tree, navigation tree depending what you want to call that. |
| 09:14 | So first of all we can display the mode of that which means how we're going to see that. |
| 09:22 | So at the moment I've got that as text, however we can display it as icons which I personally am not a big fan of. |
| 09:30 | I find that a little bit non intuitive just at a glance but some people may have that as a preference, or we can have a mixture of text and icons which again I find a little bit unnecessary so I'm just ging to flick back to text but here's the beauty of this, you may not have the same preferences as me and of course this gives you the flexibility to set it up to your exact liking. |
| 09:51 | Again we do have the ability individually here to adjust the font size for the navigation tree so you can have that set up independently at a different font size to your table so a lot of flexibility in here. |
| 10:05 | And then this function here, this little tick box or radio button here, show tree notes for disabled functions. |
| 10:12 | Now this is again going to come down to personal preference but let's just click on that and what it's going to do is essentially give us all of the options available that we're not currently using. |
| 10:23 | So let's close that down and have a look at what that means. |
| 10:26 | So if we go to sensors, now we can see all of these greyed out sensors like throttle position, oil pressure for example, we can right click on these and we can enable them straight from that menu. |
| 10:39 | Now when we do that, we will find we can see here that we've now got this little flashing light here, another nice feature here is we can click that and that is going to reboot straight from the menu there, there's a nice little radio button there which says don't warn me again which I probably should have ticked. |
| 10:59 | Where's our oil pressure, so that's now showing, we've got some problems, we can see that we have a few of these elements are now red. |
| 11:08 | Now the reason for this is that we haven't obviously defined an input for our wiring so we can click on that and we can assign that by editing and we can choose a free analog input which in this case I only have one, job done there, obviously it's asking me to reboot again and now I'm going to display do not show that message again so that's going to allow me to reboot that straight away so nice and easy there. |
| 11:36 | And if you come back to oil pressure, you can then define, that's a really interesting oil pressure calibration, probably not one that I would typically use but obviously you can either load up a calibration for a common calibration or use the typical 0.5 to 4.5 volts that we see on the usual 100 psi, 150 psi oil and fuel pressure sensors that are common. |
| 12:00 | So that's how that system works where we're displaying essentially all of these unused, you've got oil temperature, fuel temperature, flex fuel composition. |
| 12:08 | To me this is a little bit messy because we've got a lot of stuff going on here that we really don't care about, we're not interested in at the moment so I'm going to just get rid of that just to clean up the display there and get rid of those out of the menu structure. |
| 12:28 | However we can get those back, if you want to press F4, that's going to bring up the functions menu and here what we can see, basically all of the available functions, we can scroll through these, we can see the functions that are enabled already and we can enable or disable functions in here so for example we can see the oil pressure sensor that we just set up, we can turn that off because I actually don't have an oil pressure sensor fitted to this vehicle. |
| 12:59 | So you can scroll through and basically enable or disable whatever you want. |
| 13:03 | One of the key changes here which I probably should have mentioned already compared to the ESP software is we no longer have the main menu structure that we used for some of the fundamental setup. |
| 13:18 | So you'd have remembered that from being up here in the icon menu and you'd basically go through that for your initial setups, for your engine configurations, for your fuel and your ignition etc. |
| 13:31 | We don't have that anymore, instead everything is essentially handled from the navigation menu out here on the left hand side. |
| 13:40 | Also I'll just mention as well, really nice search function here so if you're not quite sure exactly where to find something, then you can simply start typing fuel and everything that has fuel in the name will display, let's say we only really want to care about fuel pressure, we'll enter that and we can see we've got our fuel pressure set up there, we can come through to that and we can make any adjustments. |
| 14:06 | So really nice feature there to fast track, just finding a particular function, particularly when you aren't maybe completely familiar with it, that allows you to fasttrack finding a particular item and maybe if you're not even 100% sure exactly what it's named, it's really easy to play around with a couple of names until you find what you're looking for. |
| 14:24 | So let's start by clicking here on our engine configuration and at this stage the information that's available again to those who have come from the ESP software starts to look a little bit more familiar. |
| 14:37 | Haltech have done a good job of basically keeping this very similar look and feel so while the NSP software is a great step forward and while it's got a lot more flexibility than the ESP software, the nice feature is that it's not going to be rocket science or particularly difficult for an ESP tuner to transition across to the NSP software so that's quite nice because when it comes to tuning, we don't want to be spending all of our time becoming familiar with the software, I've found it to be really simple and quite intuitive so that's a nice feature. |
| 15:13 | So same here, if we click on our trigger system and we come down here we've got our main trigger type. |
| 15:20 | You can see here as well as I go around here with our little mouse pointer, you can see we've got a little blue help icon here and if we hover over that you can see that gives us a little bit of information on the particular parameter we're looking at here, nothing particularly new here, again for those who are already familiar with the ESP software, this is going to be nothing new. |
| 15:45 | Likewise, we'll head across to our fuel system and we have the ability to control all of our fuel system and our ignition system etc. |
| 15:55 | Now another nice feature here with the ESP software is the ability to have favourites. |
| 16:03 | Because when we are tuning, we're going to find that the majority of the time we spend our time on just a handful of tables so rather than, we'll just close some of this down, rather than going through for our fuel tuning, let's say we want to go to our base fuel VE table, we can get to it in this way, maybe now we want to go to our main ignition table, we'll click over there. |
| 16:27 | I mean yes it doesn't take very long for us to get around to that and if you are looking at the ugly shape of my ignition table, I'd suggest that this has come fresh from a webinar where I do a ignition ramp test, ignition optimisation test I should say, to find MBT so that's why I've got a really weird shape there but rather than doing that, what we can do is add tables to our favourites and we can see up here we've got our favourite tables listed and I've got the 3 most common that I use, base fuel tuning, our target lambda table and then our base ignition table so really easy to find those tables and maybe we want to add something else to that, maybe for example we want to add our cranking table, what we can do is right click on that and click add to table, I'm not quite sure why you'd want your cranking ignition angle in there but irrespective of what particular table you are wanting to add, it's as simple as that. |
| 17:28 | And I'd probably suggest that you do pair the favourites down to just the handful of tables that you are using all of the time. |
| 17:36 | If you're going to fill that up with every single table, it's basically going to defeat the purpose of a lot of what's going on there in terms of making it no easier to fault find. |
| 17:47 | Sorry no easier to find what you're actually looking for. |
| 17:52 | Now the other aspect, again this isn't particularly new, the NSP software uses individual tables so those are displayed by these tabs across the top here. |
| 18:04 | And I'm on the main at the moment so probably normally I'd be using this for the likes of by base fuel and ignition tuning. |
| 18:13 | However we can set up tables that are developed for a specific function. |
| 18:18 | So for example if we want to do variable cam control tuning, we can click over here and I've got a particular table set up for VVT cam control tuning. |
| 18:30 | Doesn't really show all of the information that we are going to need to look at for cam control tuning. |
| 18:36 | I didn't actually have to devcelop this either. |
| 18:38 | If we go over here and we click on add new page, you can start from scratch obviously, not particularly difficult, or you can click load from file and there are a list of pre developed pages here that are going to probably cover most of what you're likely to need to do. |
| 18:58 | The other aspect here is that when you are developing these tables, that's great, when you are developing these individual pages, what you can also do is drag and drop the functions from the left hand side and I think, let's just call this test, that might work. |
| 19:19 | And we'll click OK and what is our page type, linked navigation tree, OK and what we should be able to do, I haven't actually tested this but we should, oh there we go, we can drag and drop our tables, or parameters that we want to display straight onto that and we're away. |
| 19:41 | Alright, moving on, other new features for the NSP software and this is something that I think Haltech was really lacking for a long time and many of the other ECUs that were on the market had brought this out, was the oscilloscope function. |
| 19:56 | What I'll do is I'll just get our engine up and running here so I've actually got some data and what we'll do is we'll go to the scope function which we can see up here and this just allows us to gather some of the more critical information from the trigger input. |
| 20:14 | So we can see what's happening at the moment is that the scope is gathering data in real time. |
| 20:19 | We've got 4 channels of data being displayed here. |
| 20:22 | Channel one here is our trigger voltage so that's the live voltage, basically the actual voltage that the ECU is receiving from the trigger or reference input. |
| 20:33 | So that's giving engine speed information. |
| 20:35 | Now the other channel that goes along with this is our channel two here is showing our trigger input state. |
| 20:41 | So basically what this is doing is showing us how the ECU is interpreting that raw voltage data. |
| 20:50 | So basically we should be seeing that state change which we can see here. |
| 20:56 | Basically every time a valid tooth is going past. |
| 20:59 | So that just lets us see that the ECU is actually receiving valid information. |
| 21:04 | Then if we look at channel 3 here in pink, we've got our home voltage so that's essentially our engine synchronisation input and we're going to, that's critical in this case for basically synchronising the engine so the ECU knows where abouts it is in the engine cycle. |
| 21:24 | Exactly the same for channel 4, we've also got our home input state. |
| 21:27 | So this just allows a really quick easy snapshot of the trigger input information the ECU is receiving. |
| 21:34 | Why this is so important is in my experience trigger input issues are probably the biggest stumbling block for those getting started setting up an ECU on their vehicle. |
| 21:49 | Most often if the car wont start it is a trigger setup issue. |
| 21:53 | And this allows yourself, if you understand what you're looking at to fault find this but it also gives some valuable information if you want some online remote support help from Haltech. |
| 22:04 | This will give them information that previously they weren't able to get. |
| 22:08 | I'm not going to dive into too much detail on this at the moment because what we will do is actually run a completely separate webinar on the oscilloscope function, dive a lot more into detail on exactly how to use this to capture triggering input problems that you are seeing but there's a bit of a quick glimpse at the oscilloscope function and how that can be used. |
| 22:35 | At the moment it's running live as well, you can pause that, we can choose how that scope function oscilloscope function will be triggered as well so that it's not constantly capturing data and you can sit and analyse, particularly if you've got a scope capture that shows a problem, that's going to be really powerful. |
| 22:56 | Alright what we'll do is we'll head back to our main tuning page here and we'll come to our base fuelling. |
| 23:04 | Another nice feature is the quick tune or quick lambda function. |
| 23:09 | Very similar to, if anyone's used MoTeC software, they've had their quick lambda auto tune function for a fair while and what that allows us to do is automatically tune the fuel table by pressing the Q key. |
| 23:24 | Not a lot to do at the moment so let's see if we can create a bit of a problem. |
| 23:27 | We've got our target lambda versus our wideband being displayed at the moment so obviously when those are the same, the table's tuned properly but if I just bring our RPM up here we can see if we can try and get in the middle of a cell that isn't quite as good, there we go, so we're sitting at about 1.1 lambda and our target is 1 so if I press the Q key there, what it should do, hasn't quite managed to do that in one shot, is it should make basically an adjustment, it looks at the target lambda and it looks at the measured lambda and it then makes an adjustment, a percentage adjustment to that cell in order to make a correction there. |
| 24:10 | Now I'm not giving it a really fair crack at this because I'm just free revving the engine here, we aren't actually bolted up to the dyno and the problem is with a free rev there, what we were doing is interpolating between these two cells so it's not really quite fair. |
| 24:26 | It does bring me to another point that I want to discuss on this but essentially what it's doing, for those of you who have gone through the EFI Tuning Funamentals course, you'll remember that one of the, in my opinion probably one of the most important takeaways from that course is when we understand the lambda scale and what those numbers mean what we can do is really easily calculate a correction factor to apply to our fuel table, to our VE table. |
| 24:52 | This works on injection, millisecond pulse width based tables as well. |
| 24:58 | Basically we can apply a correction factor and in one adjustment we should be able to get from wherever we are in terms of our measured air/fuel ratio to our target just in one adjustment. |
| 25:08 | So what we do is we take the measured air/fuel ratio and we divide that by our desired or target air/fuel ratio, that gives us the correction factor that we apply. |
| 25:18 | When we are using lambda numbers though it makes it even easier because I'm not great at maths and when I'm looking at maybe a target of 12.5:1 AFR and maybe we're running at 11.8:1, I can't really easily work out in my mind what that correction factor is but that example I had just there, we were running at 1.08, 1.1 lambda and the target was lambda 1. |
| 25:44 | What that means is that we're 8-10% leaner than target. |
| 25:47 | No magic there, if we add 8-10%, bang we should be on our target so that's a really nice feature. |
| 25:53 | Although as I say I didn't quite get a great demonstration of it because of the interpolation but that is a really important factor there. |
| 25:59 | To get a really good result with the auto tune functionality, we want to be as accurate as we can to being in the centre of the cell that we are currently running in. |
| 26:13 | So if you're interpolating between two cells, it's not going to be able to do a really good job, particularly if one cell is a long way off being correct and one's pretty close, so yeah try wherever possible, it's really just like making any tuning changes, we want to be as close to the centre of the cell that we want to tune as we possibly can. |
| 26:35 | Couple of features with the quick tune, and I'll get into questions and answers as soon as we've done that so probably a good tie to mention if you've got any questions, please ask them. |
| 26:44 | There are a couple of limitations, so it is limited to +/- 30% adjustment. |
| 26:50 | Probably shouldn't be an issue, particularly if you're making tuning adjustments on an already tuned engine like this. |
| 26:58 | However a lot of tuners will use the auto tune functionality when they're starting from scratch and obviously initially your VE table may be quite a long way out so just bear that in mind, this does require the potential for some manual adjustment. |
| 27:14 | The Q key on its own will only adjust the individual cell we're on but there is another option which is to use the W key and that will adjust the next load cell upwards or the next load cell higher as well as the engine speed above as well so the idea behind this essentially to kind of pre empt what we're likely to need in terms of fuelling when we get to the next highest cell so just a little bit of a tip there. |
| 27:43 | I would see that being a handy function there for those who maybe are starting from scratch and the fuel table is a long way off. |
| 27:53 | Alright now that I've actually finished the demonstration as such, we will just have a look at Scott's suggestion here and see how seamless this is so back into the software here, we see this little green arrow showing us that there is a firmware upgrade available so no guesswork, we can click on that, it's loading the firmware information at the moment, not quite sure how long this is going to take. |
| 28:13 | Hopefully not too long, and upgrade firmware now. |
| 28:19 | So it's a good way of making sure that, discard our changes, we don't really care about that. |
| 28:26 | It's a good way of just making sure at glance that you are always up to date with the most current firmware and it's going to be much more difficult than it was with the ESP software to find that you're a long way out. |
| 28:38 | The firmware update, when I did this initially, takes probably about a minute or so so it's pretty brief but we don't need to watch this complete so we'll jump in and see if we do have any questions. |
| 28:52 | If you've got more, please keep them coming. |
| 28:58 | The Natural Aspiration has asked, how does the scope function compare to EMtron and Link's? Good question, you know what to be perfectly honest, I haven't dived too deep into any of them lately. |
| 29:13 | I am also admittedly very fresh with the NSP software. |
| 29:17 | What I would say, it's easy to use, it's got all of the flexibility that we could possibly hope for so yeah absolutely everything that I think that we need in a scope function, nothing we don't. |
| 29:33 | Probably compares pretty much in line with the existing scope functionality of other ECUs that I have used. |
| 29:41 | Dave Roy has asked, how can you set misfire, check engine light detection? Great question there, the answer to that is I couldn't tell you. |
| 29:52 | Misfire detection, I might be missing something if that is a function in the NSP. |
| 29:56 | A lot of ECUs, OE ECUs will have misfire detection because they have a feedback from the ignition coil which basically tells the ECU if the coil has fired as expected. |
| 30:09 | That's very uncommon in aftermarket ECUs so misfire detection in an aftermarket ECU, not something that's particularly common, as I say I don't want to speak out of turn, I am not aware if that is functionality in the NSP software and I can't speak more to that I'm sorry. |
| 30:29 | Manitou Black's asked, do you think Haltech will ever offer the ability for users to write their own run times like you can with MoTeC? So by that I'm guessing you're talking about MoTeC's build where you can write your own firmware. |
| 30:43 | I would say without really knowing any inside gossip from Haltech that's probably pretty unlikely. |
| 30:50 | MoTeC are kind of almost out on their own with that functionality and it adds a massive layer of complexity to their business model because now they're not only supporting tuners but they're actually supporting developers building bespoke firmware. |
| 31:07 | Yeah I can't say it's impossible but it's a very niche focused product and for 99.9% of tuners out there, probably 99.99% of tuners out there, the firmware options that Haltech are providing out of the box is probably more than sufficient. |
| 31:26 | And there is also a bit of a path for future software functionality so with the MoTeC build software, firmware, if you really want to design your own function that doesn't exist, well you are free to do so, maybe you don't like the way an existing function works, well if you're smart enough you can rewrite it to work exactly how you want. |
| 31:48 | But that's not to say that's the only way to get a manufacturer to sit up and take notice and make changes. |
| 31:53 | So basically the squeaky wheel gets the oil is the old saying. |
| 31:59 | So if there's enough people complaining about a lack of a certain function, and they're talking to Haltech, there's a probably better than average chance that in time Haltech will address that and add a really popular requested function added into their firmware so yeah probably talked enough about that. |
| 32:17 | Alright that looks like it's brought us to the end of our questions there so hopefully that's given you some insight and for those maybe were existing ESP software users and maybe are on the fence, this hopefully is enough to push you over the edge, go jump on the NSP bandwagon, I promise you you will not be disappointed. |
| 32:36 | Now for those who are watching this in our archive at a later point, remember if you do have any questions on today's lesson, please ask those in the forum and I'll be happy to answer them there. |
| 32:45 | Thanks for watching and we'll see you next time. |
Timestamps
0:00 - Introduction
0:28 - Much faster than ESP software
1:29 - Same general theme as ESP
2:14 - Connection demo
3:27 - Software upgrade process
5:25 - Preferences menu
7:55 - Navigation tree options
13:04 - Menu tree instead of main menu
13:40 - Search feature
14:24 - Engine configuration
15:13 - Main trigger type
15:45 - Fuel system
15:55 - Favourite feature
17:53 - Add new pages for specific functions
19:41 - Oscilloscope function
22:56 - Quick tune
27:53 - Firmware update
28:59 - Questions


