305 | Pit Limiter Setup
Summary
Most race cars will be required to adhere to a strictly enforced speed limit in pit lane and achieving this consistently is best done with a dedicated pit limit function. In this webinar we’ll look at how these can be setup and validated.
| 00:00 | - Hey team, Andre from High Performance Academy, welcome along to another one of our webinars and this time we're going to be diving into pit limiters or realistically vehicle speed limiters in general. |
| 00:11 | We'll talk about what they are, how they function and how we can set one up and validate that it's working exactly as we expect. |
| 00:18 | And we will be using our Toyota SR20 powered 86 with a MoTeC M150 for some of this as we go along but basically you're going to be able to apply most of what I talk about here irrespective of the platform that you're specifically tuning or setting up. |
| 00:36 | As usual, we will have a question and answer session at the end. |
| 00:40 | It's a relatively straightforward topic but if there are any questions, I will be more than happy to take those at the end. |
| 00:46 | Now I think before we sort of dive into the nitty gritty and get too deep in the weeds, let's just jump into some data and have a look at how I'm personally using this pit limiter setup in our SR20. |
| 00:57 | So this is some MoTeC i2 data from our local Highlands Motorsport Park race track. |
| 01:02 | So I'll just go over briefly what we're looking at here. |
| 01:05 | And we've got our driver pit switch here so you can see this is on pit entry, we've got the switch off, come into the pit lane and pit switch is on. |
| 01:13 | So here in New Zealand our pit lane speed limit is 40 km/h, it is enforced, there's a dude with a radar gun and if you exceed that speed limit, you will end up serving a penalty. |
| 01:26 | It's not the best way of winning a race and it's certainly going to cost you time and most likely position so basically we've got here our front left wheel speed. |
| 01:36 | So this is just the wheel speed or speed reference that I'm personally using here, you can use whatever you like as long as of course it's accurate. |
| 01:44 | So this is the section basically here to here where we are in the pit lane. |
| 01:51 | We've got this little section here where we actually stop, I have to do a driver change or if we're a single driver which I was, it's a case of getting out of the car, running around the car to waste a bit of time and jump back in it, just to make it fair for the teams running two drivers. |
| 02:05 | So that's where the car is stationary. |
| 02:07 | So if I click through here, you can see that 38.9, or click on another spot, 38.8, 38.0, 39.5, so we're basically within a window of about 1 km/h to our pit speed limit and I'm purposefully playing this a little bit safe here, I definitely don't want to be over that pit limit. |
| 02:29 | So we're relying on a combination of fuel and ignition cuts. |
| 02:32 | I'll talk about them more in detail but you can see those occurring down through here and in this section here, our cuts are counting up and down. |
| 02:41 | You can see as well, this channel here is our throttle position so in the pit, we'll talk again more about this in detail. |
| 02:48 | It is important, there's a bit of driver education in here because a lot of drivers will have a pit limiter set up and maybe not really understand exactly how it all works and come to the pit lane and sit at wide open throttle and yes you can definitely make a pit limiter work like that but it's going to be doing a hell of a lot of work, it's going to be doing some bit cuts in order to try and control the engine speed and hence the ground speed so it's better from the driver's perspective if you can just find that sweet spot where you can feel or hear that that cut's just starting to occur, kind of sit on that, going more throttle is not going to make the car go any faster so yeah that's the driver education aspect, again we'll talk a little bit bit more about that as we go. |
| 03:31 | Alright so that's our data there, we're going to come back in and dive into it but that just shows you how it works and how we can get pretty close to that limit. |
| 03:38 | Obviously if I wanted to push things a little bit more, we had about 1 km/h of speed in hand so I could have pushed things but I'm playing it a little bit safe there. |
| 03:47 | So why would we want to set up one of these limiters? Well there's two really applications where I can see, one of them is exactly what we've just looked at, a race application where you do have a local speed limit that you need to adhere to and trying to do this just with your right foot watching a speedo is incredibly tricky because inevitably when you are in a race situation, you've got a lot on your mind, you really just want to go as fast as you possibly can so trying to manually control your speed, while it is possible, very tricky and almost certainly is going to end up with you either exceeding or probably going the other way and being well under the actual target speed that you're allowed. |
| 04:29 | The other application which isn't really a pit limit but kind of same same, the whole setup is exactly the same is where you might be doing a road based rally where there is an upper speed limit. |
| 04:41 | So here in New Zealand and over in Australia we have a road rally called Targa and they stipulate a maximum speed, even in the competition stages of 200 km/h. |
| 04:53 | That sounds like a lot but doesn't take much of a long straight with a reasonably powerful car for you to be sitting on that 200 km/h limit. |
| 05:02 | It is normally enforced with a GPS based tracker that the race management have access to so if you do exceed that speed limit there's not much of a threshold there and that can add a penalty to your time so again just like speeding in pit lane, it's not what we want so basically what we want to do is use technology to our advantage, use the electronics to step in there and make sure that we don't end up exceeding the limits that are available or are provided to us and make sure that we end up doing what we should be doing and concentrate on driving the car. |
| 05:39 | Now options for our target speed. |
| 05:43 | So this again is going to depend a little bit on your ECU that you're running here. |
| 05:47 | For a lot of the setups that I've done in the past, basically I was using an RPM based limiter, so a secondary rev liimiter as opposed to an actual speed based limiter. |
| 05:59 | So what we need to understand there is we've obviously got a relationship between engine RPM and road speed but that relationship is going to depend on the gear that we are in so for example 2800 RPM in first gear, it's a very different road speed than 2800 RPM in 2nd, 3rd or 4th gear. |
| 06:21 | So if you are going to do this, it can be very effective but this is again where some driver education comes in, it's more of a problem if you're tuning for a customer or a friend, they need to understand how the strategy works, how the system works so that they don't end up coming into pit lane in 3rd gear because then it blows straight past that speed limit even though the RPM limit will work perfectly when you're in 1st gear. |
| 06:48 | Now another problem that comes in there is when you are maybe changing wheels and tyres. |
| 06:54 | And even in our car, that is an issue because the rolling diameter of a wet weather tyre, grooved wet weather tyre vs a full slick is marginally different but that marginal difference in diameter will affect our road speed vs our axle rotations, RPM so that's something that does need to be kept in mind and again this is driver education, if they're going to go out and change a wheel and tyre configuration, understand that that pit limit may need to be tweaked but most ECUs will offer that functionality of a secondary rev limiter, there's usually a variety of ways we can set that up and it's really easy then to just tweak that rev limiter functionality until you're right on the target speed that you want. |
| 07:43 | The other option of course is a proper speed based system which is where we just enter a speed that we're targeting and we're done and then this doesn't matter, at least on a theoretical level it doesn't matter if we're coming into the pits in first gear or third, the ECU is calculating or measuring the speed, calculating that back to an RPM limit to apply and then the rest should just work seamlessly. |
| 08:13 | So that's how the ECU is actually applying that limit but we also need to probably consider the control strategies that are available in order to limit the speed. |
| 08:24 | So one of these is to use drive by wire throttle control. |
| 08:29 | Not personally my favourite. |
| 08:31 | I had a very brief play around with this and I didn't find it to be as accurate or fast acting as I'd have liked it to have been. |
| 08:41 | There is another way we can use drive by wire throttle control in conjunction with the M1 which I will cover though but it's not specifically using it to control the speed, it's just limiting the maximum opening to stop that situation where the driver's trying to punch the throttle pedal through the firewall while you're cruising down pit lane at 40 km/h. |
| 09:00 | Then we've got the more typical rev limiter action of either fuel cut, ignition cut or a combination of both and then in the M1's application we can use cuts plus drive by wire throttle limitation as well so there's a variety of options available. |
| 09:19 | It is nice in the ability to limit that maximum throttle opening, as I've just mentioned so that it kind of takes that driver element. |
| 09:28 | If you've got someone who's not that mechanically sympathetic, stops them driving down the pit lane at wide open throttle requiring huge amounts of cut from the ECU which is generally not that nice on the engine, generally not that pleasant for those listening as well as the car pops and bangs down pit lane. |
| 09:46 | Alright so what we'll do is we'll do is we'll jump across to the M1 software and I'll just talk you through how this all works. |
| 09:53 | So we'll start on the main tuning work book and if we come over here to our work books and click on the little drop down arrow, what we want to do for this is come down to our race functions. |
| 10:06 | This is all of the race functionality here, and the one we're obviously interested in is our vehicle speed limit. |
| 10:14 | The M1 gives us the ability to have a maximum speed limit as well as a pit limit. |
| 10:18 | So the maximum speed limit essentially works very similar to what we're going to look through with the pit limit. |
| 10:24 | This would be something that you could use for that Targa application, the road rally application which I mentioned where there may be a maximum speed limit that you have to adhere to. |
| 10:34 | So we'll just come back up to the top here and start at the start. |
| 10:39 | First of all we obviously need to tell the ECU when that pit limit is active so we simply need to define a driver switch resource or driver switch input that is going to functioin our pit switch. |
| 10:54 | Make sure that that's wired up and make sure that it is functioning and then we have to define what the mapping for that is so for example here we've got two positions, 0 and 1, this is kind of set up for a rotary 11 position switch but obviousy if you've got a simply on/off switch it's only going to be either off or on. |
| 11:15 | So in position 0 we've defined that the pit limit switch is off, that's its default value as well which you can see above so if the switch becomes faulty or the ECU detects it's either above or below the maximum voltage range then it goes into fault and in default we obviously want that switch to be off otherwise we could end up stuck in pit limit mode. |
| 11:38 | In position 1 that's when the pit limit is active so also how we've done that, in our situation which is pretty typical, we've got that on a latching otto switch that is on the steering wheel, we're going to keep everything nice and simple and close to the driver. |
| 11:56 | In our case for simplicity of the wiring, we've got that otto switch wired up to an Ecumaster CAN switchpad, that's mounted on the back of the steering wheel and then we're sending the switch position over the CAN network and that way it is able to be received by the MoTeC C125 dash, we're then sending it out from the C125 dash into the M150 so this gives us a little bit of flexibility because the pit switch information is also available inside of the dash and we'll see how we're using that shortly. |
| 12:32 | A variety of ways of doing this, there's no right or wrong way, I'm just talking through what we do need to have in place. |
| 12:38 | Alright so we'll come down here and we've got the ability to vary our boost limit vs speed if you desire, not really strictly related to the speed limiting as such but you can do that if you wish. |
| 12:58 | Coming down a little bit further, actually sorry before we get too deep into this, it is really important to make sure that you do have your vehicle speed inputs set up accurately so if we come back over to our vehicle setup and we've got our wheel speed work sheet here, making sure basically that we've got all of the data correctly calibrated for our gear ratios. |
| 13:25 | For our final drive ratio we also need our wheel circumference entered correctly so this is basically all the background information that the ECU can then use to basically come backwards from a wheel speed and convert that into an RPM which it needs for the RPM limiting so that's really important, if we haven't got that accurately set up, then we're going to have problems with our speed limiting, our pit limiting. |
| 13:54 | Come back over to our race functions page. |
| 13:57 | Right so we've gone through our driver input and our switch mapping, we've talked about our boost limit, our speed limit maximum which is this one here. |
| 14:07 | So I'm not using it, we don't have a maximum speed limit, I want to be able to go as fast as I can so not really an issue for us but you can set that also using a multi position switch if required. |
| 14:19 | What we've got here though is the one that we are interested in which is our vehicle speed limit pit. |
| 14:25 | So you can see here I've actually got this set a little bit low. |
| 14:29 | So it's 36 km/h, we've already talked about the fact that our target or our maximum speed is 40 so I've got a bit of a margin here. |
| 14:35 | This comes into the way the limiting is done in the ECU. |
| 14:39 | You're going to end up with needing or wanting a range of RPM over which the ECU will control the RPM and hence the speed. |
| 14:51 | The reason for this is otherwise we're going to end up with a very harsh car, the car's not going to drive very smoothly on that limiter so it's a bit of tooing and froing here and this comes down to our validation procedure is basically testing to see with this 36 km/h for example, and the ranges we've got for our fuel and our ignition cut limiting, what are we actually seeing in terms of our road speed? And then we can vary this so typically at least in my experience, I'm generally finding that to get a useful range for my fuel and ignition limiting, so the car's as smooth as I can get it, I'm going to end up needing that to be in this case about 2.5 to 3 k slower than what we're actually seeing when we're in the pit so that's just something to bear in mind and it will need to be tweaked as well. |
| 15:44 | Alright come down a little bit further. |
| 15:47 | So this is specific to the MoTeC, every ECU's going to do this a little bit differently but this is our pit mode, vehicle speed pit mode, how it's going to function, trying to get my words out here. |
| 16:01 | You can see we've got this set to engine speed limit but we can set it to throttle, to engine speed limit or a combination of drive by wire throttle and engine speed limit. |
| 16:11 | I would, if you're using the M1 platform, I would certainly recommend that you test it out and see what your own personal preference is. |
| 16:20 | I've found that I'm getting the most accurate control using the engine speed limit mode. |
| 16:26 | We've also got this function here which is our vehicle speed limit pit throttle limit. |
| 16:32 | It's definitely a mouthful. |
| 16:34 | What that means is this is the maximum drive by wire throttle opening we can get when the pit limiter's active. |
| 16:41 | So not to be confused with using throttle control for our speed control, so that's not how that works, this is just setting a maximum limit. |
| 16:51 | So one trick I've found with this or problem that I've found with this that probably actually needs to be addressed in the firmware is that it's great for stopping the driver, as I've already mentioned, being wide open throttle, basically hard up against the firewall coming down pit lane, giving the ECU a lot more work to do in terms of its fuel and ignition cutting strategy, however if we set this to something a bit more realistic and let's just jump across to our software, i2 here, we can see coming into pit lane here, I was actually only at about 20% throttle, probably not unsurprising. |
| 17:27 | Got a little bit more excited on pit exit and I'm up to 41% but I'm still being relatively restrained, you can see I've used a little bit more throttle here just to get the car going from stationary again. |
| 17:41 | OK so the problem I found when I was using the throttle limit and setting that to maybe 30 or 40% was that that stays active when the car's stationary and what it did was it stopped me giving the car enough throttle to actually wheel spin and get out of the pit box nice and quickly, we obviously don't want to crawl away from the pit box. |
| 18:04 | So I found that while in theory it's a great option, that little functionality there when the car was actually stationary was problematic for me so I did go back to 100%. |
| 18:13 | But again I'm tuning this system, I understand the implications so I'm reasonably careful with what I'm actually doing on the throttle as I come down pit lane and I'm not, as you see at wide open throttle there. |
| 18:27 | This is more of a problem for pro drivers who just don't really care about what's going on in the background, they just want the car to go as fast as possible and I've been in that situation before as a tuner and often you'll tell them to stop doing that and they're just going to go and do it anyway so you sort of end up in a situation of bashing your head against the wall. |
| 18:46 | It's not something that's necessarily going to be problematic, it's not going to necessarily result in engine damage but it's just not something that's really necessary in my opinion if you drive a little bit smarter. |
| 19:01 | OK now we've got an offset as well in here so the offset, just let me get through to my notes, this is only used for the combined mode where we're using pit fuel and ignition cut and throttle. |
| 19:18 | So basically it uses throttle up to a certain point for the road speed limiting and then once we go above that target speed by this offset, in this case 2 km/h, it'll bring in the fuel and ignition cut so basically the fuel and ignition cut's used as a bit of a back stop there in case the throttle control hasn't been sufficient. |
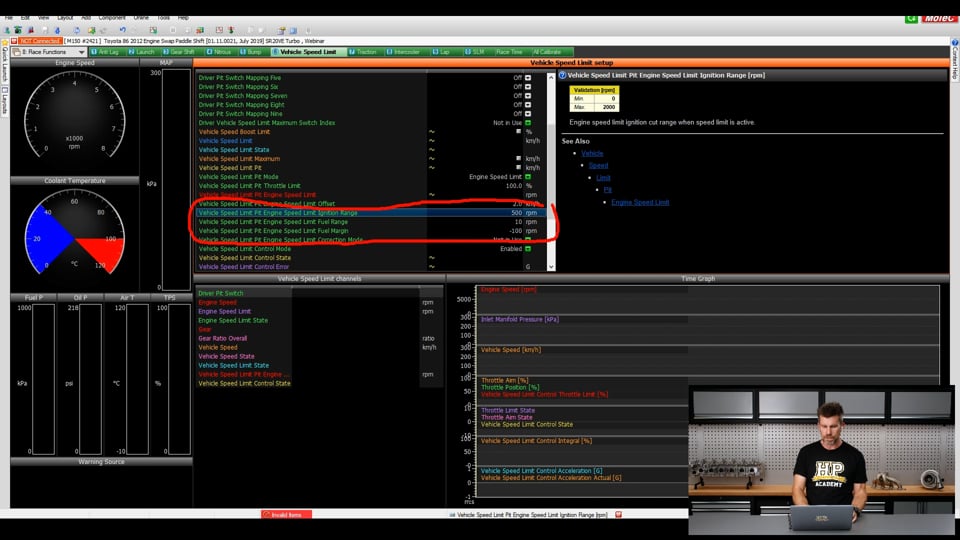
| 19:39 | We get into this area here which is quite critical and a little bit difficult to kind of explain neatly in MoTeC terms which is their ignition range, fuel range and fuel margin. |
| 19:54 | Now the terminology doesn't really help us understand this but essentially what this is is just a way of defining how the ECU will use fuel cut, ignition cut, or a combination of both in order to achieve an RPM target. |
| 20:09 | So let's just have a quick look at a diagram, this is from the help file so you'll be able to find this in the M1 help if you need a bit of a refresher 'cause as I've said, it is a little bit confusing initially. |
| 20:25 | So the key aspect is what we've set our fuel margin to, whether that number is greater to or less than 0 so before we go any further, let's just have a quick look back at this. |
| 20:38 | And you can see that the fuel margin in this case is -100 RPM. |
| 20:42 | Now that's not to say that we're bringing the RPM limit in before it's calculated. |
| 20:48 | That's not how it works. |
| 20:50 | What it means is simply we are down here and if our fuel margin is less than 100, what this means is that we're going to start using fuel cut first and foremost. |
| 21:00 | If it is over a value of 0 then it means we're going to be using ignition cut. |
| 21:06 | Why that's important is that a lot of engines, particularly anything with a shim style lash adjuster, you do need to be very mindful of using ignition cut because it can end up popping a shim off which doesn't usually end well, the SR20 is problematic in that regard. |
| 21:29 | So we want to primarily try and focus on using a fuel cut. |
| 21:32 | It's more of an issue for the overall engine RPM limit because that might be 7500, 8000, 8500 RPM at which point we've got a lot of exhaust gas energy when we're on that limiter so we're very likely to have a problem with an explosion in the exhaust manifold popping a valve back off the seat. |
| 21:51 | When we're on our pit limiter and we might be 2500 or 3000 RPM or there abouts, there's not as much energy, particularly if we're not at wide open throttle so it's much less of an issue but it is something we do need to consider. |
| 22:04 | OK so let's have a look at our exact situation here and see what this means. |
| 22:09 | So first of all we've got this line here which is green which is the calculated, I haven't drawn that very nicely but you'll get the idea, that's the calculated engine speed limit that the ECU has worked out in order to get our speed limit based on the current gear and the calculation on wheel circumference, final drive and the gear ratio so that's what it's calculated to get 40 km/h or in our case, 36, we need to be this many RPM, let's just quickly have a look at our, so we are looking at a calculated limit there of 2868 if we want to be really precise. |
| 22:49 | So that's what the ECU has calculated. |
| 22:51 | No that's not what we want, so that's where we are there and when we are a value of minus, we are starting with our engine speed limit fuel so that will occur there at the same point that our engine speed limit becomes active. |
| 23:06 | Then we've got this area here which is our engine speed limit fuel range. |
| 23:12 | So basically that -100 means that for 100 RPM over and above the engine speed limit, we're progressively bringing in our ignition cut. |
| 23:24 | So the higher we go above, the more ignition cut we're getting, by the time we're at 100 RPM above, we're applying 100% fuel cut. |
| 23:34 | So that's the fuel element of the cut strategy. |
| 23:37 | We've also got an ignition cut there and if we jump back into our firmware, we can see our ignition range here is 500 RPM. |
| 23:47 | Come back across to our little diagram and our engine speed limit ignition starts in this case, it's not really drawn how we are but that range there, that is 500 RPM so basically our fuel cut, we should essentially be 100% fuel cutting by the time we, before we ever get to a situation of bringing in any ignition cut. |
| 24:11 | So that's trying to essentially make sure that we are using 100% fuel cut and no ignition cut. |
| 24:18 | Now if you go up the other way, essentially everything's just around the other way, we're going to be using ignition cut first, we've got the range for that ignition cut which is exactly the same as what we've just looked at and then we've got our fuel margin which defines how much further above we need to be over our speed limit before our fuel cut starts to come in so really just a personal preference on how you want to set that up but it is important because it can damage some valve trains and MoTeC have made this a little difficult at a glance to understand. |
| 24:50 | Once you've got your head around that little graph, it all becomes pretty self explanatory. |
| 24:55 | We've also got a fuel range in here which is 10 RPM. |
| 25:00 | This is something that will need to be tweaked and adjusted in order to get a smooth limiting without a wide range of variation. |
| 25:11 | So this is something that you will need to tweak. |
| 25:13 | Generally the larger this range, the larger the range we're allowing the limiter to work over, the smoother it will be but obviously this also allows a lot more variation in our road speed which is obviously not what we want so there is a bit of tooing and froing in getting this set up. |
| 25:31 | And basically what I try and do is get an engine speed limit that's relatively smooth to sit on and then I will validate the actual limiting effect by checking and seeing what I'm getting down pit lane or on a straight piece of road and then adjusting my pit limit speed in order to achieve my target. |
| 25:54 | But there is a variation, basically if you come back and change any of the parameters here in your limiting strategy, that will in turn have a knock on effect on the actual speed that you're achieving on your pit limiter so you need to just be mindful of the fact that both of those elements will affect the actual ultimate speed. |
| 26:16 | Now we're going to go and have some questions shortly so this is a good time if you do have anything, please ask those now. |
| 26:24 | I just want to add a little bit to this before we go into those questions and talk about the ways we can also incorporate a bit of driver feedback into the loop here and this is something we're just starting to bring in with our own car. |
| 26:41 | So for a start, we'll come to our C125 dash setup and we'll come up to our alarms. |
| 26:47 | So basically we've got an alarm here which is this one here, when I've called it GP18, general purpose input 18. |
| 26:58 | I should have probably edited that and called it pit limiter so I never forget again what GP18 means but that's basically that pit switch or CAN based input coming from the driver switchpad, CAN keypad, basically when that's active there, we've got this pit limiter on, sorry I'll just bring that back up. |
| 27:17 | It's going to show on the dash, on the bottom line that the pit limit is active and it will also, no it doesn't activate the light, it does, if we come to our shift light module, we have, this is going to show this pattern here, GP18. |
| 27:40 | And it's going to flash basically the whole shift light module blue and purple. |
| 27:46 | So basically that's going to give the driver all of the information that they need in order to know that the pit limit is on because there's been situations where drivers have gone out on the track and sort of radioed into their crew after tootling around the track at 40 km/h for 10 or 30 seconds and said hey the car's misfiring, something's wrong and the answer is, turn the pit limiter off you dummy. |
| 28:12 | But if you've got that nice clear driver warning, that's always something that I try and program in so there's absolutely no confusion that the pit limiter is active. |
| 28:22 | The other aspect there where this could be dangerous is if you end up with that pit limiter active on a standing start, the car's going to leave the line nicely, you're going to get to 40 km/h and it's going to fall on its face, obviously that's dangerous because you risk someone running straight into the back of you so not to say this is the only way of doing it but does work quite nicely there on the C125 dash. |
| 28:48 | A new technique, and I kind of stole this from the GT3 cars, or not every GT3 car necessarily runs this but Sam who works with us and does a lot of our graphics and animations is a bit of a pro, understandably with graphic design and he's done a custom display using Display Creator. |
| 29:10 | So basically this will be the page that is active when the pit limit is on. |
| 29:16 | It shows the speed which is the number, it shows that our pit mode is on and we have this colour coded so that basically we get a visual indication straight out of our peripheral vision of what our speed is like relative to the pit limit. |
| 29:31 | So in this case, above 40 km/h it would be red, obviously no good, slow down, pretty quickly. |
| 29:38 | Green in a window between maybe 38.5 and 40 km/h, maybe 39 and 40 km/h and then below that maybe yellow to indicate that we're a little slow and if we're not using enough throttle, we can apply a little bit more throttle. |
| 29:53 | So just basically giving the driver a visual cue as to where we are at relative to the pit limit. |
| 30:01 | Obviously not something that everyone's going to be able to incorporate without going to the trouble of setting up a Display Creator page but I just saw this using iRacing on some of the GT3 cars that I've driven and found that to be quite useful. |
| 30:17 | The rest of the page, although not relevant to today's conversation, is also kind of GT3 inspired. |
| 30:24 | Alright we'll get into our questions now. |
| 30:30 | First and at this stage only questions comes from Manitoublack who's asked, with e throttle, couldn't you just be slack and set up a cruise control runtime? Cruise control run time. |
| 30:42 | Not too sure what you're referring to with a cruise control run time. |
| 30:46 | I mean yes cruise control essentially set to 40 km/h could work but at least in my experience, cruise control is not a function that operates particularly quickly because it doesn't need to. |
| 31:02 | If we are at 42 km/h, the cruise control could pull that back down to 40 km/h absolutely it could. |
| 31:09 | It's probably going to do that over a second or a few seconds which is not going to work for our pit limiter application, we need that speed to be on point straight away so yeah, cruise control strategy I don't think would be effective. |
| 31:24 | As I've mentioned, the M150 does have the ability to use drive by wire throttle so I guess you could call it kind of like cruise but they do also have that back stop of fuel and ignition cut if the drive by wire control on its own is not proving to be effective. |
| 31:44 | Alright that looks like all the questions we've got. |
| 31:47 | As I said, it is a relatively straightforward topic but hopefully those listening have got some value out of it and one thing I actually haven't mentioned yet, which I will now, when you are setting up an input for your speed control channel, don't use a GPS input. |
| 32:08 | There's a couple of reasons for that. |
| 32:10 | Most of the consumer level GPS antennaes that we tend to use are only 10 Hz which means that they only update 10 times a second, that's not particularly fast for our uses. |
| 32:23 | It works OK for lap timing within reason but it's not good enough for an actual speed trace. |
| 32:30 | The other aspect, and we definitely see this here in New Zealand from time to time, depending where you are in the world, the access to the number of satellites in the sky above will influence the accuracy of your GPS data so if you are a little bit limited on satellites, then this can create some latency in your speed trace or inaccuracies for that matter in your speed trace so what I've done is I use left front wheel speed for ours and I've got that updating reasonably quickly as well so that's displaying on the dash and I can't remember now, might be updating at something like 50 times a second, probably a bit faster than it needs to but my point here is if you are using that as a driver reference, if you're only updating it at 5 or 10 Hz, that's actually probably a little bit too slow so just a little point to add there. |
| 33:20 | Alright thanks for joining us and remember if you are watching this in our archive at a later point, if you do have any questions, please feel free to ask those in the forum and I'll be happy to answer them there. |
| 33:30 | Thanks and we hope to see you next time. |
Timestamps
0:00 - Introduction
0:46 - How we use it
3:48 - Pit limit application
4:29 - Max speed limit application
5:39 - RPM based limiter
7:44 - Speed based limiter
8:13 - Control methods | DBW throttle or fuel/ignition cuts
9:46 - M1 strategy
26:24 - Driver display options
30:30 - Questions
31:53 - Don't use GPS for speed control


