315 | Selecting the Right Wiring Connectors
Summary
Connectors are one of the more important elements of any wiring harness and there can be a baffling range of options. Your choice will be dictated often by the sensor or actuator you’re using and your budget. In this webinar we’ll look at some common options.
| 00:00 | - Hey team, it's Andre from High Performance Academy, welcome along to another one of our webinars and in this webinar we will be diving into the world of electrical connectors. |
| 00:10 | Specifically we're going to be talking about the variation available in different styles, designs, price points and what you need to know when you're deciding on connectors to suit your next wiring harness build. |
| 00:23 | Now these aren't all created equal and specifically as I mentioned, there is a huge range between price points on the likes of an OE connector and the top shelf, maybe an autosport, milspec style connector and not all of these are necessary for every particular application so choosing the right one for your job is really important, it's going to ensure that first of all, you're getting the right results, secondly, you're getting the results that suit the application. |
| 00:53 | So what would suit your modified road car or club level race car, probably isn't going to cut it at the likes of professional level motorsport and vice versa for that matter. |
| 01:03 | And we're also going to make sure you have a good understanding of what's what and what you need to keep in mind there. |
| 01:10 | It's also important, before we jump into this to mention that at the end of the lesson, we will be having some questions and answers so if you've got anything that you want me to cover off here, please ask those in the questions and we'll get into those at the end. |
| 01:23 | Alright so the first element here is what are these connectors for and what is our main consideration, and obviously we're looking at a way of electrically connecting our harness to a sensor, an actuator or another part of the harness. |
| 01:39 | Now if we just jump to our overhead camera for a moment, if I can try not to clear off the entire workbench here. |
| 01:46 | We've got one of our test harnesses here which is a professional level motorsport wiring harness, this was actually part of our pro level wiring course that Zac built. |
| 01:56 | And even here we an see there's a bit of variation in this. |
| 01:59 | Now this harness is built using concentric twisting, it's sheathed in DR25, here we can see the typical Raychem heat moulded boot used for transitions, that's all potted to make sure that it is 100% environmentally sealed. |
| 02:14 | Now we've got 2 break out connectors here, these are interface connectors for, in this case, if I turn this around, this one is for ignition system and this one here is for our fuel injectors. |
| 02:28 | So these are autosport connectors and they come at a price point however they are of course very reliable. |
| 02:35 | But that's not to say that's the only option, on this particular harness we've got couple of other examples here. |
| 02:41 | We've got a Deutsch DTM connector as well, still sealed, this time not with a heat moulded boot but with a section of SCL heat shrink. |
| 02:50 | But still a perfectly acceptable solution, we'll talk more about that as we go through. |
| 02:55 | And then we've got, for a sensor that is pretty common, uses a Bosch junior timer connector, we've got that particular connector here. |
| 03:07 | There's a variety of ways of sealing these connectors. |
| 03:10 | In this case, Zac has used a section of SCL here, these are a little bit difficult to work with at a professional harness level. |
| 03:19 | And there's a variety of other connectors as well, I'll just show one more here which in this case is another one of our DTM connectors, this one for a knock sensor, and this is a 2 pin, this time also sealed with SCL. |
| 03:34 | So that's an example of a pro level harness that is essentially fully sealed and yeah we are using a variety of different connector bodies on it. |
| 03:45 | Before we get too far down the line though, I want to talk about some of the considerations that you need to be keeping in the back of your mind when it comes to choosing connectors. |
| 03:57 | First of all, this comes down to what it's going to be for. |
| 04:01 | Now when you are choosing a connector for a particular sensor, or for that matter an actuator, you're going to be relatively limited, you're going to obviously have to use the mating connector for that particular product. |
| 04:16 | So that might, for example be, if we get to our overhead camera, this is a relatively cheap pressure sensor, being that it's brass bodied but these are available from a range of manufacturers and they use a fairly generic 3 terminal connector which we can see on the top of that. |
| 04:34 | So obviously if we want to connect to that, we do need to use the mating connector. |
| 04:40 | The same would go for an ignition coil, or maybe for a fuel injector. |
| 04:45 | Now on top of that, we also need to consider if we are connecting the harness to another part of the harness. |
| 04:53 | If we're going to be doing that, that gives us a lot more flexibility because we can essentially use any connector that suits our purposes, as long as obviously it can take the gauge of wire that we're using as well as the current requirements and as long as it's environmentally sealed as required for the particular application. |
| 05:13 | So what I'm getting at here is there's a bit of variation in what we can choose depending on what we're actually connecting too. |
| 05:21 | Sensors, actuators, we're pretty much limited and then we've got flexibility when it comes to the other parts of the harness that we're defining. |
| 05:29 | The other element here to consider is what is the application? I've already alluded to this but we've got a wide range of applications that we might be building a harness for. |
| 05:40 | This might be for a modified road car, maybe we're just adding a small break out harness to add some extra injectors to an existing engine. |
| 05:50 | Maybe we've done an engine swap or something of that nature and we're just wiring up the factory ECU. |
| 05:56 | That level for a road car is not particular demanding, it's not going to be put under a huge amount of stress and strain like we'd see in a race application. |
| 06:06 | And also the results, if we suffer a failure are probably not going to be quite as dramatic. |
| 06:13 | Obviously no one wants to be stuck on the side of the road but it's one thing being stuck on the side of the road and calling a tow truck, it's another thing not finishing a race, losing out on points and wasting a huge amount of time and money at a major race event so these are the things we need to factor in. |
| 06:29 | For a modified road car, we go to maybe club level race car. |
| 06:33 | I find that there's a lot of interchangeability here. |
| 06:36 | At the club level, essentially normally what we do for a modified road car will, in most instances, be absolutely adequate for a club level racecar as well. |
| 06:46 | At the professional level though, that's not the same. |
| 06:50 | At a professional level, we might be dealing with cars in the $500,000 and above vicinity and this comes down to what I was saying before, what I was mentioning before, the sort of ramifications of having a DNF sort of step up a lot. |
| 07:05 | It might cost $100,000 for a weekend of competition when you take into account the running costs of the car, what the crew are getting paid, accommodation and all of the other ancillaries that go around a race meeting so having a DNF due to a wiring reliability fault really is not acceptable when there is that much money on the line. |
| 07:27 | So those are the things we need to factory in and obviously there's a range in there. |
| 07:33 | Ultimately, particularly if it's your car, it's really going to be your decision as to where you sit in terms of your failure tolerance and what your budget is because the budget and failure tolerance is really going to drive a lot of these decisions as we go. |
| 07:50 | We also need to consider some of the problems that we see with factory connectors. |
| 07:55 | And these are often overlooked. |
| 07:58 | Most people would think that factory connectors are absolutely reliable and I can assure you that they definitely are not. |
| 08:06 | While they might be absolutely fine for a stock application on a road car, when we start modifying these cars, particularly into serious race cars, often the level of vibration and shock loading that the cars are subjected to, causes some problems which we'll get into in a moment. |
| 08:25 | Before we get into that though, one of the biggest factors that we need to consider is simply availability of the connector bodies and the terminals and this sort of goes without saying but if we can't buy the connector bodies and terminals, then it's going to be very very difficult to actually build a harness using these. |
| 08:43 | So this, you'd think that in this day and age it's going to be very easy to source connectors for most engines but, well most manufacturers but it actually is not. |
| 08:56 | Some very very easy, some almost impossible. |
| 08:59 | One of the ones that I've found very very difficult to find is for Ford engines, particularly late model Ford engines, it's been very difficult for me to find brand new connector bodies and terminals for those. |
| 09:14 | On the other hand, there's some where it's very very easy. |
| 09:17 | GM, Toyota, Honda, Nissan for example, it's generally pretty easy to find those connector bodies. |
| 09:26 | Now I'm just going to find this website that I wanted to show you, which I foolishly did not bring up before I got started so bear with me here. |
| 09:38 | So this was, if we jump across to my laptop screen, this was a website that, or a company I should say that were displaying at SEMA that I bumped into and I found them quite interesting because one of the common questions we get is where should I find X, Y, Z connector and we get people sending us in photos of connector bodies and I mean it's impossible, we're not a wiring supplier and ultimately our experience across the full spectrum of cars out there is absolutely minuscule so that's very difficult for us to answer. |
| 10:16 | But this company here, connectorexperts.com, they seem to do a really really good job of providing connector bodies for a huge range of different manufacturers, so you can search by make or by vehicle, you can also send them in a photo for some of those more obscure connectors so if you are getting stuck, can't guarantee that these guys will be able to help you but it's certainly worth a crack. |
| 10:43 | Other sources that we quite often use are Rywire in the US, Ryan is really really good with Honda, obviously that's his specialty but he's also got OE connectors for a fairly wide range of vehicles so definitely worthwhile trying him out. |
| 11:02 | And there are also a range of other common wiring suppliers online that will also offer OE connector bodies. |
| 11:12 | One thing I do need to mention here in the line of buying OE connector bodies is these days, understandably there are a lot of knock off products coming out of China and the likes. |
| 11:25 | And this is a bit of a tricky one because I can't say outright that Chinese aftermarket connectors are all complete garbage, obviously that's not something that you can make a blanket statement about but in general I have seen some pretty questionable connectors coming out of Chinese suppliers so wherever possible, try and find genuine OE connectors. |
| 11:50 | That's going to guarantee you the best possible chance. |
| 11:54 | Alright so moving onto reliability. |
| 11:58 | So this is something that again is easy to take for granted with a factory connector clearly, it's designed for the factory engine, the factory sensor or actuator so it should be reliable right? Well not always, one of the problems with an OE connector, which most people would give absolutely no consideration to, is they're usually rated at a very limited number of engagement cycles. |
| 12:22 | And by engagement cycles I'm simply talking about exactly what it sounds like, the number of times that that connector can be reliably inserted and removed from its mating housing, sensor, actuator or whatever it may be. |
| 12:35 | Now some of these connectors are only rated for a handful, maybe a dozen or 20 insertions and removals. |
| 12:46 | Which on face value is probably absolutely fine for that OE application. |
| 12:52 | We don't tend to be removing the engine out of a factory car every sort of 6-12 months, it'll probably stay there for most of its life and probably the most likely scenario is an ignition coil or something like that being removed so that a spark plug can be changed at 100,000 mile service. |
| 13:13 | So generally the factory connectors get installed and they stay there, hence the low engagement cycles they're rated at is absolutely fine. |
| 13:22 | But in our instance, we tend to be working on our cars a lot more so the engagement cycles can be problematic and when we exceed the engagement cycles, there's a couple of possible problems we can end up with. |
| 13:35 | First of all, the actual connector may no longer stay engaged positively. |
| 13:40 | So this one here which we're going to look at in a bit more detail, when I insert it, we can physically hear it click into place, no amount of force, within reason is going to actually be able to extract that connector from its housing without me physically pushing down on that little clip, which is exactly what we want. |
| 13:59 | So if we over engage the connector body, exceed the cycle limit, then it may lose that spring tension and it may actually not engage properly. |
| 14:10 | The other one that's a little bit more subtle and a little bit harder for us to notice is we may no longer have the retention on the actual terminal or pin that it had originally so we can end up with a sub par electrical connection. |
| 14:24 | That one, as I say, can be a little bit harder to notice and that can also be exacerbated by vibration which we'll get to next. |
| 14:34 | So aftermarket connectors, generally come of course with a higher level of engagement cycles that they're rated to because they know that we're going to be working on these cars more often. |
| 14:44 | Now another, or a factory actuator that I know to be problematic and have had personal experience with is this Toyota coil. |
| 14:55 | I've kind of got the solution here, which we'll talk about in a bit more detail but we'll get this under our overhead here. |
| 15:02 | So this is a Toyota coil that is relatively common, it's used on a pretty wide range of Toyota engines, there are a few guises of this coil, that one is actually off a Toyota 3UZ-FE. |
| 15:16 | But we had these installed on our 1ZZ-FE which is a 1.8 litre 4 cylinder naturally aspirated engine which was on our remote practice dyno. |
| 15:28 | And after about 6 or so months of use, we were having problems with intermittent ignition misfires and it happened at certain RPM ranges throughout the rev range which is where we were getting resonant frequencies. |
| 15:44 | And essentially what it was was the tension on the pins was insufficient, that vibration would actually allow the electrical connection to be interrupted and that would cause the misfire. |
| 15:57 | So this is actually a reasonably widely understood problem with the Toyota coils. |
| 16:02 | Here in New Zealand there is a single seat racing series called the Toyota Racing Series, it's actually used as a feeder series to Formula 1 believe it or not. |
| 16:14 | We've had the likes of Lando Norris come through, obviously currently driving for McLaren in F1. |
| 16:20 | He actually won the Toyota Racing Series back a number of years ago so it's a valid stepping stone to F1 and, getting a little bit off track, provides super license points as well which is relatively rare. |
| 16:33 | Anyway these cars, while they have gone through a few modifications lately, the original variant used an engine that ran this particular coil, they had exactly the same problems with it. |
| 16:46 | So just the factory connector was not reliable enough, we'll get that connector under our overhead, this is one of the connectors and this is a factory genuine connector, comes with the little terminals and also the little seals there as well. |
| 17:02 | Interestingly, to get us through on the engine dyno, we could actually fix that by extracting the terminals from the connector body and essentially crimping them down to provide a little bit more tension on the pin that they mate in. |
| 17:17 | So that was, when we were diagnosing that problem, we could actually kind of prove the issue and actually resolve it. |
| 17:24 | Of course that's not the desired result and it wouldn't be a permanent fix but it did get us through until we went to the solution that we just saw which I'll talk about a little bit more. |
| 17:35 | The other element there is weather tightness of these factory connectors. |
| 17:40 | Again, I've just put it out of sight but let's just bring that back in, we do generally find that most factory connectors will end up a little seal, little bit like this, try and get this a little bit more central so we can see, little rubber seal that goes over the wire, over the insulation and then when the terminal is inserted, that will go into the back of the connector body, I'm doing a really shoddy job of that but it goes in there and basically provides some sealing from weather, from moisture and dirt ingress. |
| 18:16 | On the other side, if we turn it around, it's a little bit difficult to see, there is actually a rubber seal at the back of this connector as well and that will seal onto the outside of the ignition coil so most factory connector bodies work in a similar kind of way. |
| 18:33 | So they're OK to a point, they're fit for purpose and obviously provide some level of moisture and dust ingress, I don't have an ingress protection rating, IP rating for them, and they almost certainly will vary from one connector to another. |
| 18:49 | What it does for us is when we are building a fully sealed harness though, like the one we looked at before, it really doesn't give us too much potential to properly boot the connector and retain that fully sealed harness. |
| 19:05 | So we're going to end up at some point basically with the wire exposed, or at least the insulation around the wire exposed and running into the back of that connector body. |
| 19:15 | Now there are some, let's just go back to our overhead. |
| 19:20 | This one here, our ignition coil would be very very difficult to modify in any safe and reliable means to add a boot to the back of. |
| 19:30 | I've got another one here, this is a factory connector body for a Toyota, I think this one here might be a CAN position sensor or a VVT actuator, there's a bit of interchangeability around but again very difficult to modify this in any way where we could add a boot. |
| 19:47 | On the other hand, this is a connector for a Bosch EV14 style injector. |
| 19:54 | There's a couple of different variants of these on the market but I have seen in the past, people essentially slice through the back of the connector body and thereby giving enough room to actually apply a boot. |
| 20:07 | This little section here on the side, which might be a little bit hard to see, it's actually designed so that you can get your finger on it and actually pull this off the injector but that actually also acts as a bit of an anchor for the boot so that the boot doesn't come off. |
| 20:22 | So sometimes it's possible to make subtle modifications to an existing connector and get a heat moulded boot onto that connector and retain fully sealed harness but that would be the exception rather than the norm. |
| 20:37 | On top of weather tightness, the other issue that do have to consider is heat damage. |
| 20:44 | This normally becomes more of an issue if we're dealing with a vehicle that's quite old. |
| 20:51 | A classic example of this is the Nissan RB, SR actually is the same problem where the wiring harness for the ignition coil sits down in the valley between the two camshafts and basically it's got a cover in stock form that runs over the top of that and it sits in there, basically like an oven so after the engine is 15 or 20 years old and done 100,000 plus miles, you'll often find that when you go to extract one of these connector bodies, when you actually depress the little tabs so you can extract it, it'll simply break off, the plastic's gone hard and brittle, it's not going to handle heat. |
| 21:31 | Now considerations here is getting airflow to the areas that are going to get hot anyway. |
| 21:38 | Obviously if we get too much heat into any connector it's not going to last. |
| 21:43 | Harness routing, keeping it away from exhaust systems, turbochargers, wastegates, also is always advisable, irrespective of what style of harness we are building. |
| 21:54 | Alright so let's talk about the solution to the problem where we've got an actuator or a sensor that is either unreliable, case in point here is our Toyota ignition coil, but we could use this for any sensor or actuator where maybe we can't source the connector body, the connector body is known to be problematic like the Toyota ignition coil, or we want to build a fully sealed harness and we want to terminate to an autosport connector. |
| 22:27 | So the idea here is what we're going to do is take that factory sensor or actuator and we're going to pot it so that we can then terminate it to whatever connector we choose. |
| 22:38 | So as I said, we've already seen this but let's have a little bit more of a detailed look at it, we'll get that back under our overhead. |
| 22:45 | So this one actually hasn't been completed yet, this is sort of part way through the process. |
| 22:50 | But essentially what we do here is actually solder the conductors onto the terminals or pins inside the connector itself, to the actuator and then we pot the back of that connector using a potting compound. |
| 23:08 | Now for anyone who's followed us for a fair while, you'll know that we are reasonably vocal in our dislike for solder. |
| 23:16 | And I still stand by that but it is very difficult in our industry to make blanket rules and for every rule of course there is an exception. |
| 23:26 | Now getting onto this, we need to understand the problems that exist with solder and if we understand the problems with solder then we can understand some of the ways that we can work around that and prevent these problems actually causing a failure of our wiring harness. |
| 23:44 | So the biggest one is that solder will tend to wick up the conductor. |
| 23:48 | This gets worse when we're applying too much heat and too much solder and it will wick a long way up the wire and the problem is not actually the solder joint itself, it's the point where the solder stops and the wire conductors continue and that basically becomes a potential failure point and I'll be clear, it's not going to say that it will fail but it is a potential failure point if the wire is then subjected to vibration or movement. |
| 24:17 | Basically it can harden at that point and the wire conductors can break. |
| 24:21 | So with this, just coming back to our overhead here, all of our soldering is done inside the back of this connector body. |
| 24:29 | Being very careful as well that we're not applying excessive heat or an excessive amount of solder so the wicking effect is all retained essentially inside the connector body. |
| 24:38 | And then because we are filling this with a resin, a 2 pot epoxy, this provides mechanical strain relief, essentially locking the solder joint in position, it can't move, it can't vibrate so the failure mode is essentially eliminated. |
| 24:57 | To do that, there's a couple of different options on the market. |
| 25:00 | We'll get under our overhead here, this one is the Hellermann V9500 2 pot epoxy. |
| 25:07 | The other one that's probably just about more common is the ResinTech RT125 and we use that for potting actuators and sensors like that. |
| 25:18 | We also use it for sealing our harnesses and gluing down our heat moulded boots as well so something that we will have on hand if we are doing any motorsport wiring. |
| 25:29 | Obviously that requires a bit of time to allow it to set up, generally I like to allow them about 24 hours to set completely and I probably should have mentioned as well, before we do that, the wiring that's going to this is already sheathed in DR25 which is kind of our industry standard. |
| 25:48 | So this then gives us a flying lead, this one probably a little bit excessively long for what it is but essentially gives us a flying lead that we can then terminate as I mentioned to our choice of connector body. |
| 26:00 | Be that something high end like an autosport connector or be that something a little bit more entry level like the Deutsch DTM connectors that we'll talk about in a moment. |
| 26:11 | Generally when we're working at this level, we would be using Tefzel wire as well. |
| 26:18 | Benefits with Tefzel, there are a few of them, one of the biggest ones though is that the insulation around the Tefzel wire is extremely thin compared to TXL wire just for an example. |
| 26:30 | The outside diameter of the wire for the same gauge is generally around about half or thereabouts. |
| 26:36 | So that's some options there that are available. |
| 26:40 | Once that's done, I did mention we are going to add a heat moulded boot. |
| 26:44 | So this is the sort of heat moulded boot that we can find, these are available in just about an unlimited range of sizes and shapes and what we do there is simply install that over the end of our wire and get that into location, doesn't look like it's a particularly good fit at the moment but these have a massive shrink ratio, so this would be shrunk down. |
| 27:10 | Before it's shrunk completely as well, it is also sealed at both ends with a line of that epoxy that we just looked at and that goes one step further, as well as the epoxy that we've potted the connector with, when those heat moulded boots are recovered, they become semi rigid so that again adds further strain relief to the finished part. |
| 27:33 | Now there's an obvious and significant downside to this in that if we're going to this trouble, no longer do we have the flexibility of popping into the OE manufacturer's supplier and buying a new ignition coil or sensor or whatever it is that we've potted. |
| 27:50 | So that is something we do need to consider. |
| 27:53 | Generally with this sort of harness construction technique, we'd go ahead and prepare spares for any of the common sensors or actuators and have those at the track with us so if we have an ignition coil fail, it gets to be a slightly more serious operation to replace that coil, we do need a prepared spare ahead of time. |
| 28:13 | Alright so this brings us to the obvious question of what connectors should we be using? And we've talked about factory connectors and why at anything beyond road car or lightly modified road car, club level race car, factory connectors are often going to give you problems. |
| 28:40 | What are our options to go beyond that? So I mean at the high end, we of course can look at an autosport connector like this one, I'll get that under our overhead. |
| 28:51 | I'm not going to go into too much detail on these, we've got a number of webinars in the archive, you can check on if you want to know more about how to work with these or how to choose them but I think probably anyone watching this webinar, it's unlikely that that's your first time seeing an autosport connector. |
| 29:06 | On the outside, the autosport connector is a incredibly reliable connector. |
| 29:13 | It does an insane job at what it's designed for but it does come with some significant downsides as well. |
| 29:20 | Number one of those of course is the cost. |
| 29:23 | It's not unusual for a pair, connector body pair like this to be somewhere in the $200-$300 USD range. |
| 29:32 | On top of that, you also need some pretty expensive tooling to be able to work with that. |
| 29:37 | The GMC crimp tool and positioners to work with all of the contacts that go along with that. |
| 29:43 | A little bit of specialised knowledge in terms of how to actually work with them but honestly it's not rocket science. |
| 29:48 | Again we've got webinars that cover exactly how to do this, ensure that you are getting the best results and working reliably. |
| 29:56 | On top of this, another advantage with the autosport connectors is they do come in a range of different keyways. |
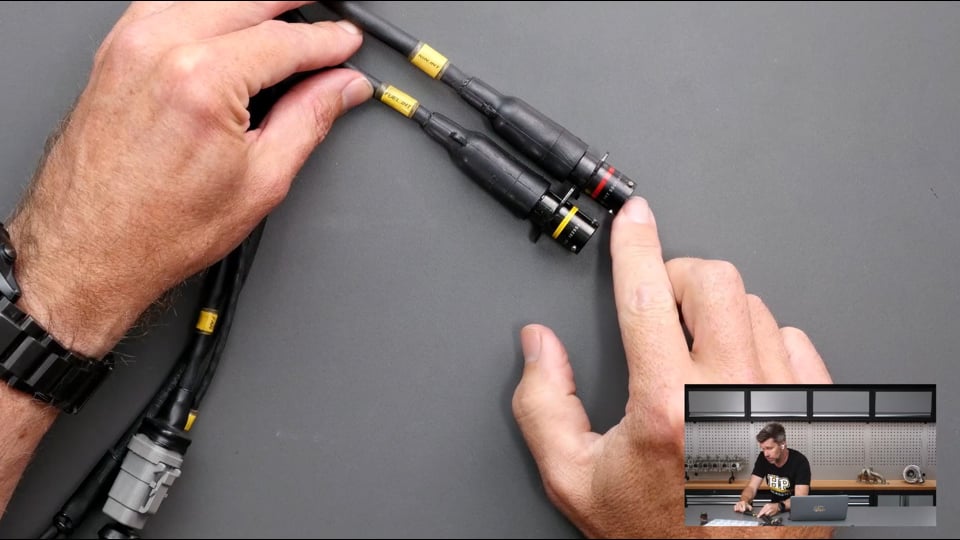
| 30:03 | What I mean by this is the coloured band, if we go back to our overhead here, on this one we can see it's got a red coloured band. |
| 30:11 | And that refers to the keyway, it's going to be difficult to see, we do have little keys here in the shell, the outside of the body, which mate with the mating connector. |
| 30:24 | So essentially red to red, is going to go together. |
| 30:28 | Now this might seem irrelevant but in some instances, particularly when we're looking at the smaller autosport connectors, and we'll get our pro harness back into shot here. |
| 30:39 | In this instance we've got two connector bodies that are absolutely identical in every way shape form, one for our fuel and one for our ignition. |
| 30:49 | And these are going to essentially be located right beside each other in the engine bay when everything's installed. |
| 30:56 | So obviously, in that instance, it would be very easy to accidentally connect the mating harness to the wrong side. |
| 31:03 | So that's why this one is a yellow keyway and this one is a red keyway. |
| 31:07 | The mating connectors, the keying is different, meaning that they will only go onto the colour coded side. |
| 31:15 | So it's impossible to incorrectly connect them. |
| 31:18 | So again you might be thinking it's not too relevant and in most instances there's going to be some separation between your connectors but when we're working particularly with the likes of the autosport line, or ASL connectors which are quite common and can be used in a range of different flying lead applications like our coil that we just saw, we can end up with a lot of these in very close proximity so using the different coloured keyways is really really important to avoid accidents or incorrect insertions. |
| 31:51 | All of these autosport connectors as well are designed to work with the Raychem or Hellermann heat moulded boots and again, I'll get it back into shot, let's actually try another one here, just to demonstrate the sort of range of these that are available. |
| 32:06 | This is a connector that's designed to have 2 heavy gauge contacts for power distribution and then 3 smaller contacts that are designed for lower current draw, so these are all in the same body. |
| 32:22 | So what we can see on the back of this is this gnurling here along with this little machined lip. |
| 32:28 | So that lip is designed to take the matching lip on a heat moulded boot and between that, the epoxy that we use and that gnurling, means that it's going to be positively located and it's not going to come off. |
| 32:41 | So great product but expensive and requires a little bit of knowledge to work with. |
| 32:48 | Let's move to our cheaper entry level which is probably my go to, which is the Deutsch range of DT, DTM and DTP connectors. |
| 33:01 | So these are provided in 3 different families I guess you'd call them, depending on our current requirements. |
| 33:08 | We've already seen them, let's just get a couple of these into our overhead shot here. |
| 33:14 | So here I've got a 3 way and a 4 way, let's actually mate them around the right way. |
| 33:20 | So these work with some pretty common easy to source and relatively well priced contacts. |
| 33:28 | We've got a male pin and a female socket. |
| 33:33 | And then they also require these little wedge locks as well which go in after the terminals have been inserted to prevent them coming out. |
| 33:43 | So the upside of these is that they are really reliable for the price point. |
| 33:49 | The other upside is that price point, a 2 or 3 way connector body, depending where you're getting them from and what currency you're in, probably somewhere in the region of about $10 USD so absolutely not going to break the bank. |
| 34:02 | Another really nice feature with these is you don't need any expensive tooling to work with them. |
| 34:08 | There are some generic crimp tools like this one here. |
| 34:12 | Get this under our overhead. |
| 34:14 | This is designed to work with the likes of the DT connectors. |
| 34:19 | This one is for 14, 16 and 18 gauge for a size 16 contact. |
| 34:27 | I've got another one over here as well, this is for a size 12 contact. |
| 34:32 | And I don't think I have my size 20 contact one but essentially they all look the same. |
| 34:37 | It's been a while since I bought one of these but I think they're around about maybe $40 odd USD, thereabouts so again certainly not going to break the bank. |
| 34:45 | They don't require any specialist knowledge in order to use them so that is one of the reason why we use a lot of those DTM connector. |
| 34:53 | In terms of their specification as well, they are rated at 100 engagement cycles minimum. |
| 35:00 | So that's not to say they're going to fall to pieces at 100 engagement cycles but they are tested to ensure that they don't degrade or lose any of their retention or electrical conductivity at 100 engagement cycles and even in a motorsport application, 100 engagement cycles is quite a lot. |
| 35:17 | Also rated to work reliably between -55°C and 125°C which is probably more than sufficient for just about any application we would need. |
| 35:29 | Beyond that, you're probably going to have other problems with your actual wire deteriorating and failing as well. |
| 35:35 | Also rated for high levels of shock and vibration immunity which is again, as I related to, something that a lot of the OE connector bodies are not. |
| 35:46 | So again, they're really designed with our motorsport environment in mind. |
| 35:51 | The rating for their moisture and dirt ingress protection is an IP68 which is pretty meaningless to most people but essentially, that IP rating means that they are reliable if they're fully submerged under water up to 1.5 metres for 30 minutes I think, don't quote me on that but there or thereabouts. |
| 36:13 | Essentially I wouldn't probably expect that they're going to be a great solution to fit on the outside of a submarine but for most instances in a motorsport application they're going to be more than sufficient. |
| 36:25 | You can use them on offroad vehicles, you can power wash them and they're going to retain reliability as long as they are used properly. |
| 36:33 | Actually, I'll come back as well for a moment and talk about the seals, let's go to our overhead, on these factory connectors. |
| 36:42 | This is something I didn't mention at the time. |
| 36:44 | One of the problems with these seals is that they are designed for automotive grade wiring that the OEs used, so TXL for example with quite a large thickness of insulation. |
| 37:00 | So if you're using TXL wire in 20 gauge, you're going to have a good amount of grip with that seal on the insulation. |
| 37:10 | However for our uses in a motorsport application, it's not uncommon for us to be using 22 or even 24 gauge wire and if we're using tefzel wire, not only is the conductor smaller but the insulation is also much thinner. |
| 37:25 | We can get to a situation where those factory seals are no longer going to actually provide any grip or bite on our insulation so what this means is that essentially everything looks fine but there is a moisture path directly through the back of the seal so on the other hand the DTM or the Deutsch family of connectors are designed exactly for this use on tefzel wire. |
| 37:50 | So moving on, there are 3 ranges of these and this really comes down to the current handling capability that you need. |
| 37:58 | The two that I've got these are both in the DTM range and this would suit most of our wiring that we're going to be doing in and around the engine where our current handling capability isn't really a huge concern. |
| 38:12 | The DTM will work with up to 22 gauge wire and a size 20 contact. |
| 38:21 | It's rated by Deutsch at 7.5 amps maximum so again you're probably not going to be exceeding that on most of your sensors or actuators on the engine. |
| 38:31 | On the other hand though if you do want to run maybe a fuel pump or a radiator fan, that's probably going to be below what you're going to need in terms of current handling capability. |
| 38:43 | So we've got options there, before we go onto that, the DTM family, they're available in 2 position, 3 position, 4 position, 6, 8 and 12 position. |
| 38:53 | So a fairly wide range of options there to suit just about anything that you need to wire up. |
| 38:59 | So current handling capability, if DTM's not going to cut it, if you need to go above 7.5 amps, then you can step up to the DT family. |
| 39:06 | I don't unfortunately have the DT and DTP here in front of me but essentially they look all but identical, they're just physically larger with larger contacts that are going to go into them. |
| 39:17 | The DT uses a size 16 contact and is rated at 13 amps. |
| 39:21 | It'll work with 14 through to 20 gauge wire and those again available in the same 2, 3, 4, 6, 8 and 12 position. |
| 39:30 | Then if 13 amps is still not enough, if you really want to pull some serious current, you can go to the DTP connector. |
| 39:39 | Again, very similar, just a bigger step up in size again. |
| 39:43 | These use size 12 contacts rated 25 amps, 10 to 14 gauge wire. |
| 39:47 | These are only available in 2 and 4 position. |
| 39:50 | So it's a pretty wide range of family of connectors there that is going to cover most of your applications. |
| 39:56 | They are easy to work with, they work well, they're cost effective, but of course they do have some downsides. |
| 40:03 | One of these is that in a complex wiring harness, you can end up with a lot of these. |
| 40:09 | There are no keyway options for them which means that if you've got connectors nearby, it can be very easy to inadvertently connect the wrong connector up so that's one thing you need to be mindful of. |
| 40:23 | You do need to watch out for that, which is why, it's really important to go to the trouble of properly labelling your wiring. |
| 40:34 | So this one here has EOT which stands for engine oil temperature. |
| 40:39 | This one here is our gearbox interface for our gearbox wiring. |
| 40:43 | So it's easy if we're taking our time and we're careful. |
| 40:49 | But in the heat of the moment in a pitstop where something's gone wrong and we're rushing to get the car back out onto the track, particularly if we've got someone else working on the car that maybe doesn't know it inside and out like the person who built the wiring harness, that's when things can go wrong and a lack of keyway options is problematic. |
| 41:09 | The other aspect which sounds maybe a little bit silly is that these actually end up quite bulky when we've got a lot of them in close proximity so it really tends to end up adding a lot of unnecessary bulk to the harness so that's something to watch. |
| 41:24 | Actually one element I haven't talked about here as well with these is the ability to add boots to these and you do need to be careful, if you are buying these connectors, I don't have a non booted variant but this side of the connector which takes the female socket, this actually has a modification which is this extended section of the housing here, it has this little recess here which is designed to take a heat moulded boot. |
| 41:51 | And you've got options there, as we saw with that harness I've shown you as a sample, it's quite common to actually just use a section of SCL, semi rigid heat shrink as the boot. |
| 42:03 | Mainly just as a cost saving but as long as you're a little bit careful with the application of heat, there's absolutely no reason why you cannot use a Hellermann or, Raychem boot on one of these as well, there's a range that do fit them. |
| 42:23 | The opposite side of those connectors which I'll just bring into shot, these do not take boots so you're still not going to have a completely sealed harness, albeit these ones would generally be located on the sensor or actuator side anyway. |
| 42:40 | Alright getting on towards the end of this so again just another reminder if you've got questions, please ask them and we'll get into those in a second. |
| 42:50 | I don't have this one here to show you at the moment but another option very similar to the DTM range of connectors but much much smaller, much more compact and much much more expensive is the TE Connectivity autosport composite range. |
| 43:10 | So jump across to my laptop screen, this is the autosport composite, as its name implies it's a thermo plastic composite housing and uses conventional autosport style contacts and it's tiny, it's probably for its size, it's a 6 position connector, if we had this side by side with a DTM 6 way, it's probably about a quarter of the size so it's very very small, way smaller than the 3 pin that I had to show you on that overhead. |
| 43:42 | So benefit there of course is, gets around the problem with bulk. |
| 43:47 | These are also designed purely for motorsport use so they are designed to take boots on both sides. |
| 43:53 | These were actually designed from what I understand, we actually toured TE Connectivity's facility in the UK back in 2019 and they designed these in conjunction with Williams for their F1 car. |
| 44:09 | I haven't seen too many of them out in the wild but they are starting to become a little bit more popular, probably a thing that is holding them back is the insane price tag. |
| 44:17 | Here in New Zealand, I think I paid about $110 NZD so about $70 or so USD for a matching pair, maybe $80 USD for a matching pair so it's quite a high price point, particularly if you need multiples of these. |
| 44:33 | As I mentioned, they are available with multiple keyways though so gets us around that problem of interconnectivity when you've got a lot that are located in the same place. |
| 44:42 | These can also be stacked in close proximity, they've got a slot down the side of them so you can actually stack multiple connectors side by side and they are also designed for reliability to actually take a cable tie, so you can see here there's a little slot through the housing, once it's connected you can put a cable tie through that, you can use that cable tie to secure it to part of the engine or chassis or a mounting tab but when that cable tie is also installed, it ensures that the two halves of the connector cannot come apart. |
| 45:13 | Downsides in terms of working with these, other than the cost, you're also back to requiring the DMC crimp tool and positioner to work with them so definitely they're not going to be for everyone but they are a nice solution nonetheless, good to know that they do exist. |
| 45:30 | Actually in terms of size, we can see the sizes dimension, I think that's 12.8 mm and 14 mm high so yeah, pretty damn small. |
| 45:43 | Last one we're going to talk about today, and again unfortunately I don't have a sample to show you, is a generic milspec connector. |
| 45:50 | And this term, I really don't like using it because it is thrown around so much with a lack of understanding of what that term actually means and it is of course just a military specification which a lot of these connectors are made to a military specification, just a way of ensuring that they will perform in a certain way under certain conditions. |
| 46:14 | But yeah as I say that term's sort of thrown around so much and with not a lot of understanding. |
| 46:21 | So jump across to my laptop screen again, this is actually a pair of these milspec connectors that we used on one of our Toyota 86s, we actually had a reliability problem, talking about connectors, that was quite interesting and again I should have taken another shot that shows a bit of the location of this but these two connectors are the main wiring harness between the engine and the chassis and in stock form it uses a really large oval shaped plastic housing that includes terminals of 2 different gauges. |
| 46:57 | And despite that never being modified, we actually had problems consistently with the reliability of that factory connector, we put it down to the fact that with our turbo installation, it's probably a lot more heat than in stock form and it sort of tends to funnel up the back of the engine bay from the front pipe and basically come up underneath the connector but we were having problems with reliability of that VVT connection through that factory connector. |
| 47:28 | In the end after 3 or 4 problems, we threw that away and we replaced it with this pair of these milspec connectors. |
| 47:34 | Now these are available from a range of different suppliers. |
| 47:38 | They are very similar to an autosport connector but they have some very important differences. |
| 47:43 | The first of all being the price point. |
| 47:46 | They're probably about a third to a half of the cost of a comparable autosport connector. |
| 47:53 | No need to use expensive specialised crimp tooling as well, easy to work with these with conventional crimp tooling. |
| 48:01 | The other thing that's really important is that we could not have actually used an autosport connector in this application due to, and it's very hard to see, the fact that we are dealing with factory wiring here which has that very thick insulation which I've already sort of mentioned. |
| 48:18 | Now that will simply not go through the autosport connector. |
| 48:24 | If we actually get this one under our overhead, this is designed for 20 gauge wire or size 20 contacts with 20 gauge wire and the size of the hole in the back of this insulator here, as you can see, very very small, even without a huge amount of actual scale. |
| 48:43 | So you're never going to get a section of TXL or normal automotive wiring through that, it's just not going to work. |
| 48:49 | These generic milspec connectors on the other hand, are. |
| 48:55 | They also do require a back shell which screws on if you want to use a boot on the back of them which in this case we're not so something to be aware of. |
| 49:04 | These are a nice middle of the road option. |
| 49:07 | See these quite regularly used for the likes of bulkhead connectors. |
| 49:12 | The likes of Rywire which I've already mentioned, Ryan uses a lot of these on some of his professional harnesses as well so a nice step up from either using a gromet through the firewall with no connector body at all, but not going to the expense of a full autosport connector. |
| 49:31 | Alright so we will move into our questions now and if you do have any more, please feel free to keep asking, we'll see how many we can get through. |
| 49:52 | First question comes from Ryan who's asked, hard resin vs. 2 part epoxy on rubber boots? I'm not quite sure on the angle with this question and I'm not sure what you're referring to with hard resin. |
| 50:06 | Essentially the only product I use is a 2 pot epoxy and when it comes to the likes of these boots, again I'm not sure if this is what you're referring to, I don't really call these a rubber boot, I'm not actually sure of the physical construction of them but we call these heat moulded boot or a heat recoverable boot. |
| 50:29 | These are available in 2 different styles, they can be pre lined with epoxy which melts when it's recovered down and this one actually is, it's already got the epoxy inside of it, or you can get them without epoxy in which case you would mix up a batch of your Resintech RT125 and then using a syringe, you would install a small bead of that prior to recovery so yeah I'm sorry I'm not sure what exact angle you were going with on that, if you get a chance you can clarify and I'll see if I can give you a little bit more information. |
| 51:08 | Alex the Bachelor has asked, considering the price of the Autosport or Souriau connectors, are Deustch industrial/HD/HDP something you guys would recommend? I dont think i've ever seen them mentioned in a course or webinar. |
| 51:21 | HD and HDP is not a connector that I'm personally familiar with, I don't know, I've never used their industrial range. |
| 51:31 | Again, speaking out of turn because that's not a product I'm familiar with, we've gone over obviously inside of this webinar, the DT and DTP so that may be a crossover there. |
| 51:44 | Dave's asked, when using factory sensors, would you always try and get rid of the factory connector, even at club level, and instead pot the sensor and run a flying lead to a better style of connector? No absolutely not, I probably should be a little bit more clear, it's not an essential and it comes down to that same thing of where are you using the car, what's the level you're operating at? For an engine swap, a road car that's been modified, club level racecar, absolutely not, that's a lot of work and expense to go to potting all of the sensors and it really does also come down to is there a known issue with that sensor? So for example, the Toyota coil that we've looked at and gone over extensively, in that case you might be on the fence. |
| 52:23 | In a road car application where it's not seeing the level of vibration that we'll see on a racetrack, might be absolutely fine, we do know that that is a potential failure point with that particular product though so it's something we do need to keep in mind. |
| 52:37 | If on the other hand we're dealing with a sensor that there's 100 million of them out there in the world, maybe the Honeywell pressure sensor for example, we looked at the brass variant of that, the connector that comes with those is not my favourite, it's not a great connector body but it's also pretty well reliable and pretty well proven so in that instance, yes you could pot it but you're making a lot more work for yourself, perhaps unecessarily and it's going to add time and expense to your build so this is where you really need to make your own decision based on the application and based on your budget and how much time you're prepared to put into it. |
| 53:17 | There is no black and white answer and you must do this. |
| 53:21 | Alright that brings us to the end of our questions. |
| 53:24 | For any of our members watching this in our webinar archive later on, please remember you can ask questions in the forum and I'll be happy to answer them there. |
| 53:32 | Thanks for watching and we'll see you all next time. |
Transcript
0:00 - Introduction
1:23 - Pro harness overview
3:46 - Considerations when choosing a connector
7:50 - Problems with factory connectors | Availability
9:26 - Connector suppliers
11:55 - Problems with factory connectors | Reliability
21:54 - Potting a sensor or actuator
28:15 - Choosing a connector | Autosport
32:48 - Choosing a connector | Deutsch
42:50 - Choosing a connector | TE Connectivity Composite
45:43 - Choosing a connector | Milspec
49:32 - Questions


